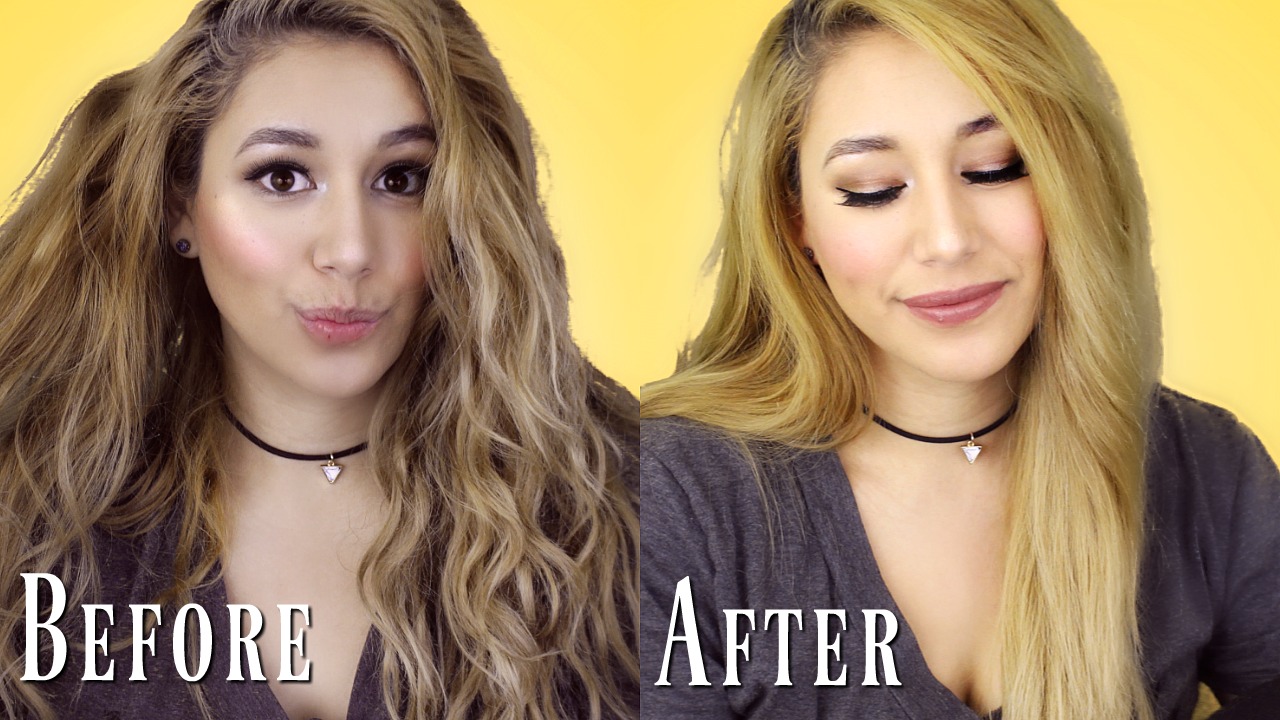
It has been so long since I have posted and so much has happened that I want to share. I guess that for a later post though. Today lets get down to business with a VIBRATING Flat Iron. I know what your thinking, the products they come out with now a days are crazy! Well this one sounds funky ,but it is absolutely genius! It actually works guys, so Im bringing it to my blog and I am also doing a giveaway.
I have tried this first hand and I love it to straighten or curl my hair. (I will be showing you a tutorial at the end of how to do both)
This is the Asavea Vibe Vibrating Flat Iron Buy it Here.
*Not an affiliate Link
PROS:
Heats up in 60 sec
Vibration options which decreases the FRIZZ (I love this for when I straighten my hair)
Temp 325-450
Does not pull on my hair! AT ALL
Ceramic Flat Iron- Gives you consistent temperature
Swivel Cord So when Curling It doesn’t get tangled in your hair
Automatic shut off after 60 min
Fiberglass technology helps retain moisture to your hair
Affordable (is on sale right now for $49.99)
You can turn the vibration mode on or off
When vibration mode is on, it only vibrates when clamped shut!
CONS:
NONE seriously It works so well I cant think of
As I have been trying this for the past couple weeks I actually prefer the Vibrating mode to be on when Im straightening my hair. The reason why is because it completely eliminates frizz and smooths my hair to the point that It even looks like I put anti frizz product in it when I didn’t. Whenever I curl my hair I don’t use the vibrating mode.
So I will be showing you how I straighten and Curl my hair in the video below. I honestly do think that this flat iron is amazing and worth a try. I recommend it 100%!
I have another surprise for you first, I’m doing a giveaway! Asavea was so kind to host a giveaway , absolutely free, all you need to do to enter is click here .
Its open until Feb 11, 2018 I will be announcing the winner in the description box of my video below. I will also be emailing you personally so make sure to check your spam folders!!
So I hope you guys enjoy the tutorial and Good luck!
I know its been such a long time, but I promise I’m back and all my technical problems are behind me. So I know what the question is that you probably have.. What have I been doing? Well I’m glad you ask I have been binge watching Pretty Little Liars. I am not kidding in no way shape or form. I have grown rather obsessed with the show. If you haven’t watched it let me fill you in on the plot. Basically in a small town full of secrets where a group of 5 girls keep lots of secrets. One day one of the girls goes missing and a year later is found dead. The whole question is who killed her? and why do the other 4 girls keep getting texts from a person named A. Honestly it has kept my husband and I on our toes.
So what does that have to do with today? Well in Season 3 ,Hanna Marin, A character from the show cuts her hair and has some beautiful hairstyles for short hair. Some of which I want to recreate and show you how to do.
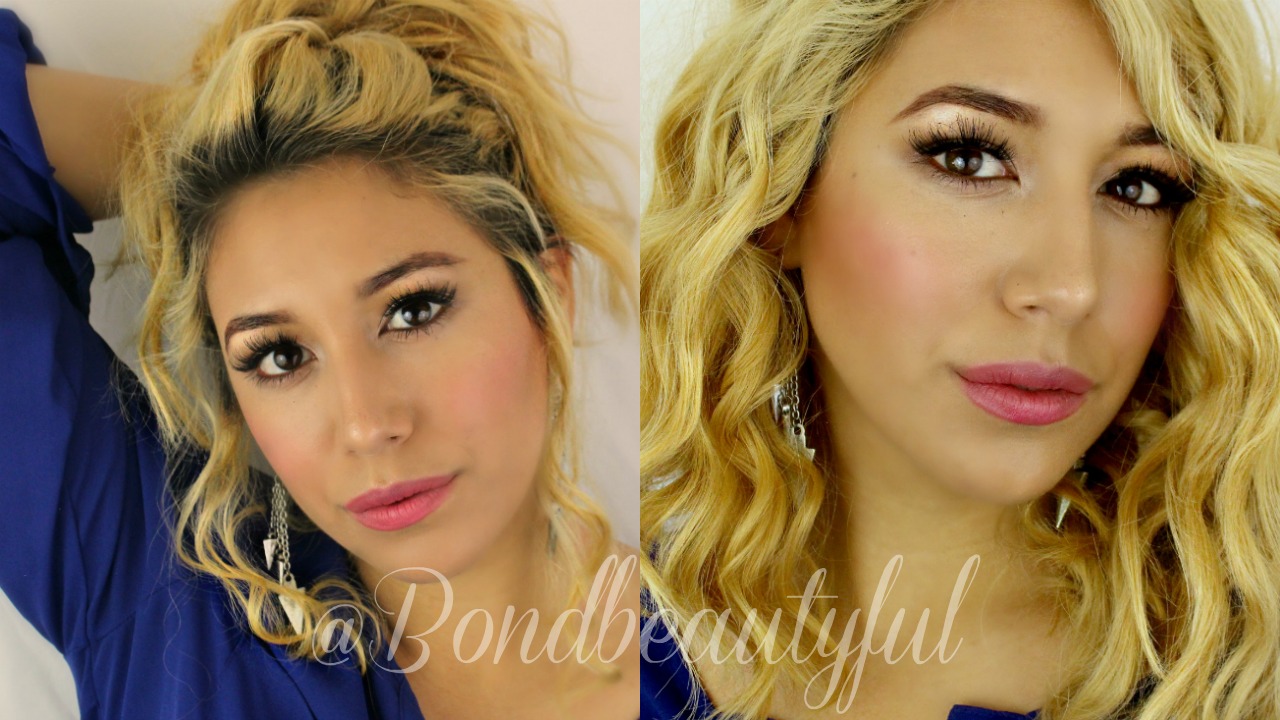
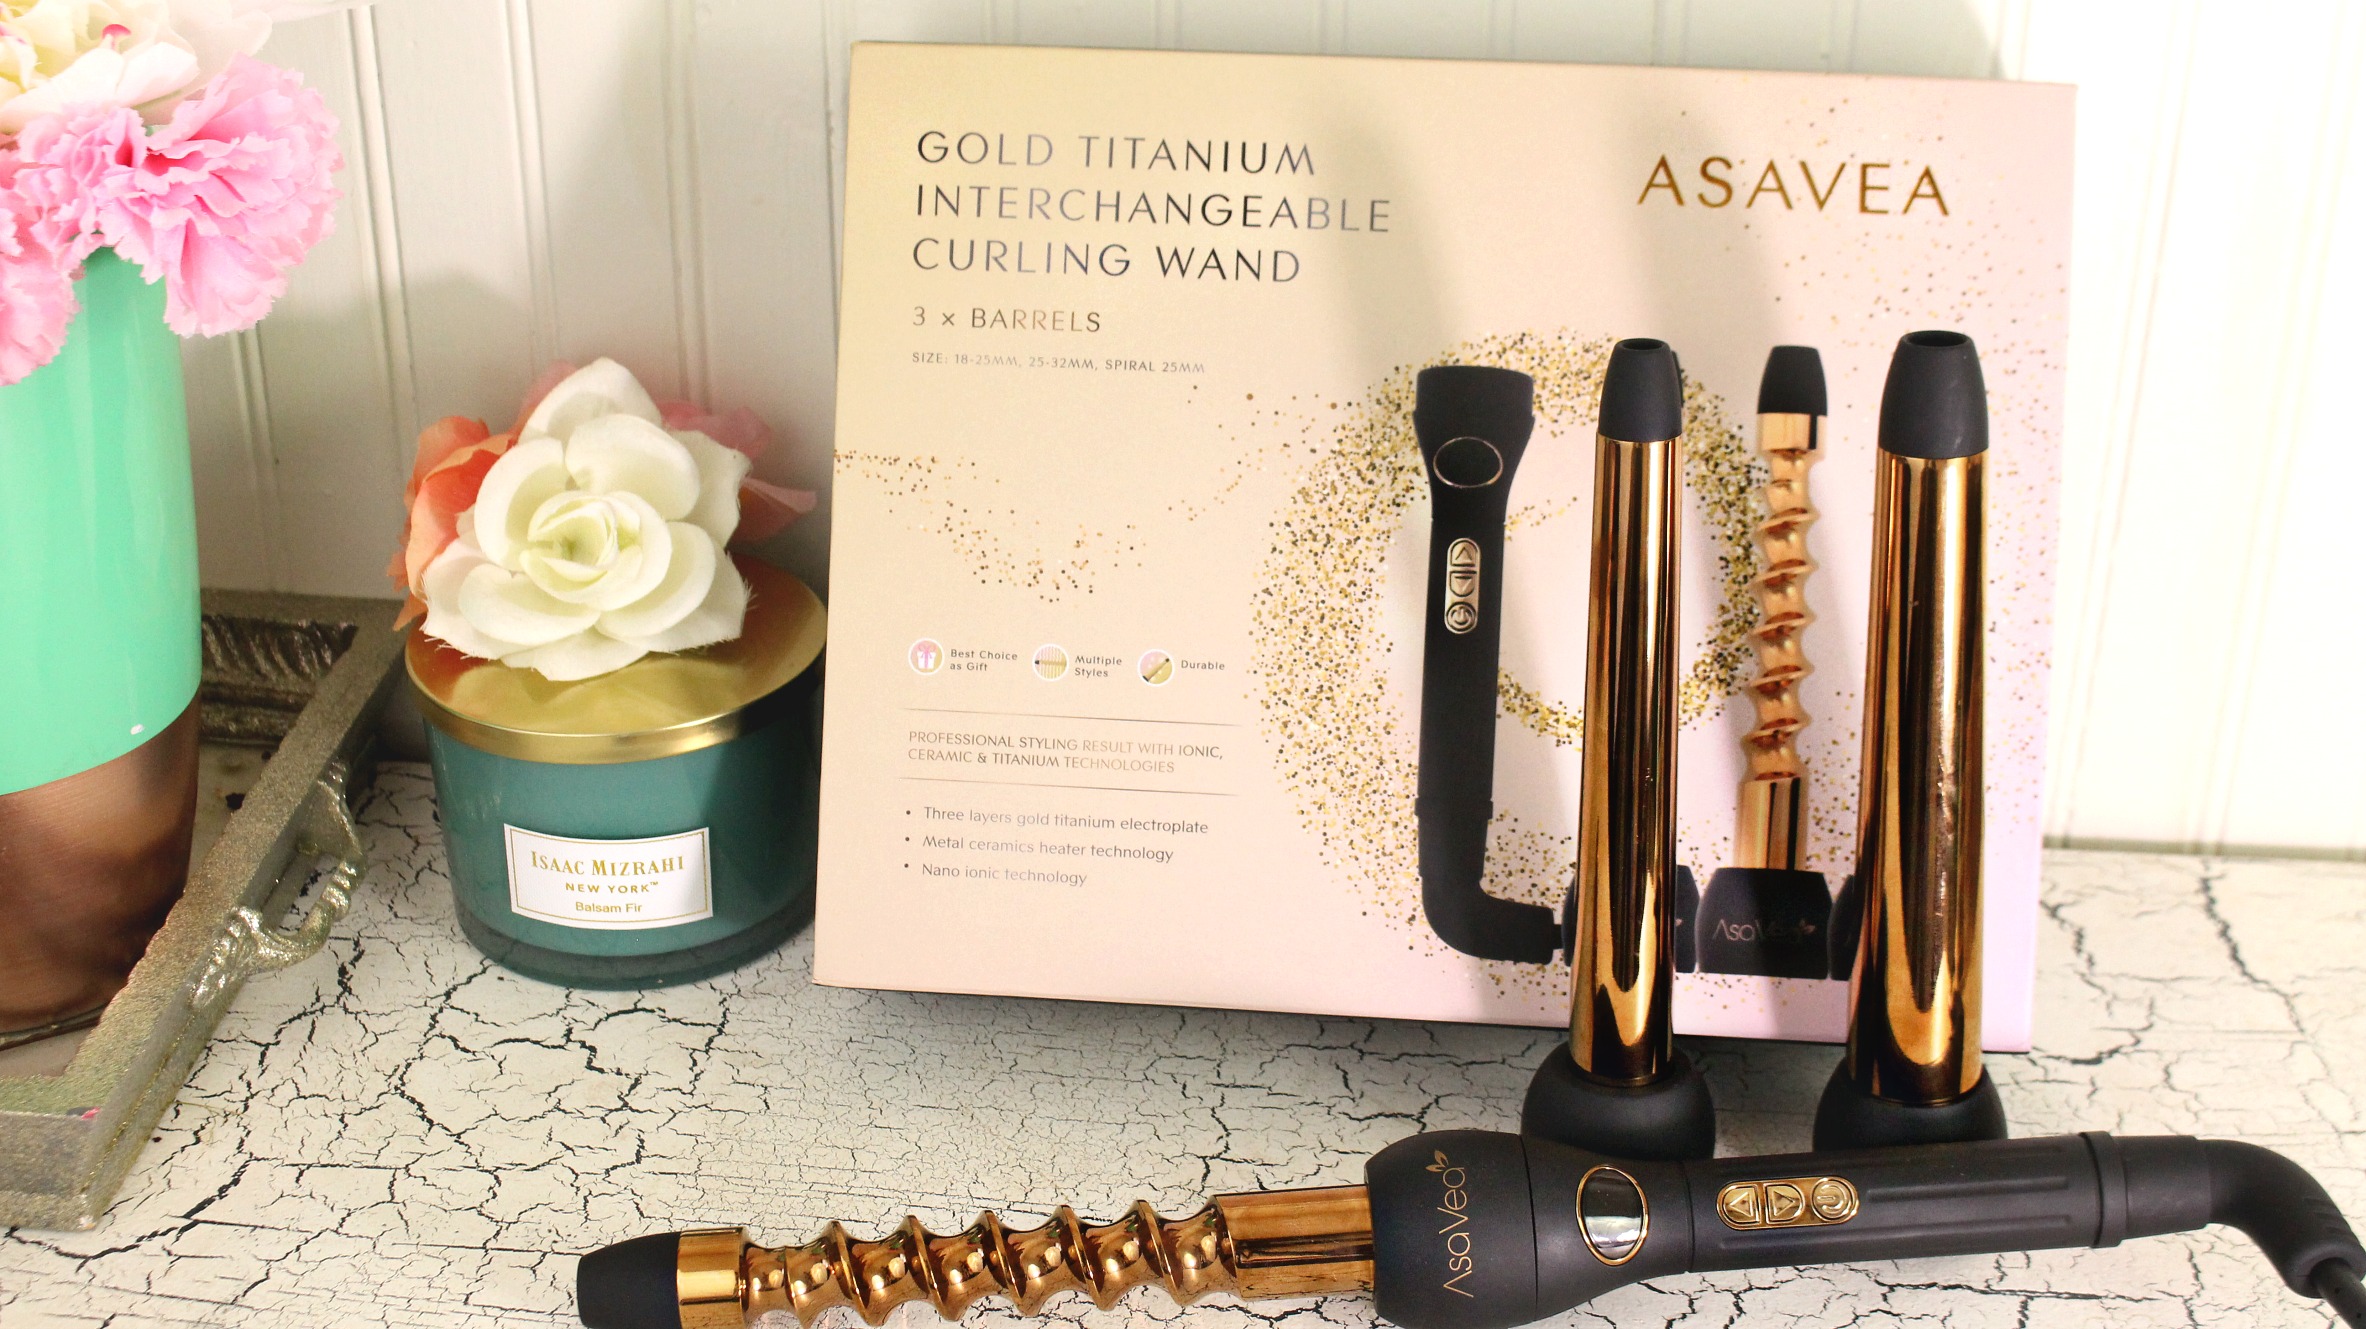
Not only do I want to show you these hairstyles, but I also partnered up with Asavea * To bring to you todays video & blog post. They recently launched a new Hairstyling tool and you guys seemed to really love it when I shared their hairstyling straightener brush. So I thought I would also share this beautiful Gold Titanium Hair Curling Wand.
(* This video & post is sponsored, so I do receive compensation for sharing this product with you. But all my opinions are honest and I truly do love this Hair Curler and recommend it.)
So think of this as a review & hair tutorial in one! Also stay tuned to the very end because, just like with the Straightening brush post, I will be GIVING ONE of these AWAY.
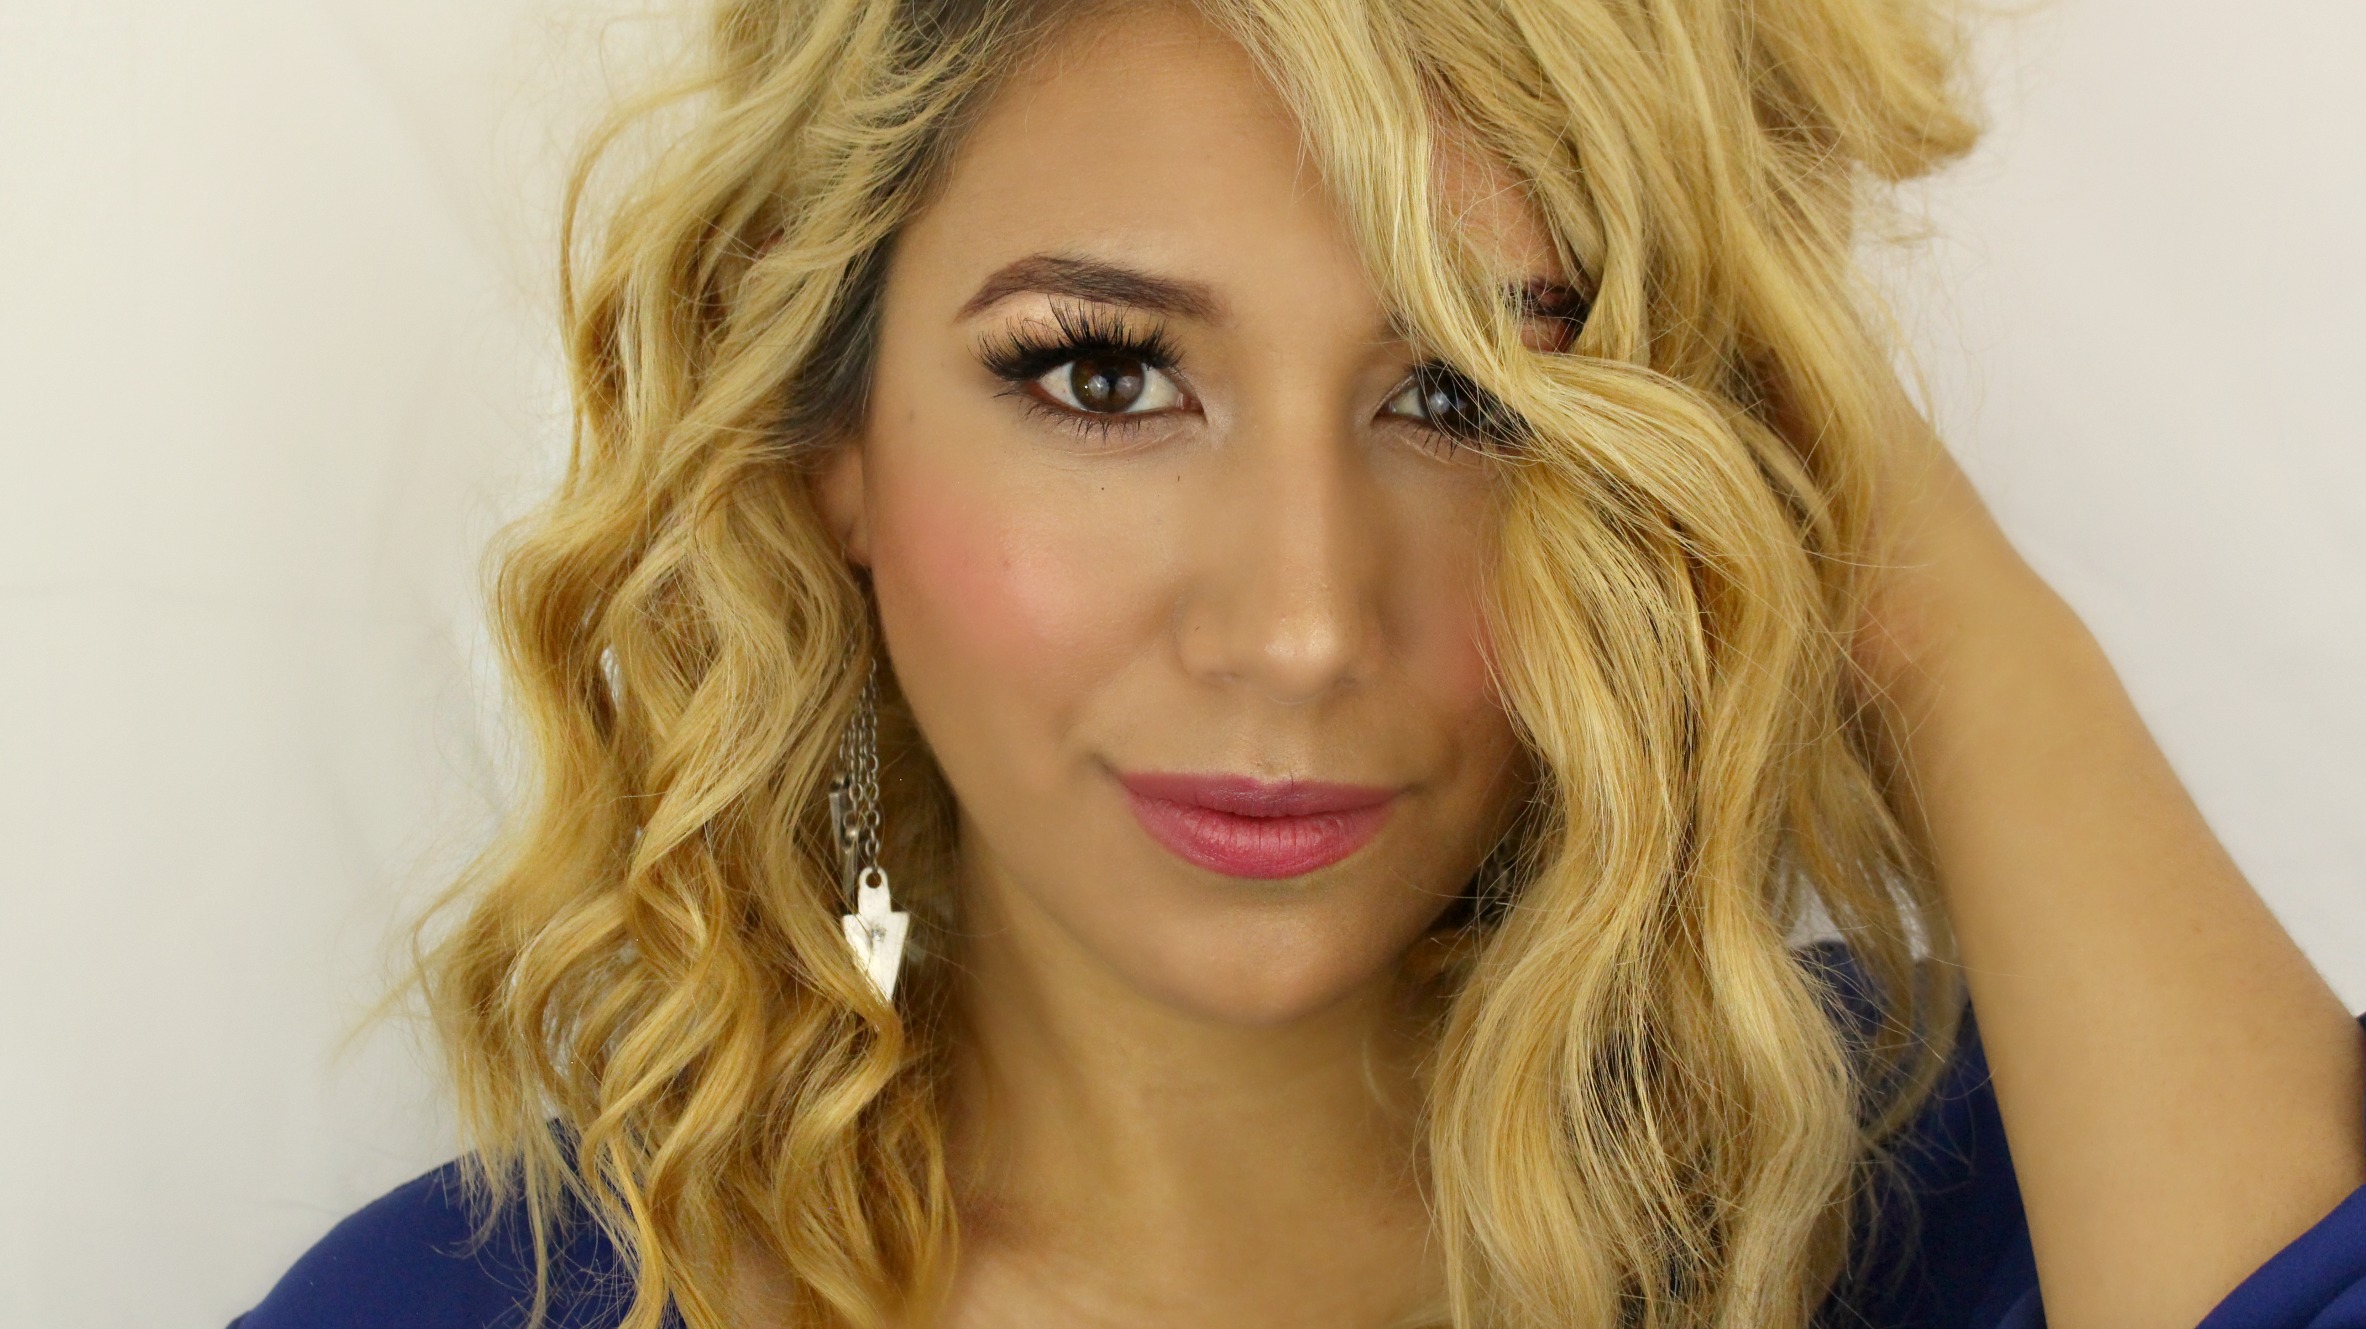
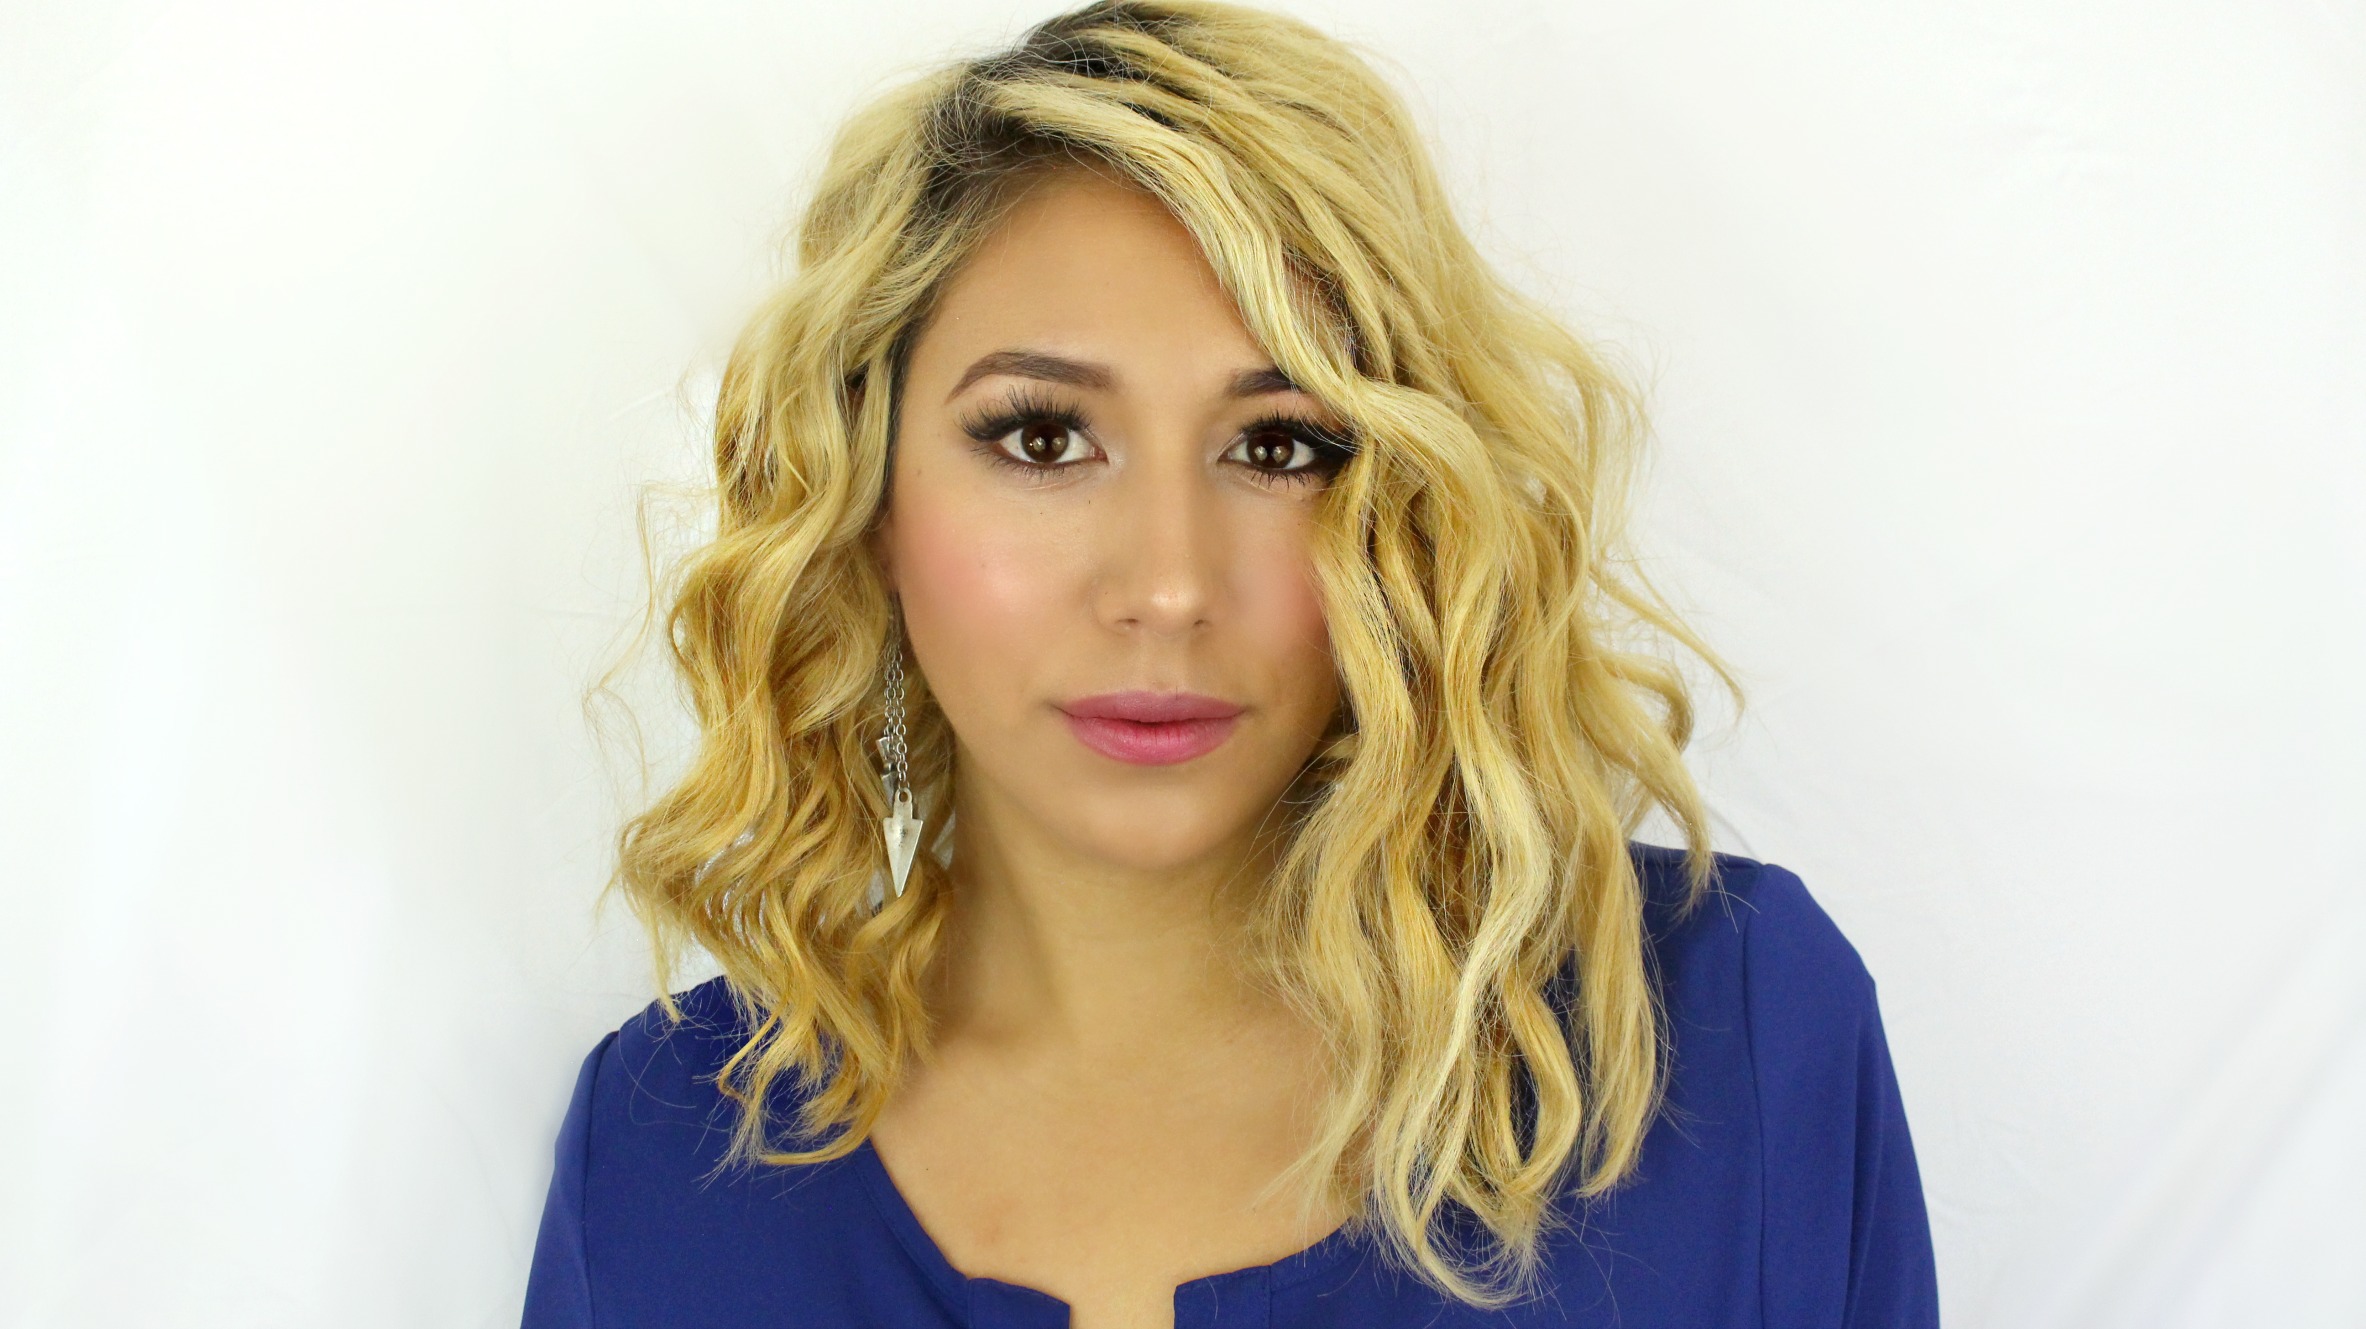
In the video below I will be showing you how to do this textured, curly, messy Lob hairstyle. This is a iconic Hanna Marin Hairstyle. She rocks this textured lob more than any other hairstyle.
This was so easy to do and surprisingly quick. I used the Spiral Barrel to achieve it and I love how it turned out. What I love most about this hairstyle is that you can really dress it up or down just by adding more texture and breaking it up more with your fingers.
So here are some of the Asavea Hair curler Pros:
The Gold & Ceramic material help to keep your frizz under complete control
It heats up quickly and cools down quickly
Your hairstyle lasts longer than other curlers (or at least it did for me, It lasted me 3 days and I didn’t have to recurl my hair at All!)
Its beautiful! I know you love the GOLD!
It has a Swivel Cord so Its easy to use without the cord getting caught or in the way.
The controls are easy to use and you can decided how hot you want the curler to be.
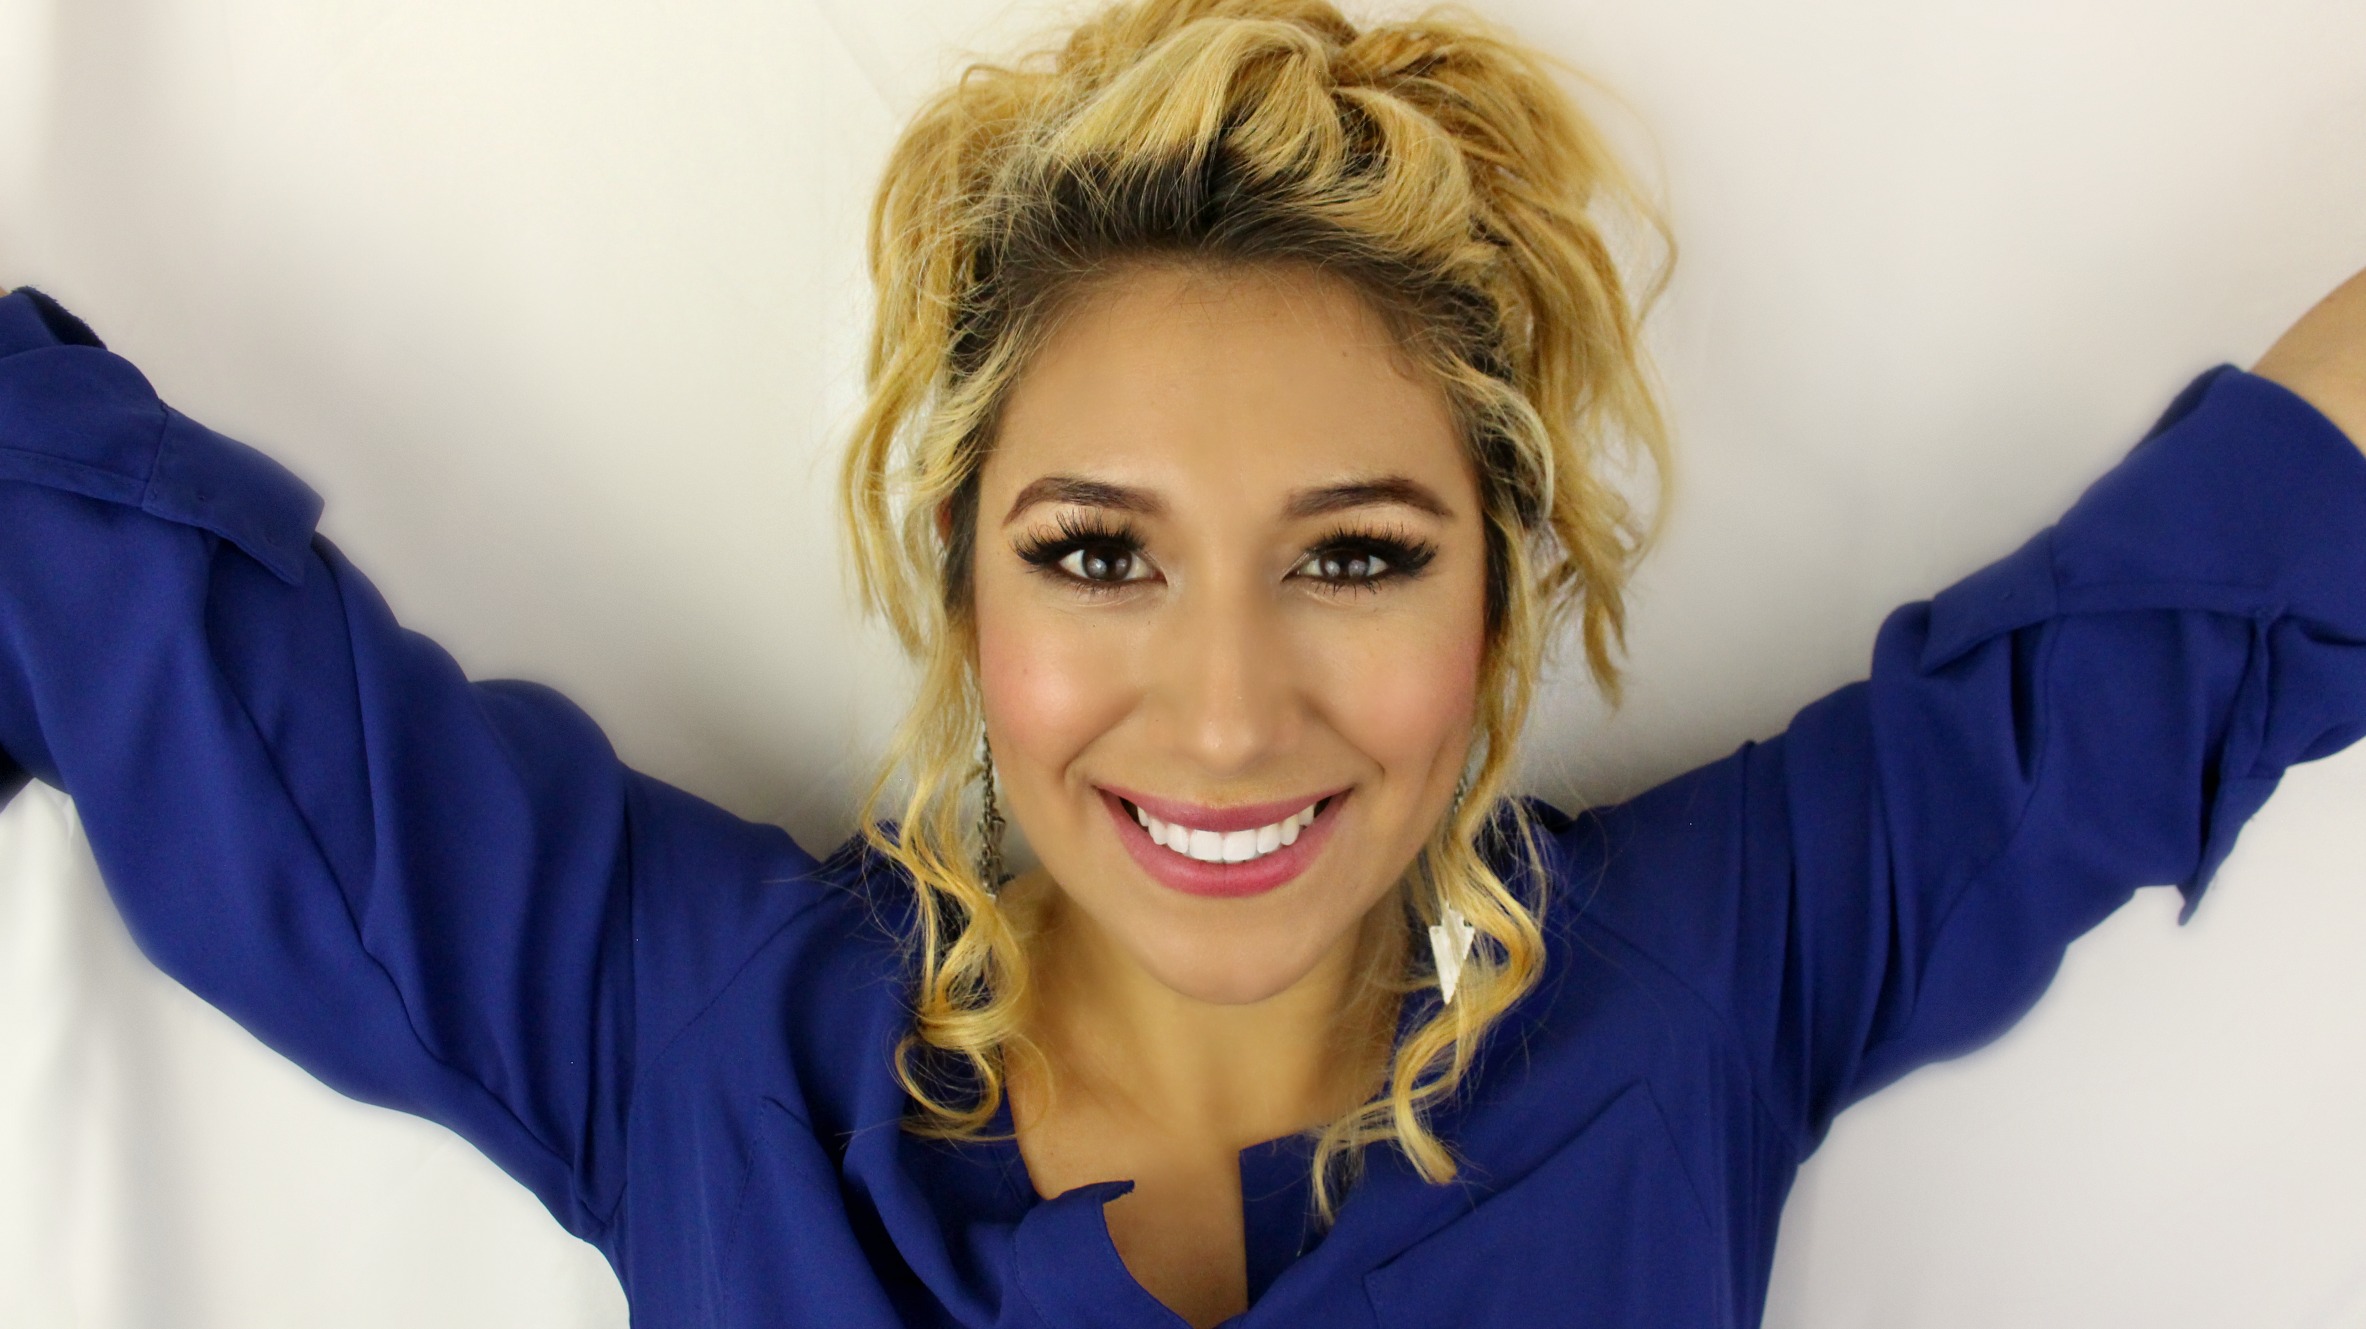
The Second hairstyle I did is a messy, easy undo. I like to do this on day three when my curls are still intact but maybe not as voluminous and I feel like putting my hair up. All you need for this hairstyle is a teasing comb & some bobby pins.
I love this because you can again make it as messy or as formal as you want. Its perfect for short hair because the braided back keeps all those little short layered hairs into place without bobby pins.
Ok ok, pictures are nice but lets see how to actually accomplish this. I promise it looks like I spent a lot of time doing this hairstyle but I really didn’t!
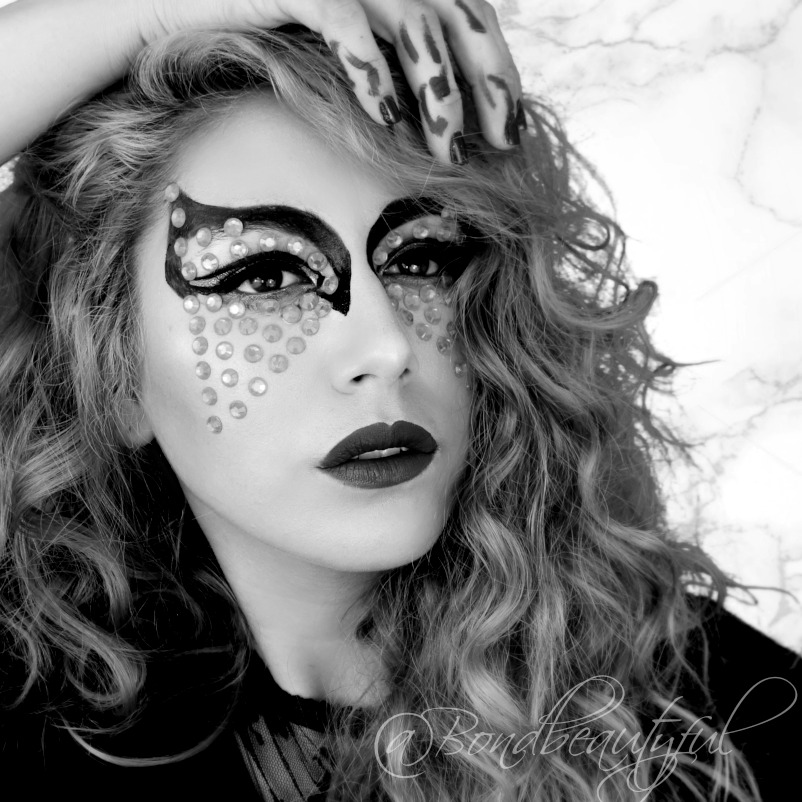
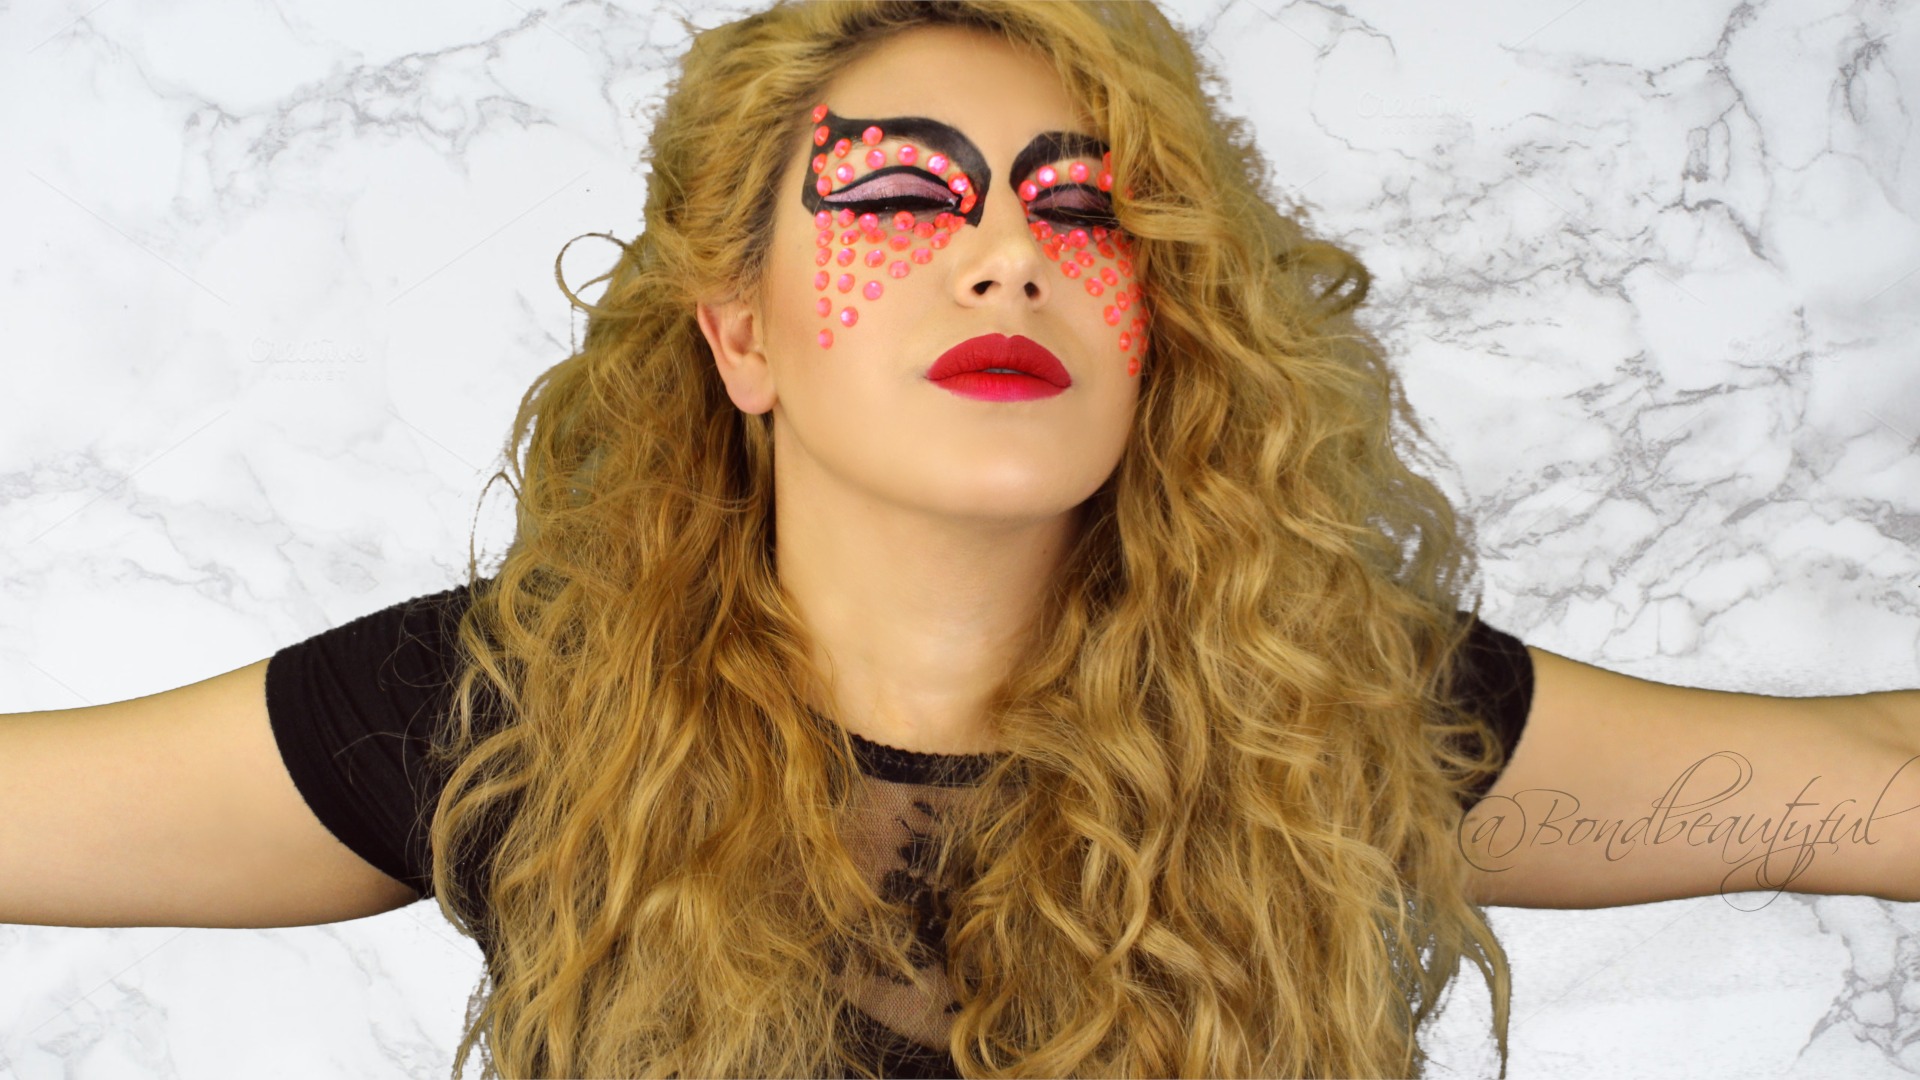
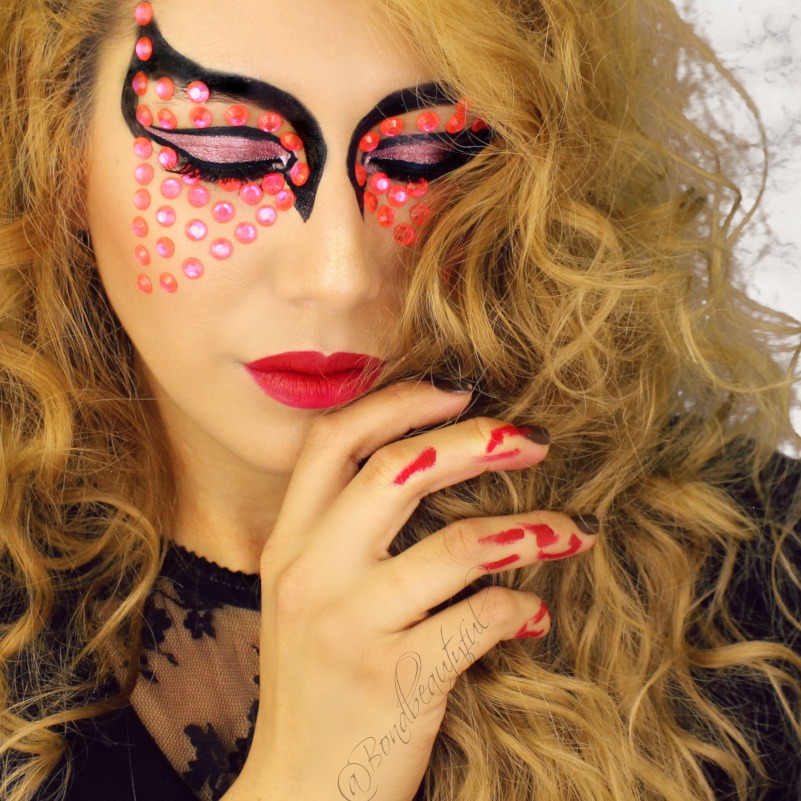
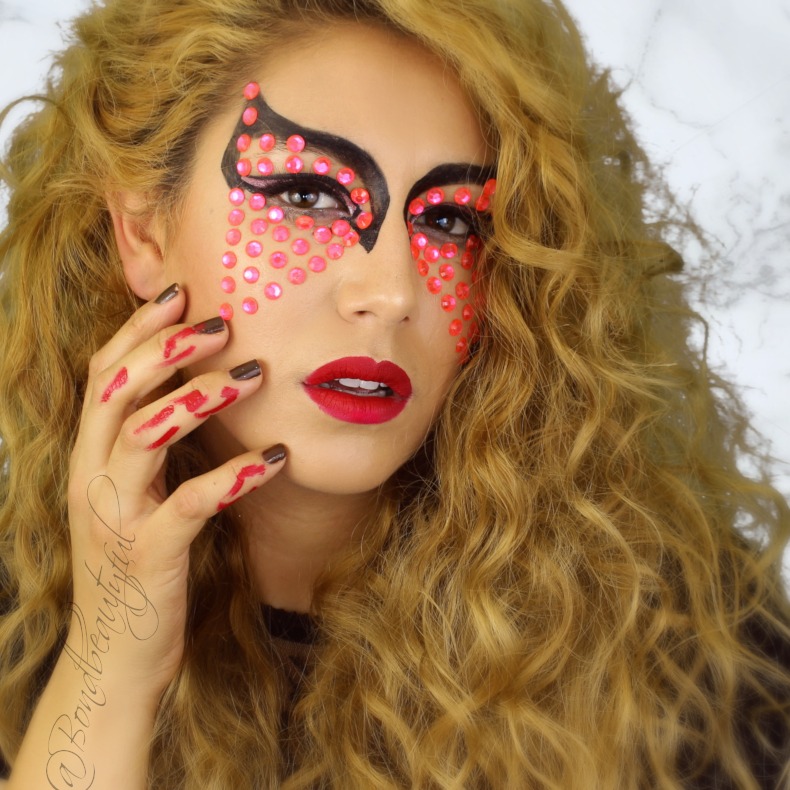
I have missed you guys! I know I have been gone a while so sorry, life has twisted and turned on me. But here we are I am back and happy to be here. I wanted to do a fun post for you guys since I haven’t done on in so long. I know all of you watched the Super Bowl or at least the half time show. Lady Gaga performed and she came out with a strong makeup look. I wanted to recreate this mainly because it was requested on my Instagram, but also because it is unique and fun.
So I went ahead and recreated it for you but I added my little twist to it. Instead of Red Gems I did pink, also I didn’t add the netting like she had. Her whole eye , gem & Black outline was actually a sticker. Because I did mine by hand I left out the netting through out the gems. Either way hers looked gorgeous and I think I did it justice. So I have a full video tutorial for you below, also I shared my edited Instagram Ready Pictures and I would love for you to vote in the comments and tell me which of all these pictures in this post you love best!
Products:
Dermacol Foundation 221
Clinique Blush Fig
Tiny Beauty Eyeshadow Tint: Violette
Elf Baked Eyeshadow : Burnt Plum (lid)
Hard candy Lookpro Matte Eyeshadow Palette (crease)
BhCosmetics Be a bombshell Bronzer Diva
Gems from Walmart & Kiss Lash Glue (Clear)
Milani Stroblight Highlighter Sunglow
Wetnwild Catsuit Missy & Fierce, Pink Really Hard
Milani Make it Dewy Setting Spray
Milani Make it Last Setting Spray
NYC Liquid Liner
Jordana Fabuliner
Kiss Lashes Ritzy
StarLooks Gem Pencil Amethyst
It was all actually easy to do, especially when I don’t have to do so many straight lines with eyeliner. So for all my visual learners, or those who are just curious on how I accomplished this look, check out the Tutorial.
Before you go COMMENT below and tell me which pictures do you like best from this post?
Thank you guys, and Im so excited to be back! I have lots of tutorials,reviews, hauls & more coming soon!
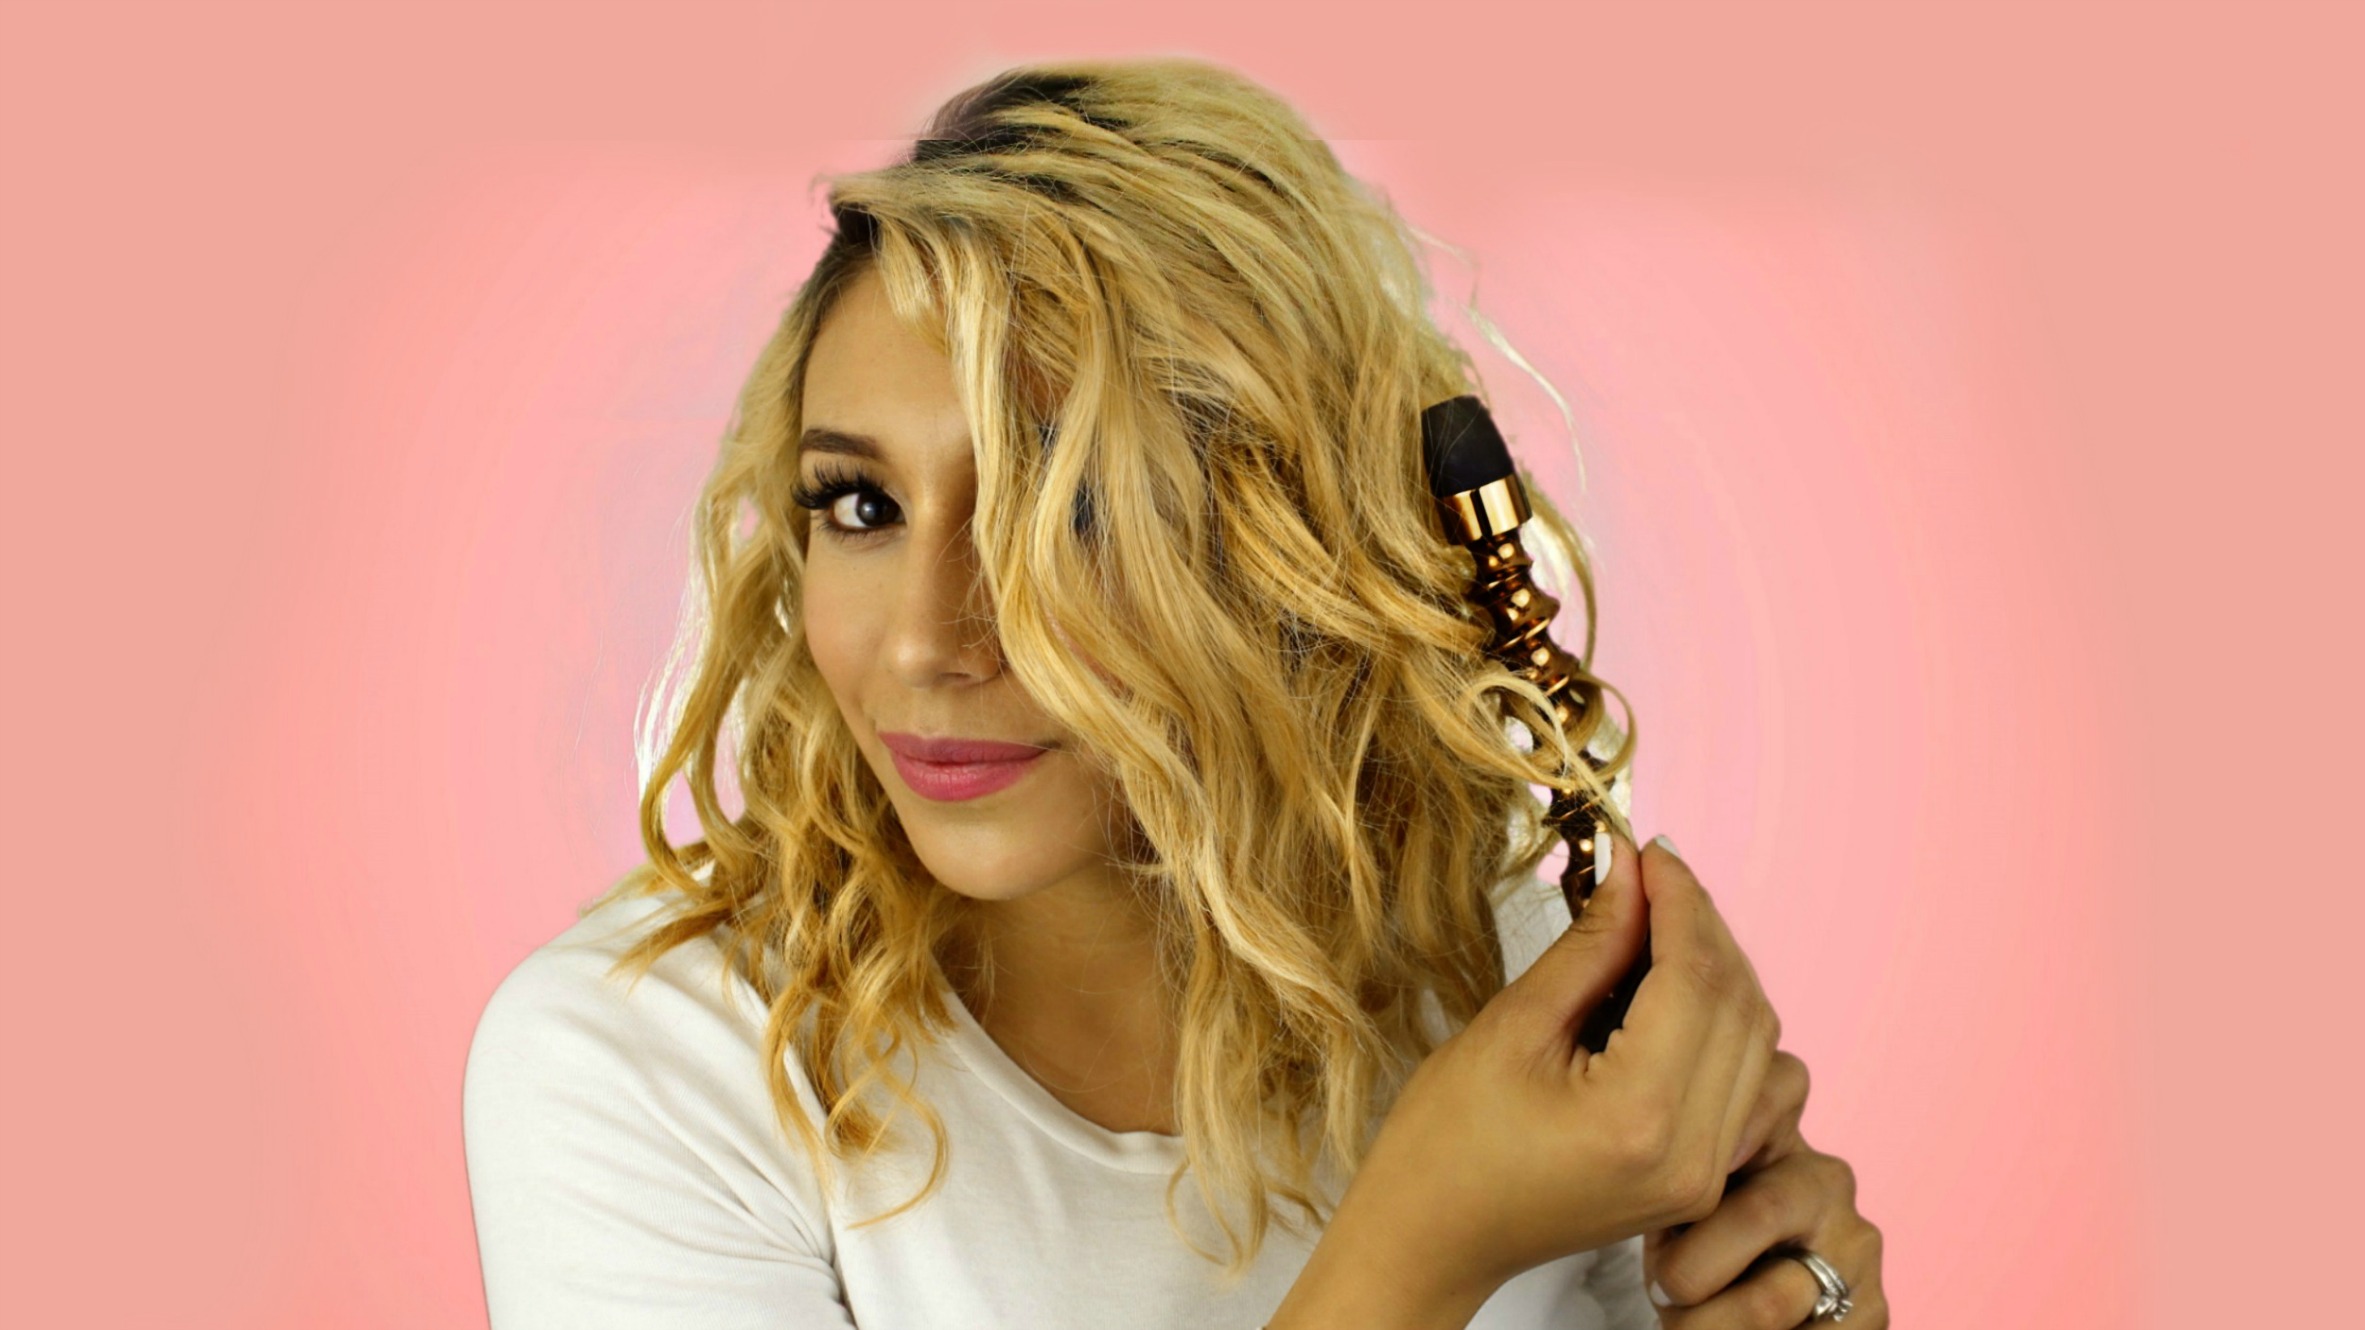
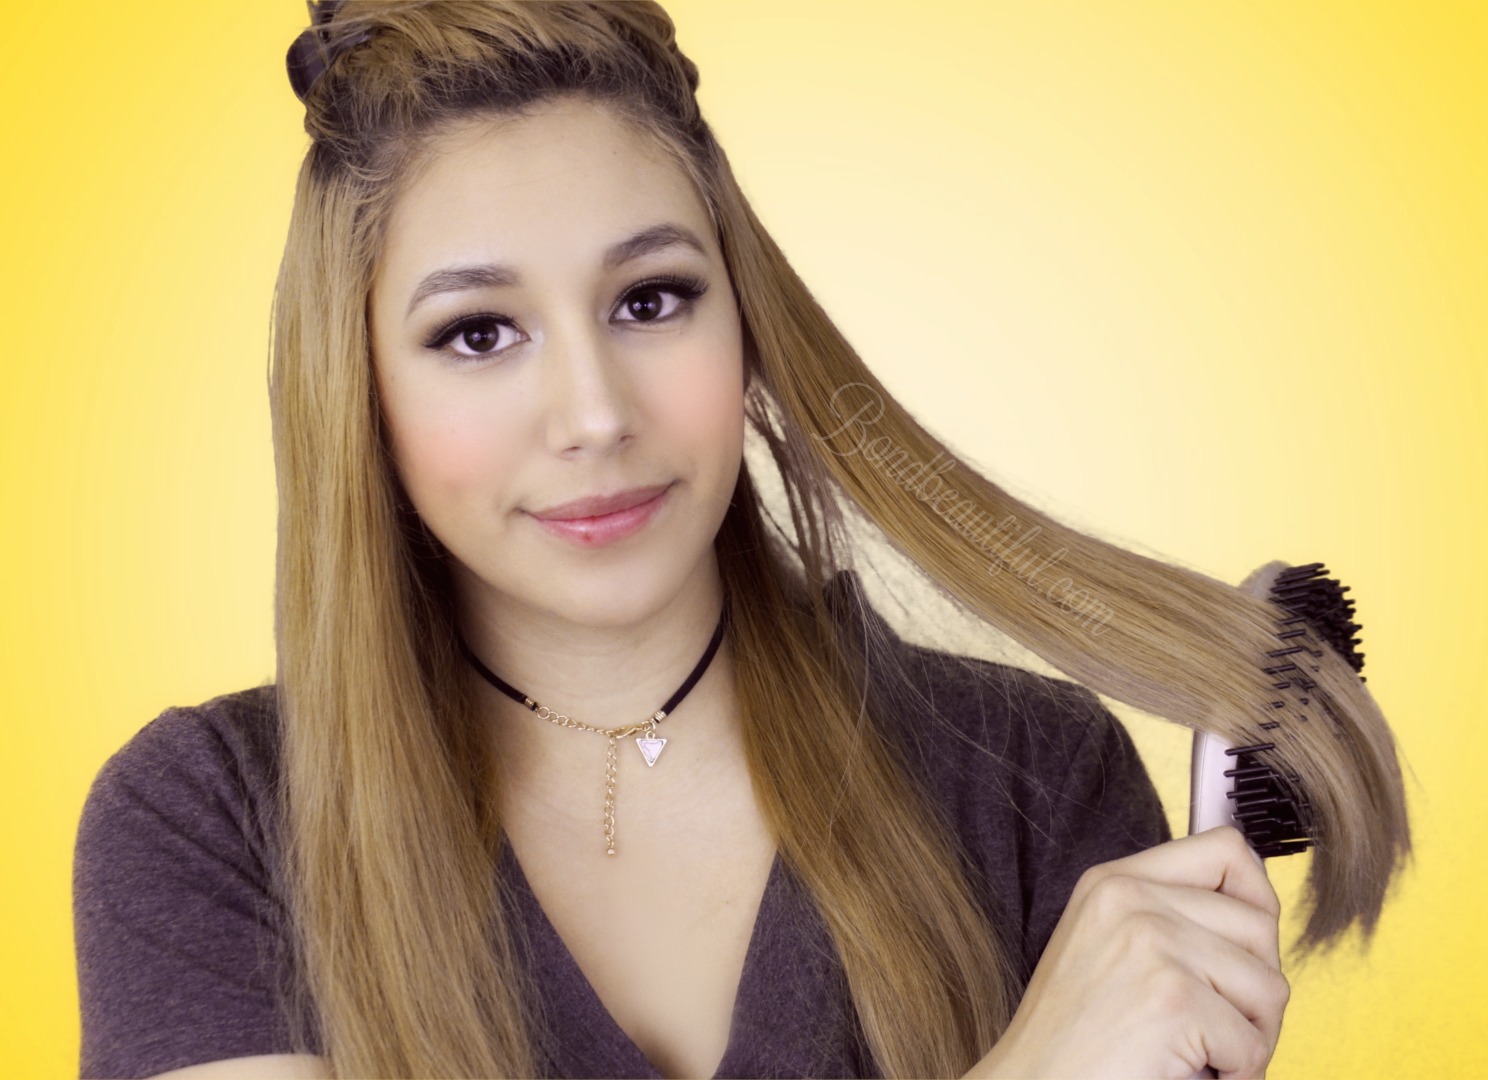
Its been a long time since I have done a post. With that said one of my new years resolution is to be more consistent in my blog & youtube. I really want to do more this year and I hope you guys are as excited as I am for this new year! So Im starting out this year right with a giveaway! With that said you will have to wait till the end to learn more about that. Today I wanted to tell you my thoughts and experience with the AsaVea Hair Straightening Brush*. I was sent this brush a couple weeks ago to try out and I have been so impressed with it that I decided to do a whole blog post about it.
Lets talk about what the company claims really quickly (Inserted exactly from the website*) Advanced MCH ceramic heat technology delivers a consistent optimum temperature Suitable for a variety of hair types with seven temperature levelsfrom 330˚F to 450˚F Give you smooth, straight, frizz-free hair in half the time it takes to use a flat iron.
PROS:
Heats up & Cools Down Quickly
Because of the Bristles it creates a barrier between you and the flat iron part to help prevent burning; although the bristle still get hot they are not as hot as the iron plate underneath.
Decreases frizz when straightening because of the brush & iron combo. (although for my hair it definitely illuminates some of the frizz but not all because of how frizzy & damaged my hair truely is)
Temperature is suitable to fit all hair types. I like to have it at 410
Straightens & styles my hair without leaving it flat. It straightens it & gives it volume.
Love how it styles BANGS does an amazing job & makes it easier. (see video below for small demo)
Minimizes damage because I only pull it through my hair 2 times!
CONS:
Takes the same amount of time for me to straighten my hair. (But for others with super super curly hair & non manageable hair it can minimize your hair straightening time if you use this first)
If you have really tangly or damaged hair you need to use a brush first or it will rip your hair out. Its not soft enough to use this to get tangles out!
For some the Price will be a CON it retails for $54.94* ; But with that said to get a really nice straightener it costs about the same or even less than a CHI
So with that said lets talk about some Tips & Tricks to making this the most affective.
I comb my hair through before using this
I divide it into 1inch sections
I pull my hair straight (still gently) while I pull the comb through
Start at the very roots & pull through slowly
DO NOT STOP Always keep moving to prevent any burning or damage
AT the very end curl the ends by turning your wrist in or out depending on what look you are going for
At the Crown I Will divide the section I would usually tease and put Comb at the base & pull backwards (Making a n motion)to give it extra volume. (See video same motion as I do with my bangs)
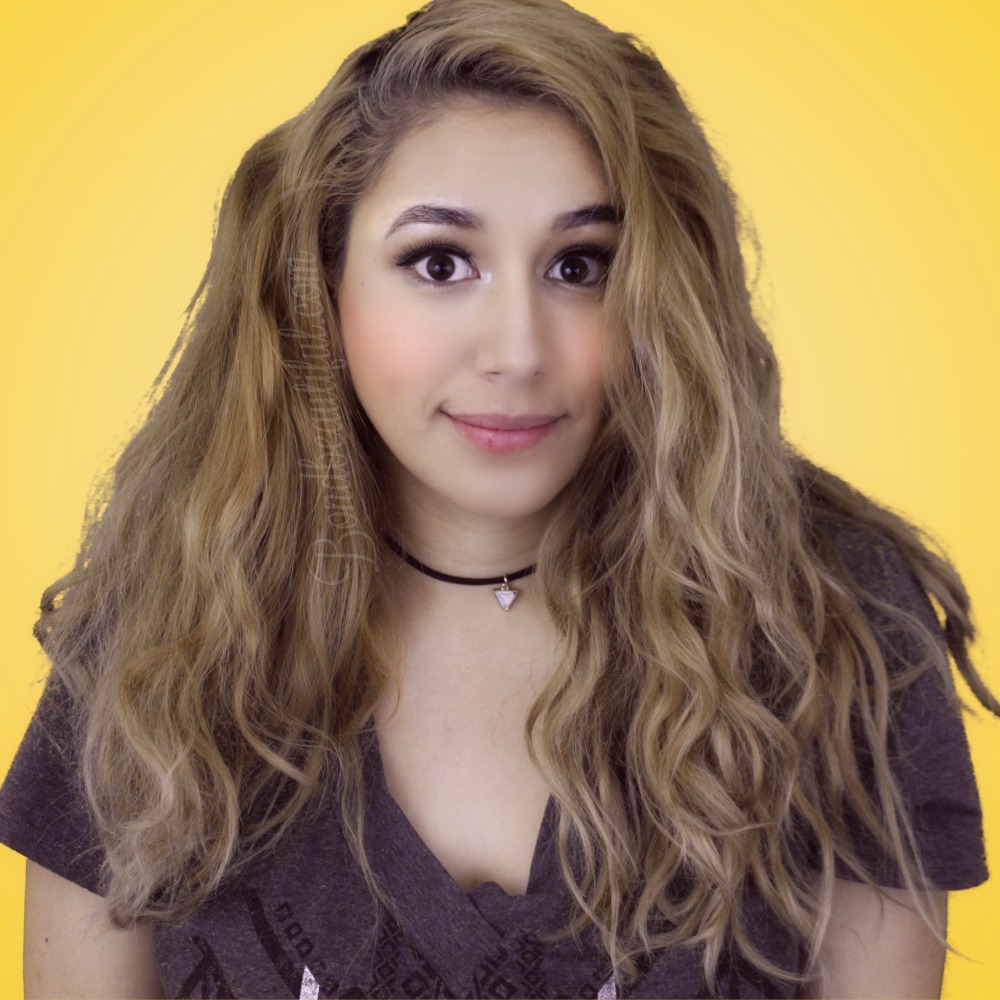
Here is how my hair turned out: Before & After (see video below)
I was a skeptic but now I have converted to the Straightening brush way haha. I really do enjoy using it and because I don’t get burned as easily I will definitely use this more than my straightener. Even though I do not have really curly kinky hair I have seen it used on that hair type and it works wonders as well. So with all that said in my opinion I think it will work on all hair types & it is worth the buy.
Here is my full review , where I show the Straightening Brush & I show you a full demo of me using it!
For the giveaway just click here to enter! All you need to be is subscribe to my youtube and then you get lots of bonus entries! Make sure to read the rules carefully too! Good luck!
So tell me tell me what is one of your new years resolutions?
*I do receive a small amount of compensation if you click and use my link. If you choose not to feel free to look the product up on amazon or google!
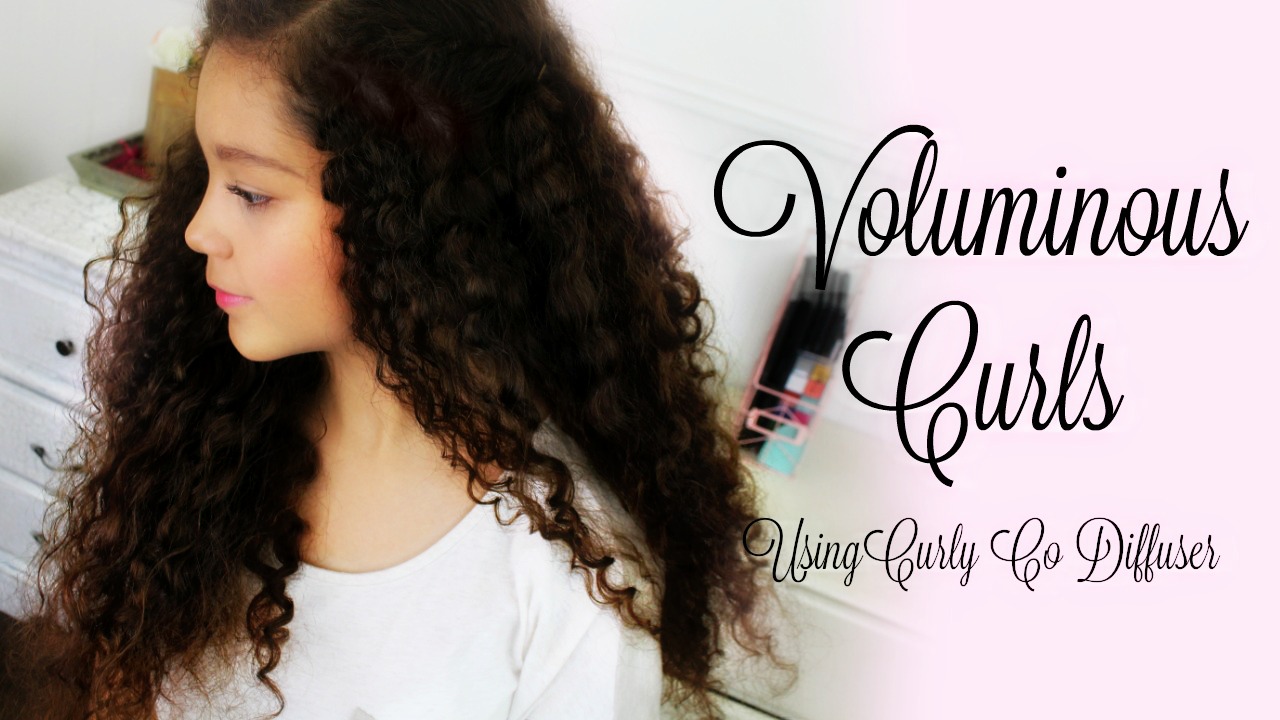
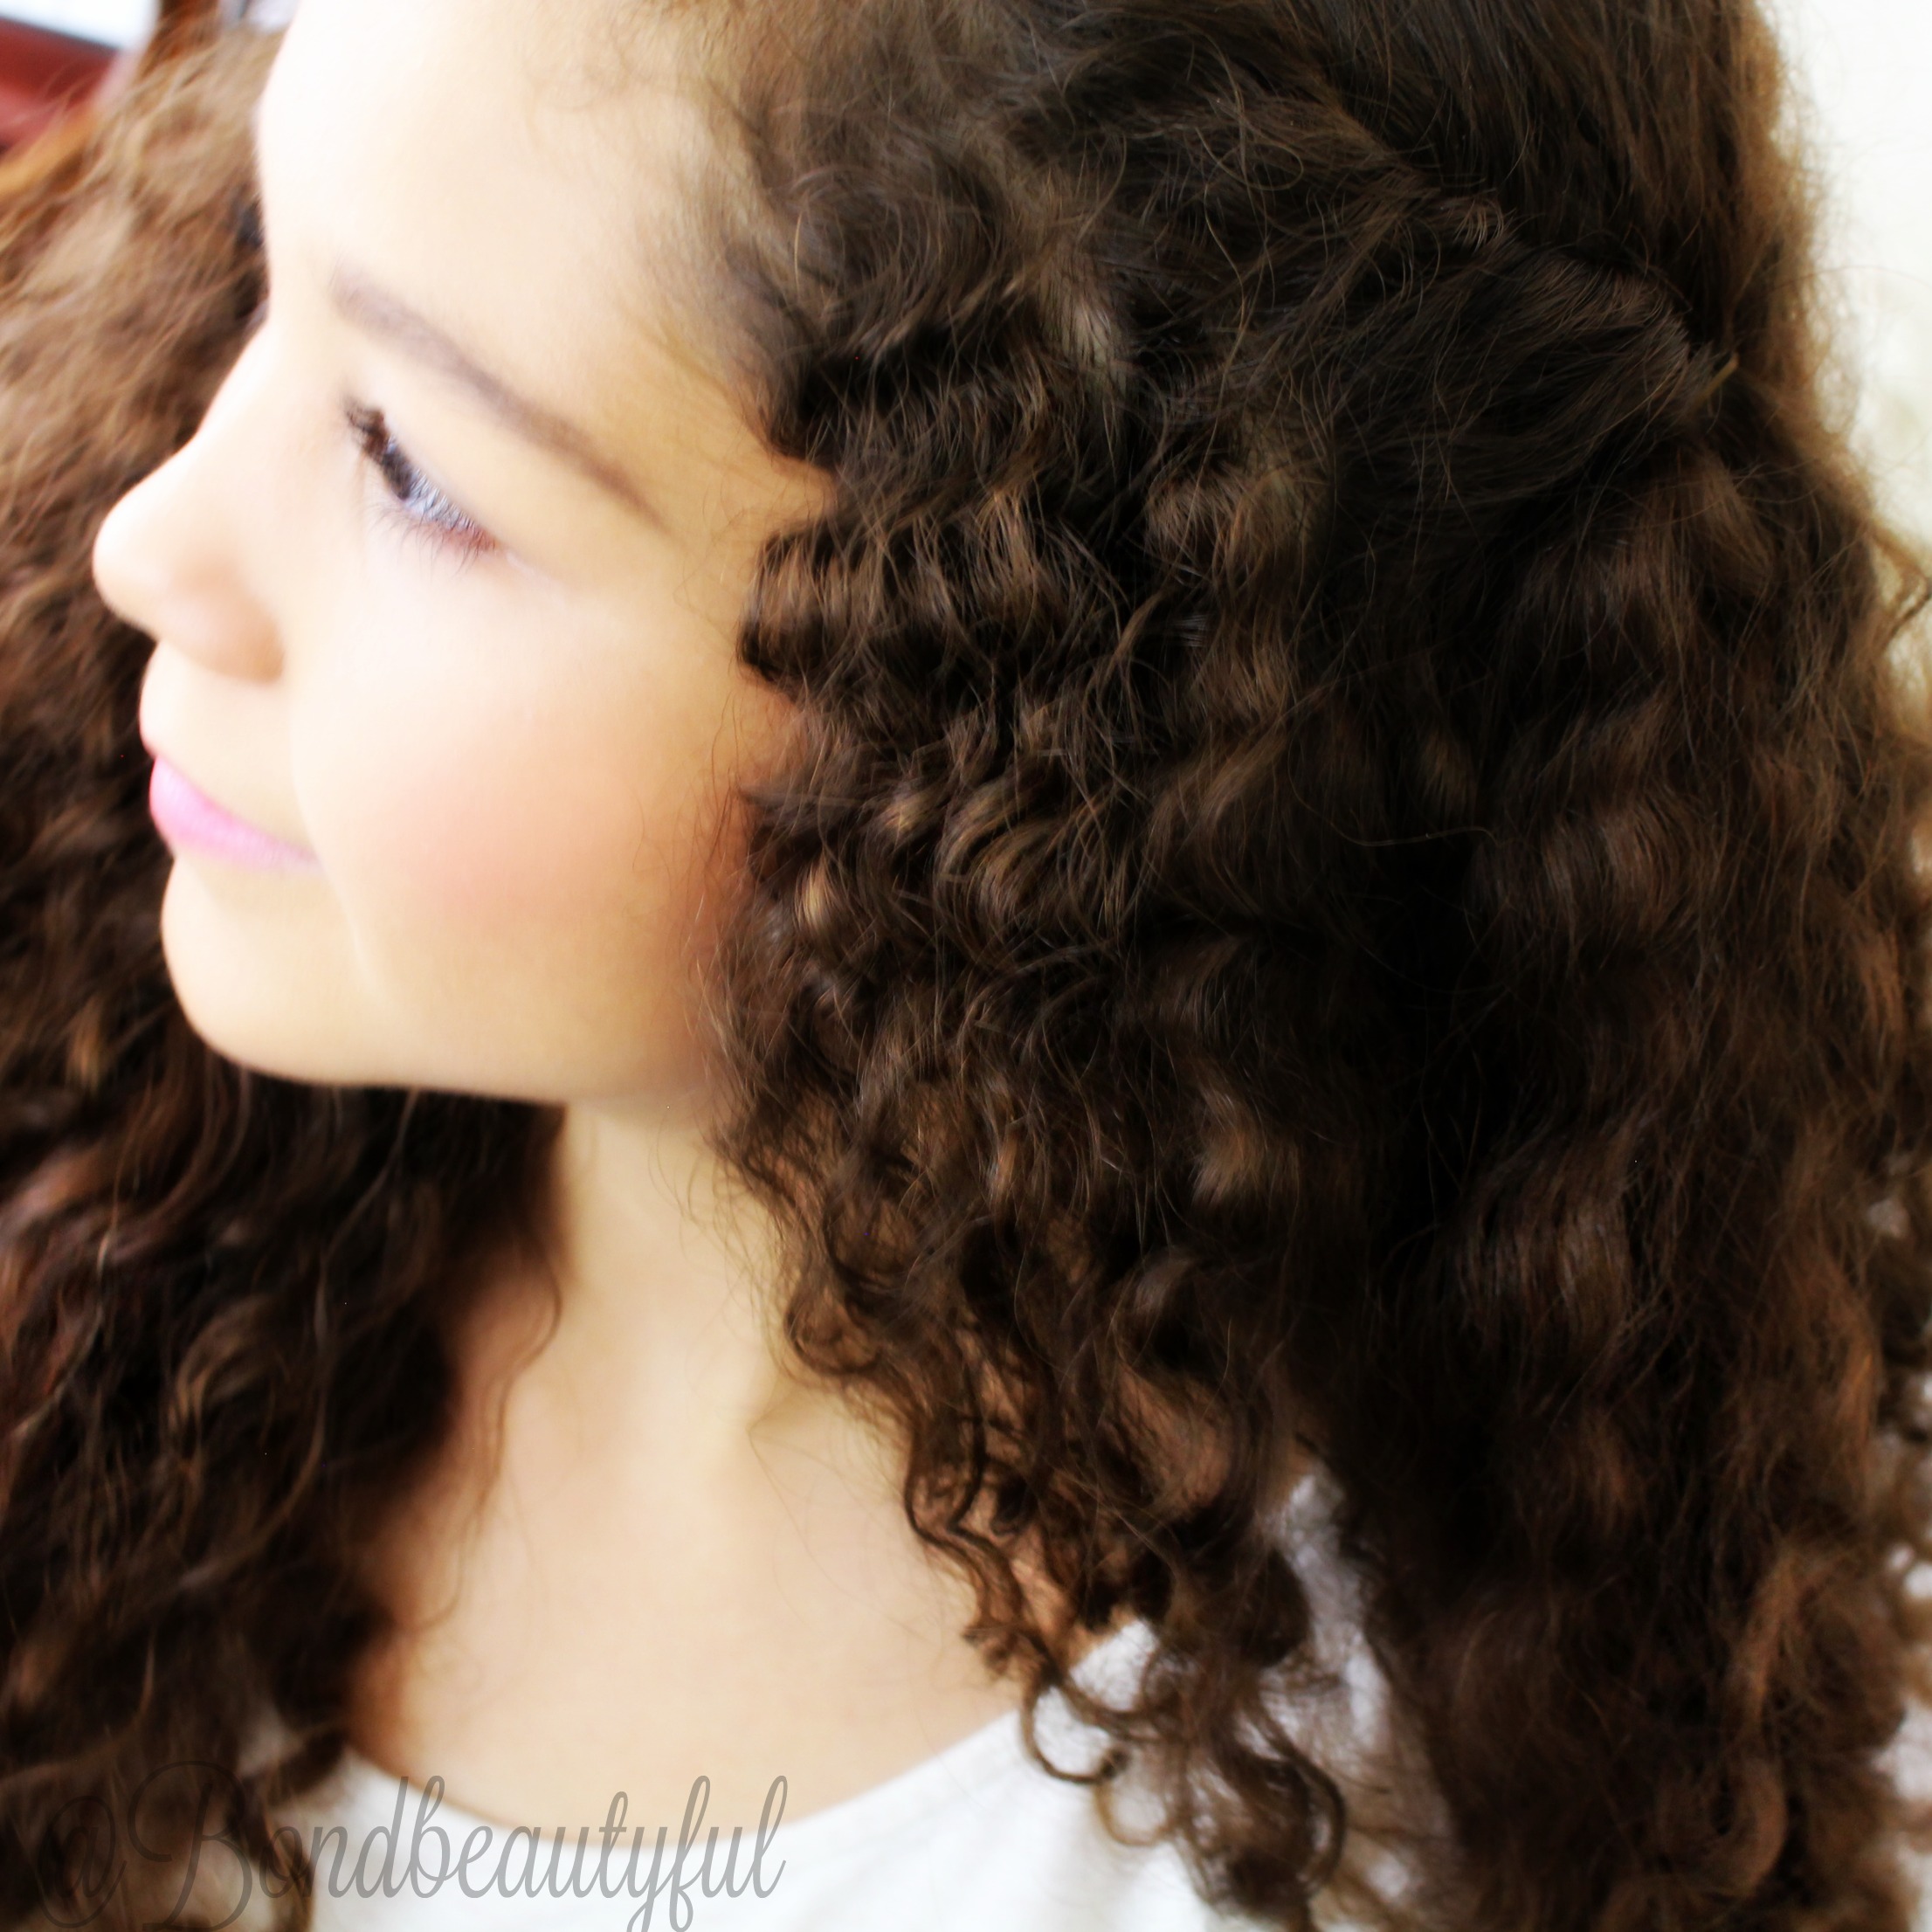
Today I thought I would bring my niece to show you how to create some beautiful voluminous natural curls! I am doing this with a Curly Co Diffuser. I am actually super impressed with this diffusers. I have used several different ones in the past but this is the first time I use one that is:
A. Universal
B. Collapsable
C. Made of soft plastic rather than hard plastic
So I have a full video tutorial & review on this product (below); but I thought I would also chat and tell you about it here on my blog!
So lets get down to the basics , what is a diffuser exactly?
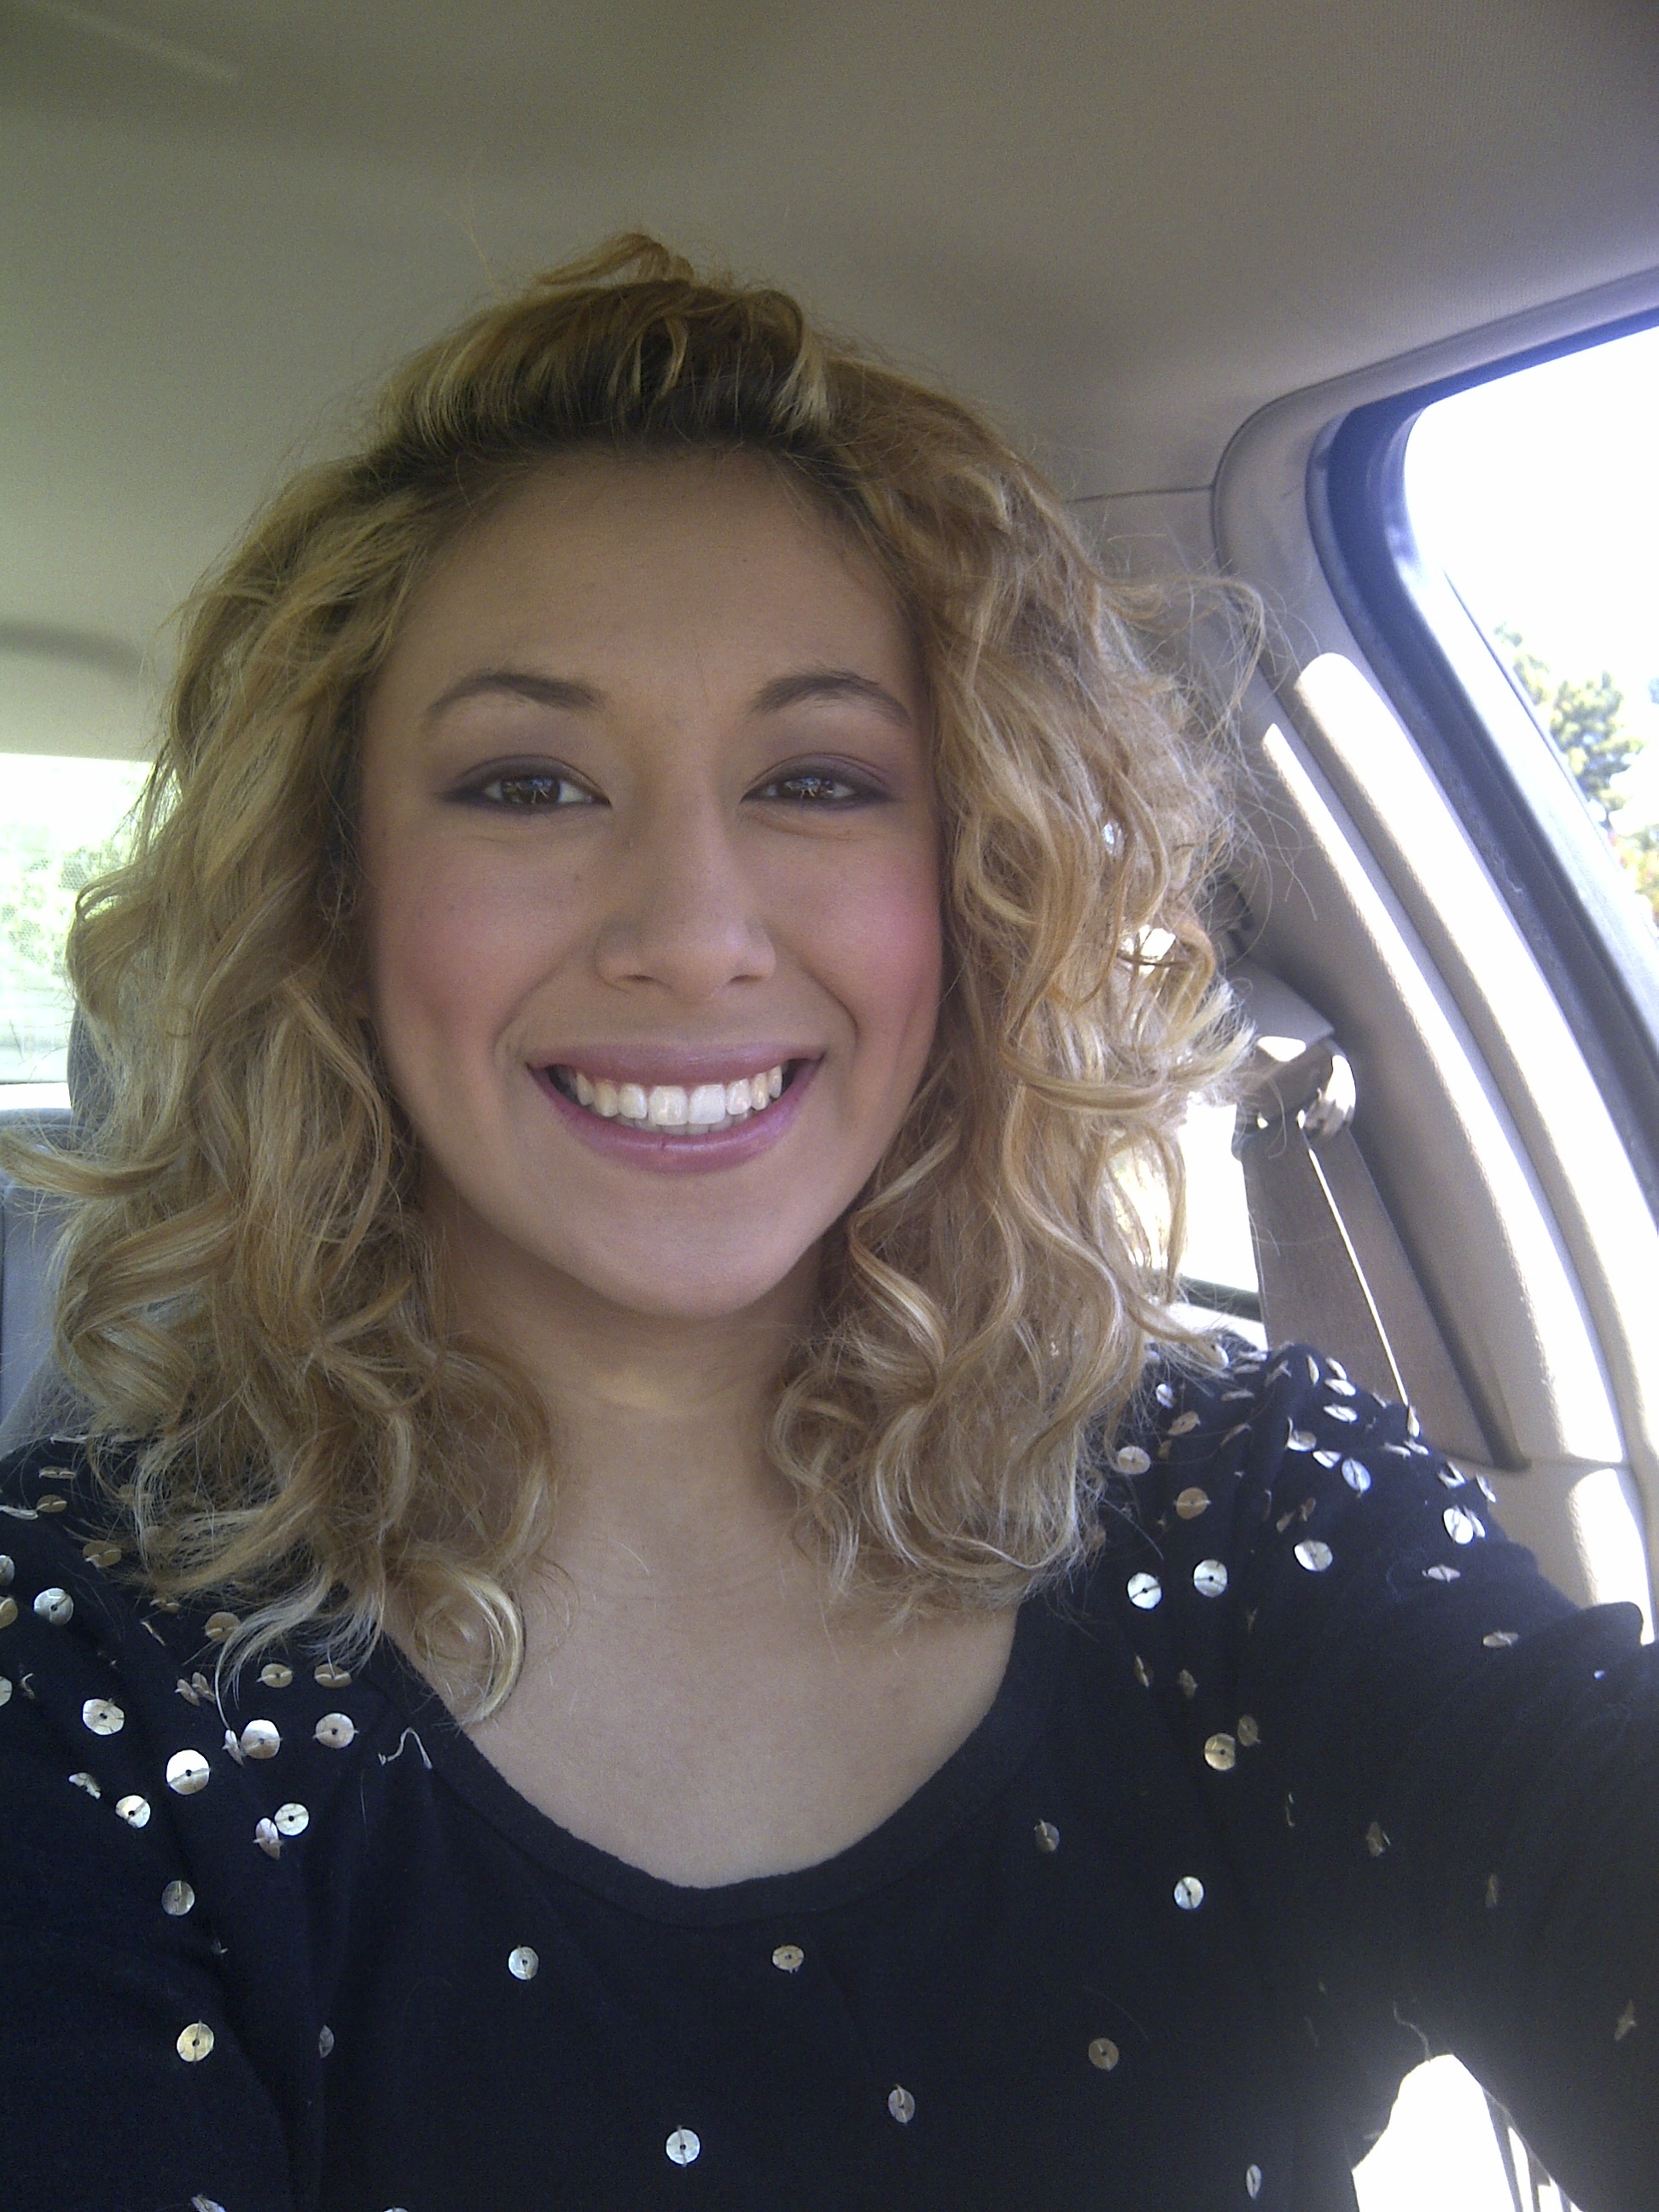
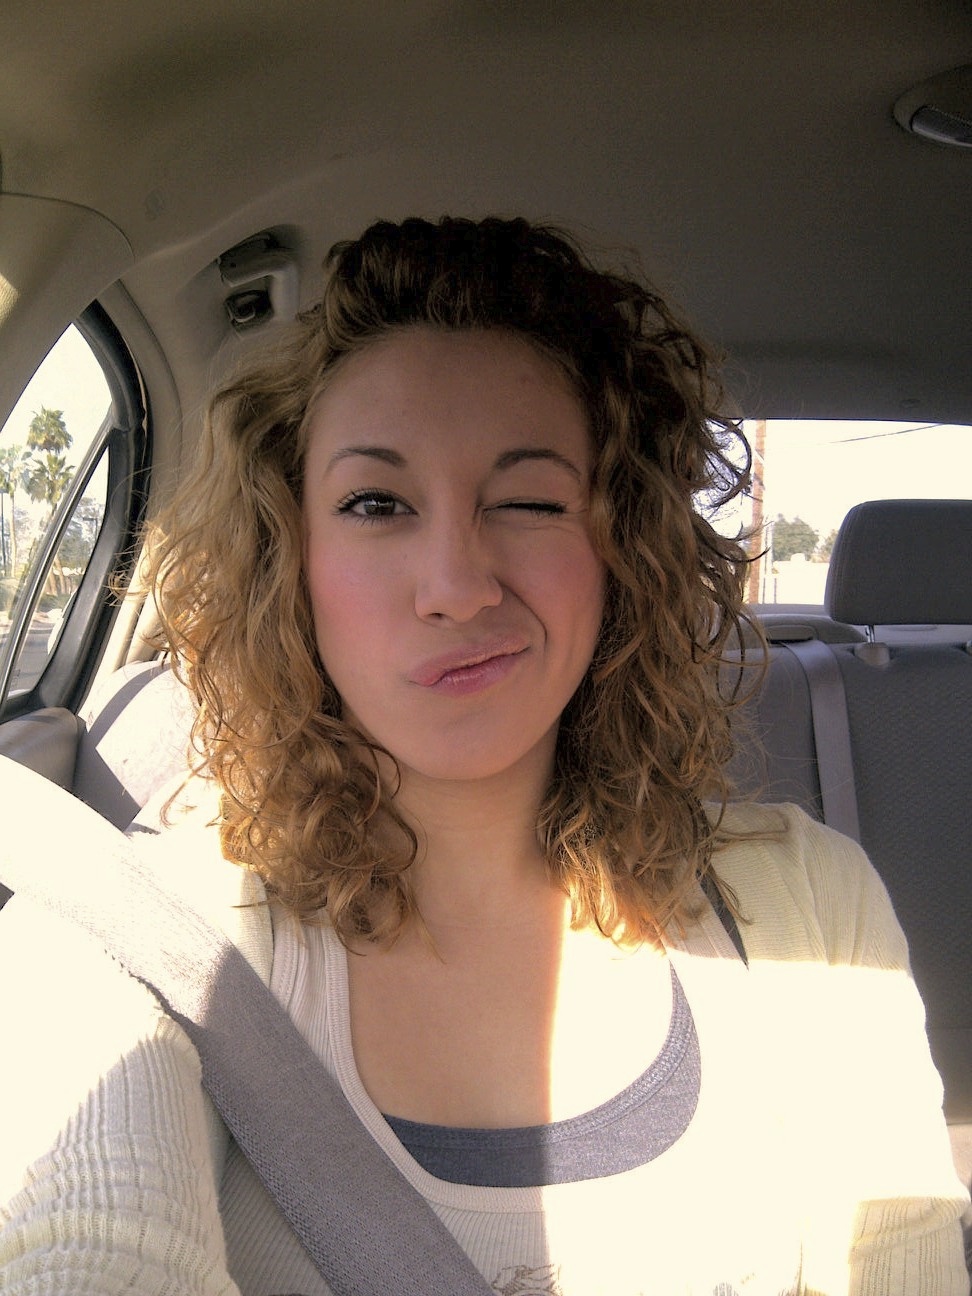
Its a attachment to your blow dryer that helps you dry your hair in a way that reduces frizz. It is made for curly hair and it gives you volume and helps your define your curls. I absolutely love diffusers I have been using them ever since I was in high school! Lets see what that looked like for a second..
So now that we saw some curly pictures of me lets see how awesome my nieces hair turned out after she used the diffuser.
So here are some tips on how to do this:
Use hair product whether it is curl cream, mousse, or gel. If you touch your hair without product it will only add frizz!
Never leave the blow dryer on one spot for too long , don’t forget its still a hot tool.
Always push upwards to add the most volume when using the diffuser.
Here is the simple steps that we did to achieve this hairstyle:
Apply mousse + Hair Oil to your hands mix together, then apply to your hair.
Start diffusing on Level 3 on Warm setting (to help reduce hair damage )
Put your hair gently into the diffuser then push the diffuser up towards your scalp
hold for a couple of sec then repeat all over your hair
Add more Product & continue to diffuse
Then put the setting on cold and diffuse one last time
Then apply hair spray or any other hair product you choose & your done!
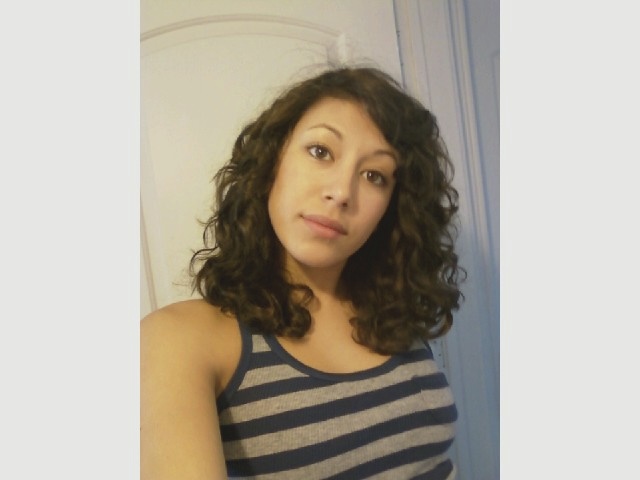
My hair is really damaged from all the bleach I have been doing so my hair has lost lots of its curl but this is how it looks after I diffuse it!
Pros & Cons to this Diffuser:
Easy to store
Well Made & because of the material is less likely to break when dropped
reduces frizz & adds volume
really dries your curls fast!!!! (It took my niece about 5 to 10 min to dry her whole entire hair!! WHAT!
Its universal so it fits on all hair dryers
The Diffuser head is big so it fits lots of hair!
It turns with your head thanks to the collapsable capabilities
Only cost $14.99 (I do get compensated if you use this link , if you choose not to just look it up on amazon Curly Co Diffuser )
Happy Wednesday , you know what that means time for another blog post!
So bare with me , it is not a makeup tutorial because I am still not in my house! So every is still packed away. So a couple weekends ago I went camping with the family. It was so fun but for some reason every time we go camping my husbands family loves to take pictures and post them on facebook. I dont know about you but when I camp I either look like
A. a man
B. A puff ball
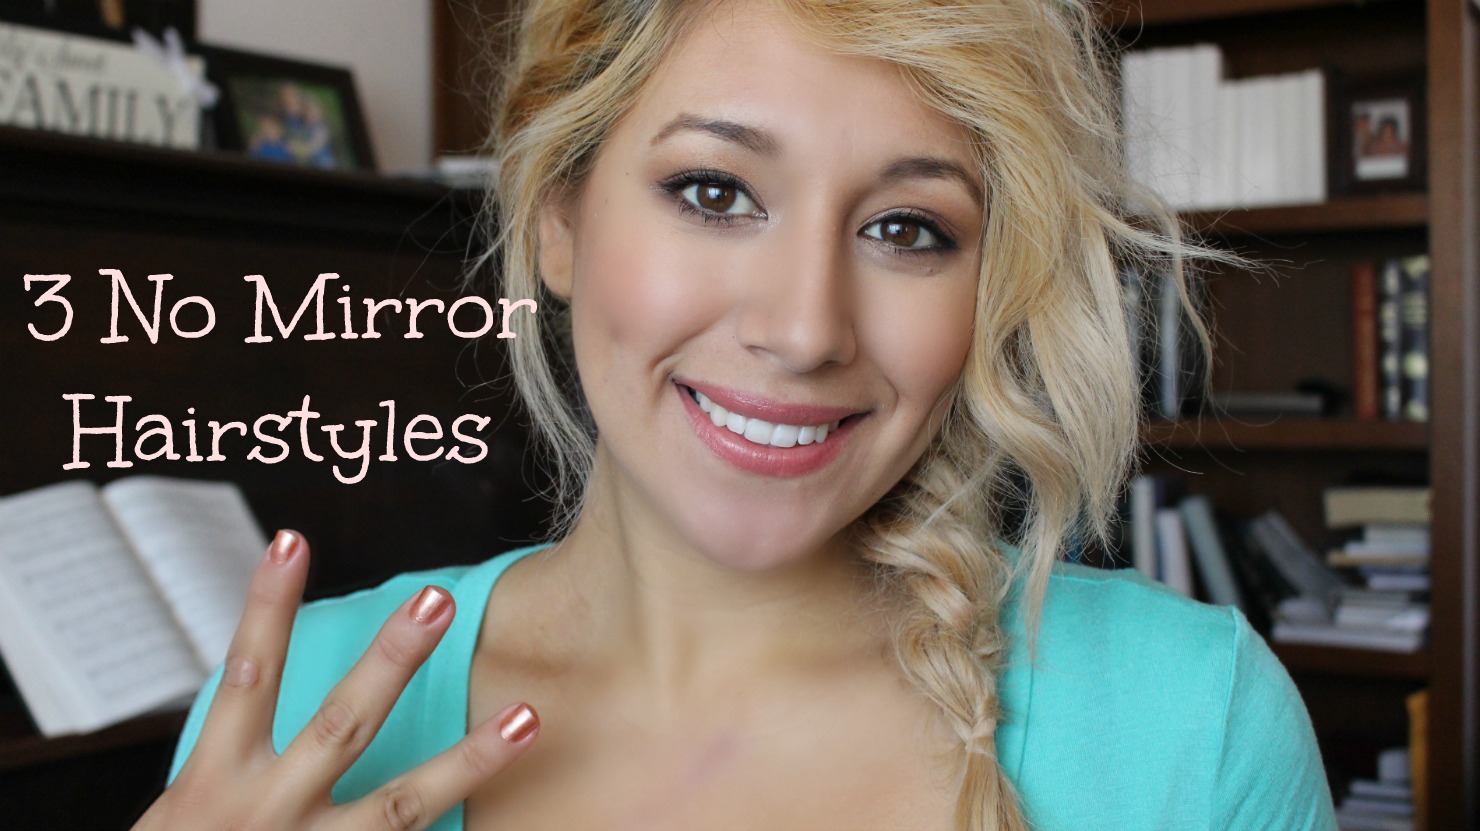
So this time I decided to come up with some hairstyles that will keep my hair out of my face, that will be stay all day, and that I dont need a mirror to do! So here are the three no mirror hairstyles I came up with I hope you enjoy them!
So I know that when you go camping your not suppose to care how you look. But if you can look cute while doing something fun why not?! Specially when everyone wants to document every second of their lives with pictures!( like I do!)
I have some tips to help make your hair ready for a no mirror hairstyle.
#1. make sure there is some sort of texture or curl to your hair from before. I love doing these hairstyles on 2 day old curled hair! This way no matter which crazy way your hair decides to go it looks like its meant to do that!
#2. Use dry shampoo on your roots. This will soak up any access oil & stiffen your hair so it doesnt move much from how it originally looks which is awesome to keep it in place looking cute.
So all you need for these hairstyles is a hair band or elastic..
If you have layers braid the right side of the hair that has the layers.
Sweep your hair all to the opposite side
Incorprate the braid you made on your right side into two strands for your fish tail braid. ( I use a fish tail braid because it is sturdier than a regular braid)
Braid your hair
use a clear elastic or hair band
Use the Braid you already have , or make a side braid
Twist the hair , making a bun.
tuck the ends in
secure it with a hair band
pull out any bangs or any hair you would like to have out.
Take out any bangs or hair you would like to leave out.
pull your hair back into a high ponytail.
make a hole above the hair band and twist your hair backwards into the hole.
take out most of the hair forming a bun.
Your done!
I hope these were easy to follow .. Check the video to see these all done!
Thank you guys so much for your support!
Remember Beauty comes from within so let yours shine!
So I am super excited, just like all of you, for the Divergent movie! When I heard that Sephora released a LIMITED EDITION Divergent Makeup Kit I was too excited and I purchased it right away. I have had it for a little over a week now and I am ready to tell you what I think, Show you swatches & Show you how to do this Dauntless Smokey eye look I created. So if you want to get it for yourself then just click here. (If it is out of stock then check your local sephora near you , or wait for it to come in stock again!)
* I was not paid or asked to do this, I just am really excited and want all of you Divergent Fans to know about this!
If you want to see swatches, my thoughts & How to do a smokey eye using this kit then click below.
So this kit cost me $59.50 , It comes with three eye palettes, a face palette, four lip glosses and a double ended brush.
It even Comes with little cards that help you create a Dauntless, Erudite, or Abnegation Day & Night look. First off the Packaging is great it is a strong card board material that doesn’t give at all! Not only that but I know that us girls want cute packaging on our stuff and this has it! So lets see what all this stuff looks like..
The Cheek Palette is called the Divergent Cheek Palette. It comes with a blowy coral blush, a matte rose blush , a champagne highlight & a matte warm bronzer. All these are so creamy and pigmented. They feel nice and I was really impressed with how nice they wear on the face as well. I love that It has a matte and a Glowy/shimmer blush.
The Three eye palettes are the Abnegation palette,Erudite palette, and Dauntless palette. All these shadows except for the transformer shades are really pigmented they feel silky soft and the color pay off is amazing. I find myself being super gentle when I dip my brush in and when I apply it . These feel to me like Urban decay quality shadows, they are worth every bit of the money I spent on this kit. If you have a chance to go to sephora and swatch them , they are seriously really good quality. The transformer shades are the first eyeshadow shades in each palette. With exception to the Dauntless palette transformer shade, they are not pigmented. They are used to add shimmer but no color. If you use them wet though they do add a great highlight to your look and it picks up a lot better. ( They are made to be used wet)
Last are the four lip glosses and double ended brush.
The brush is really soft and I feel like it does a great job blending . It feels like a higher end blush so I was pleased with it. The only thing is that because it is double ended I have to store it horizontal if you don’t like to do that then you won’t like this brush.
The glosses are sheer with a subtle tint of color , as you can see on my arm. They feel really soft and silk , not stick or tacky. I personally don’t like sticky gloss and I was really happy to see that these are not that way. These smell minty but they don’t tingle, so they are not plumping or anything like that. The shade from top to bottom are: Fear not, Natural Virtue, Supreme Ritual , and Temptations Choice.
So this is the look I came up with , this is actually what I picture a Dauntless woman to look like when I read the book. It is a very smokey eye with some mahogany color in it as well. This is super easy to recreate !
add a black base close to the lashes and blend onto the lid.
Apply Radiant Initiation (Erudite Palette) into the crease as a transition shade and blend really well.
Put Serene Vanilla (Dauntless Palette) underneath the brow for a matte highlight.
Apply Burnt Mahogany (Erudite palette) All over the lid and up towards the crease but not passed it. blend with some of the Radiant initiation shade and a blending brush. Also blend it in the lower lashes.
apply Dauntless Ink (Dauntless palette) Very close to the lash line and smoke it out so that it looks like there is an easy transition from the mahogany to the black.
Apply Choose wet in the inner corner of the tear duct for a glowing effect.
Apply a liquid eyeliner to the upper lashes , with a subtle wing.
Apply a black pencil in-between upper lashes and tight line.
apply a skin tone liner on the waterline.
Apply mascara and you are good to go.
For the Face I applied the bronzer as a contour shade , I used the highlighter on my cheek bones for a highlight , and I used Misty rose on the apples of my cheeks.
For my hair I curled my hair with a 1 ½ inch curling wand then I teased the root of my crown area. Next I made three twists and I pinned them with bobby pins. Super easy hairstyle again a perfect Dauntless hair look. Its easy to do but yet it looks fierce.
Thanks you guys for taking the time to support me and to check out all my posts and videos! I hope you guys enjoyed this and let me know if you have seen the movie yet and what you think!?
Till Next time,
Remember, Beauty Comes From Within so let yours SHINE!
<3 Love, Bondbeautyful
Happy Valentines Day, Because tomorrow is the Day of Love I wanted to show you two choices for valentines day. One is more casual and the other is fancier for a nice dinner. If you want to see me show you how to do this then click on the video below.
Casual:
1. You can curl your hair or have it straight. (I curled it the night before & this is what it looked like today! I wanted it to look messy & real slummy).
2.Braid your bangs into a rope braid & pin it underneath some hair to hide the bobbypin.
3. Make A Half pony tail & with your thumb create a hole. Then flip the pony tail in the hole 2 times to create a twist.
4.divide the pony tail into two parts & braid each part.
5. Flip them over & above the twist & pin them in a heart shape!
Thats a super easy casual hairstyle perfect for the day of LOVE.
Fancy:
1. Seperate your bangs & face framing bits of hair . Then pin it out of the way.
2. Take out 1 inch strand of hair behind your ear & braid it.
3. Pull your hair to one side & twist it in the back .
4. tie your ponytail & braid a strand of hair, wrapping it around the base of the pony tail.
5. put the braid behind your hair in between a bobbypin & sew it through the twist you made.
6. Last use a 1 1/2 inch curling iron & curl your bangs, & ponytail.
* Dont forget to use hairspray to insure that your hairstyle lasts all day!
I hope you guys have a good valentines & if you need help finding a makeup look that is perfect for tommorow check out my makeup tutorials for valentines day!
So whats your favorite curling iron?
Mine is the Cortex 4 in 1 curling wand!
Remember, Beauty comes From within so Let it SHINE!
Happy Monday, Valentines Day is right around the corner so I paired up with a fellow beauty guru on youtube and we decided to give you two great Valentines Day Makeup Options. I am showing you how to do a soft smokey eye and nude lip. She is doing more of a flirty pink Valentines Day Look. If you want to check out her video you sure can, here is her channel link
Lets talk makeup, this Eye look was super easy. I wanted to do a smokey eye, but I wanted to make sure that it was wearable. You can wear this look in the day time because it is so soft, or night time. I decided to go with a nude pink lip & a shiny gloss so that the eyes would appear softer..
First , I applied the Highlight shade Virgin underneath the brow lightly.
Then I used the duo end pencil (brown side) and I applied it to the crease and made a V in the outer edge of the lid.
Next I blended it out with a crease brush
Then I applied Sin all over the Lid
Next I applied Buck everywhere that I used the Brown Pencil with a crease brush , I also applied it to the outer half of the lower lid
Then I went in with creep and only applied it to the deepest part of my crease. Use a very light hand, this makes the crease look deeper & your eyes look more defined.
Then with naked I blended with a blending brush softly you just want to smoke it out.
Next I used the Jordana 12 hr eye pencil on the upper lash line & smoked it out with a smudge brush.
Last I lined my water line & tight line with a black pencil . Don’t forget to curl your lashes and apply mascara. Your all finished.
Now Lets talk Hair!
I Curled My hair with a 1 ½ inch Curling wand . I curled away from my face & I used 1 inch sections. * Make sure to spray your curls with hairspray after each curl is curled individually.
Then I let it completely cool down. * Don’t skip this important step or else your curls will not last all night.
Then I hairspray my entire head again.
Next I Used silk serum & applied it to my ends to add shine. I also ran my fingers through my hair softly to open up the curl a lot more.
Tease the Hair to add volume.
I took a 1 inch section on my right side and twisted it. I then pinned it to the back.
Now on the left side, where my bangs are combed to I am going to do two twists & pin them.
I do not like flat hair so I tugged on the crown a little to make it more voluminous. You can hairspray it again if you like but its all finished.
Simple Hair & Makeup for valentines day!
I hope you guys are as excited about the day of love, as I am!
What are you going to do for Valentines Day?
If you try this look or hair out make sure you tag me on instagram , twitter or Facebook! I would love to see!
Thanks you guys for all your support & have a fun and safe Valentines Day!
Remember, Beauty Comes From within So let it Shine!
So today I thought I Would do another makeup tutorial, This one is inspired by Frozen a popular Disney movie. Elsa is the Frozen Queen , so why not recreate her makeup. Valentines day is just around the corner so here is a beautiful option for you gals. Yes I did a video tutorial for you to see, so take a look.
Products I Used:
Covergirl Outlast Stay Fabulous Foundation
Starlooks Obsidien Kohl Pencil
Elf Pressed Powder Eyeshadow: Miss Popular
Elf Blush : Berry Merry
Flamed Out mascara & Its So Big Mascara
Elf Lip Exfoliator
Elf HD Lifting Concealer
Elf Long Lasting Lustrous Eyeshadow: Soiree
Be a Bombshell : Shameless
Ultra Brow Powder Maybelline: Light Brown
Rimmel Stay Matte
Elf Mineral Infused Face Primer
Elf Little Black Book : warm Edition
Profusion Neo Perle Palette (Purple edition)
Eyes:
Apply a Cream Eyeshadow (Cranberry shade) , Blend with your finger
Apply a light matte shade underneath the brow
Apply a Cranberry Shimmery Shade on the lid , using patting motions
Apply a Taupe shade into the crease &Lower Lash Line
Blend it out with a light pink shade
Liner your upper lash line, bottom Lash Line, Waterline & Tight Line with a black pencil (Pencil liner is softer)
Apply Mascara
Fill in your eyebrows with a Brow Powder (This makes the eyebrows look soft)
Face & Lips:
Apply a Silicone based Primer to fill in your fine lines & Pores. This gives your the flawless “look”.
Apply a long lasting full coverage foundation
Apply a brightening concealer in a inverted triangle shape underneath the eyes. Blend with your foundation brush
Apply A powder over top of the concealer & along the Tzone if your oily
Apply a Cranberry “frost bite” Type of blush, you can also add some on your nose to make you look like you just came in from a cold night.
Apply a Shimmer light pink highlight to the top of you cheek bones to give you the Frosty Elsa look.
Last, Apply a Cranberry Semi Matte Lipstick, All Done!!!
Hair:
Curl Your hair with a 1 ½ inch curling want, curl them outwards
run your hand through the curls once they have cooled , & spray with hairspray
Tease & Pin up your crown with bobby pins, to add volume
Gather your hair & start twisting the hair around the face all the way around to the desire side. (Leave hair out to frame your face)
Now start braiding your side bride.
Last to add volume tug on the braid to make it look thicker & messier. Wala your all done with the Elsa Hair!
Music: “Let It Go” : Jun Sung Ahn, Www.Juncurryahn.com
https://www.youtube.com/user/JuNCurryAhn
I hope you guys enjoyed my video tutorial, Make sure you take a look at all my social networks! So what are you planning for valentines day?
Im currently planning to go to dinner at The Chocolate Factory! Yum ..
Till Next Time ,
Remember, Beauty Comes From Within So let it SHINE!


 So I will be showing you how I straighten and Curl my hair in the video below. I honestly do think that this flat iron is amazing and worth a try. I recommend it 100%!