Hello my bondbeautys,
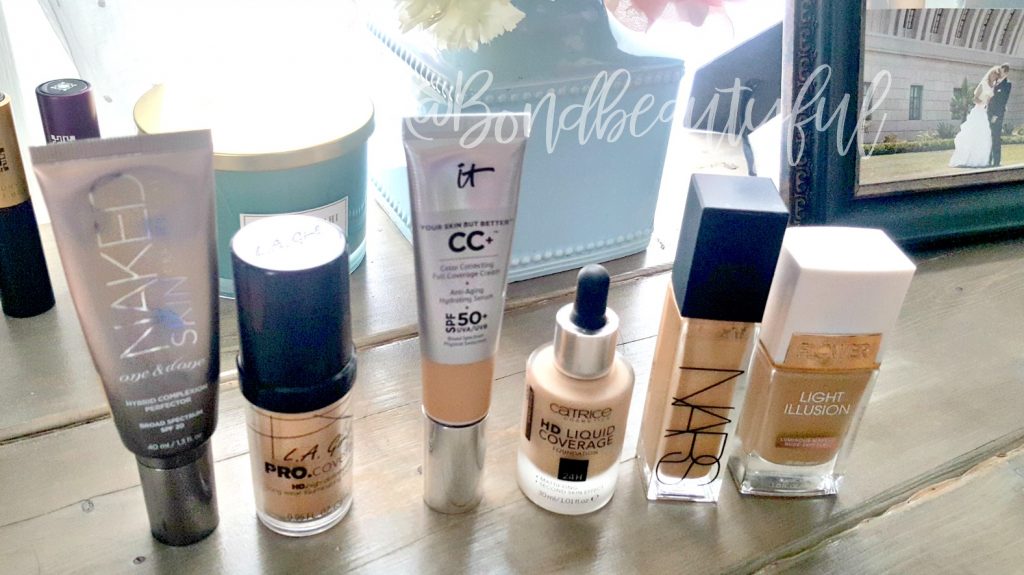
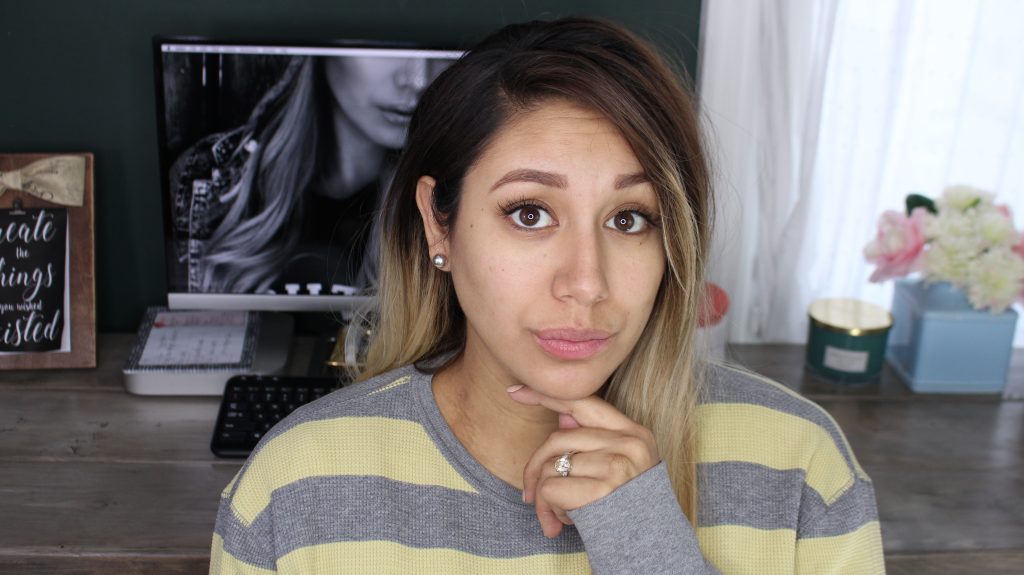
Its so good to be back writing on the blog. Todays post is a very special one, because I’m going to go through and share my foundation week foundation finds. So if you don’t know what foundation week is, I’ll tell you. For seven days I try a new foundation and make a 1st impression video sharing (in detail) how it wore and my thoughts. So I thought I would pair that series up with my blog so I can show you more pictures and tell you my thoughts after I have worn the foundations for weeks now.
($36.00) So lets start with Day 1 of Foundation week, We are talking about the Urban Decay One & Done Foundation. I wear the shade Medium and I find it is a great match for me (I’m a Mac NC35). Their shade range is not good at all, but since its marketed as a light coverage the thought is that lots of different shades will still be able to pull it off even if the shade is slightly off. They only have 6 shades in total.
*At the very bottom of the post I will include foundation shade matches for me so that if you are trying to compare, you can.
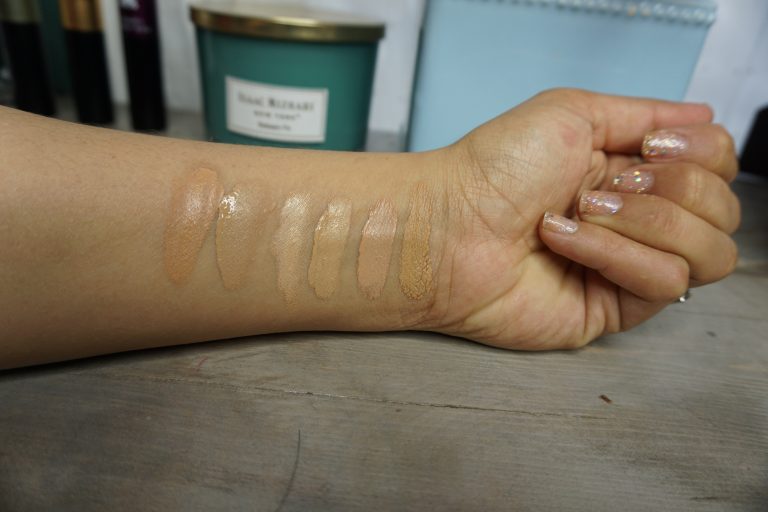
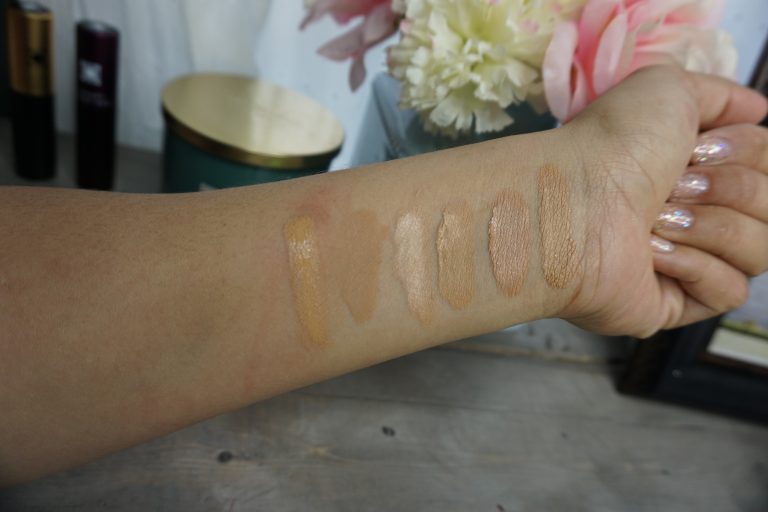
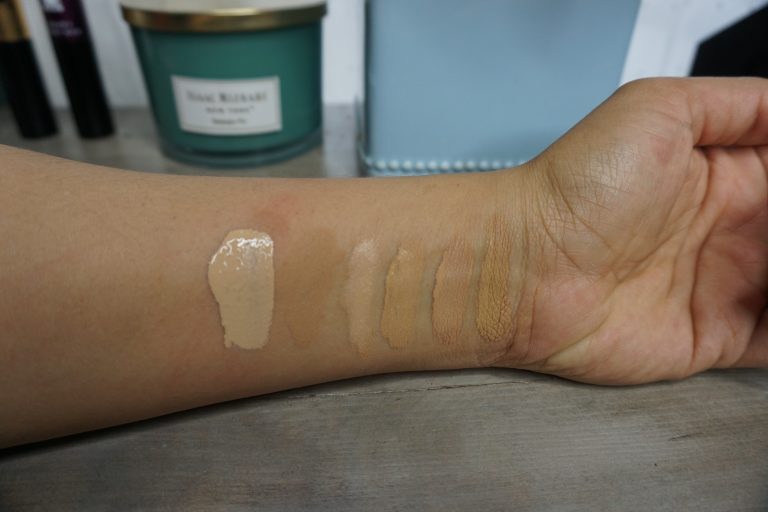
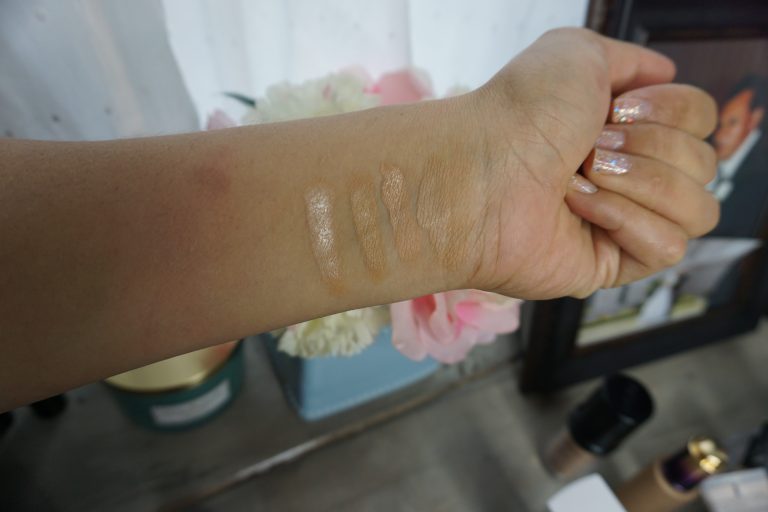
I love this foundation because it has light to light/med coverage. Its so easy to blend and looks amazing with either both a sponge or a brush. So no matter what your preferred method to apply is, it will look amazing. I love this foundation for everyday bases, or light foundation days. It gives a natural finish and looks great on my dry skin all day long. I was really impressed how a light coverage foundation could last on my skin all day, but apparently with this foundation it can. Below are some swatches of this foundation swatched next to some of my other foundation matches.
(L-> R) Urban Decay One & Done Medium, Fit Me Matte 220, Dermacol 218,Wet N Wild photo focus Golden Beige, Covergirl Healthy Elixir Nude Beige, NARS Natural Radiant M3.5
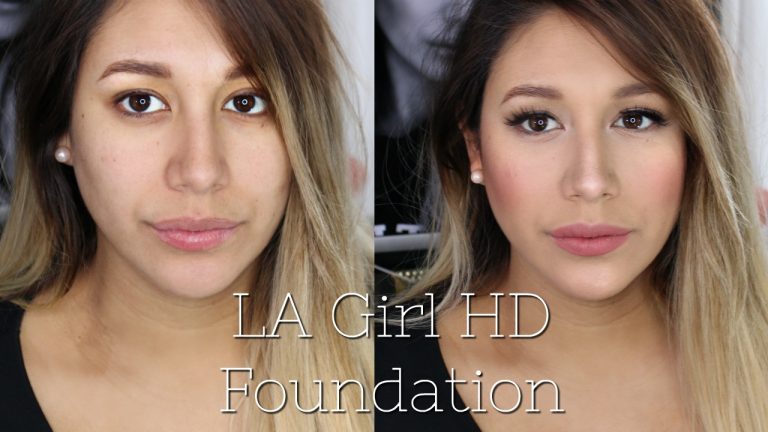
Day 2- L.A. Girl Pro Coverage HD Foundation.
This Foundation is seriously such a beautiful buildable full coverage foundation. It has a shade range of 16 shades, which includes a white shade. It retails for $8.99. For being a drugstore foundation this is actually really nice selection. I wear the shade Nude Beige. This foundation has a very natural luminous finish to it, and I personally find it to be patchy with a sponge. I would definitely say go with a brush with this foundation. I personally love a luminous primer underneath so the Becca Priming Filter, or the Physicians Formula Spotlight Primer are good ones.
*All Links are affiliate links
(L-> R) L.A. Girl HD Foundation Nude Beige, Fit Me Matte 220, Dermacol 218,Wet N Wild photo focus Golden Beige, Covergirl Healthy Elixir Nude Beige, NARS Natural Radiant M3.5
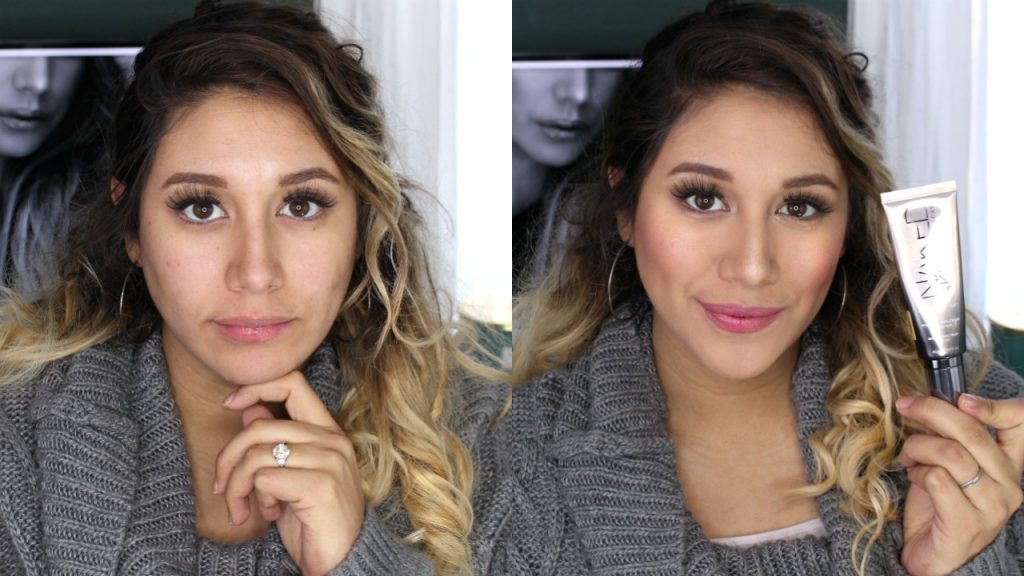
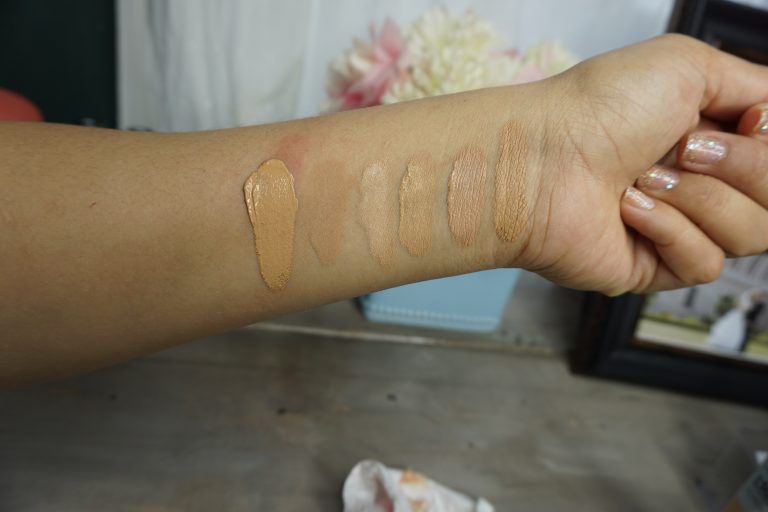
Day 3 It Cosmetics CC Cream Medium Tan. This is more like a medium coverage foundation, that can build up to full coverage. (depending on what you consider to be full coverage) Again like the Urban Decay One & Done this one doesn’t have a good shade selection; it has 7 shades. It retails for $38.00 and has 1.08 fl oz. I really do love this one, again its perfect for everyday, for teens, or moms basically anyone! Its a beautiful natural luminous finish that wears all day. Great on dry skin but also can be set with a good powder for those with oily skin.
(L-> R) IT Cosmetics CC Cream Med Tan, Fit Me Matte 220, Dermacol 218,Wet N Wild photo focus Golden Beige, Covergirl Healthy Elixir Nude Beige, NARS Natural Radiant M3.5
Day 4, is Catrice HD Liquid Coverage Foundation 030 Sand Beige. This is by far the most disappointing foundation, but yet the best foundation all in one. It has full coverage, a very natural matte finish, and it last all day long. But, it only has 3 shades, 3! What?! That is just so crazy, I went with the shade 030 because it had the right undertone. I definitely needed to darken it with a mixer, so I used the Catrice Prime Fine Makeup Transformation Drops Darkening. I really wish they would come out with more shades because it seriously looks like skin. I didn’t need to set it because it set on its own and wouldn’t transfer. This is a good matte foundation to try if you have dry skin. For now this is a great mixing foundation, plus whenever you set it with a spray woah looks beautiful!
(L-> R)Catrice HD Liquid Coverage 030 Sand Beige, Fit Me Matte 220, Dermacol 218,Wet N Wild photo focus Golden Beige, Covergirl Healthy Elixir Nude Beige, NARS Natural Radiant M3.5
Day 5, Nars Natural Radian Longwear Foundation M3.5 Vanuatu $49.00. So far this one is the most expensive, but also the one with the biggest shade selection with 33 different shades. Honestly this one is so gorgeous on the skin. I would definitely repurchase this one. Just because I was able to find a very accurate shade and it looks flawless on the skin. It also wore amazing and its the foundation that I got the most compliments on. Every time I wear this foundation my skin looks so healthy and truly radiant.
(L-> R) Urban Decay One & Done Medium, Fit Me Matte 220, Dermacol 218,Wet N Wild photo focus Golden Beige, Covergirl Healthy Elixir Nude Beige, NARS Natural Radiant M3.5
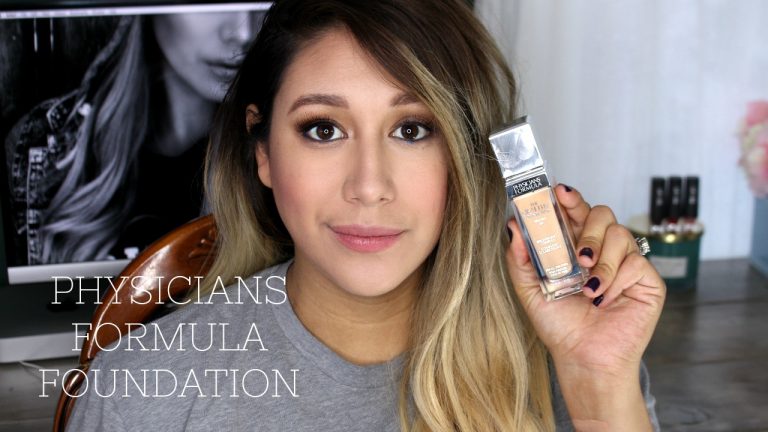
Day 6, Physicians Formula The healthy foundation M3 $12.99. Comes in 12 shades. The shade I tried in the video did not match me M3 is definitely my match, if you are wondering. I honestly didn’t like how this foundation looked on my skin. It looked a tiny bit powdery and you could tell I was wearing makeup. If you have dry skin using a hydrating primer & a setting spray would help. I think this one is all about preference. Plus on my skin it didn’t last very long. I do not have swatches for this one but M3 is my match for sure.
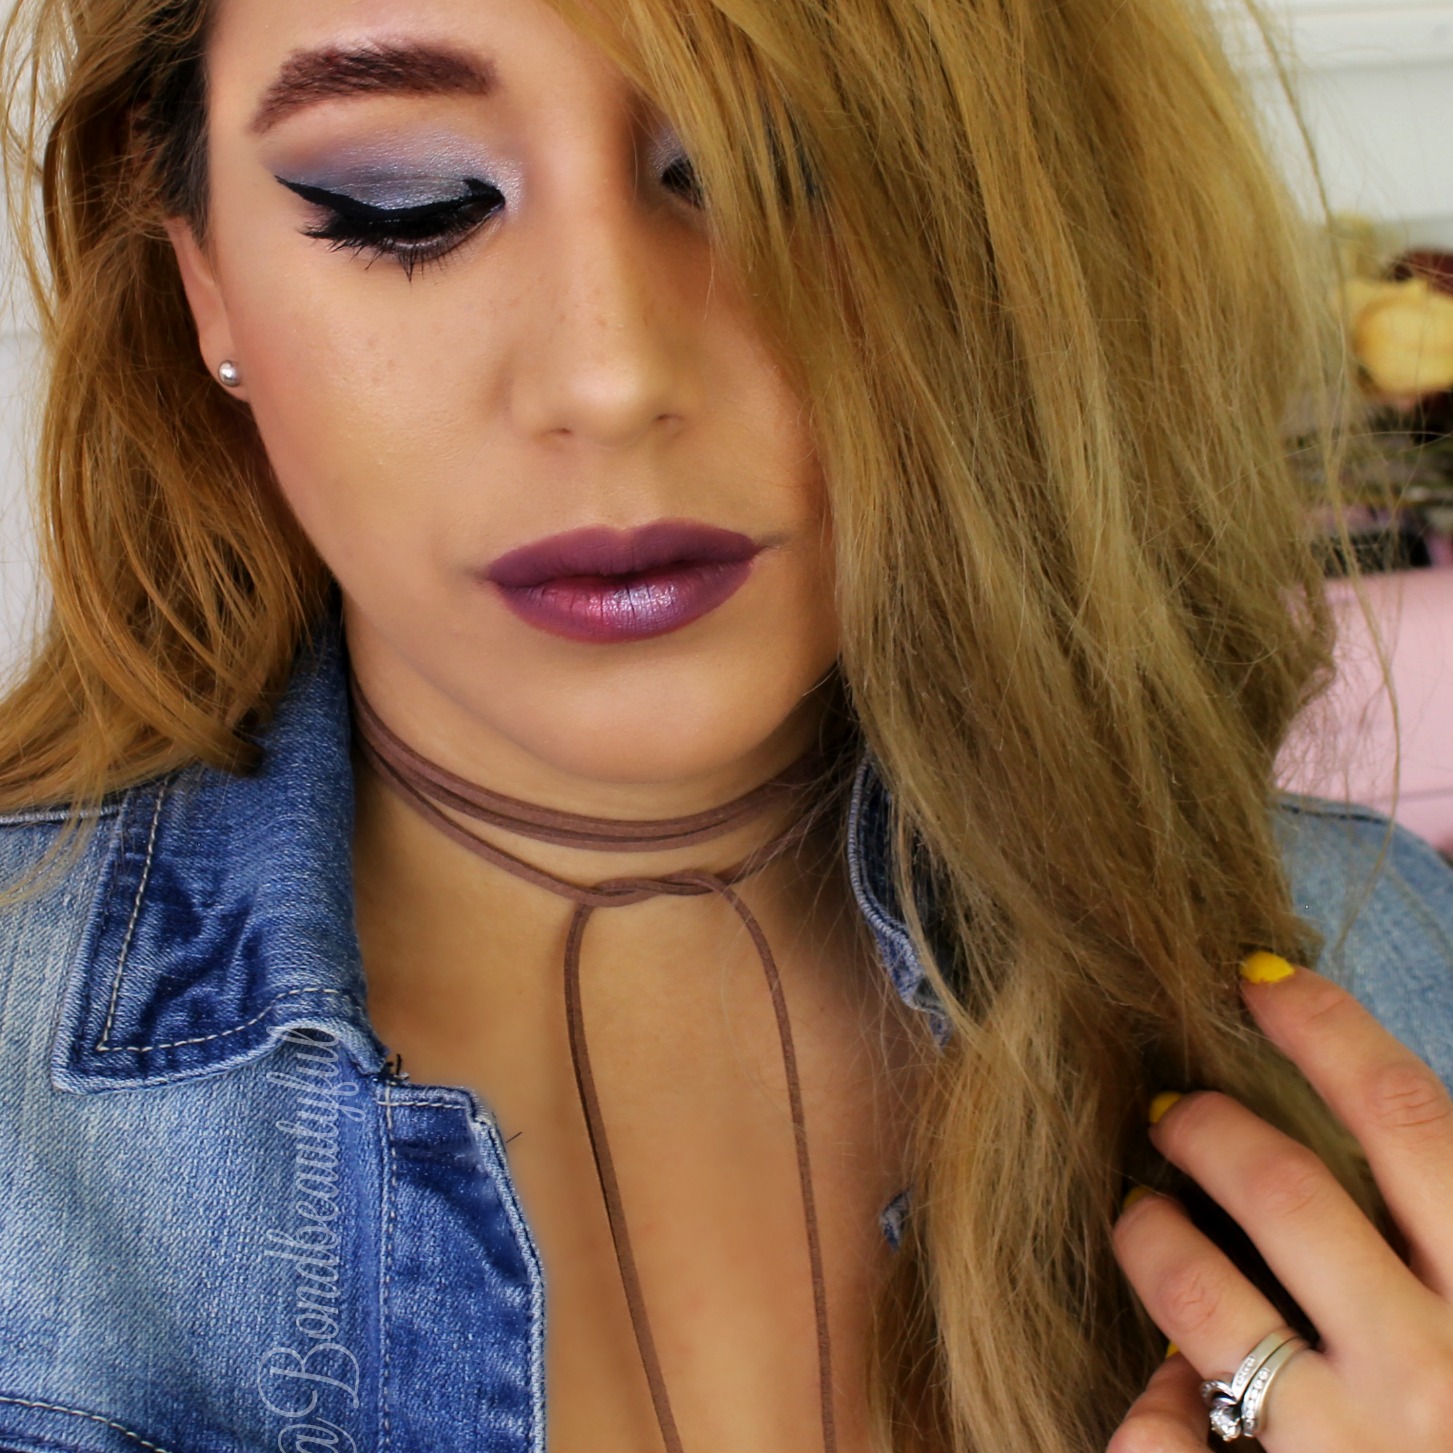
Day 7, Flower Beauty Light Illusion Foundation M3 Classic Tan ($13.99). This foundation comes in 12 colors. Let me tell you by far this is my favorite foundation for two reasons: First, this is such an affordable foundation. Second, this is literally the best color match I have ever found for my skin. Not only that but this foundation looks beautiful, not just beautiful, stunning in natural light (Outside or inside), Studio Lights and in Flash! I just am so amazed with this foundation. It has a radiant dewy finish, but not to dewy in the oily way. I set this lightly and it remains look beautiful ALL DAY LONG! For a drugstore foundation, the lasting power of this one has just absolutely amazed me. In other words GO GET THIS FOUNDATION RIGHT NOW!
(L-> R) Flower Beauty M3, It Cosmetics CC Cream Medium Tan, Tarte Rainforest of the Sea Medium Sand, Maybelline Fit Me 210
Foundation Matches for Me:
• MAC NC35 • Lancome Teint Idole Ultra Longwear Cushion 280 Bisque W • Loreal Infallible Pro Matte Foundation 105 Natural Beige • It Cosmetics Bye Bye Foundation TAN • It Cosmetics CC Cream Medium Tan • Maybelline Fit Me Matte & Poreless 220 Natural Beige • Mally Ultimate Performance Professional Foundation Medium • Too Faced Born this Way Foundation: Natural Beige-Medium With Neutral Undertones • Estee Lauder Double Wear 3w1 Tawny • Urban Decay Naked Skin One & Done Medium • Mac Studio Fluid NC30 • Milani Conceal + Perfect foundation 04 or 03 • Clinique Superbalanced Silk Makeup: Silk Nutmeg • Too Faced Born this way undetectable medium to full coverage foundation Sand • Covergirl Outlast stay luminous Soft Honey 855 • Maybelline Super Stay Better Skin Natural Beige 50 • Fenty Beauty Pro Soft Matte Foundation 240 Medium Warm • Nars Sheer Glow Foundation Stromboli-Medium3 • Nars Natural Radiant Longwear foundation Vanuatu 3.5 M or MORE BARCELONA 4 • Make Up For Ever Ultra HD Cover Stick 118= Y325 Flesh • The Ordinary 2.0Y & 2.1Y • Urban Decay Naked Skin Weightless 5.0 • Flower Beauty BB Cream Mix BB2+BB3 • Anastasia Beverly Hills Stick Foundation Golden • Urban Decay All Nighter Foundation 5 • Make Up For Ever Ultra HD Foundation Y365-Desert • Becca Stick Foundation 10 Caramel -Medium (Yellow) • Catrice HD 030 (Add Darkener Drops but right undertone) • NYX Total Control Drop Foundation True Beige • Kevyn Aucoin Sensual Skin Foundation: SF06 • Giorgio Armani Beauty Luminious Silk 6.5 Medium,Warm-Medium to tan skin with warm undertones • Too Faced Peach Perfect Comfort Matte Foundation Warm Beige
I hope this post was helpful for all those wondering about this foundation. If you want to see more videos for me than check my social media links and subscribe!
*again all links are affiliate or links that I receive compensation if you use. Thank you for those that use my links.
It has been so long since I have posted and so much has happened that I want to share. I guess that for a later post though. Today lets get down to business with a VIBRATING Flat Iron. I know what your thinking, the products they come out with now a days are crazy! Well this one sounds funky ,but it is absolutely genius! It actually works guys, so Im bringing it to my blog and I am also doing a giveaway.
I have tried this first hand and I love it to straighten or curl my hair. (I will be showing you a tutorial at the end of how to do both)
This is the Asavea Vibe Vibrating Flat Iron Buy it Here.
*Not an affiliate Link
PROS:
Heats up in 60 sec
Vibration options which decreases the FRIZZ (I love this for when I straighten my hair)
Temp 325-450
Does not pull on my hair! AT ALL
Ceramic Flat Iron- Gives you consistent temperature
Swivel Cord So when Curling It doesn’t get tangled in your hair
Automatic shut off after 60 min
Fiberglass technology helps retain moisture to your hair
Affordable (is on sale right now for $49.99)
You can turn the vibration mode on or off
When vibration mode is on, it only vibrates when clamped shut!
CONS:
NONE seriously It works so well I cant think of
As I have been trying this for the past couple weeks I actually prefer the Vibrating mode to be on when Im straightening my hair. The reason why is because it completely eliminates frizz and smooths my hair to the point that It even looks like I put anti frizz product in it when I didn’t. Whenever I curl my hair I don’t use the vibrating mode.
So I will be showing you how I straighten and Curl my hair in the video below. I honestly do think that this flat iron is amazing and worth a try. I recommend it 100%!
I have another surprise for you first, I’m doing a giveaway! Asavea was so kind to host a giveaway , absolutely free, all you need to do to enter is click here .
Its open until Feb 11, 2018 I will be announcing the winner in the description box of my video below. I will also be emailing you personally so make sure to check your spam folders!!
So I hope you guys enjoy the tutorial and Good luck!
Its a bran new day and we are doing #foundationweek. Basically it is where I do A new foundation review/first impressions post every day or 7 days. I started this on my Youtube channel and really wanted to do some blog posts to go along. Plus I know you would really enjoy some good written details.
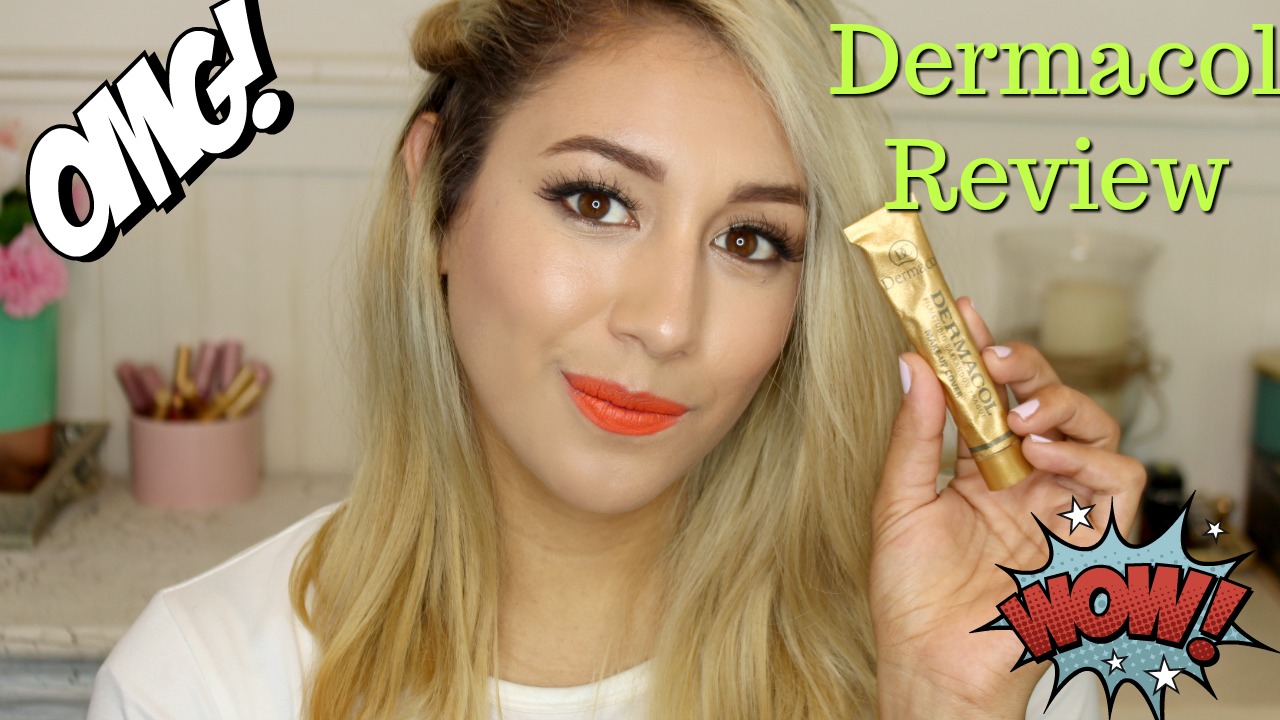
Today I wanted to share this FULL FULL COVERAGE FOUNDATION. The Dermacol Makeup Cover Foundation*. This is seriously the Worlds most full coverage foundation, I’m not exaggerating. My Perfect shade match is Dermacol 221, If you want to see what shades of foundations match me well then look in the description box of the Video below.
*I do receive compensation for clicking my link, if you do not want to click on my link then feel free to google Dermacol Foundation.
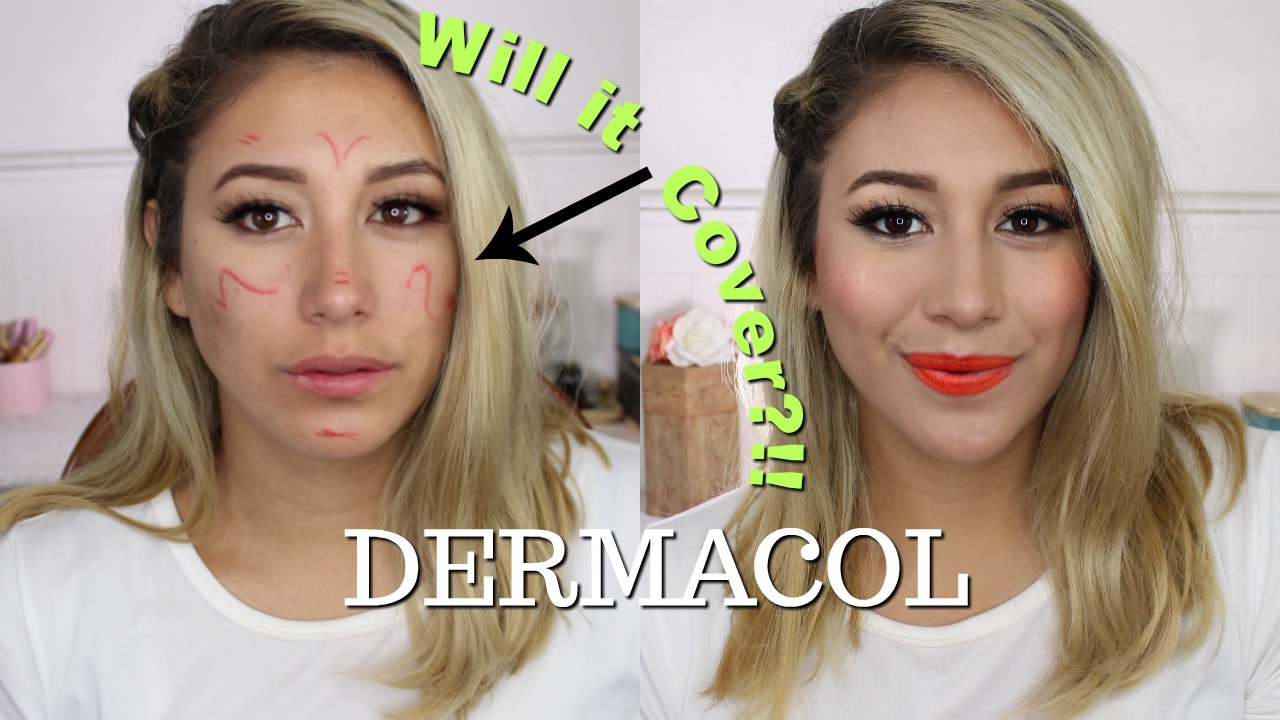
So why is this foundation the Worlds Most? It covers everything! To show you I went through and completely marked up my face with a red marker. Why Red? well its more realistic because often times acne & imperfections are red. I know its genius! This foundation smoothed over everything so easy, I still can’t believe it. The best part is that you only need a pea size amount for you entire face. Less is more with this one.
Lets talk Pros & Cons:
PROS
Use thin Layers & covers Everything
Long Wearing
smooths over imperfections and leaves a dewy/natural finish on the skin (Healthy Glow)
Applies Good with Brush Or Sponge (I personally love using a Brush)
Perfect for Pictures or an event
If you want to wear it for everyday you can mix it in with your moisturizer
DOES NOT OXIDIZE
affordable foundation
CONS
Feels A little Thick on the Skin
I think this is a good foundation for everyone to have. If you have dry skin or Oily skin I think you can wear this. If you have Oily skin make sure to powder with a mattifying powder or use a mattifying primer. Now this is why I think everyone should have this, even if you do not use this all the time. This is a great foundation to use to spot conceal spots around your face. So if you need more coverage on your forehead apply your regular foundation all over and only apply this on the area on your forehead you need more coverage. I give you guys my stamp of approval and the best part is how affordable it is. See it Here.
If you want to see how this foundation wears through out the day, I did do a full First impressions video where I take you with me along my day so you can see for yourself how it Wears.
So I hope you enjoyed my review I will be back tomorrow to share another blog post. If you want to see how well it covers see the video below!
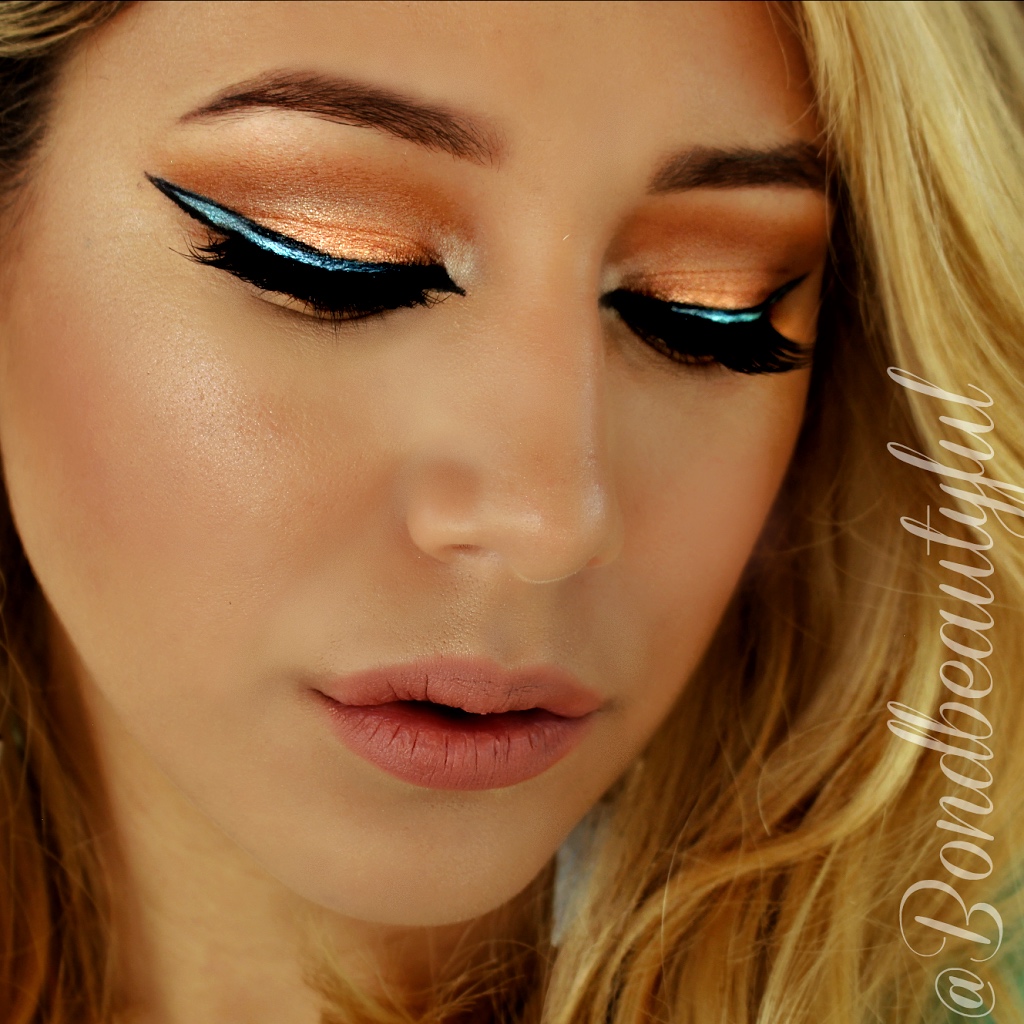
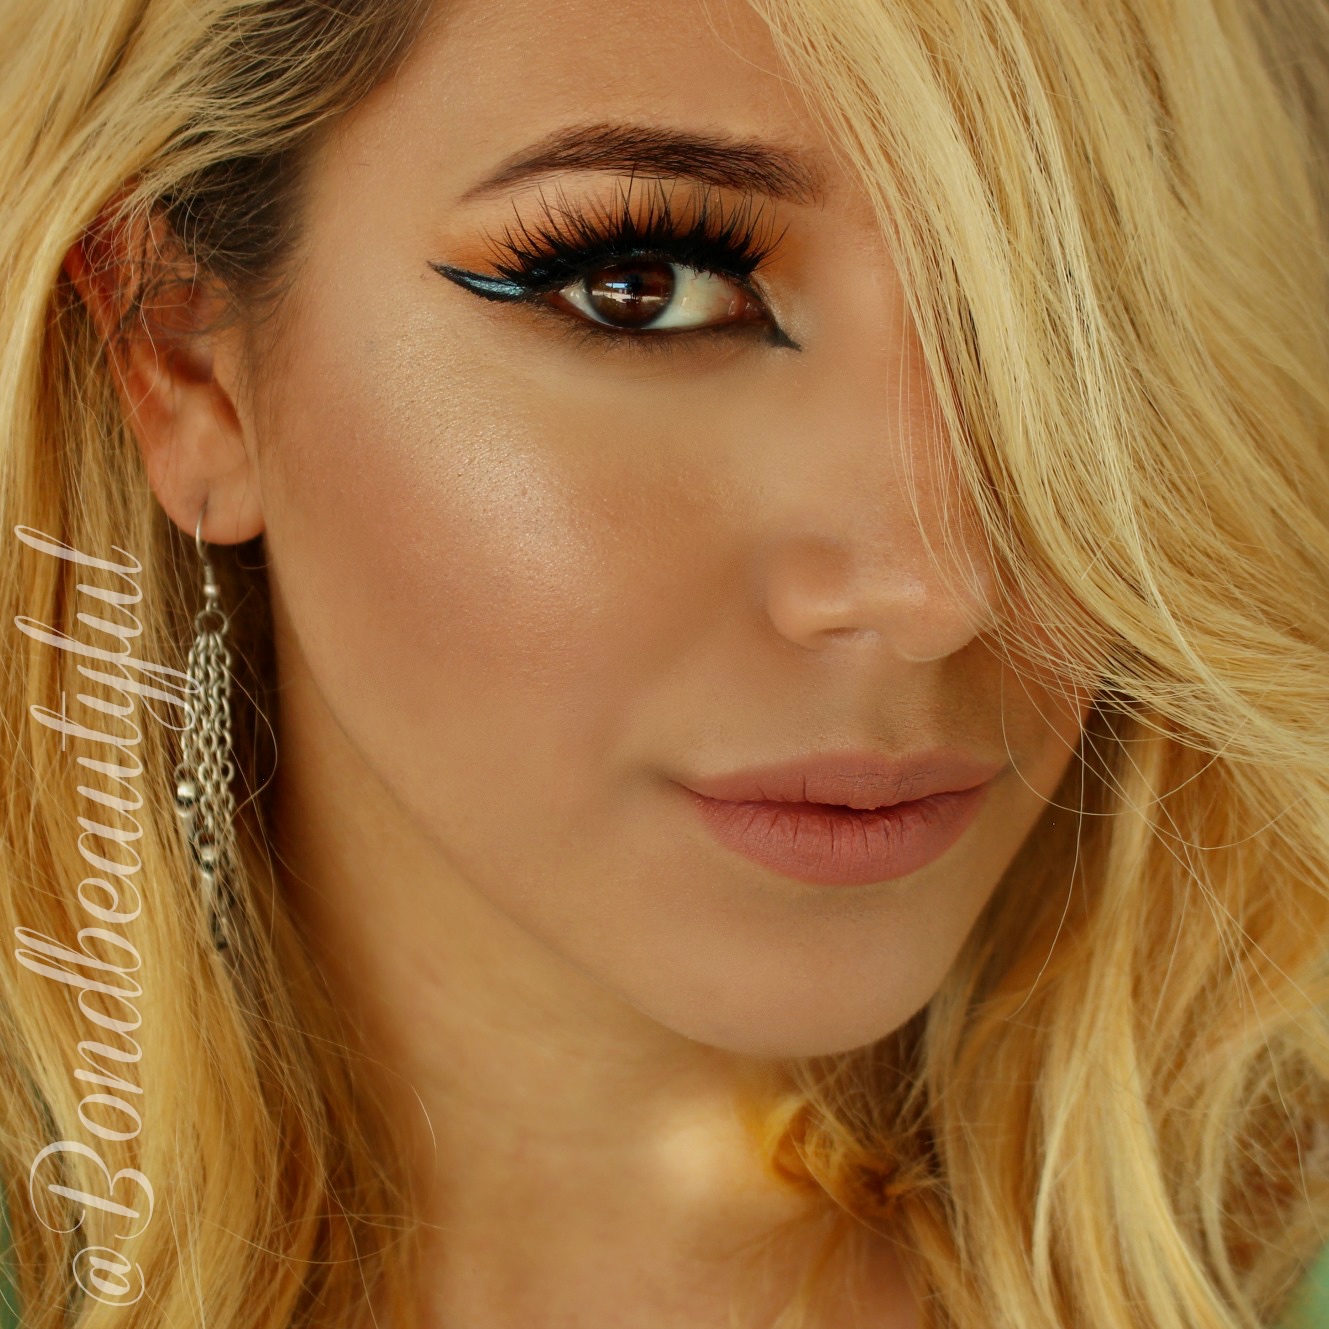
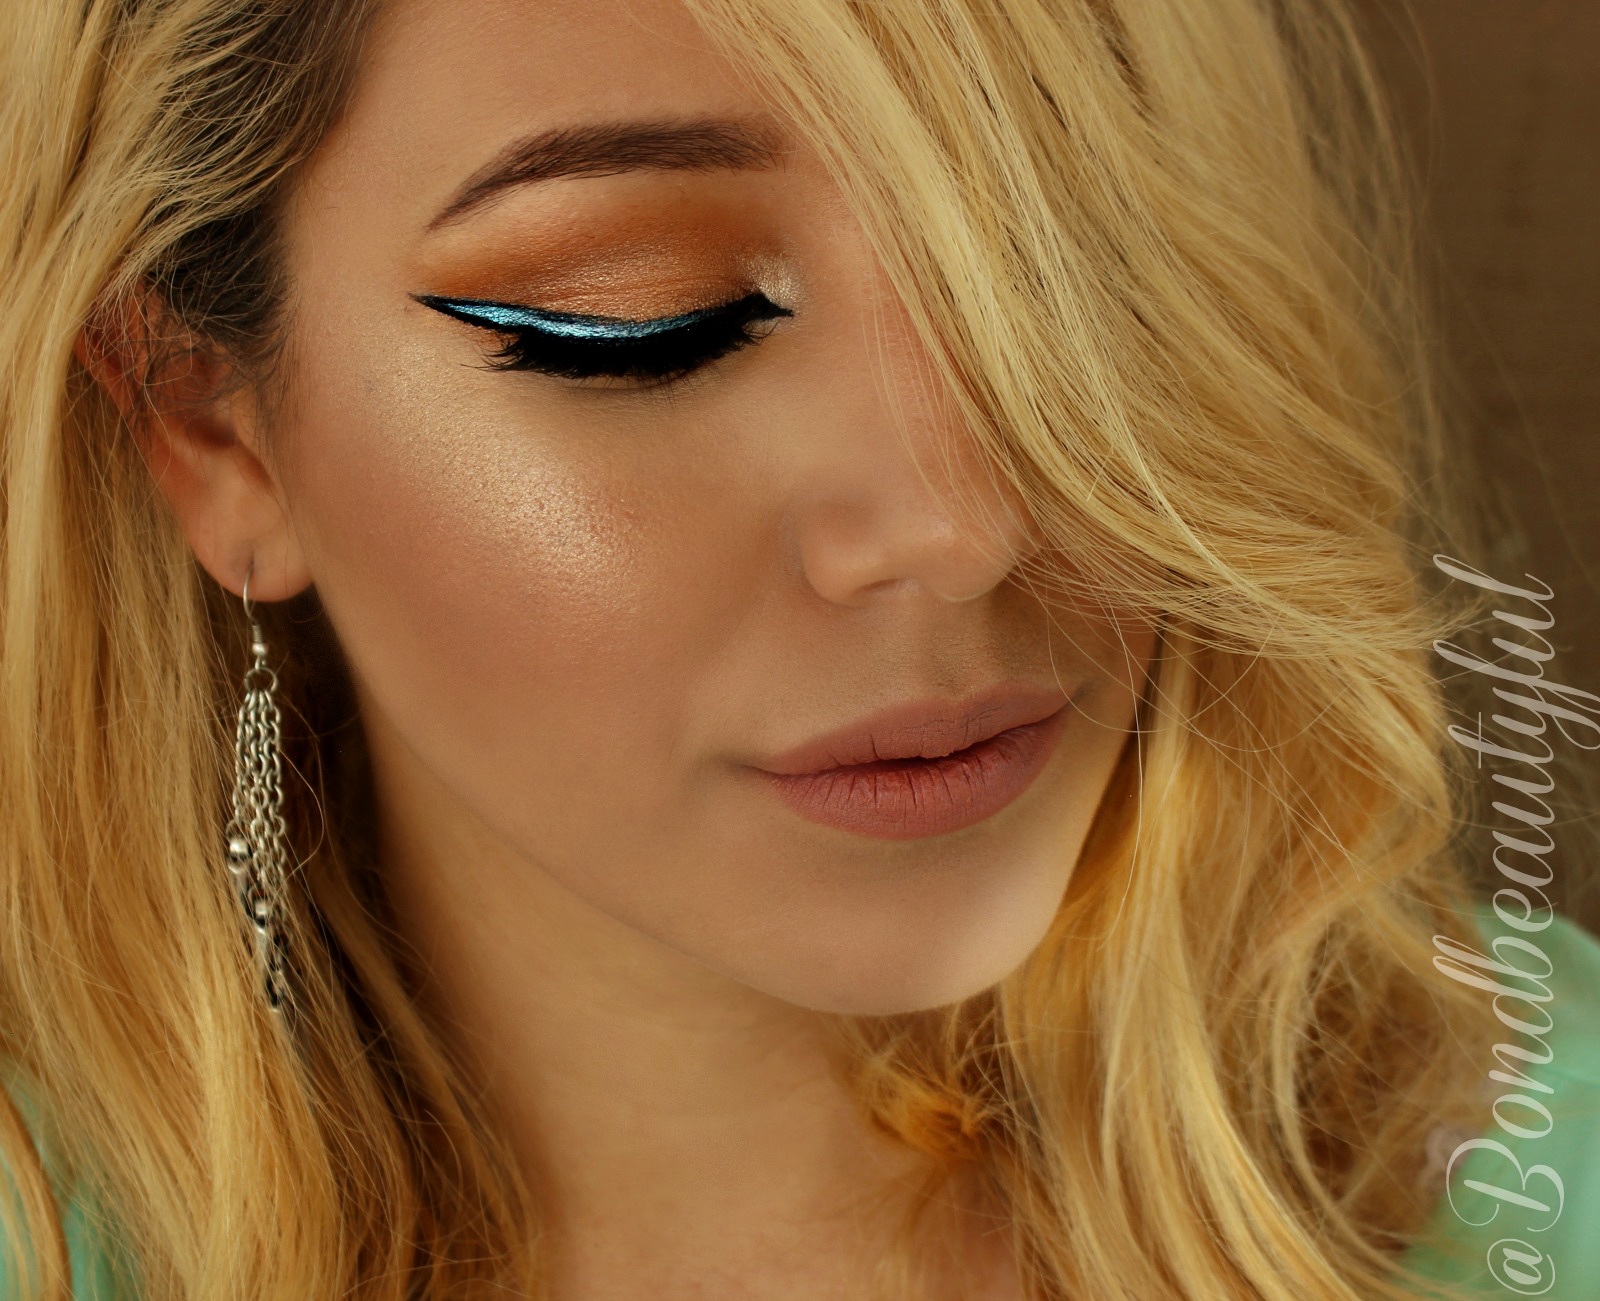
Another beautiful Friday and I’m ready to share this fun, trendy makeup look with you! Im going to cut down on chit chat and lets just get started. I have been obsessing over the Cartoon Eyeliner Trend that has been taking over Instagram. I wanted to recreate a summer bronzey look & combine it with Cartoon Liner. I love how it turned out and I know you will too. (Full Tutorial Below)
I started out with a Gold Bronzey Eyeshadow look and added a pop of color with the liner. Surprisingly Cartoon liner is really simple! I just made a super bold cat eye shape with Teal Gel Liner. Then I outlined it with a black eyeliner. It took time and patience but it was worth it. Take your time, its ok if its not perfect. In the tutorial below I show you how I to fix the lines if they arn’t as straight as you would like them to be.
Heres a list of the products I used for this makeup Look.
Too Faced Bronzer Wheel- Summer Love Bronzer & Pink Leopard
Ulta Cheek Color : Flushed
No7 Lift & luminate foundation
Morphe X Kathleen Lights Palette (Use any warm bronzey, gold shades you have!)
L’OREAL Infallible Gel Liner Black
Hua Mian LI Waterproof Liner 11: Wish APP ( Nyx Liners are good too!)
Milani Lipstick Matte Naked
Becca Skin Perfecter OPAL
WetnWild Contour Stick Where’s Walnut
NYX Micro Brow Pencil Ash Brown
Don’t forget to see the tutorial below
Also there is a GIVEAWAY GOING ON. Im giving away a Asavea Gold Titanium Curling Wand All you have to do is click Here to enter. Its free and it going on until July 1st.
So tell me whats your favorite Makeup Trend of the moment? COMMENT BELOW and lets get a fun conversation going!
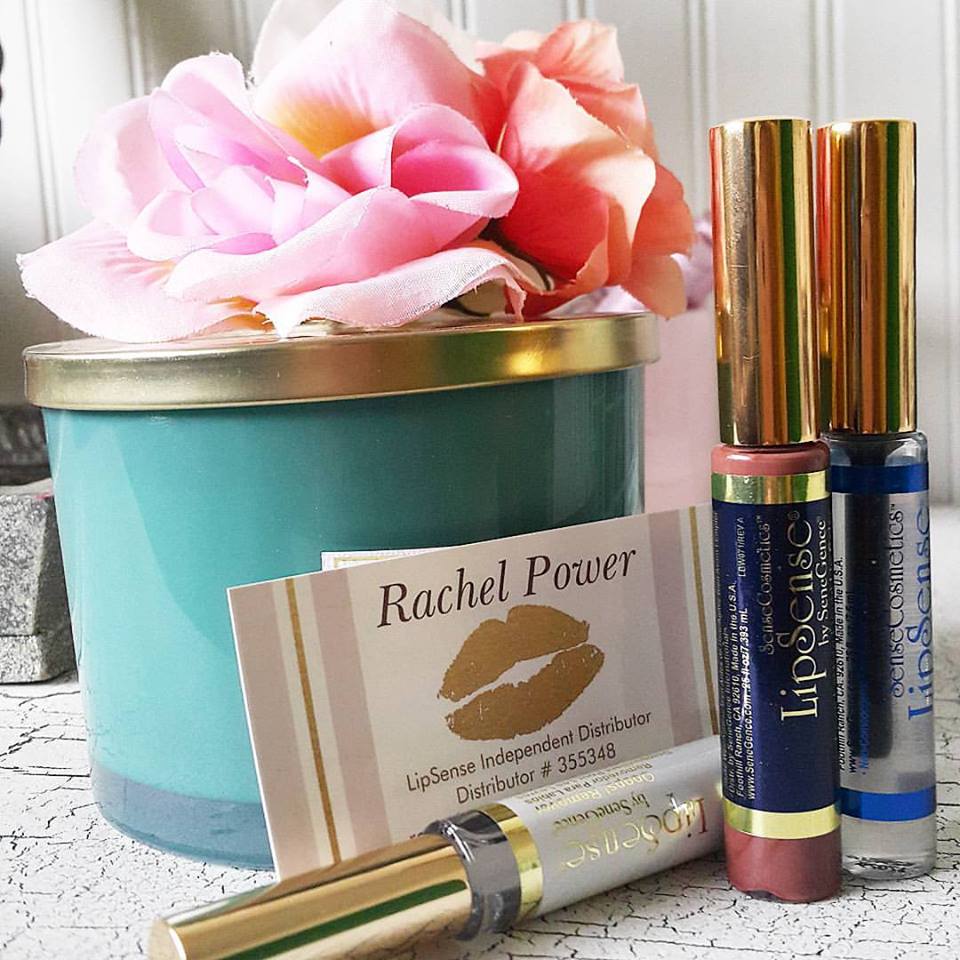
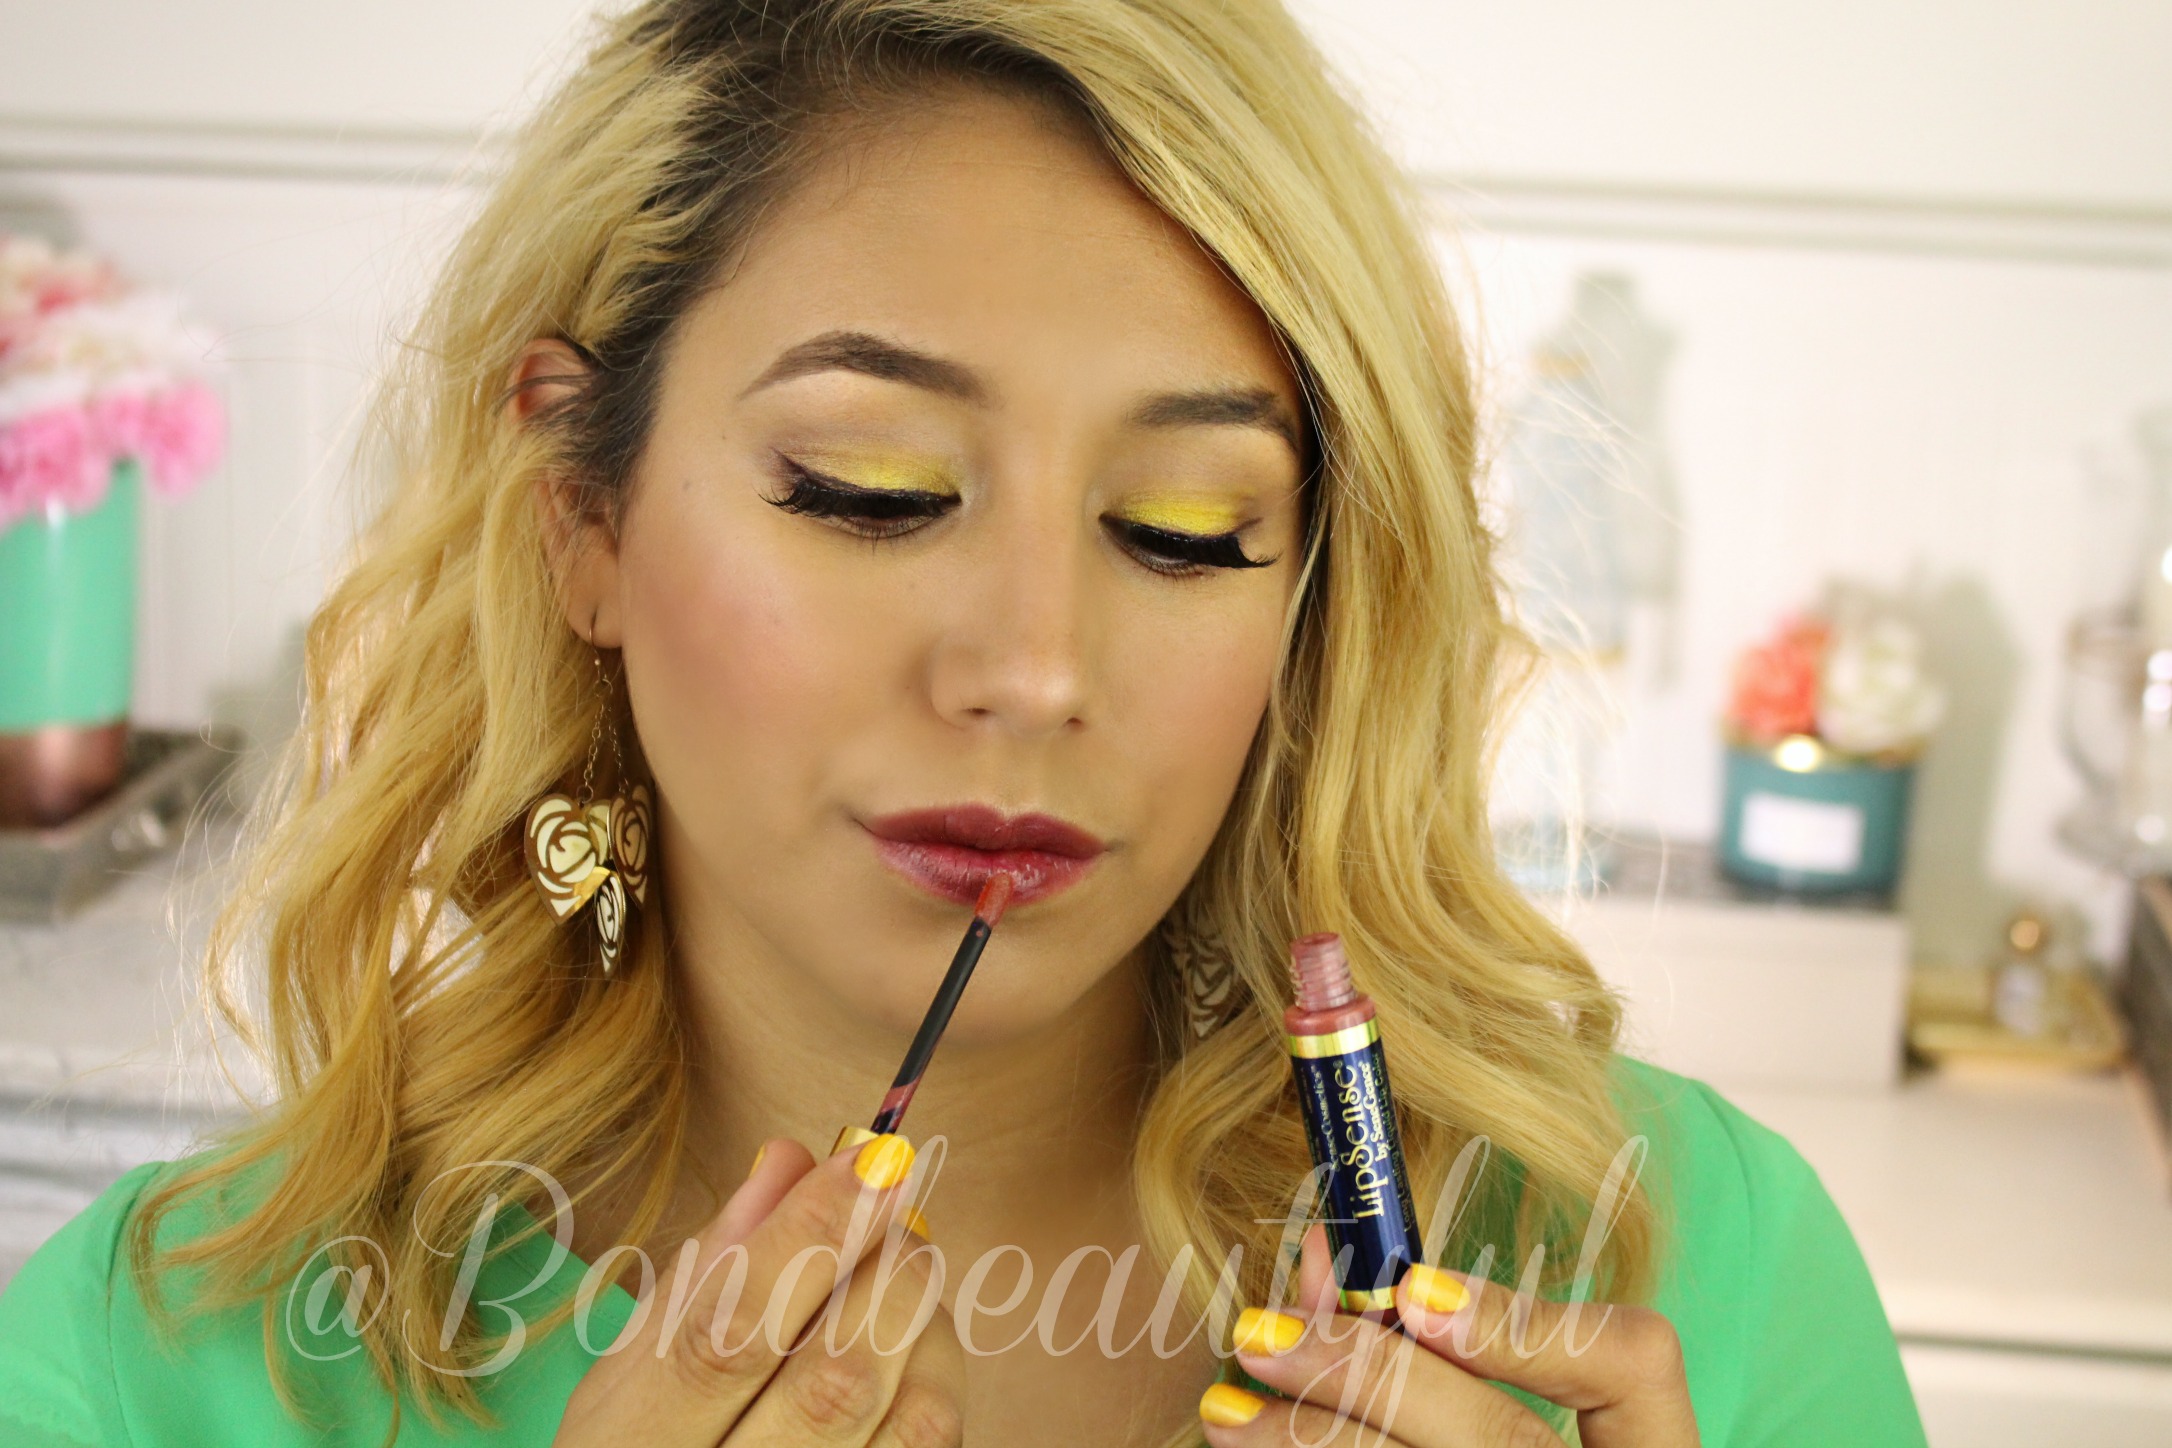
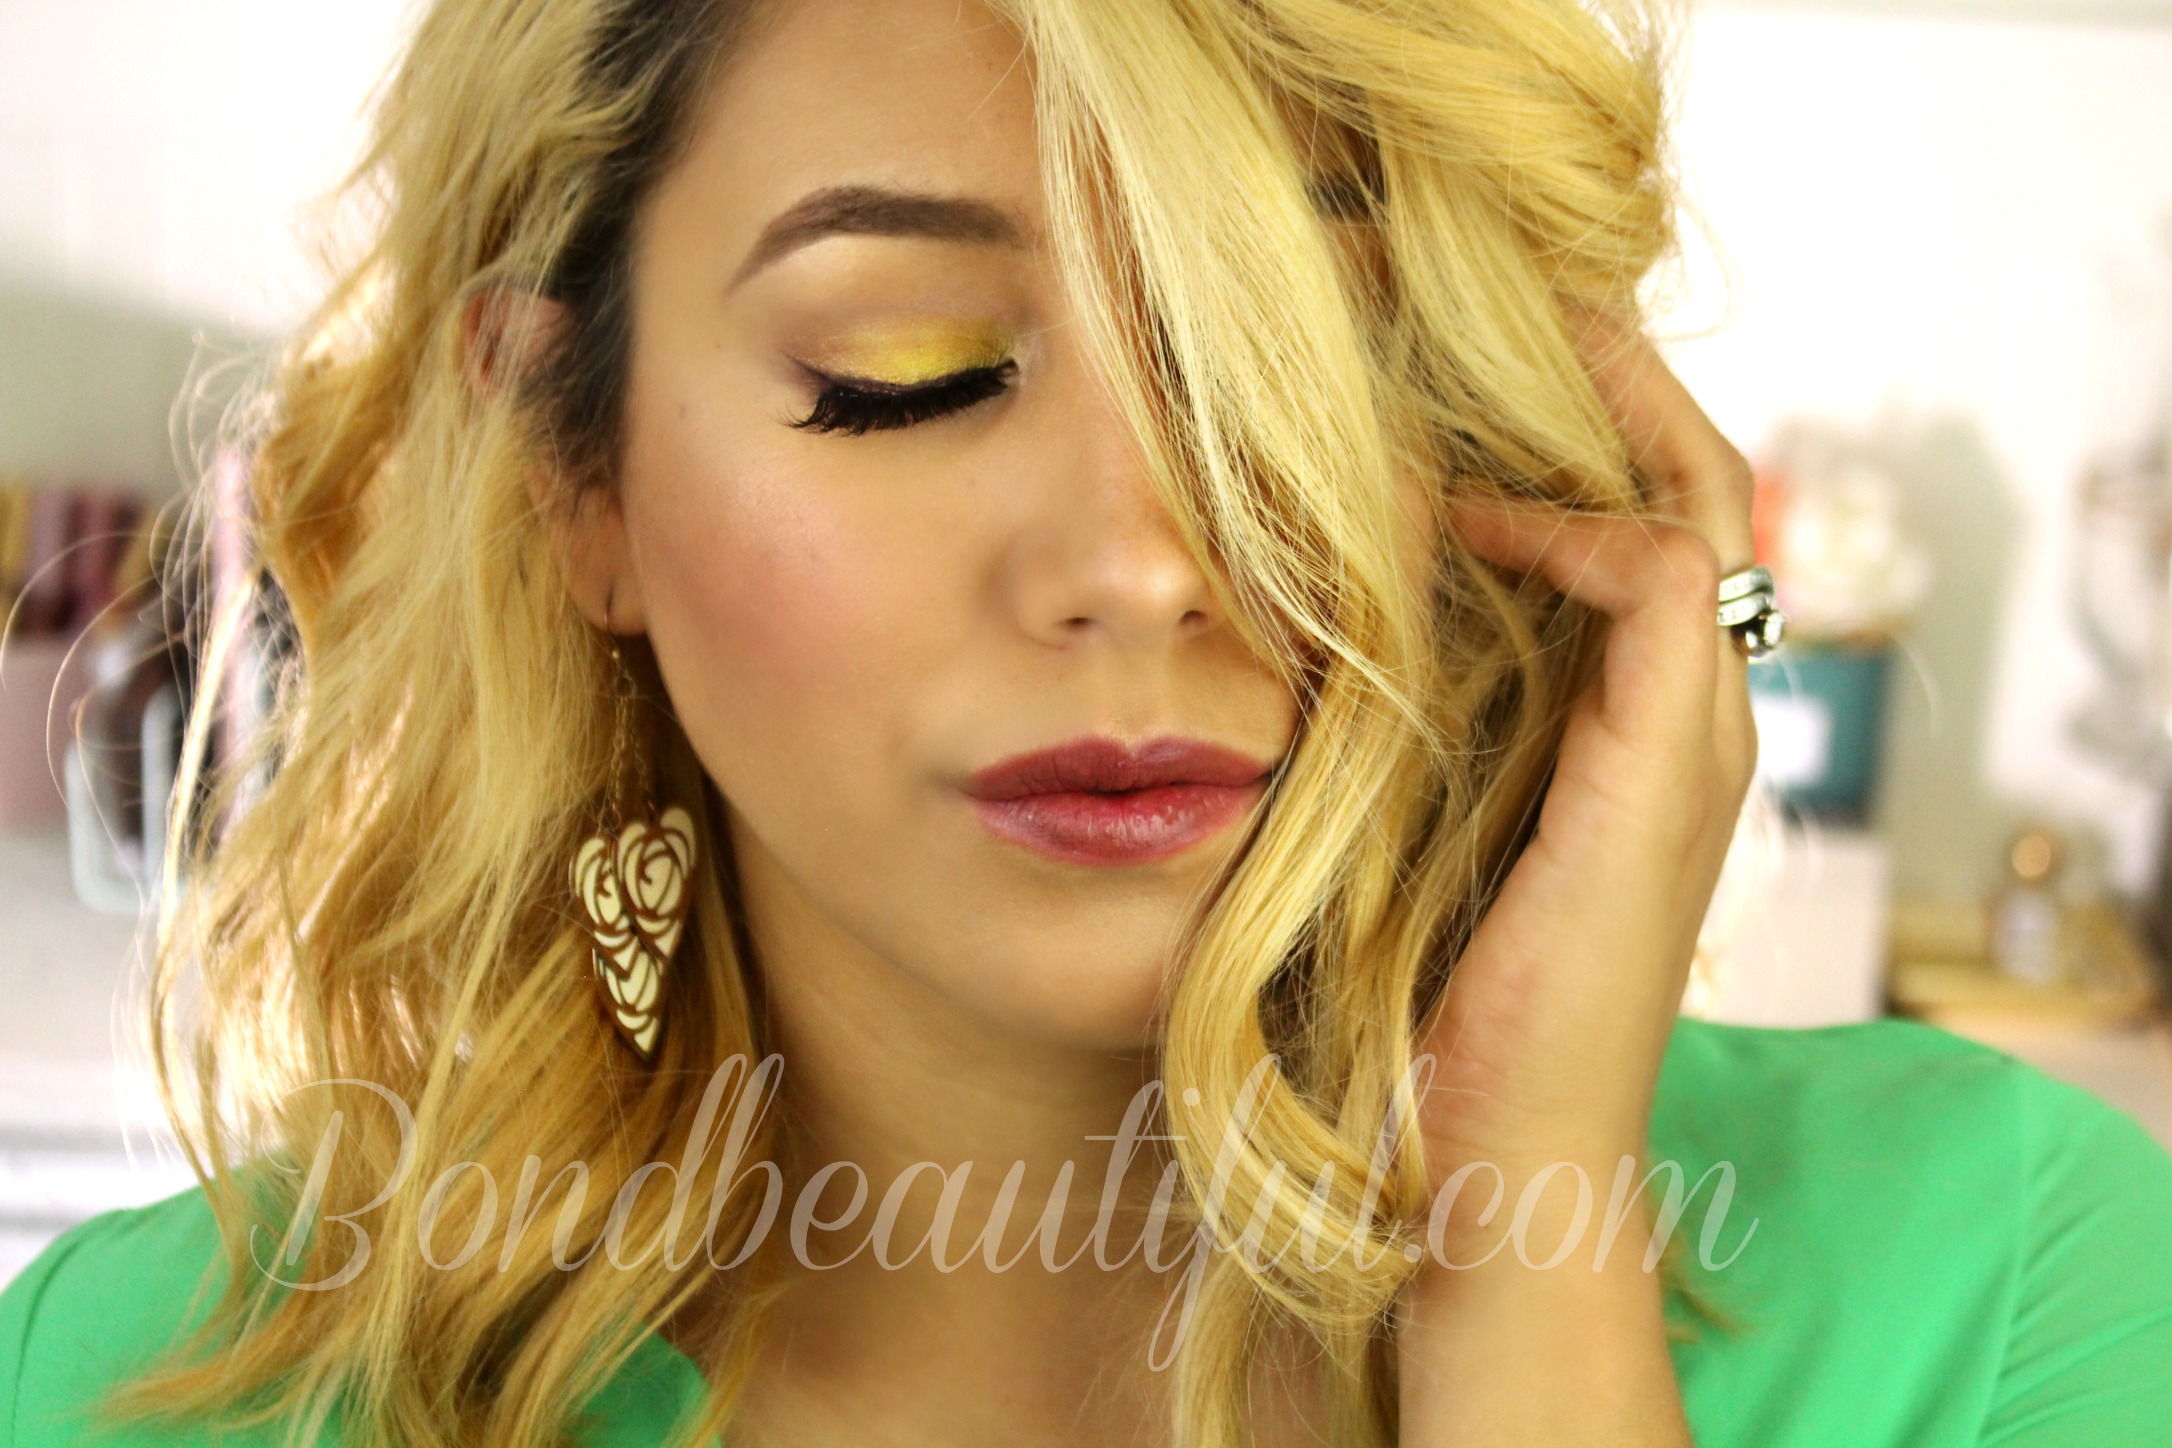
Today I’m posting about a product that really peeked my interest through Facebook & instagram! Lets cut to the chase , we are talking about Lipsense I know you all have heard about this. You have probably been invited to a lipsense party at one point. Its suppose to be this magical lip color that lasts on your lips all day long. It is suppose to be immovable so immovable that if you rub your fingers against your lips nothing will come off!
Well today we are going to talk about if its true, how long it lasts & at the end I will even show you in a video!
I have the starter kit (as shown above) it comes with a lip color (Bella shown), Moisturizing Gloss, & Oops remover. I received mine from Rachel Powers who did a fabulous job at packaging everything nicely and shipping it out to me quickly. I received it about 3 days after I ordered it!
doesn’t dry out your lips, instead it restore moisture to your lips
Thinner than water & immediately evaporates on the skin
47 different shades & multiple finishes
So with this in mind I tested this out several times and did a full wear test with check ups in the video below.
My conclusion is: This is truly amazing! I love it so much. It really does do everything it claims, which is rare to actually find a product that does that. This is my go to date night lip color because it does not rub off or kiss off! It lasts through eating and never leaves a lip print on a glass. I especially love the Moisturizing Gloss it does a really good job of sticking to the lips but not making your lips feel sticky. Also even when the gloss does come off I noticed my lips still felt moisturized and healthy.
If you have been curious or wanting to try Lipsense I definitely think you should! I love it so much I’m going to go back and get a couple of different colors. The only Con I found is that you have to go through a distributer. I went through Rachel Powers who is such a sweet amazing lady. She packaged everything beautifully even included a tips & tricks page! Just contact her and order some! Its so easy and YES she ships it right to your home! click to go straight to her Facebook.
Anyways thats enough chatter see my video review & wear test below!
Have you tried lipsense? If so whats your favorite color? if not what color would you get if you did ?
I know its been such a long time, but I promise I’m back and all my technical problems are behind me. So I know what the question is that you probably have.. What have I been doing? Well I’m glad you ask I have been binge watching Pretty Little Liars. I am not kidding in no way shape or form. I have grown rather obsessed with the show. If you haven’t watched it let me fill you in on the plot. Basically in a small town full of secrets where a group of 5 girls keep lots of secrets. One day one of the girls goes missing and a year later is found dead. The whole question is who killed her? and why do the other 4 girls keep getting texts from a person named A. Honestly it has kept my husband and I on our toes.
So what does that have to do with today? Well in Season 3 ,Hanna Marin, A character from the show cuts her hair and has some beautiful hairstyles for short hair. Some of which I want to recreate and show you how to do.
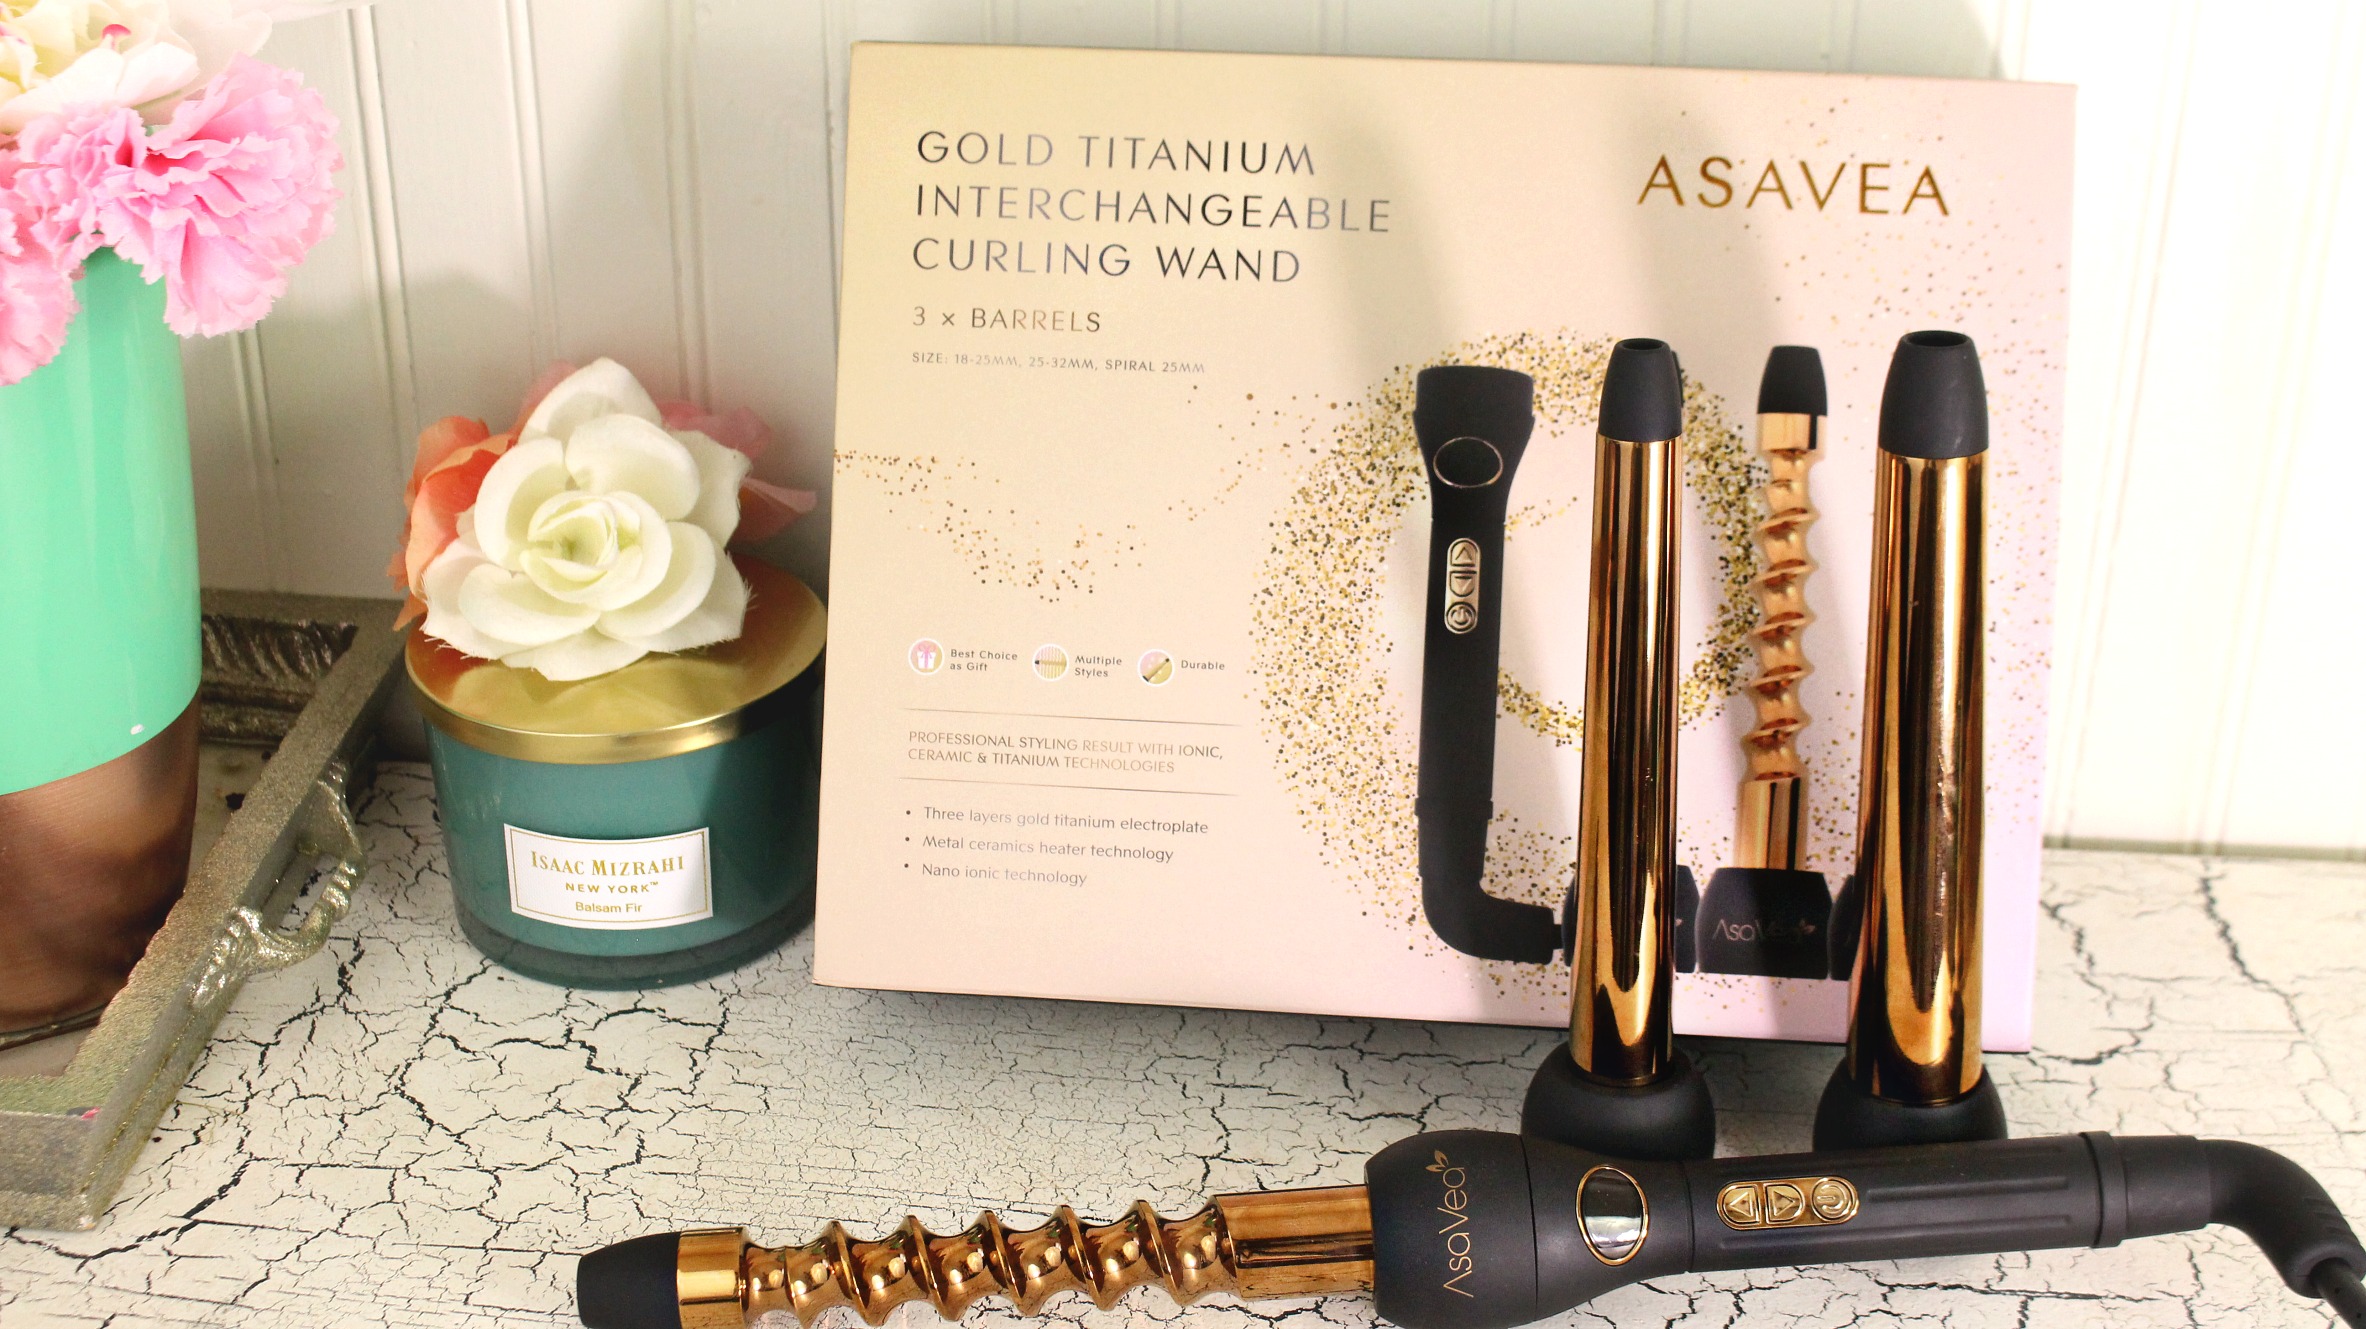
Not only do I want to show you these hairstyles, but I also partnered up with Asavea * To bring to you todays video & blog post. They recently launched a new Hairstyling tool and you guys seemed to really love it when I shared their hairstyling straightener brush. So I thought I would also share this beautiful Gold Titanium Hair Curling Wand.
(* This video & post is sponsored, so I do receive compensation for sharing this product with you. But all my opinions are honest and I truly do love this Hair Curler and recommend it.)
So think of this as a review & hair tutorial in one! Also stay tuned to the very end because, just like with the Straightening brush post, I will be GIVING ONE of these AWAY.
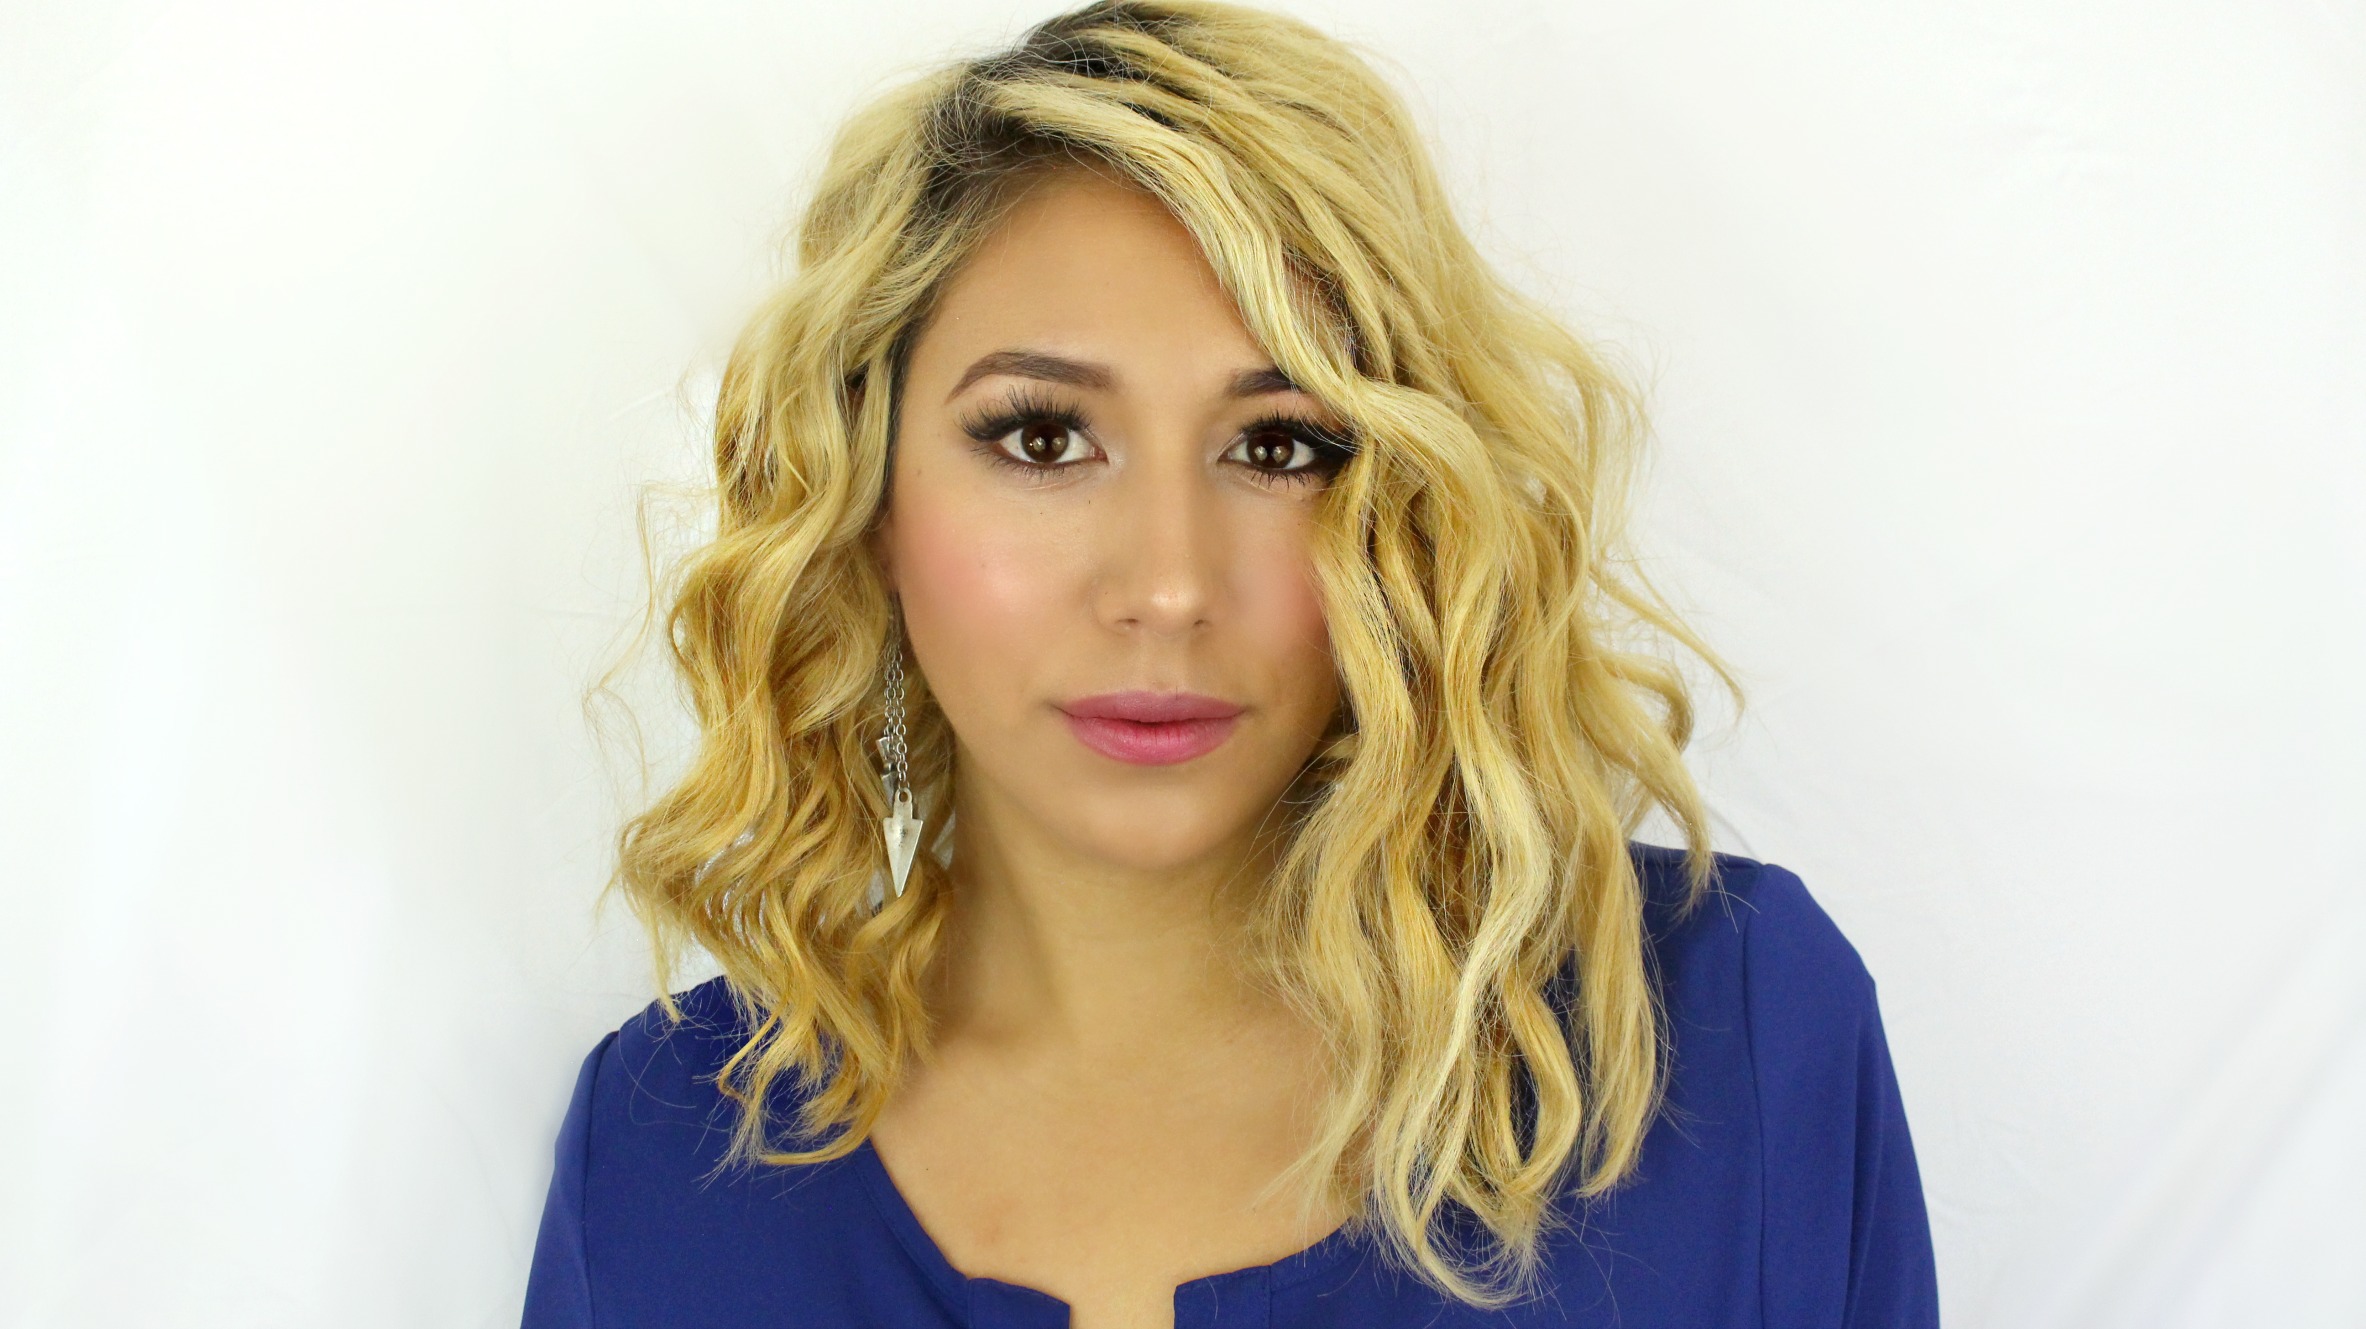
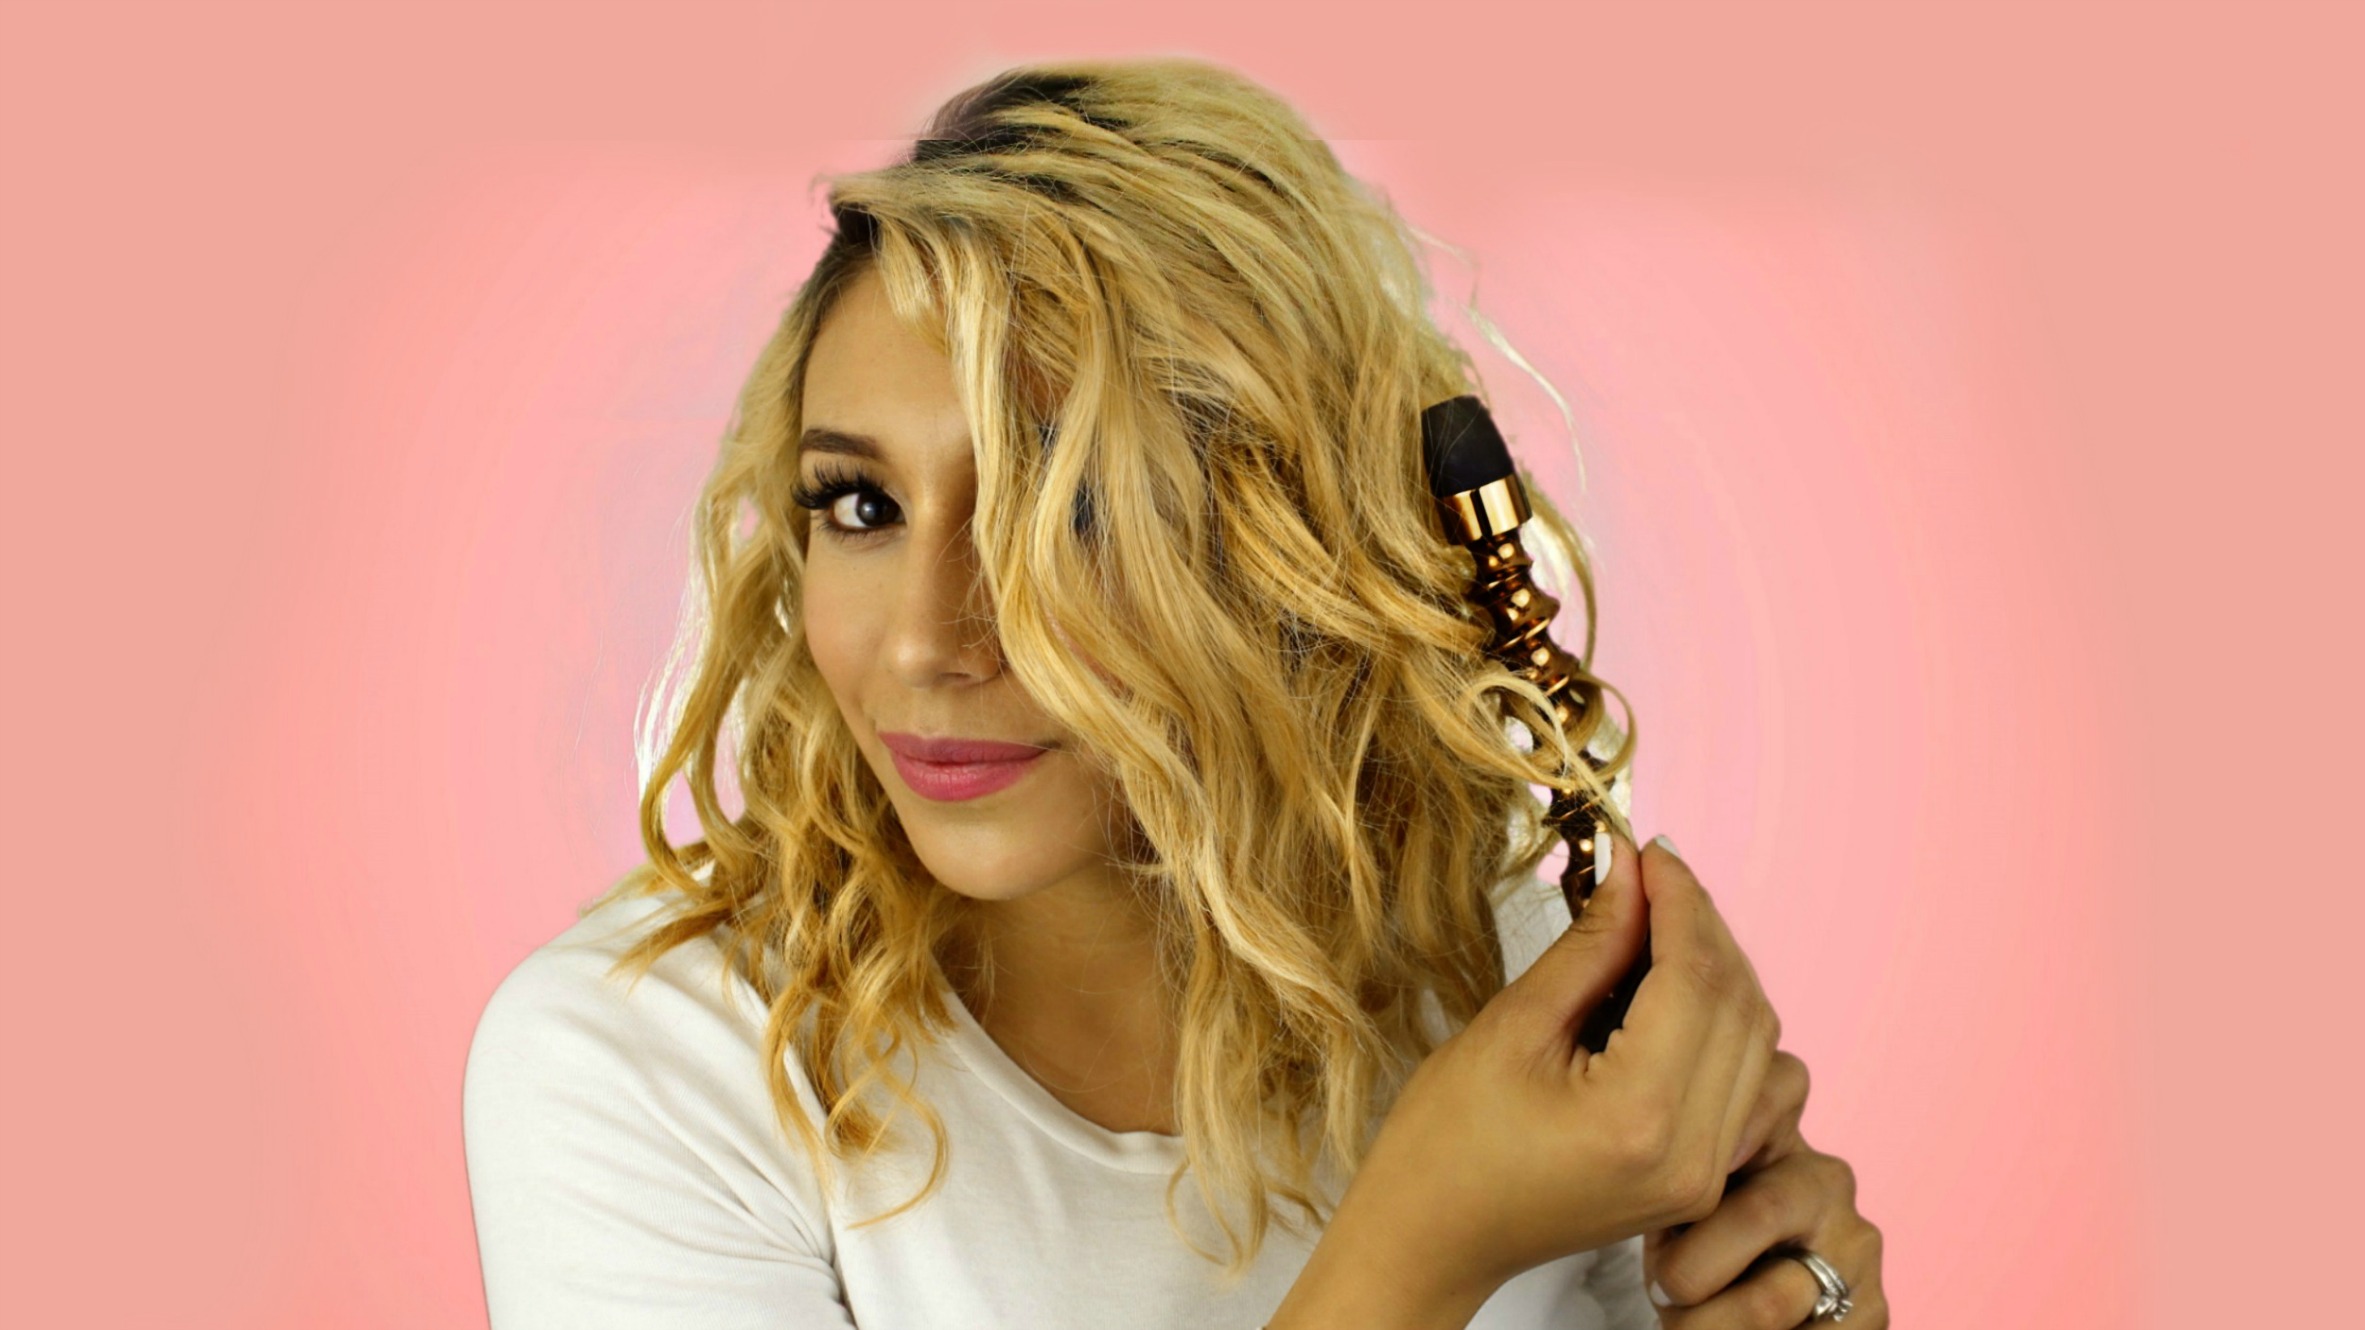
In the video below I will be showing you how to do this textured, curly, messy Lob hairstyle. This is a iconic Hanna Marin Hairstyle. She rocks this textured lob more than any other hairstyle.
This was so easy to do and surprisingly quick. I used the Spiral Barrel to achieve it and I love how it turned out. What I love most about this hairstyle is that you can really dress it up or down just by adding more texture and breaking it up more with your fingers.
So here are some of the Asavea Hair curler Pros:
The Gold & Ceramic material help to keep your frizz under complete control
It heats up quickly and cools down quickly
Your hairstyle lasts longer than other curlers (or at least it did for me, It lasted me 3 days and I didn’t have to recurl my hair at All!)
Its beautiful! I know you love the GOLD!
It has a Swivel Cord so Its easy to use without the cord getting caught or in the way.
The controls are easy to use and you can decided how hot you want the curler to be.
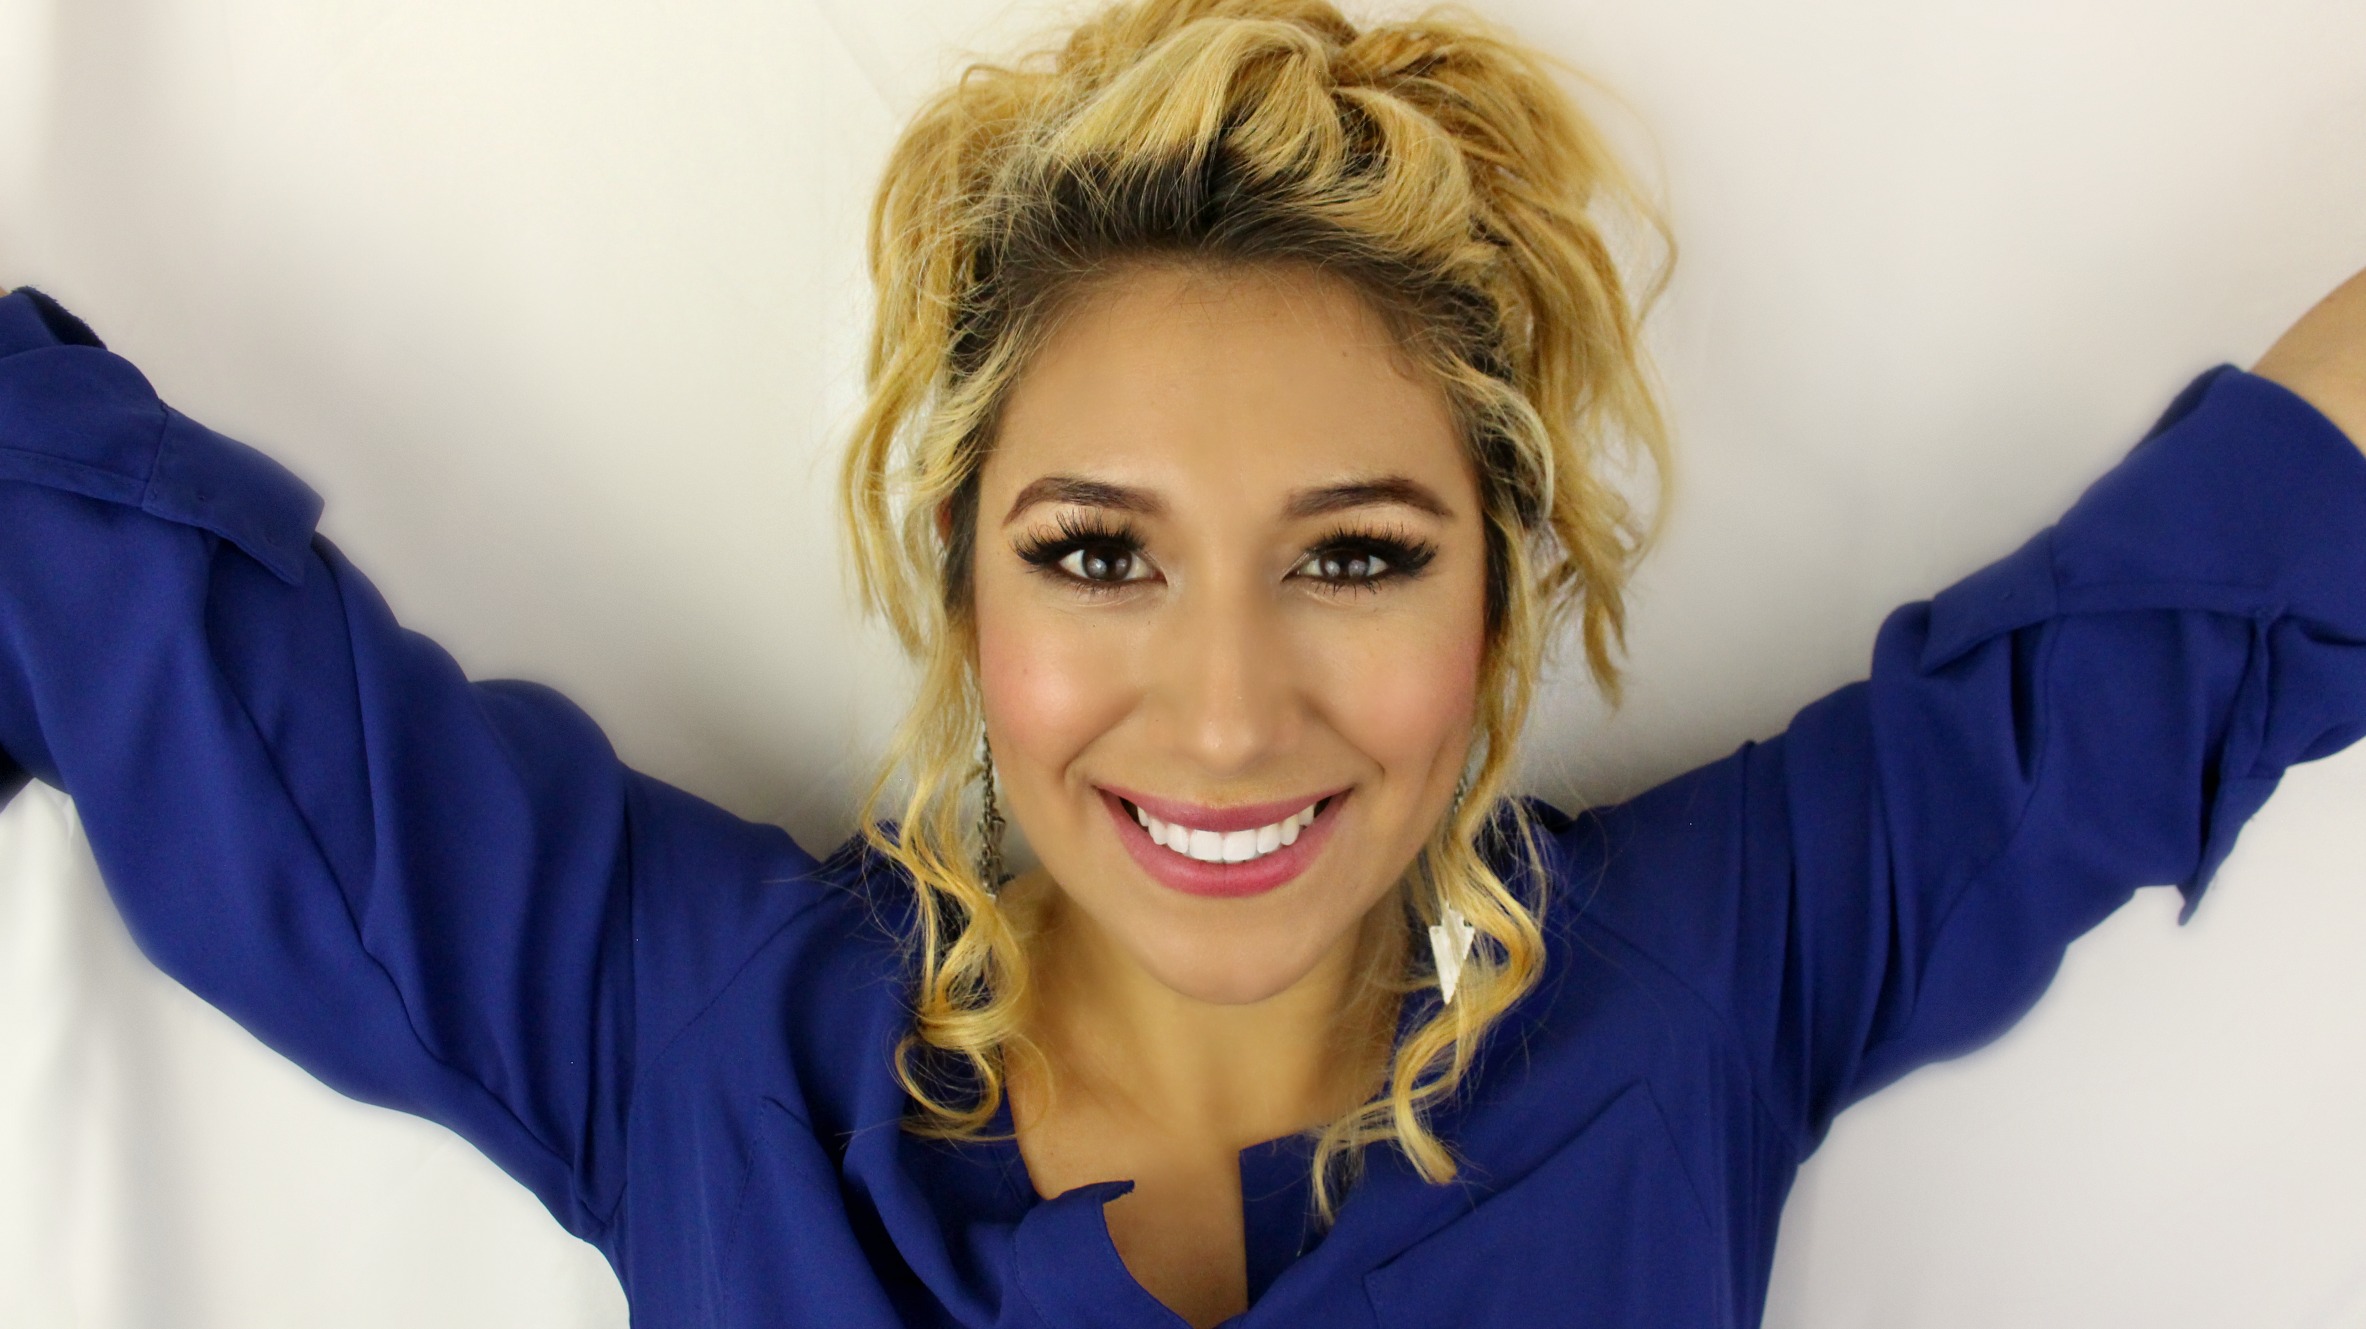
The Second hairstyle I did is a messy, easy undo. I like to do this on day three when my curls are still intact but maybe not as voluminous and I feel like putting my hair up. All you need for this hairstyle is a teasing comb & some bobby pins.
I love this because you can again make it as messy or as formal as you want. Its perfect for short hair because the braided back keeps all those little short layered hairs into place without bobby pins.
Ok ok, pictures are nice but lets see how to actually accomplish this. I promise it looks like I spent a lot of time doing this hairstyle but I really didn’t!
Happy Friday, today is a special friday because its my wonderful husbands birthday! I wouldn’t be where I am at today, and I wouldn’t have this blog if it wasn’t for him. So Thank you!
Im so excited to share another InstaTutorial with you guys. So what this is for those of you that are new; On Instagram I sometimes like to do fantasy/editorial/themed Makeup looks that will just look beautiful in pictures. Sometimes when I do these I like to turn on the camera and film it in a tutorial form. But, whats different than other tutorials is that at the very end I share some of my edited picture and you can vote in the comments on which pic you like. And which pic you think I should put on my Instagram Feed! This is a fun way to kind of join both the youtube & instagram platform. Don’t worry I’m going to be showing you those pics and you can vote too, right here!
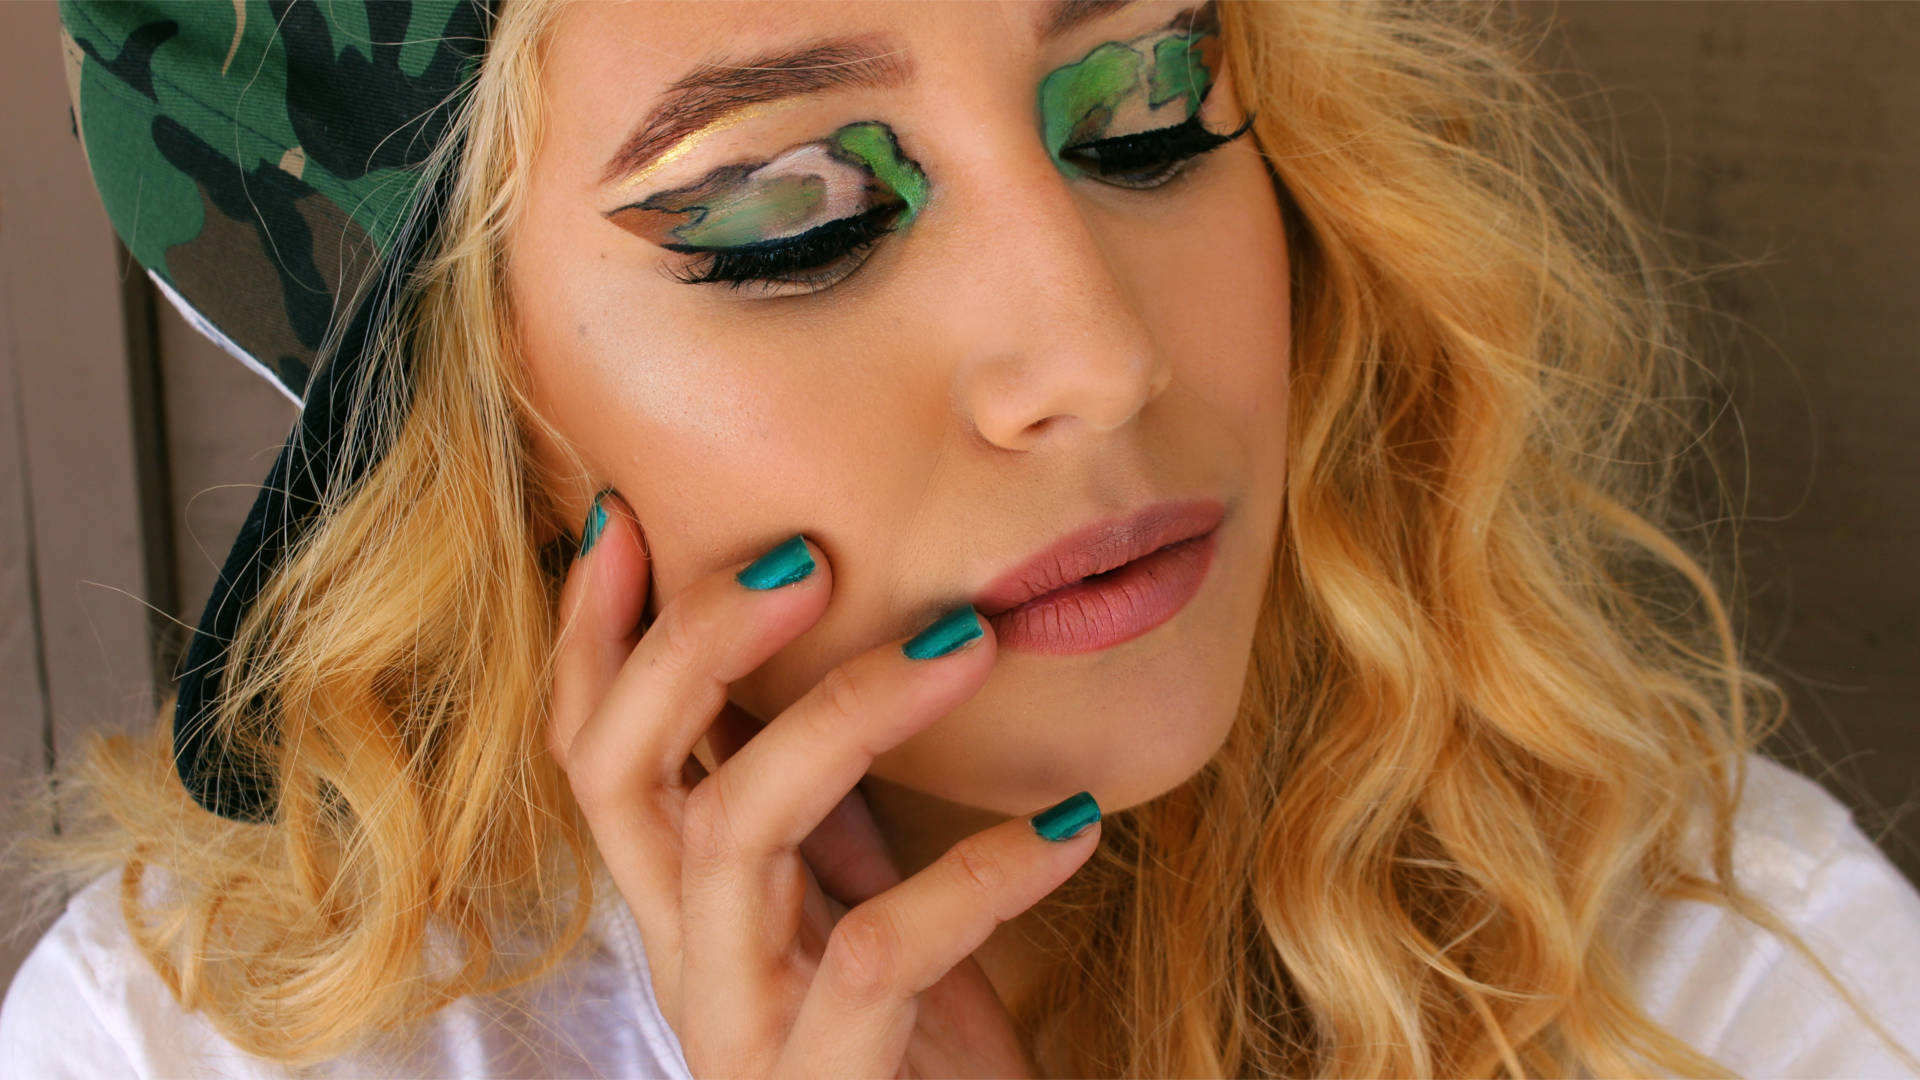
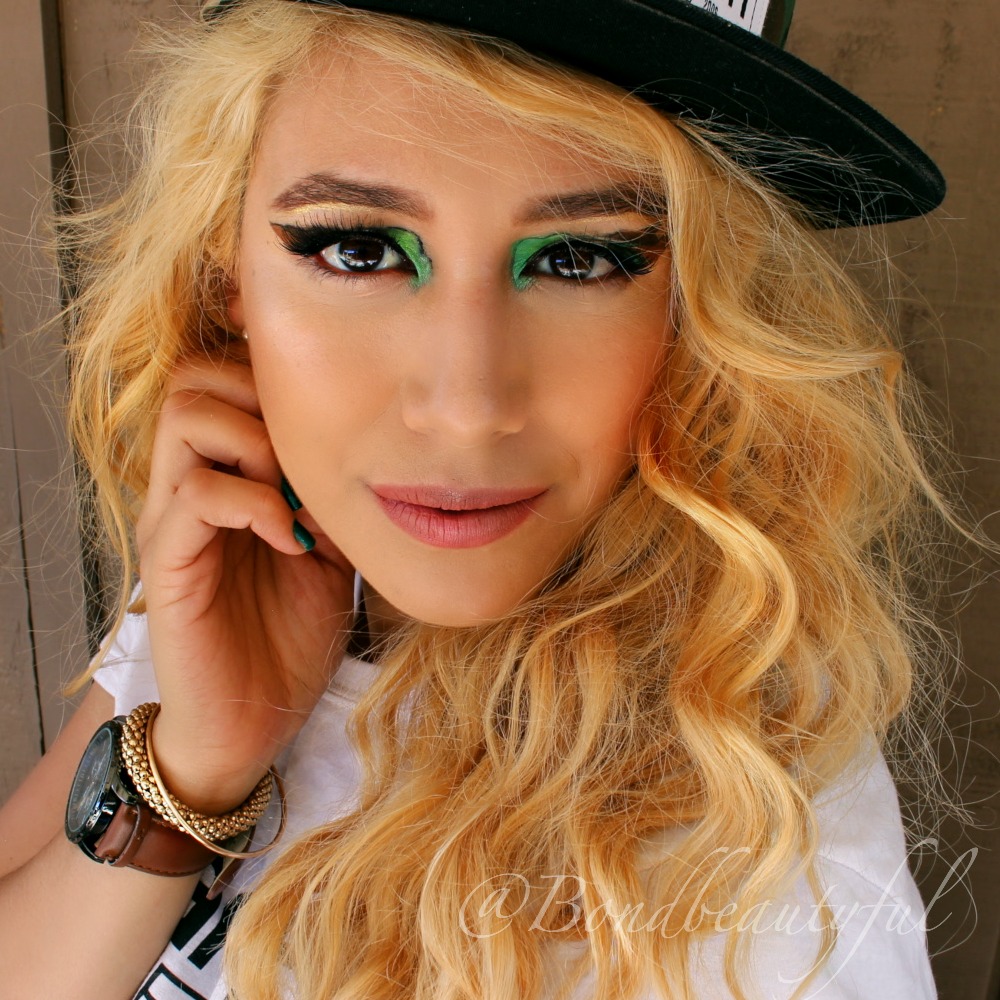
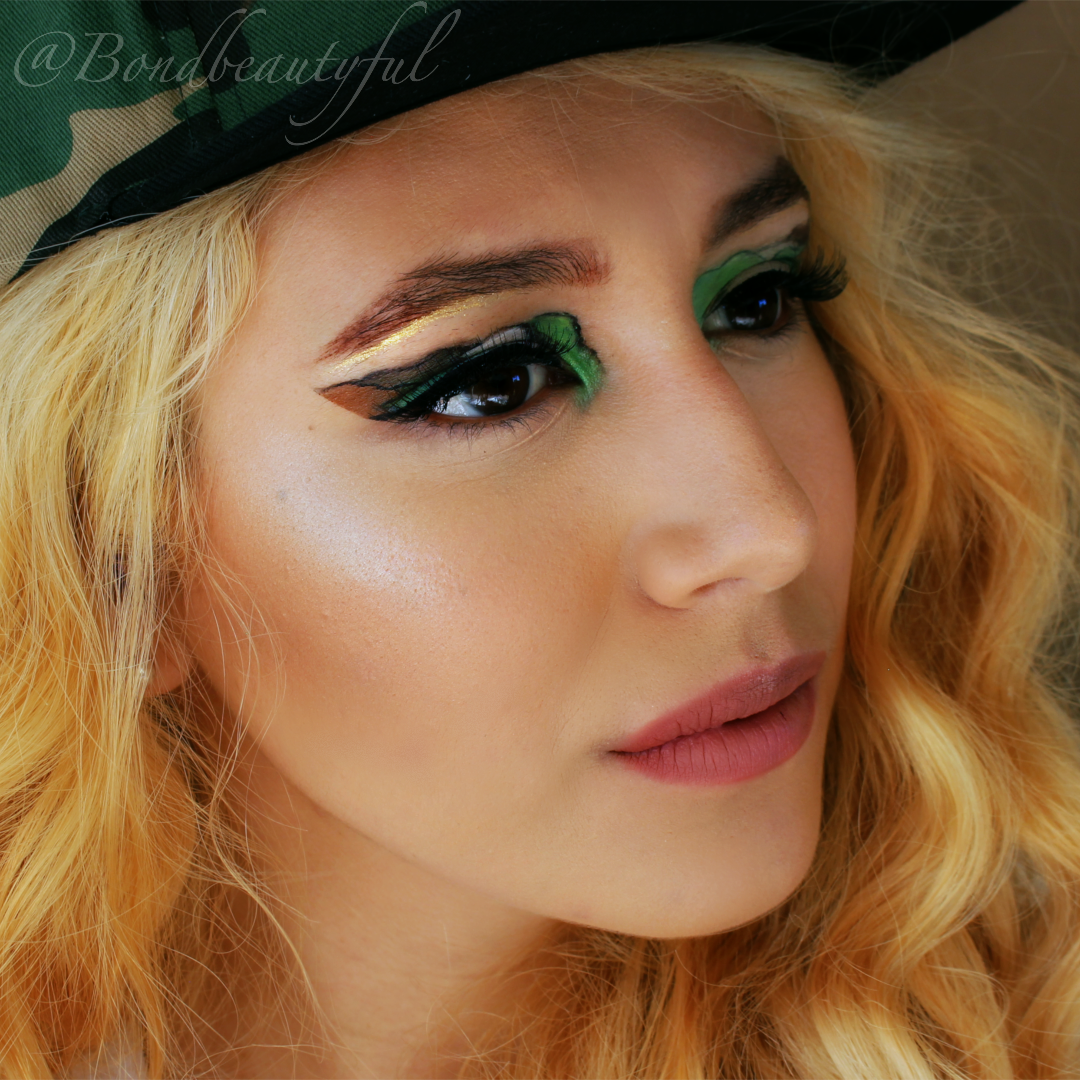
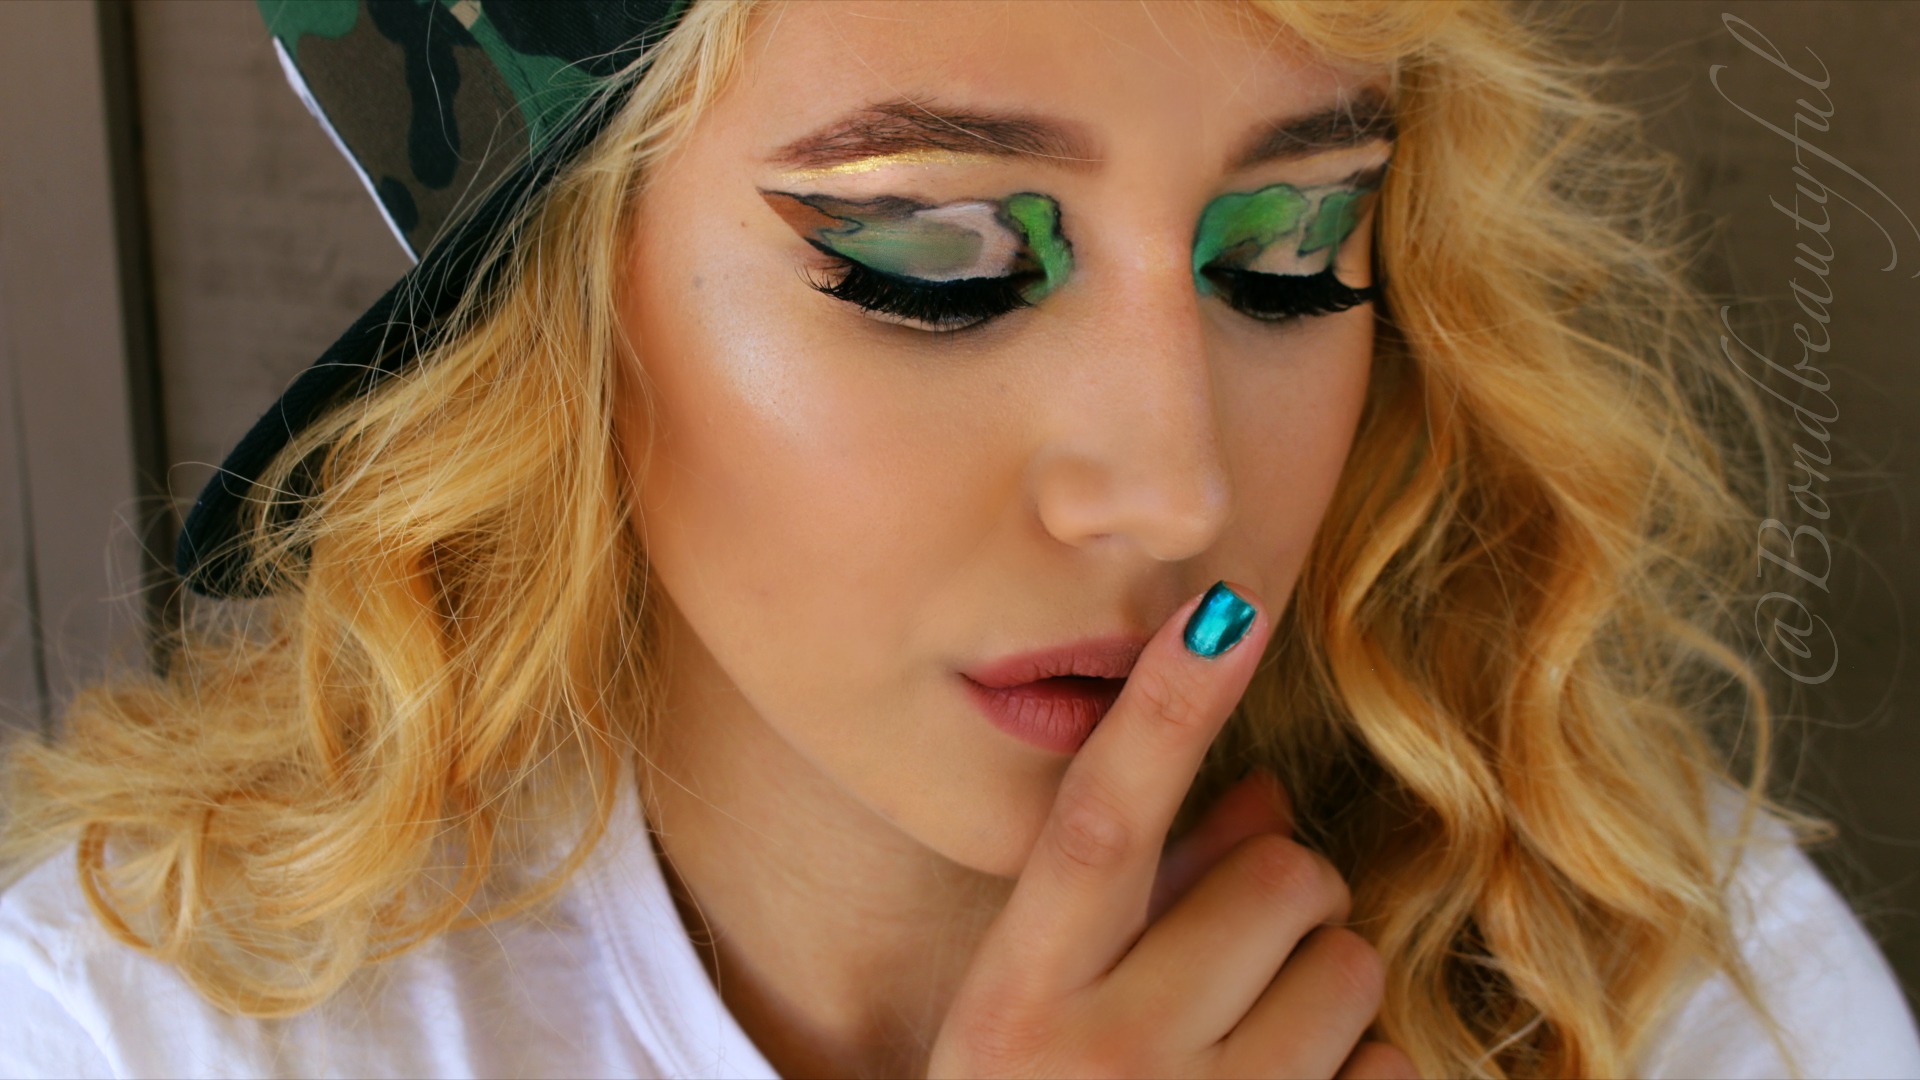
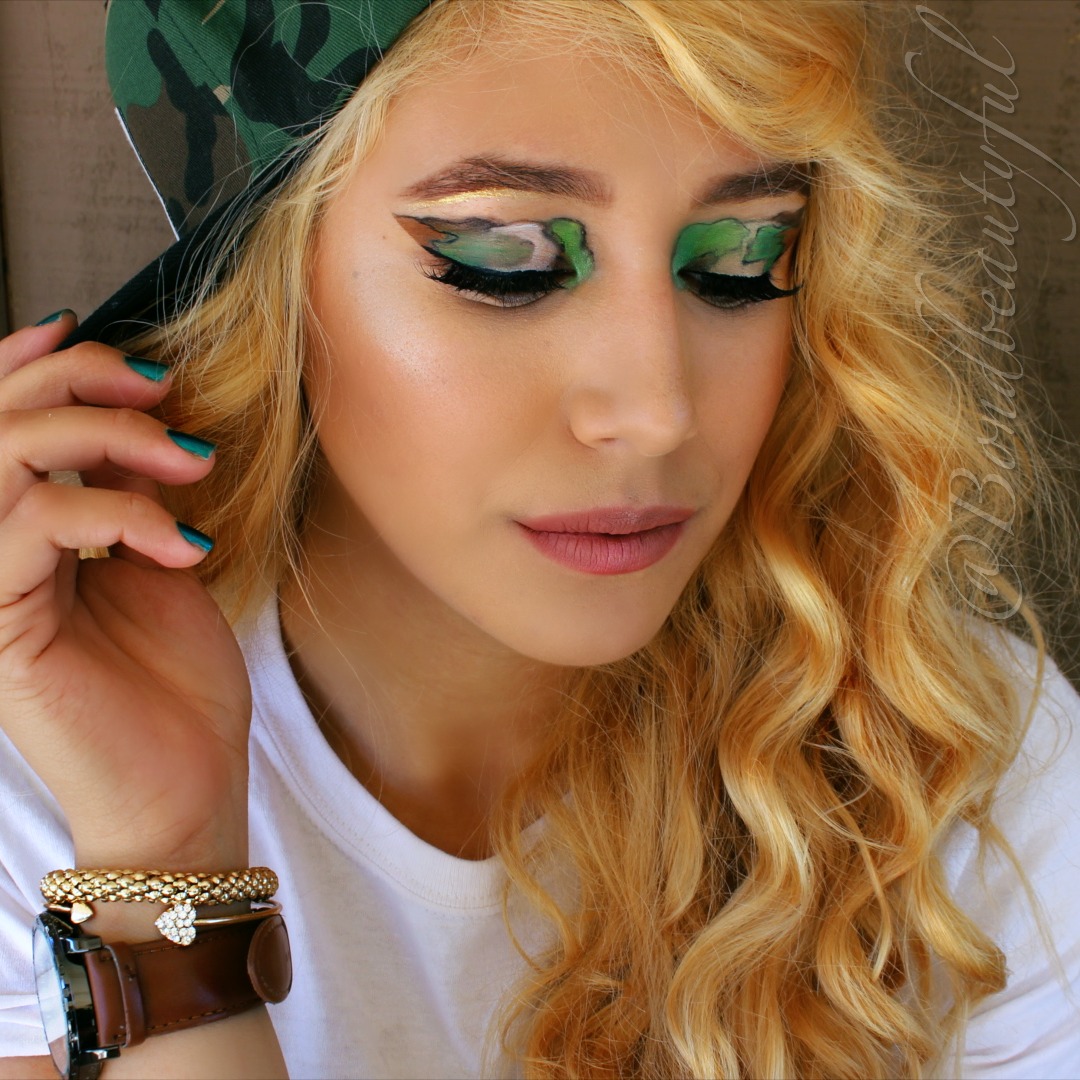
For this look I was super inspired my my camo that I love to wear. Yes its a SolarCity Hat :). No I’m not sponsored I just have a bunch of SolarCity Gear and out of all the hats my husband owns this one is my favorite. So I thought why not turn it into a amazing eye look that I have never seen done before. Hence this makeup look was born.
So before I share my tutorial below I thought I would share the Pictures so you can vote, and give you all the makeup details. This look actually turned out to be quite easy.
(1st Picture)
1. I started off by shaping a bold, square brow.
2. I traced out the pattern that I wanted with the black from the Imagic Flash Palette.
3. I filled in the different portions with different Army colors from the flash palette, brown, dark brown, army green,bright green, & cream
4. I set all those creams with powdered Eyeshadow that matched.( below all palettes used)
5. I then went back over the black outline with a thin eyeliner brush & the cream shadow again.
SolarCity Shirt
SolarCity Camo Hat
Silver Stud Earrings : Forever 21
Watch & Bracelets RUE 21
Nail polish: Zoya : Giovanna
*I do receive compensation if you use my links, if you choose not to feel free to google these makeup products.
This was super fun to do for you guys, I hope you will take a look at the video tutorial I did for it, even if its just the fun intro!
Thank you guys so much for all your sweet comments & support! You are truly amazing! Don’t forget true beauty comes from within, so let your beauty shine!
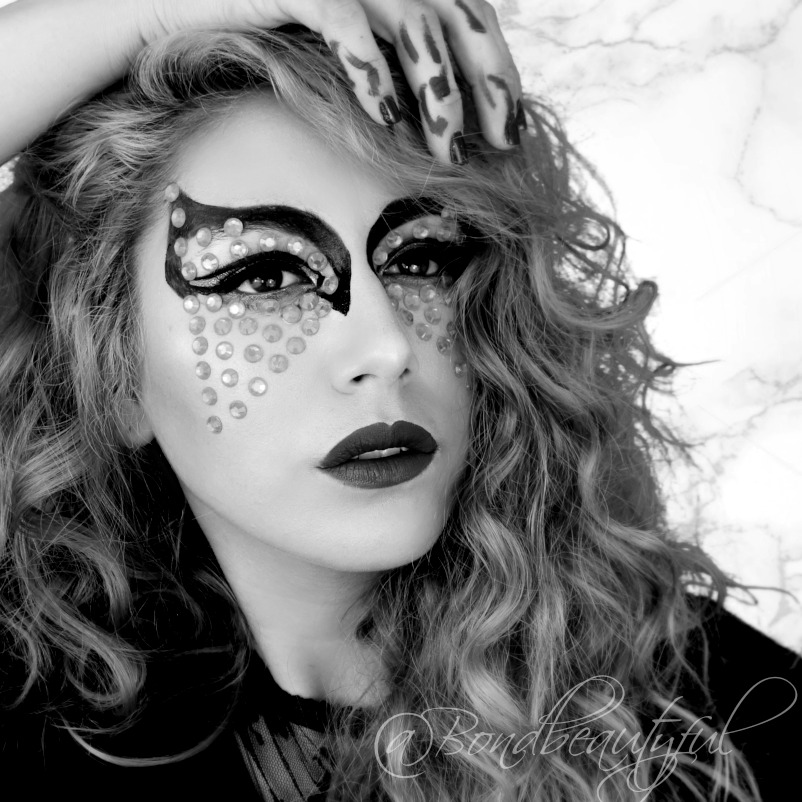
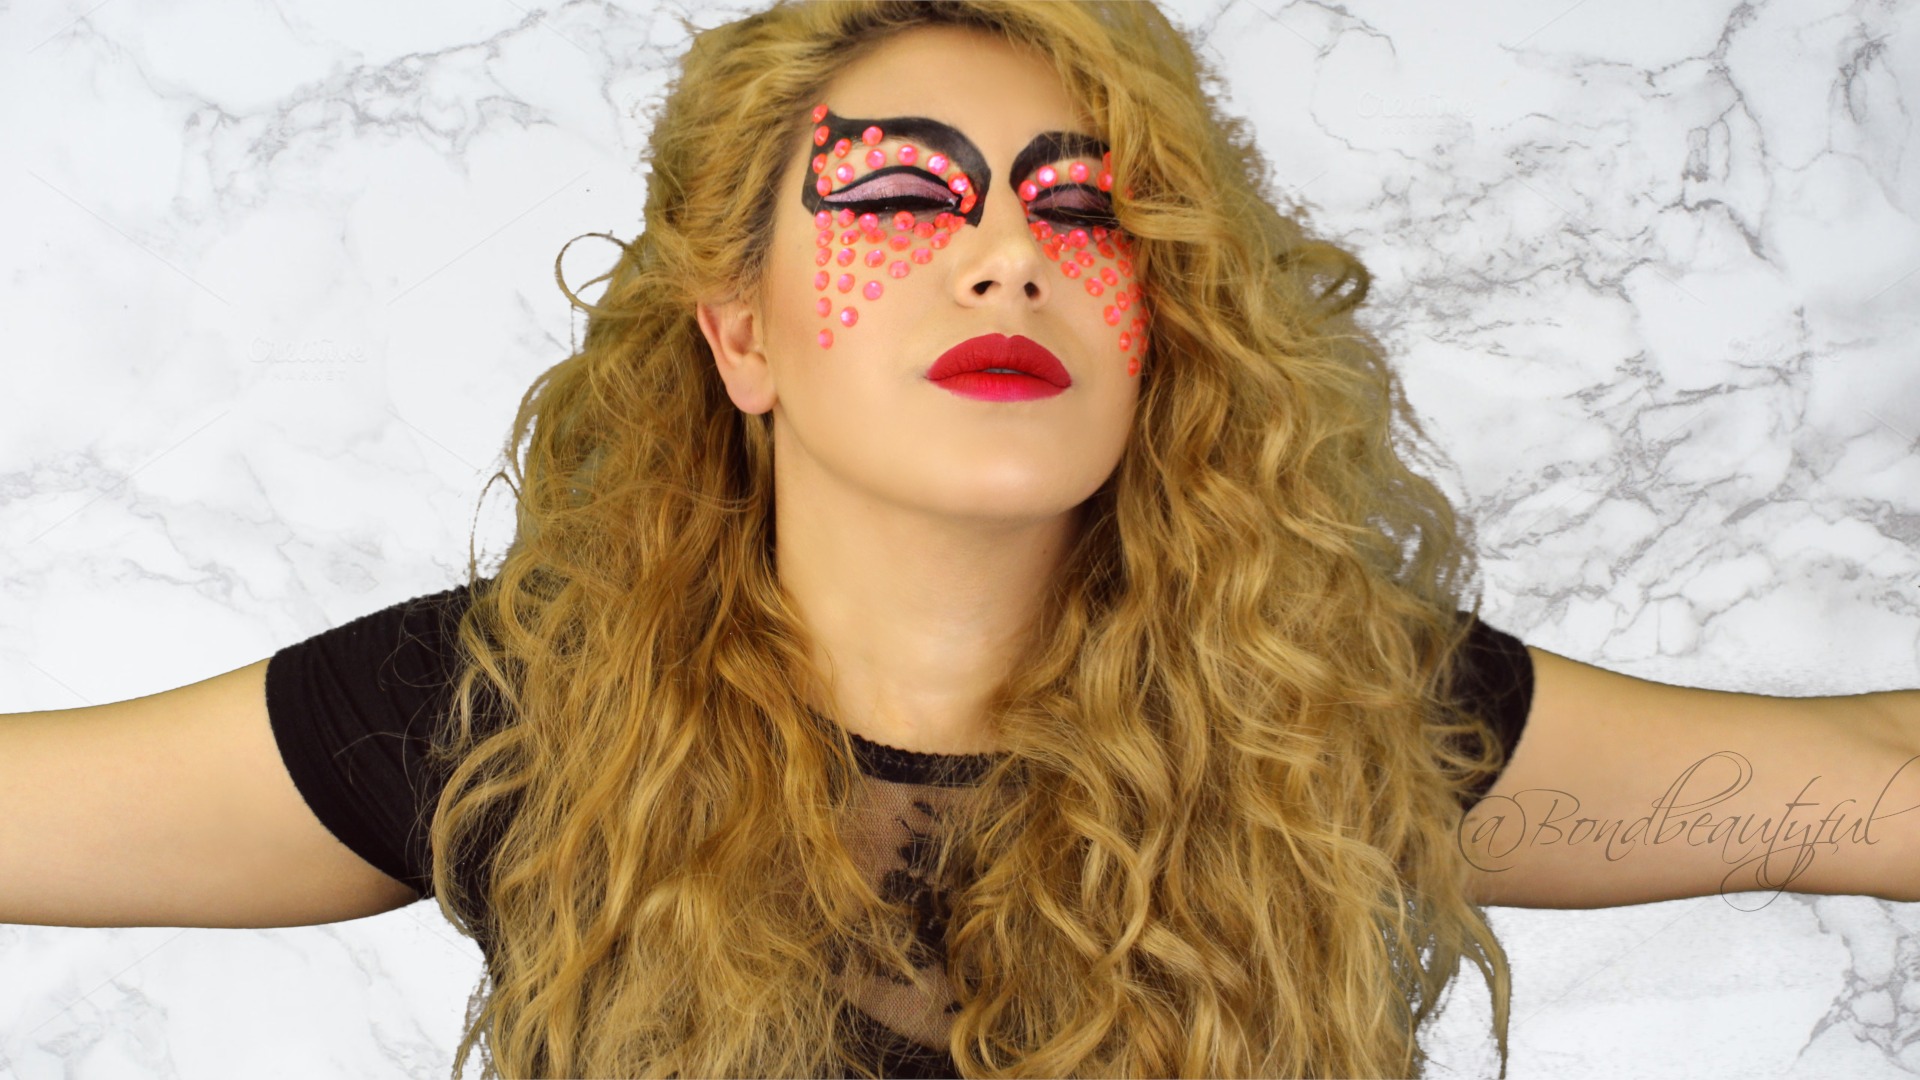
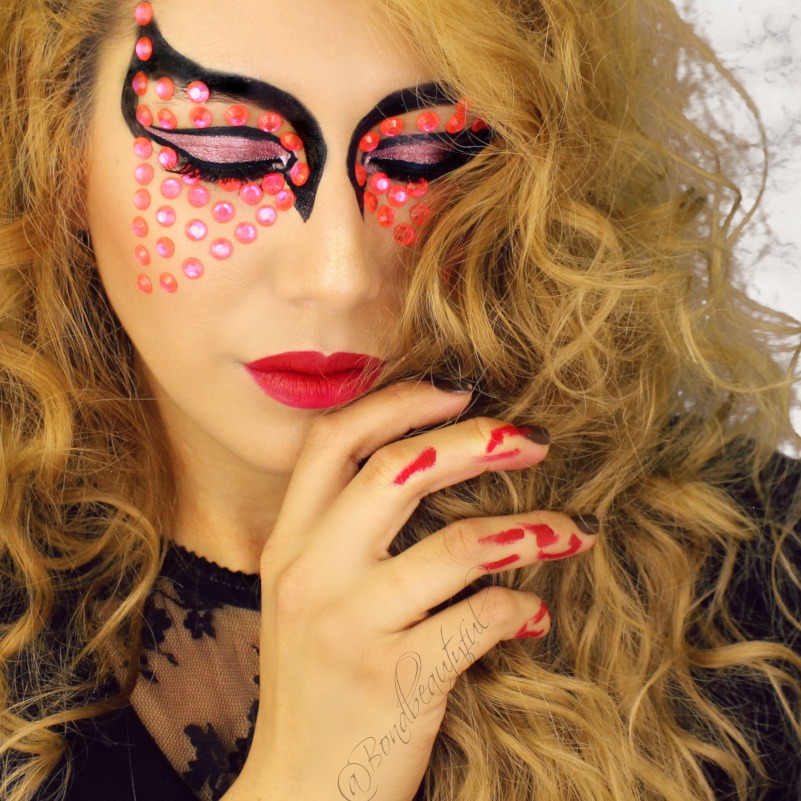
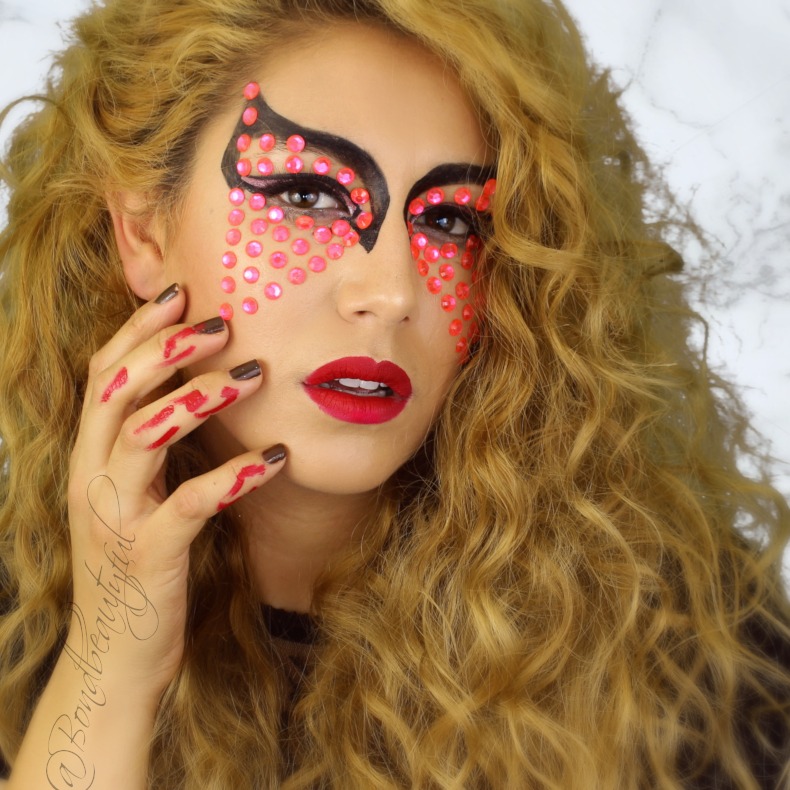
I have missed you guys! I know I have been gone a while so sorry, life has twisted and turned on me. But here we are I am back and happy to be here. I wanted to do a fun post for you guys since I haven’t done on in so long. I know all of you watched the Super Bowl or at least the half time show. Lady Gaga performed and she came out with a strong makeup look. I wanted to recreate this mainly because it was requested on my Instagram, but also because it is unique and fun.
So I went ahead and recreated it for you but I added my little twist to it. Instead of Red Gems I did pink, also I didn’t add the netting like she had. Her whole eye , gem & Black outline was actually a sticker. Because I did mine by hand I left out the netting through out the gems. Either way hers looked gorgeous and I think I did it justice. So I have a full video tutorial for you below, also I shared my edited Instagram Ready Pictures and I would love for you to vote in the comments and tell me which of all these pictures in this post you love best!
Products:
Dermacol Foundation 221
Clinique Blush Fig
Tiny Beauty Eyeshadow Tint: Violette
Elf Baked Eyeshadow : Burnt Plum (lid)
Hard candy Lookpro Matte Eyeshadow Palette (crease)
BhCosmetics Be a bombshell Bronzer Diva
Gems from Walmart & Kiss Lash Glue (Clear)
Milani Stroblight Highlighter Sunglow
Wetnwild Catsuit Missy & Fierce, Pink Really Hard
Milani Make it Dewy Setting Spray
Milani Make it Last Setting Spray
NYC Liquid Liner
Jordana Fabuliner
Kiss Lashes Ritzy
StarLooks Gem Pencil Amethyst
It was all actually easy to do, especially when I don’t have to do so many straight lines with eyeliner. So for all my visual learners, or those who are just curious on how I accomplished this look, check out the Tutorial.
Before you go COMMENT below and tell me which pictures do you like best from this post?
Thank you guys, and Im so excited to be back! I have lots of tutorials,reviews, hauls & more coming soon!
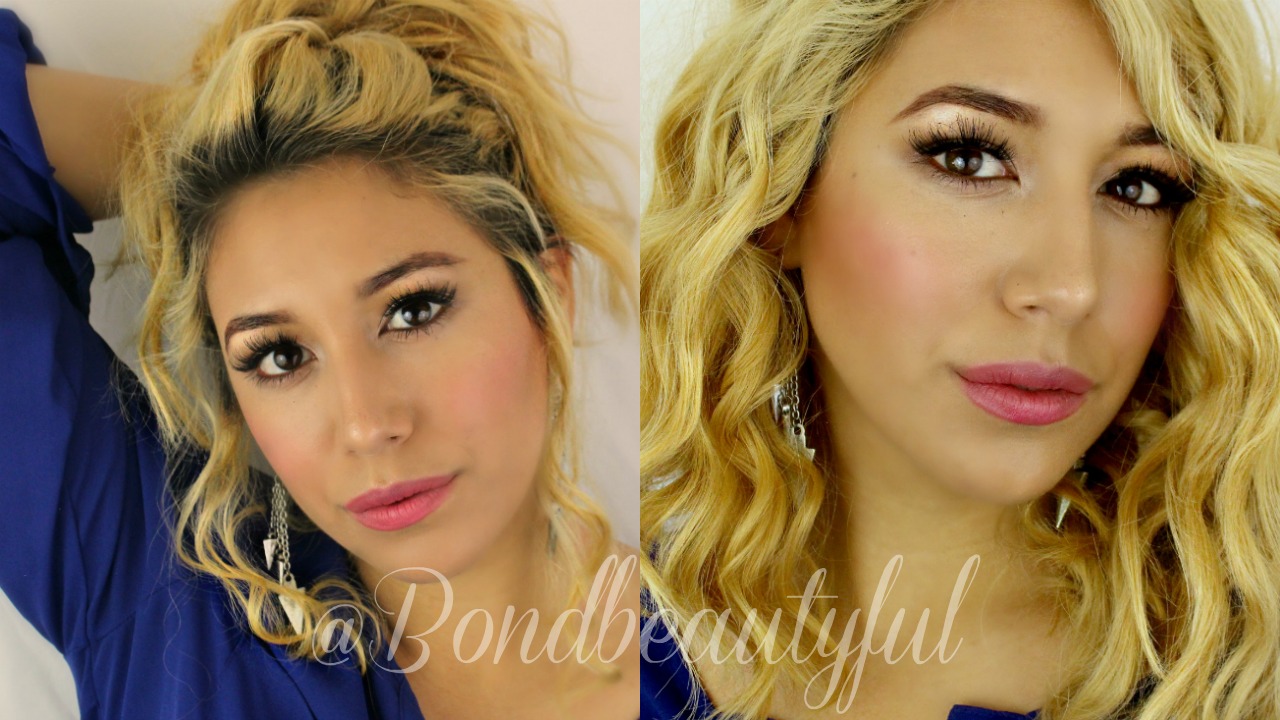
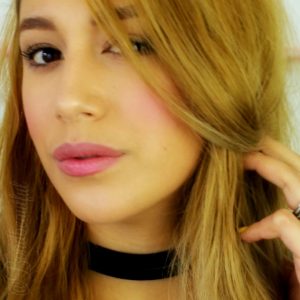
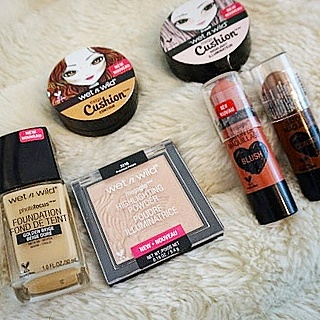
Im so excited to be doing the Ultimate Wet N Wild New Releases Post! I have done a first impressions & a full review on all the new products I got at the beginning of January. Wet N Wild is really stepping up their game this year. None of the products I have tried so far from them are duds! So I’m going to keep it short and simple and let the videos do the talking enjoy!
First I have a full first impressions where I take you throughout the day and see how all these products wear.
New Products:
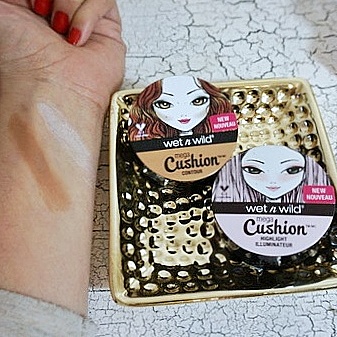
Cushion Contour $5.99
Cushion Highlight $5.99
Megaglo Highlight $4.99
Contour Stick $3.99
Blush Stick $3.99
Photo Focus Foundation $5.99
After Using these products for almost a month and really trying them in all different ways I have a full review on the Foundation..
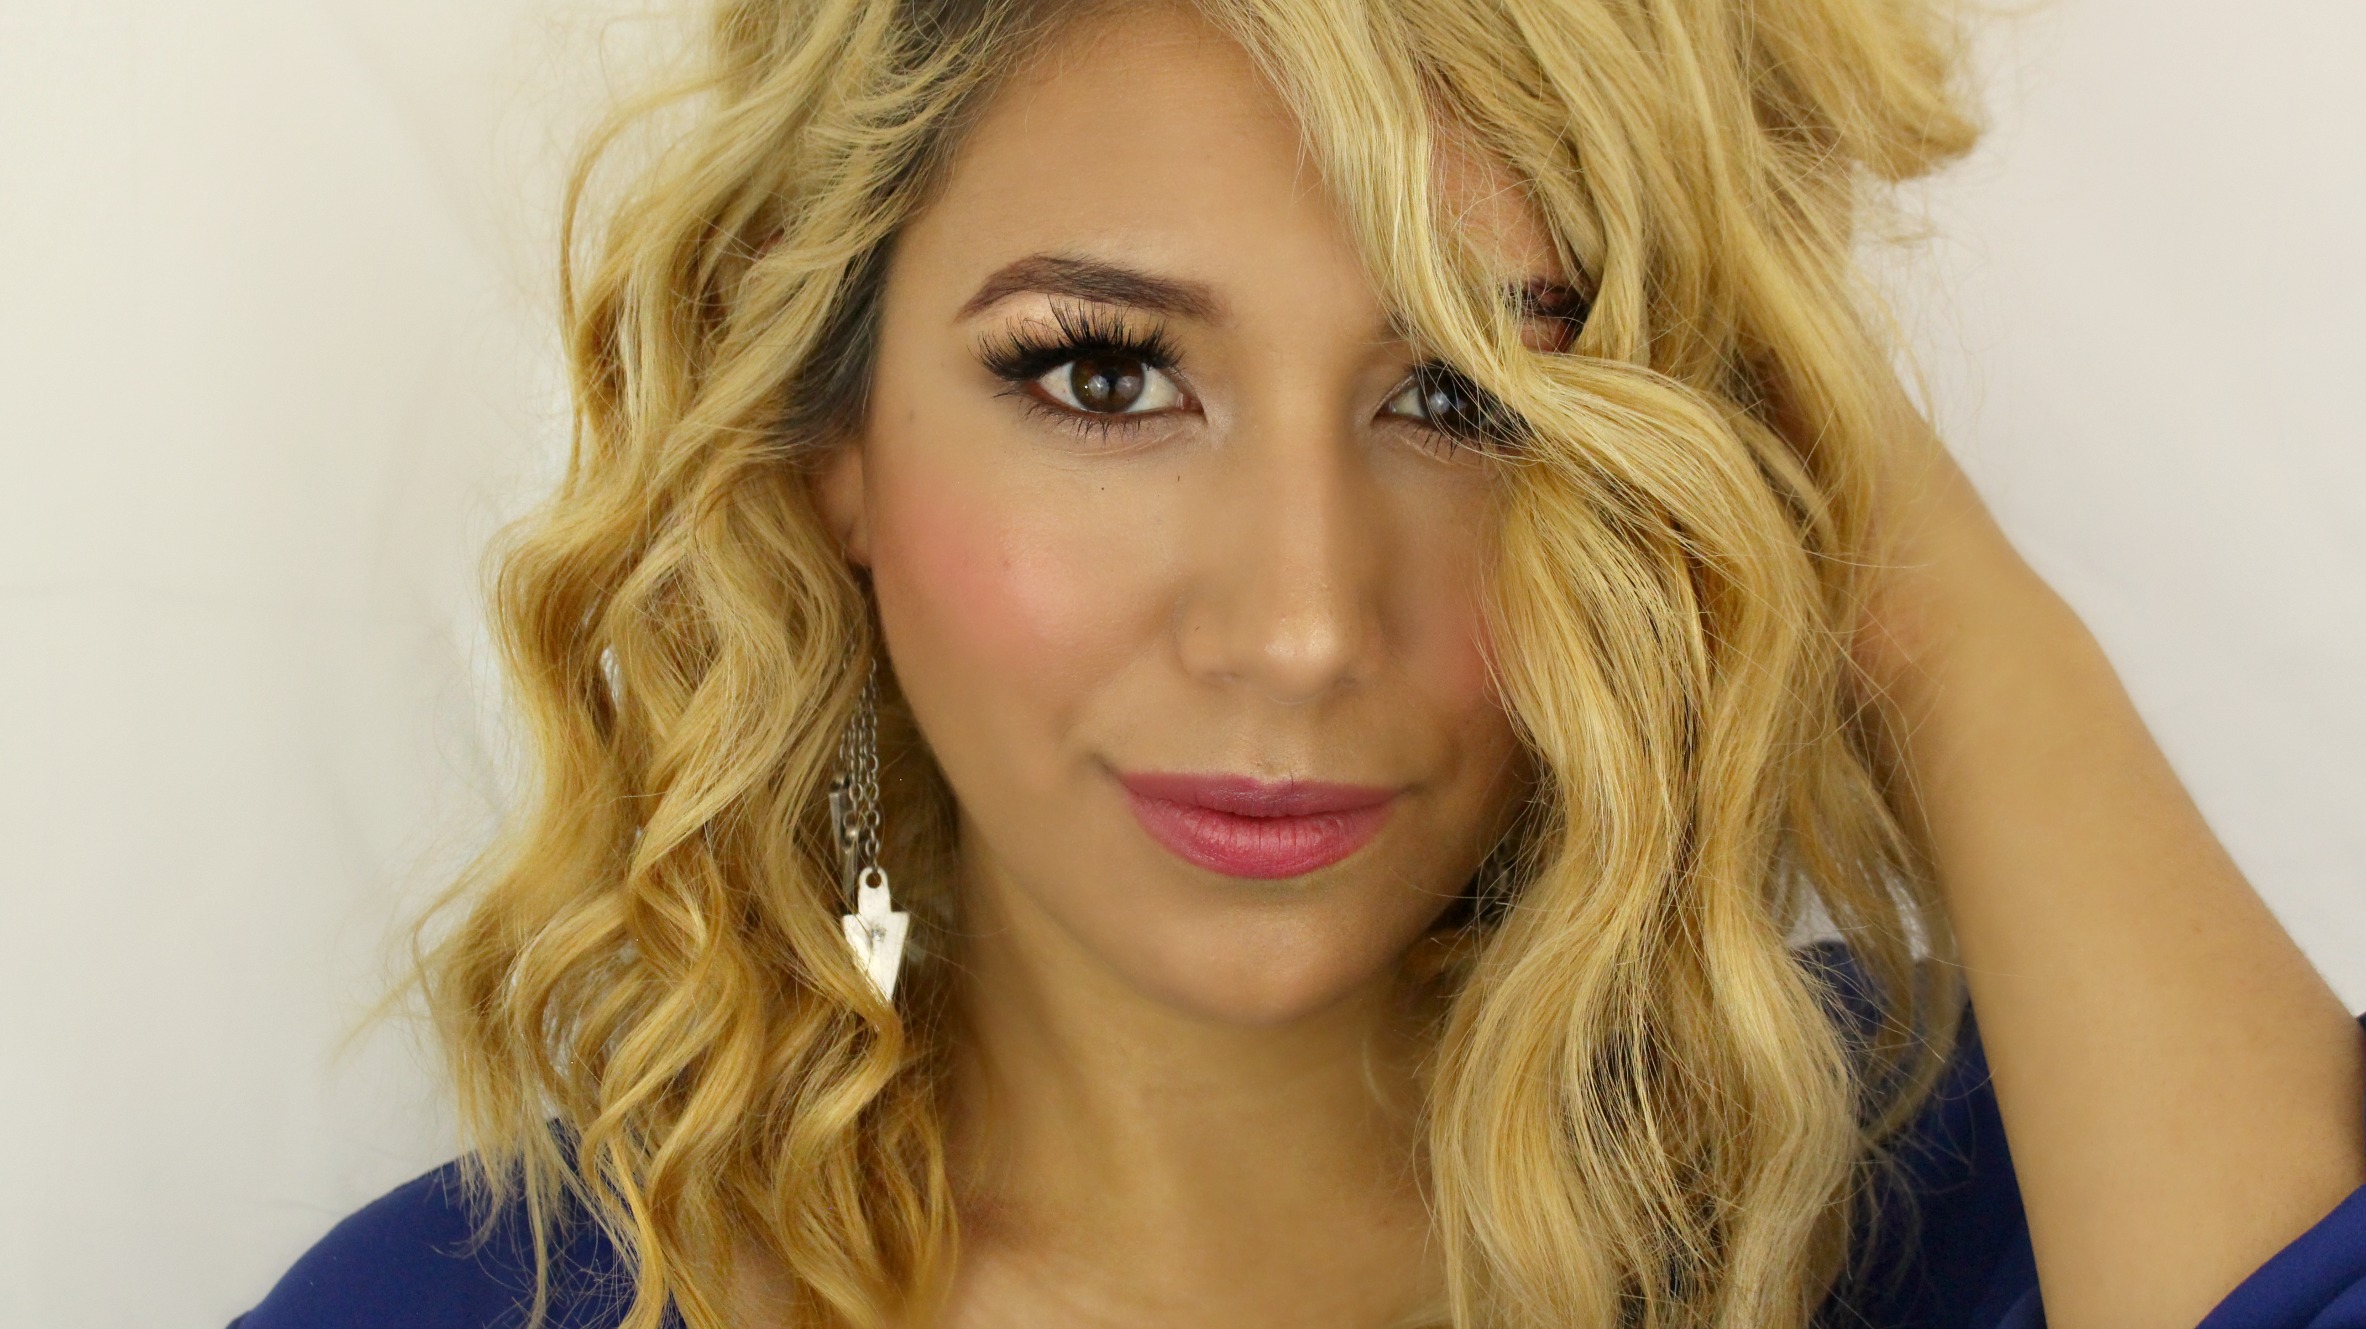
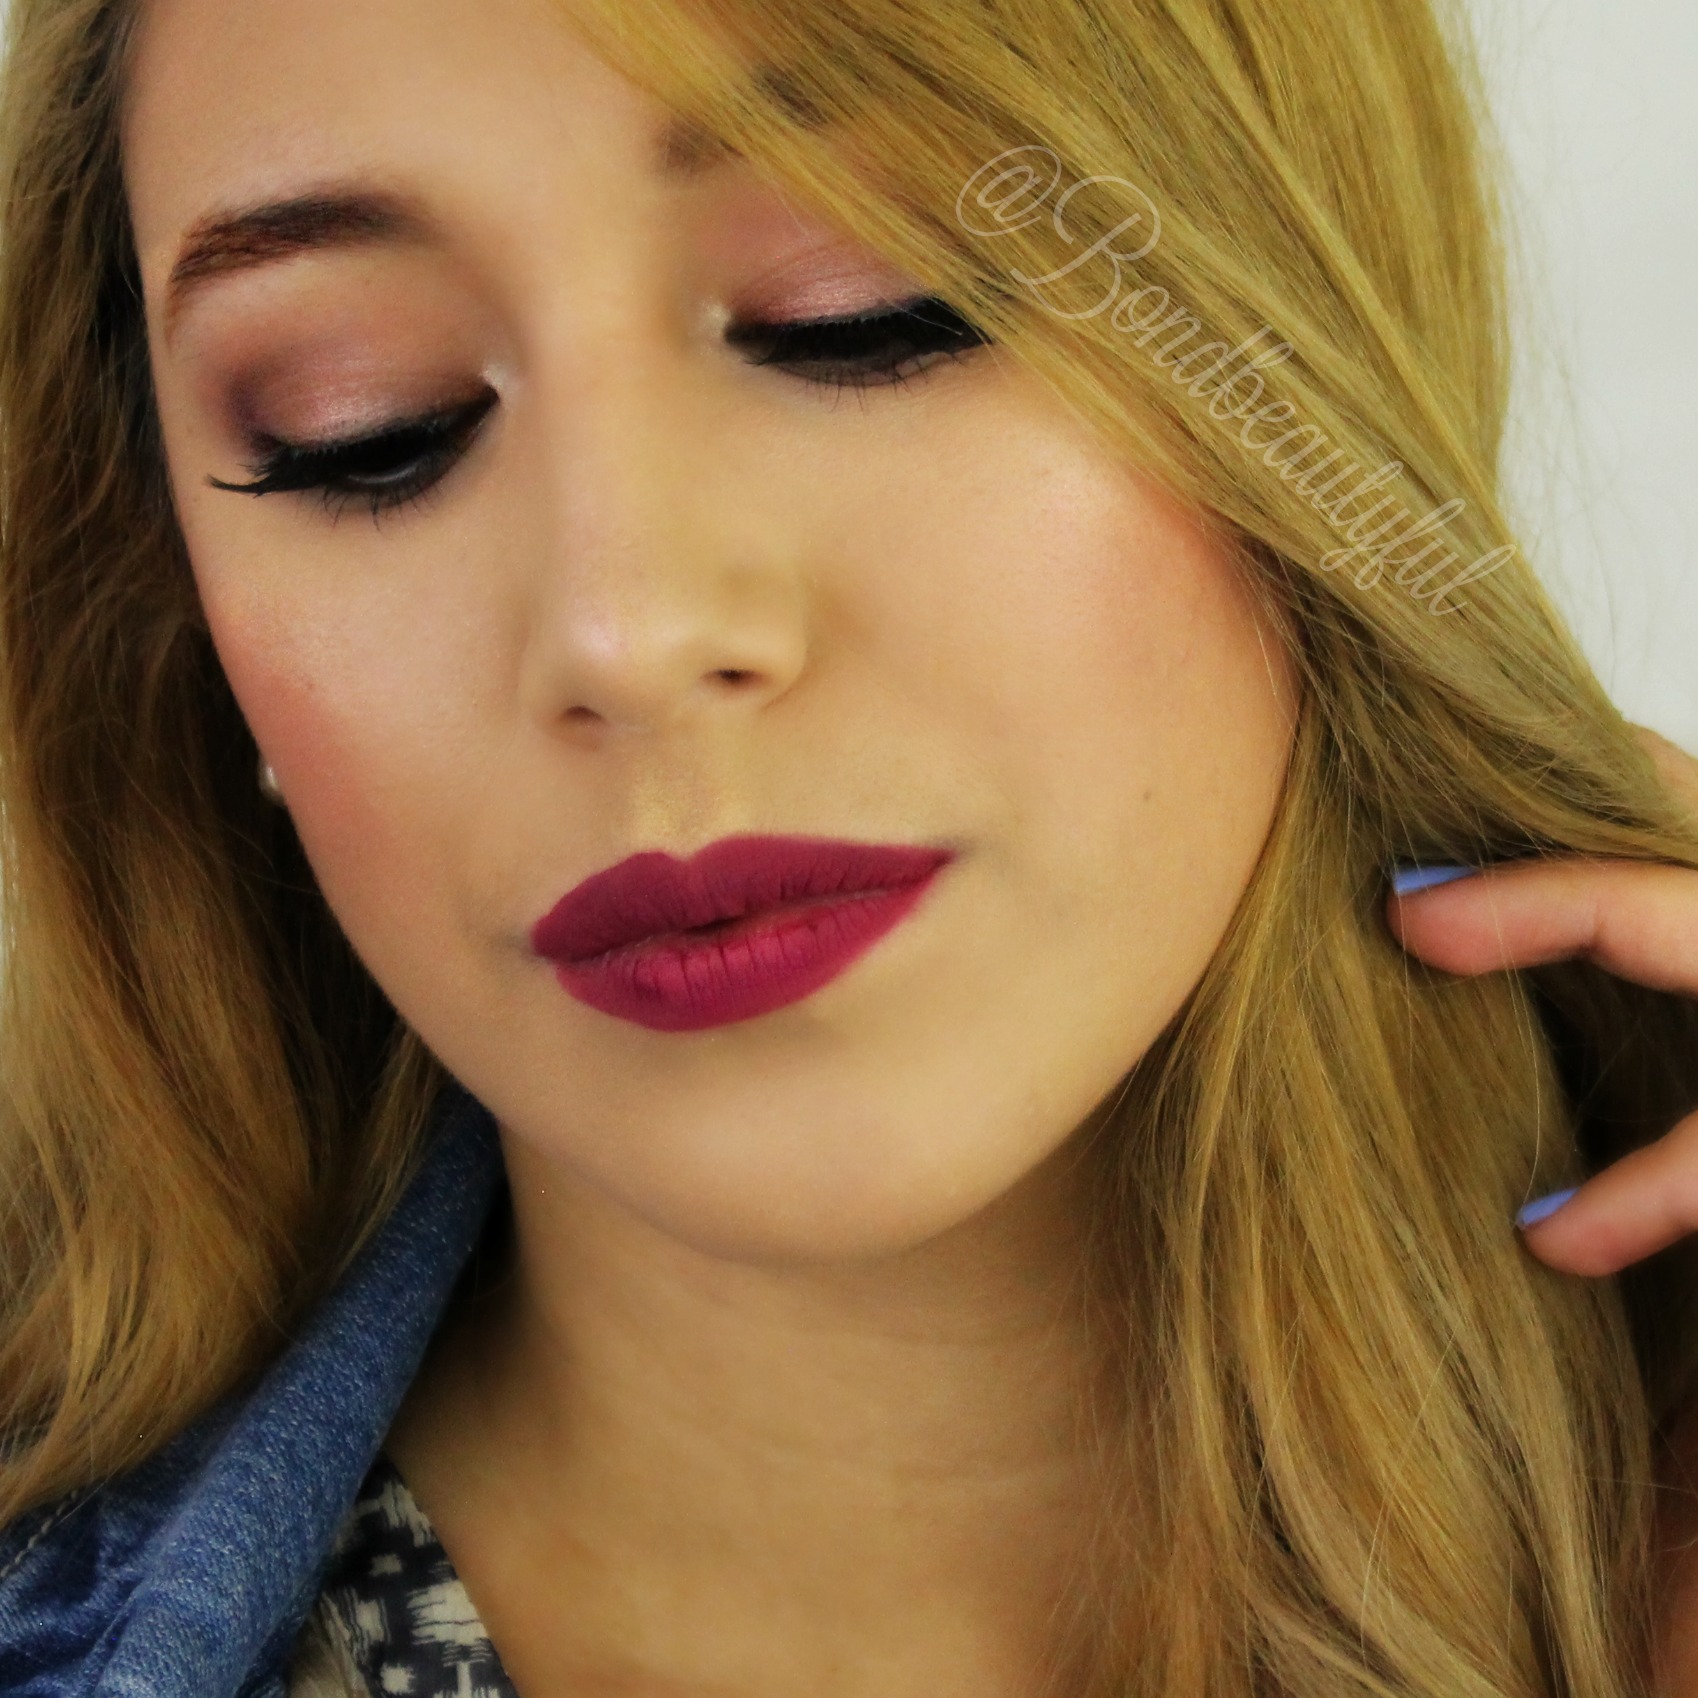
Overall the Foundation is my personal favorite! I think it looks beautiful on camera, in pictures & in person. As it warms up to the skin it becomes almost skin like. It looks so natural and beautiful. Also it is a High Medium Coverage when applied with a brush & it is perfect for my needs.
This is one of my Recent Editorial Style Instagram Pics where I’m wearing the Foundation. Also it matches perfectly with my undertone.
WetNWild Photo Focus Foundation Golden Beige (Matches Fit Me Matte & poreless 220)
As far as the other products I tried the cushion products are amazing. I love how they dry down completely so I don’t need to set it. It also lasted longer than any of the other contour / highlight products I have tried from wet n wild.
I also love the undertone of their contour shades, the cushion & stick. They are a perfect natural shade that isn’t too warm or too cool. I feel like these are the most universal shades. Plus the cushions last me 12 hrs (when applied with a brush)
WetnWild is one of the most affordable brands at the drugstore; and for them to come out this year with some amazing products is fantastic. I feel like they came out swinging!
Wearing:
PhotoFocus Foundation Golden Beige
Blush Stick Floral Majority
Contour Stick Where’s Walnut
MegaGlo Highlight Precious Petals
Have you tried any of these products? I hope this was helpful!
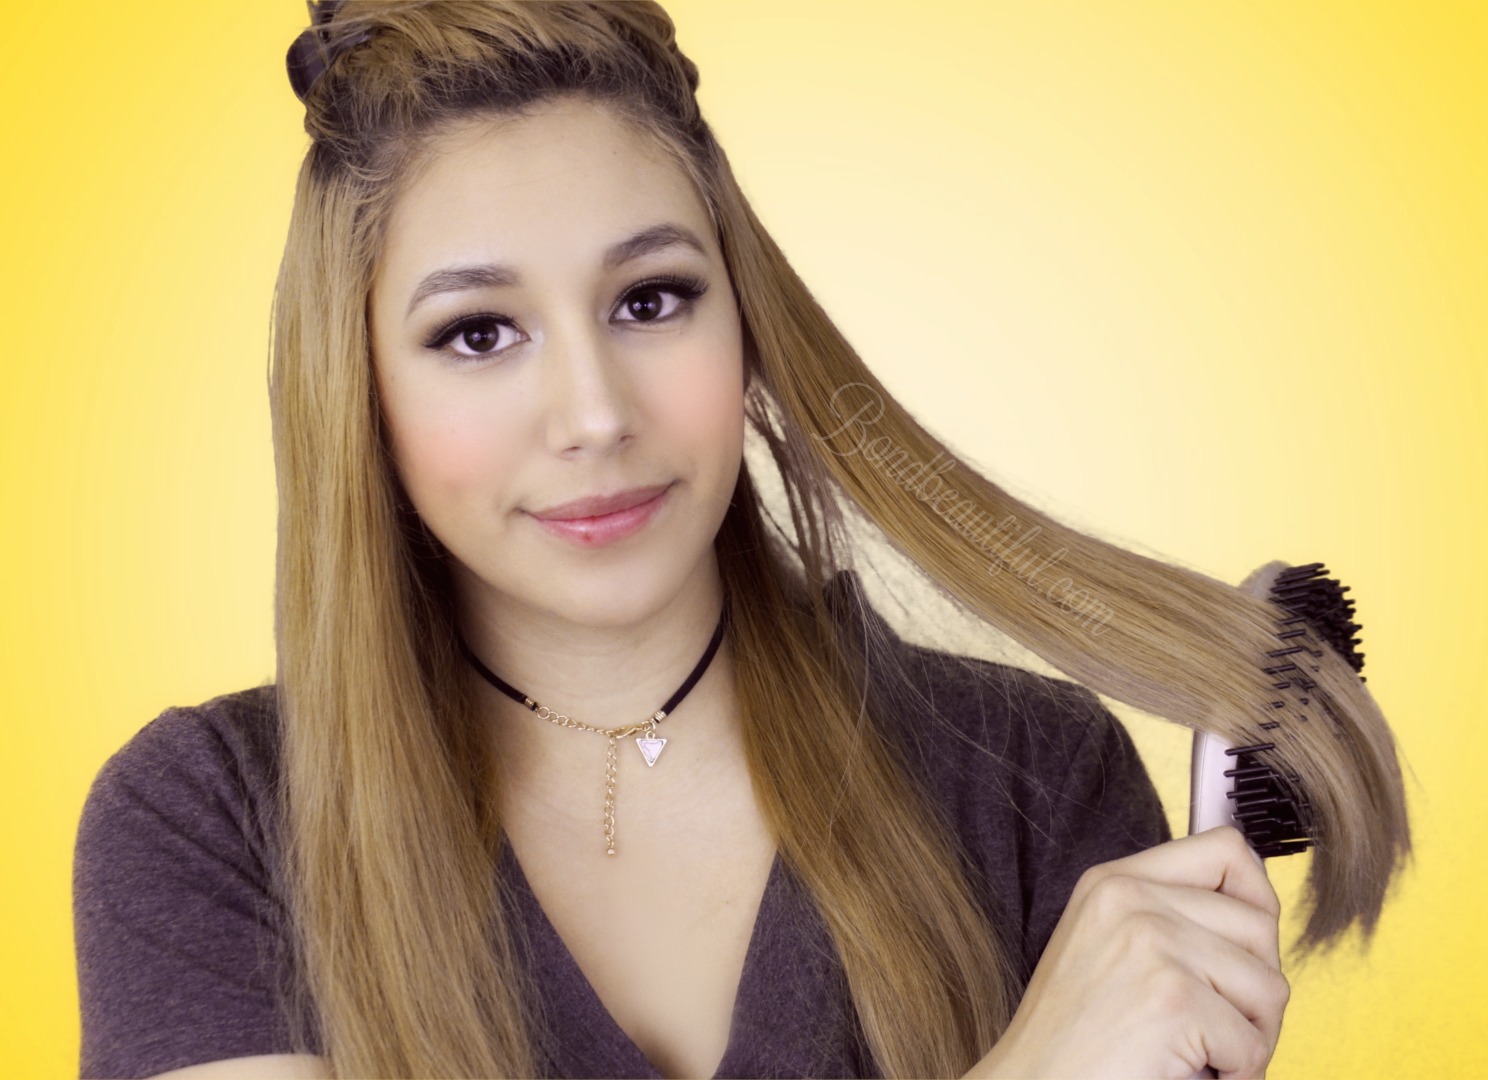
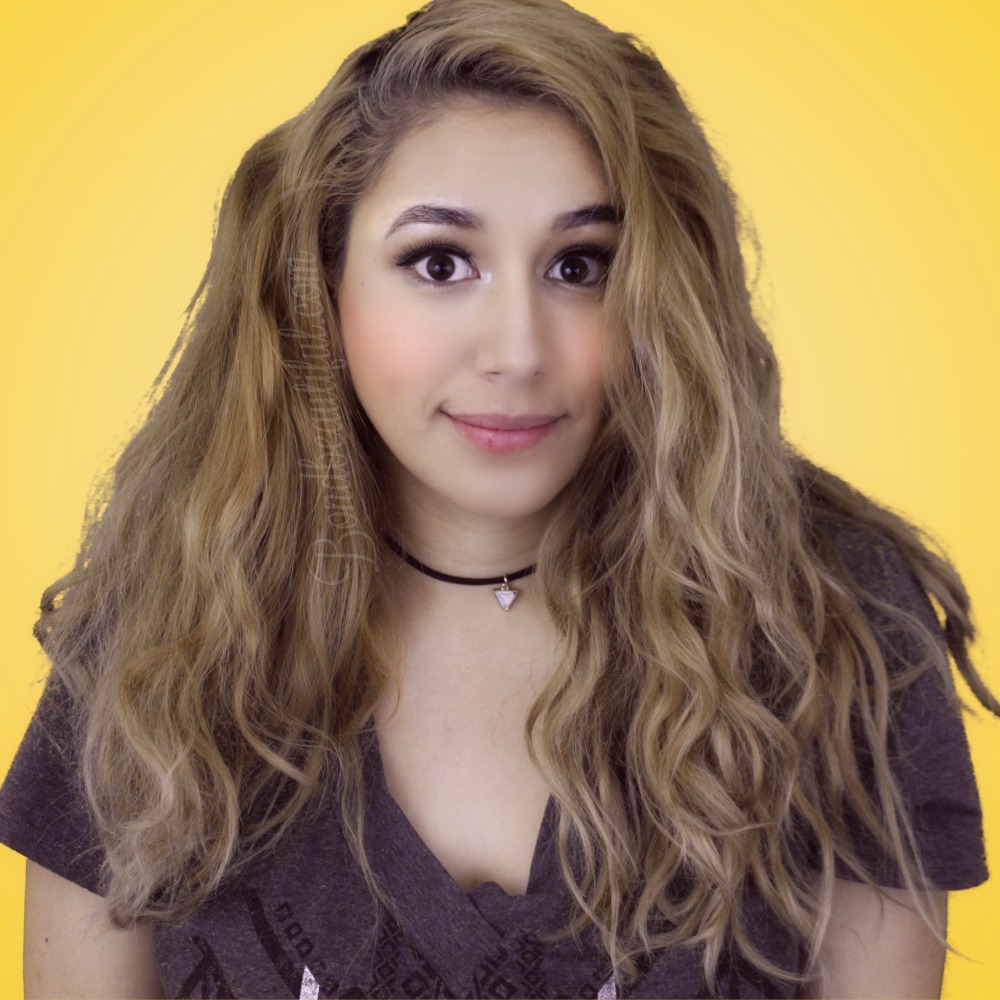
Its been a long time since I have done a post. With that said one of my new years resolution is to be more consistent in my blog & youtube. I really want to do more this year and I hope you guys are as excited as I am for this new year! So Im starting out this year right with a giveaway! With that said you will have to wait till the end to learn more about that. Today I wanted to tell you my thoughts and experience with the AsaVea Hair Straightening Brush*. I was sent this brush a couple weeks ago to try out and I have been so impressed with it that I decided to do a whole blog post about it.
Lets talk about what the company claims really quickly (Inserted exactly from the website*) Advanced MCH ceramic heat technology delivers a consistent optimum temperature Suitable for a variety of hair types with seven temperature levelsfrom 330˚F to 450˚F Give you smooth, straight, frizz-free hair in half the time it takes to use a flat iron.
PROS:
Heats up & Cools Down Quickly
Because of the Bristles it creates a barrier between you and the flat iron part to help prevent burning; although the bristle still get hot they are not as hot as the iron plate underneath.
Decreases frizz when straightening because of the brush & iron combo. (although for my hair it definitely illuminates some of the frizz but not all because of how frizzy & damaged my hair truely is)
Temperature is suitable to fit all hair types. I like to have it at 410
Straightens & styles my hair without leaving it flat. It straightens it & gives it volume.
Love how it styles BANGS does an amazing job & makes it easier. (see video below for small demo)
Minimizes damage because I only pull it through my hair 2 times!
CONS:
Takes the same amount of time for me to straighten my hair. (But for others with super super curly hair & non manageable hair it can minimize your hair straightening time if you use this first)
If you have really tangly or damaged hair you need to use a brush first or it will rip your hair out. Its not soft enough to use this to get tangles out!
For some the Price will be a CON it retails for $54.94* ; But with that said to get a really nice straightener it costs about the same or even less than a CHI
So with that said lets talk about some Tips & Tricks to making this the most affective.
I comb my hair through before using this
I divide it into 1inch sections
I pull my hair straight (still gently) while I pull the comb through
Start at the very roots & pull through slowly
DO NOT STOP Always keep moving to prevent any burning or damage
AT the very end curl the ends by turning your wrist in or out depending on what look you are going for
At the Crown I Will divide the section I would usually tease and put Comb at the base & pull backwards (Making a n motion)to give it extra volume. (See video same motion as I do with my bangs)
Here is how my hair turned out: Before & After (see video below)
I was a skeptic but now I have converted to the Straightening brush way haha. I really do enjoy using it and because I don’t get burned as easily I will definitely use this more than my straightener. Even though I do not have really curly kinky hair I have seen it used on that hair type and it works wonders as well. So with all that said in my opinion I think it will work on all hair types & it is worth the buy.
Here is my full review , where I show the Straightening Brush & I show you a full demo of me using it!
For the giveaway just click here to enter! All you need to be is subscribe to my youtube and then you get lots of bonus entries! Make sure to read the rules carefully too! Good luck!
So tell me tell me what is one of your new years resolutions?
*I do receive a small amount of compensation if you click and use my link. If you choose not to feel free to look the product up on amazon or google!