BondBeautYful

Find Your Beauty From Within

Menu

Skip to content
  • About
  • Beauty
  • Bondbeautyful LIfe
  • My Foundations Shade Matches

Category Archives: DIY Projects

1 Brand Makeup Tutorial: Bombshell Makeup

6 / 17 / 166 / 18 / 16

thumb 2

Hello my Bondbeautys,

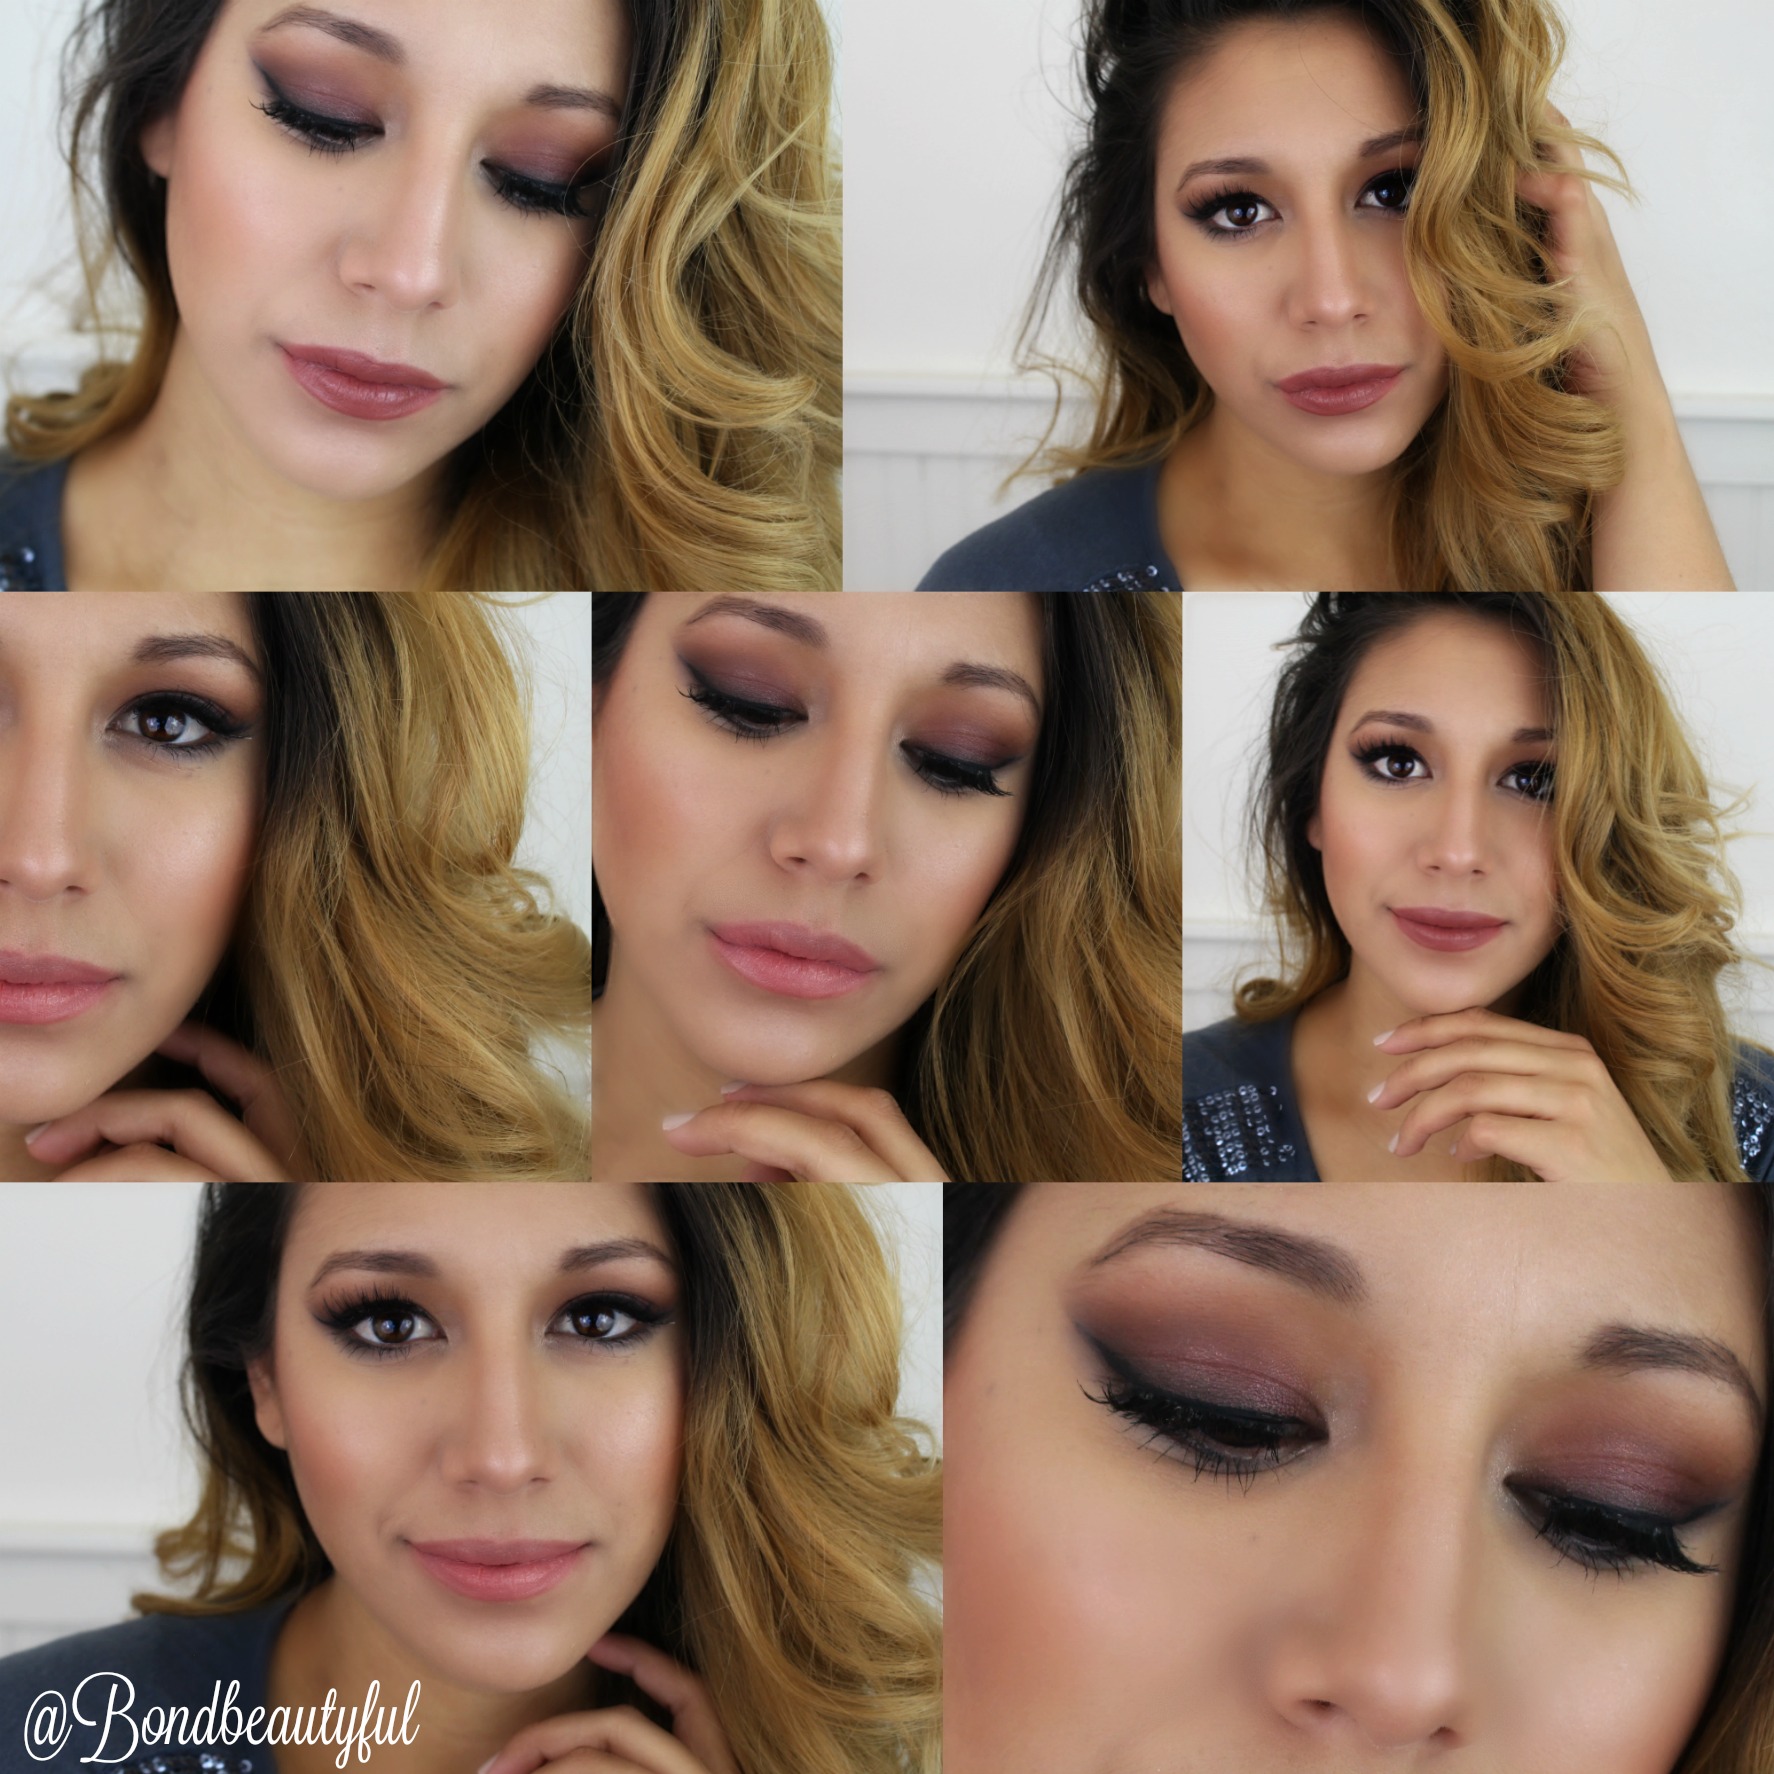
Today I am so excited to bring to you this tutorial because this is a collaboration with two other beauty you tubers! I am collaborating with Piper Hampton & Velmalee.  They are amazing & talented. Plus they are also very entertaining which is why we make videos right? Any ways we are each doing a one brand tutorial using a drugstore brand. I decided to do Wet N Wild because of how CHEAP they are. I rarely use the word cheap to describe a brand, but I wanted to get my point across. They are so affordable that sometimes they get looked over because of it. Just because they are CHEAP doesn’t mean they are CHEAP. Their products are amazing and to prove it I went all out glam with this Bombshell look; using only their products.

bombshell collab thumb

This look is so beautiful and anyone can recreate it, I make it super simple. Its sexy & perfect for a special occasion! (Tutorial down below)
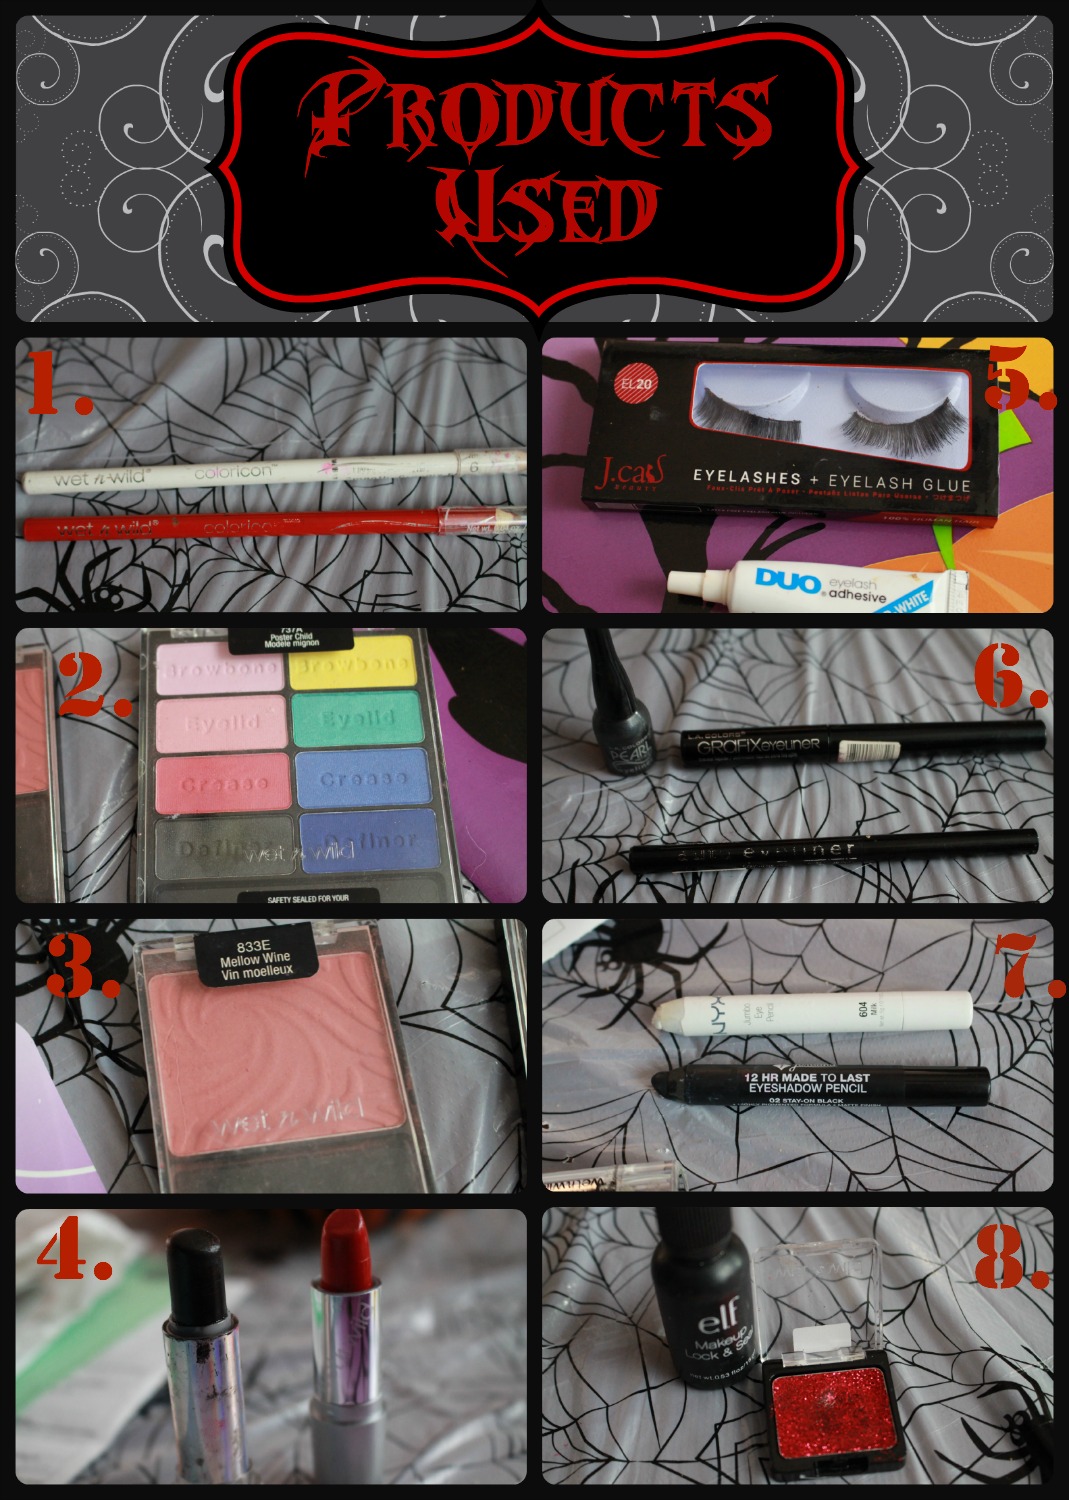
Products Used:

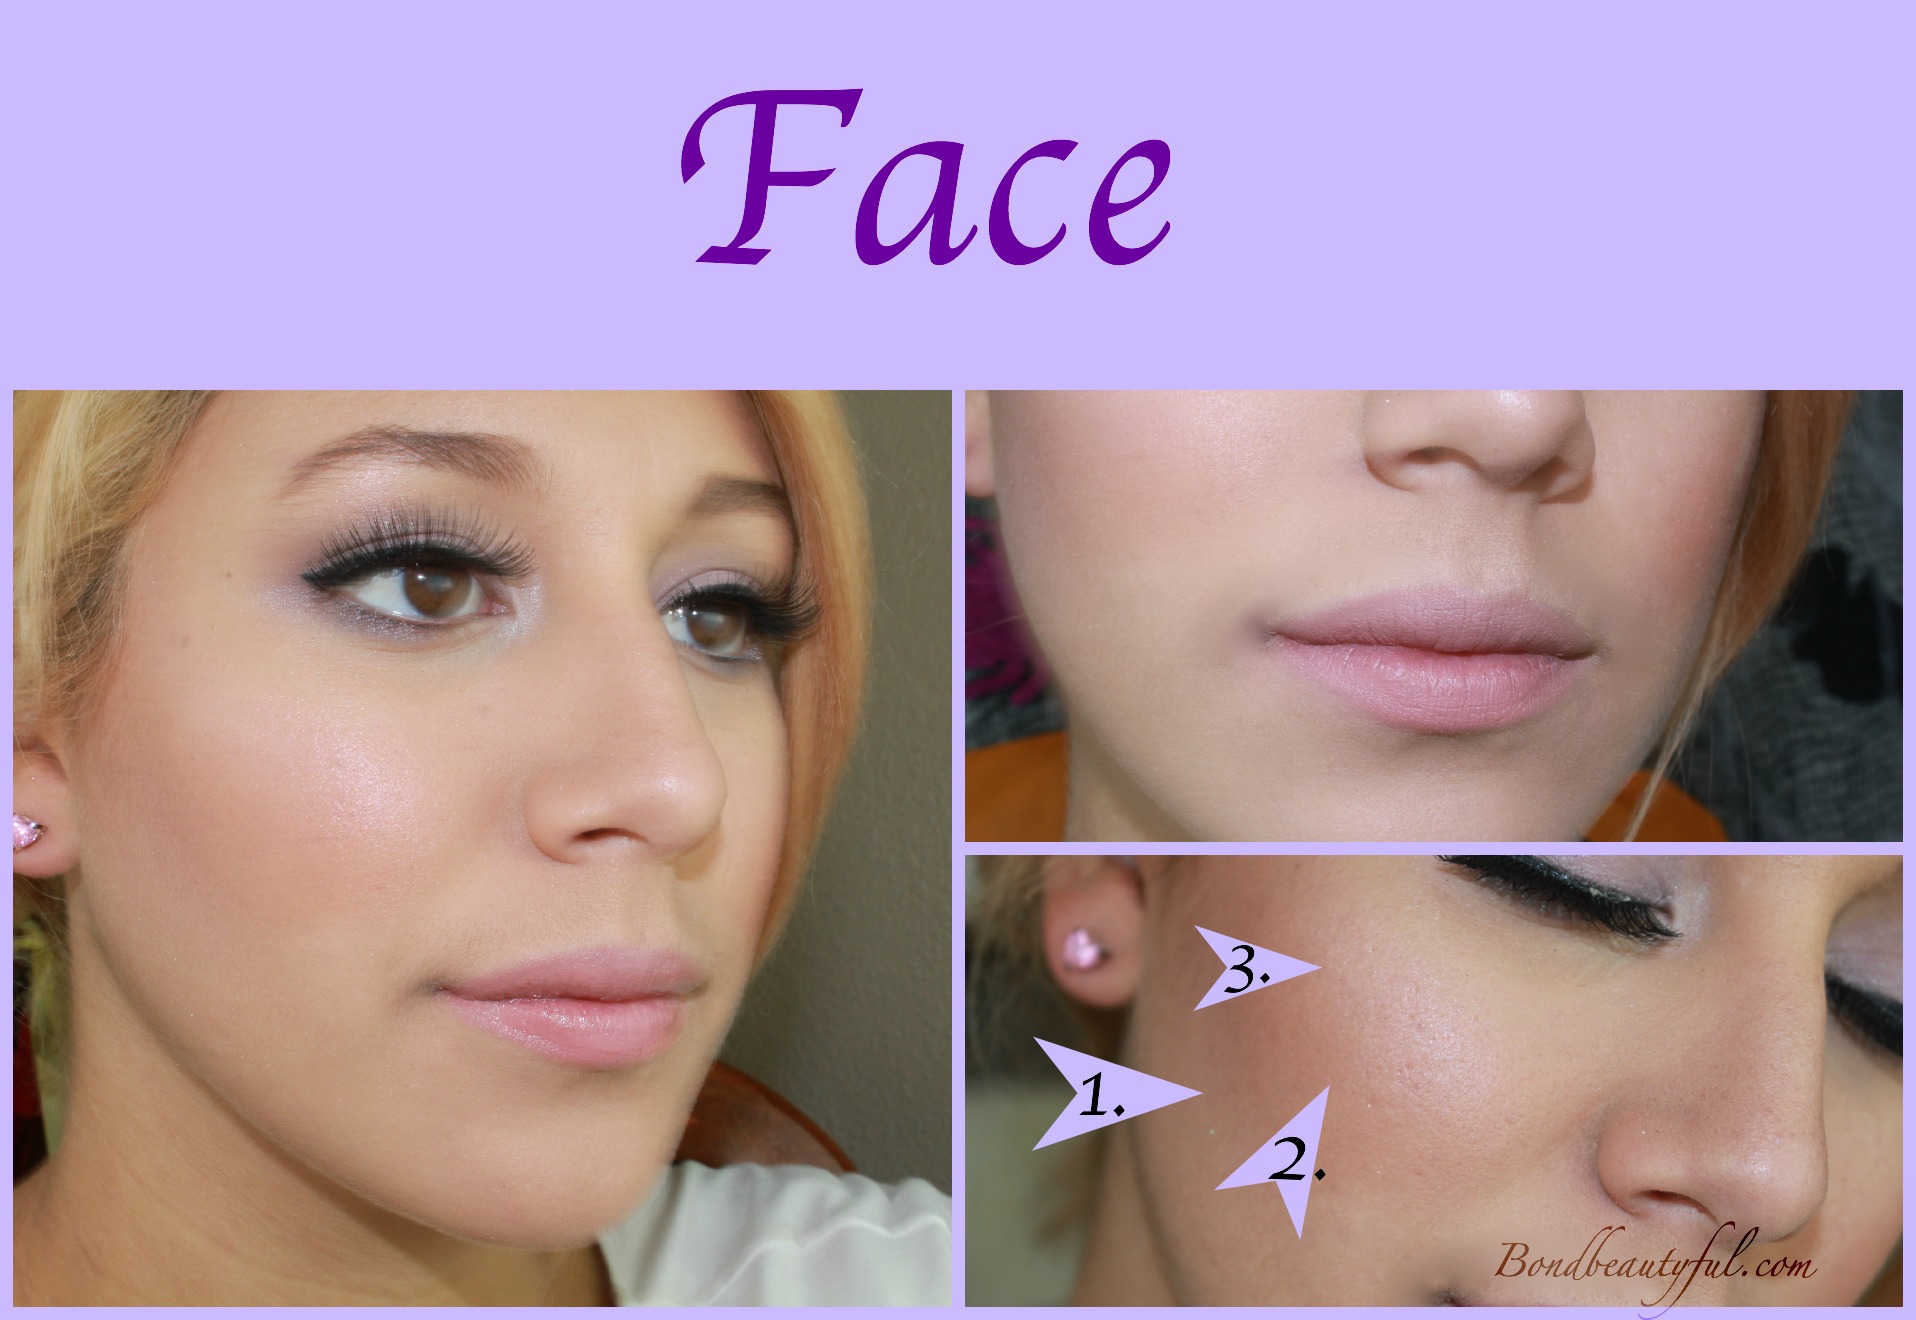
  • Wet N Wild Coverall Foundation & Primer
  • Wet N Wild Megaglo contouring palette contour Dulce De Leche
  • Wet n Wild Coloricon Blush Apri-Cot in the Middle
  • Wet n Wild To Reflect Shimmer Powder Boozy Brunch
  • Wet n Wild Megalast Lipstick Bare it All
  • Wet n Wild Petal Pusher Palette
  • Wet n Wild Single Eyeshadow Nutty
  • Wet n Wild Poster Child Palette (Black)
  • Wet n Wild illuminating concealer pen Posing Nude & A Happy Medium
  • Wet n Wild Color icon eyeliner pencil Mink Brown& Black
  • Wet n Wild H2o Proof Liquid Eyeliner Dark Brown
  • Wet n Wild Lengthening Mascara

thumb

This look is something that I did recently on my 100 days of makeup I am doing on my Instagram. Basically every day for 100 days I am challenging myself to do a different makeup look. I did this on Sunday on Instagram and so I decided to show you how to do this on my youtube today!(The exact picture is down below) If you are interested in all my makeup looks I have done check out my Instagram!

Day 5

(In the Instagram picture I used different products but I recreated the same look using Wet n Wild down below!)

Let me know what makeup tutorials you want to see next!

my signature

Leave a comment

Lilac Bridal Look

10 / 30 / 145 / 24 / 16

Lilac Bridal Look

Hello my Bondbeautys,

I am so excited to share this Bridal Makeup Look with you guys ! For this look I paired up with Lover.ly , which is a online one stop shop for brides. I was really surprised when I visited their website, it really is a one stop shop! I wish this was around when I got married it would have made wedding planning a whole lot easier!

They sent me pictures of three different dresses and I immediately got inspired by the beautiful strapless dress with purple detailing at the bottom. The first thing I noticed on this dress was the beautiful ombre fabric on the dress. It turned this dress into a non- traditional wedding dress. This gave me lots of leg room for what type of makeup to do. Usually bridal makeup is more neutral and natural; but for this look I wanted to add a modern twist by having lilac eye makeup instead of the usually browns. It added flavor and a modern twist to this bridal look without making it look informal. The sweetheart neckline gave me even more of a reason to use a such a feminine color on the eyelid.

Face & Dress

This Lilac Bridal Look that I have created for you will compliment this dress perfectly. The Lilac eye makeup really ties the makeup and the gown together nicely. I wanted this look to be fun and flirty but still elegant. I wanted you to notice the makeup but I didn’t want to take away from how stunning the dress looks. So enough of all the blabbing lets get started with how to accomplish this look. (List of  the products used will be below).

Eeyes

  1. First I applied a white cream eyeshadow base to the Eyelid area. (to help the lilac color show up more vibrantly.)
  2. I then applied a cream matte shade to the brow bone for a subtle highlight. (because the dress is so eye catching I didn’t want to distract with shimmery makeup!)
  3. Then I applied a matte Lilac Shade to the Eyelid. (Using patting motions for the most color payoff).
  4. Next I applied a Light Cranberry Shimmery Shade on the outer half of the lid. (Blend the two shades together)
  5. Apply a Medium Brown shade to the crease with a crease brush.
  6. To deepen the crease I used a Matte Grey shade in the crease and lightly to the outer third of the lid. Then make sure to blend with a fluffy blending brush.
  7. I Also added that same Grey in the lower lid. I also added a pearly white shade to  the inner corner of the lid. (doing this opens your eyes more and it looks stunning in pictures)
  8. Next is  winged liner. I also added a dark eyeliner  to the tight line and in between the upper lashes to add volume. Then in the waterline I added a white eyeliner pencil to open up the eyes even more!
  9. No Bridal look is done without adding lashes! (Lashes really show up beautifully in pictures so even if you are not a lashes girl I would highly recommend them for your wedding pictures).

Eyes done

Since the dress is a strapless dress it adds a sexy vibe to the bridal look ; so I wanted to incorporate that into my eye makeup with a winged eyeliner. Having your eye makeup done is only half of it, next is having flawless face makeup.

Face + Ffinished

  1. First I applied a Matte Bronzer underneath the cheek bone for a nice contour. (Even if you never contour or highlight your face doing so on your wedding will make such a difference in your pictures. Don’t you want that bridal glow?!)
  2. Next I applied my blush, I chose a blush that is more of a natural Pink shade. (you don’t want to much purple or it won’t look natural and will take away from the dress.)
  3. Last I applied a pink highlight shade to the tops of my cheek bones, nose & cupid bow.
  4. For the Lips I decided to do more of a nude pink shade . I used a matte lipstick and then later added a lipgloss for that shiny finish. (Matte or Shiny is up to you, they both photograph beautifully).

This makeup look is so easy you can do it at home. If you are getting it done by a makeup artist make sure to do a trial run. I hope you guys like this look, if you do feel free to pin these pics on your Pinterest for later! Thank you so much for all your support and also thanks to Lover.ly for featuring me on their website! Make sure to check out their website!

last pictureProducts I Used:

Face:

  • Covergirl Stay Fabulous Foundation
  • Rimmel Stay Matte Powder
  • Instant Age Rewind Neutralizing Concealer (Under the eyes inverted triangle shape)
  • L’oreal Feel Naturale Blush Au Naturel
  • Pixi Bronzer: Subtly Suntouched
  • Elf Baked Highlighter: Baked Diamonds
  • ELF Matte Lip color: Natural
  • Philosophy Holiday hugs lipgloss

Eyes:

  • Kirkland Borghese Palette (Lilac ,cream & Grey Eyeshadow)
  • NYX Eyeshadow Pencil : Milk
  • Profusion Neo Perle Eyeshadow Journal( Cranberry Eyeshadow)
  • Naked  Palette: Virgin (Highlight in the inner corner)
  • Wet N Wild Eyeliner: White (Water Line)
  • Starlooks Obsidian Kohl Pencil (Tight line & In between Lashes)
  • Essence Gel Eyeliner: Midnight in Paris (Winged Liner)
  • L’Oreal Voluminous Butterfly Waterproof Mascara
  • Kiss 01 Lashes (Duo Lash Glue In Clear)

Don’t Forget Beauty Comes from Within so Let yours shine!

<3 Love, Bondbeautyful


Leave a comment

Harley Quinn Halloween Makeup

10 / 22 / 145 / 24 / 16

harley quinn thumb

Hello my Bondbeautys,

Yes , I am doing another halloween makeup look. This time I am doing a collab with another Beauty Guru on youtube , we decided to each pick a villain from the Batman Comics. I decided to do Harley Quinn and she is doing Poisen Ivy. I am so excited I loved the Batman Comics as a kid and still do , last year I did do a cat woman Halloween look too. A video is so much easier to do for this because of all the steps.

I hope you enjoyed the tutorial. This was actually a pretty easy look to do it just took a few steps ; but I felt like it turned out great.

Harley Quinn FaceFor the face I decided to use my reg
ular foundation and concealer rather than a white face paint. I really wanted Harley Quinn to still have her pretty look rather than look ugly. So all I did was apply my concealer & foundation, then I used a red blush on the cheeks.


harley quinn eyes

The eyes are a little bit more complicated. I decided to do a  black smokey eye on and smudge black eyeliner on the lower lid. Harley Quinn’s costume is half black and half red so I decided to incorporate the red in with the eyebrows. I just used a Lipliner and then applied red shadow on top to make it more long lasting. I did notice that my lashes got lost in all the black so falsies are definitely going to be your friend with this look. I think that all the curvy lines and dots really added to her look and made it seem more like her.I did decided to do a winged eyeliner on the upper lash line & fill in the waterline with a red lipliner. (Any time you use lipliner make sure to top of with red eyeshadow.) I also went onto of my winged liner with a glittery eyeshadow to add some sparkle and red into the eye look.

The mask was pretty easy to do with an eyeliner, if it is easier for you just map out your lines with a white or nude eyeliner first. I really wanted to keep the diamond trend going on the face because her costume has lots of diamonds on it. So thats why I made my mask look more like diamonds.

harley quinn liips

I wanted the Lips to be a big eye opener so I decided to do a diamond in the center of the lips but make it half black and half red. Then on the outside of the lips I used the opposite colors. I did decided to make my lips more pointy and a little thicker than my actual lips to play up the costume.

harley quinn products


  1. Wet N Wild Eyeliner : White , Wet N Wild Lipliner: Berry Red
  2. Wet N Wild Palette: Poster Child (Red &  black)
  3. Wet N Wild Blusher: Mellow Wine
  4. Wet N Wild Lipstick: Cherry Frost 514a , Wet N Wild Fantasy Lipstick: Black
  5. J Cat Beauty Lashes: EL20 , Duo Lash Glue: Clear
  6. LA Colors Pearl Eyeliner, LA Colors Grafix Eyeliner, LA Colors Automatic Eyeliner
  7. Jordana 12 hr Eyeshadow Pencil: Stay on Black , Nyx Jumbo Pencil : Milk
  8. Elf Makeup lock & Seal, Wet N Wild Single Glitter Eyeshadow: Vices

I hope you guys enjoyed this Halloween Look, I had so much fun doing this collab with Gemma! Make sure to subscribe for my youtube for more videos & like my Facebook Page!

Don’t forget Beauty Comes from Within so let yours Shine!

<3 Love, Bondbeautyful

Leave a comment

DIY Family Photo Ideas (Easter Sunday)

4 / 21 / 145 / 24 / 16

Happy Easter 1April 20,2014

Happy Easter My Friends,

Sorry I have been missing in action for a while! We just moved to North Carolina and we still are not in our new apartment! No worries though I have a fun blog post for you today! Easter sunday is family picture day and we have some great ones for you! My friend used my camera to take these and I edited them, so you can do it at home no professional needed!

husband and wifeTheres lots of editing software you can use, but I’ll let you in on a little secret…

Picmonkey

easter 2easter 3 Another great program I like is also Gimp, and photoshop. The camera I use is Canon Rebel T5i and I absolutely love it! I also just used natural light outside , thats it so here are some more great family picture ideas I hope you enjoy..


eeaster 3easter basketbhyrumhungryEggs.
family 5

hyrum0

hyrum egg 1

easter bunny

I also met my 300 Subscriber goal on youtube and wanted to do a fun different type of video for your guys so enjoy!

If you Haven’t see my Bondbeautyful youtube channel check it out!

I hope you guys enjoyed if you have any more questions let me know! Happy Easter to all of you from the Bond Family!

Remember, Beauty Comes from Within So let it SHINE!

<3 Love, Bondbeautyful


Leave a comment

DIY Cute Candy Machine

2 / 17 / 142 / 23 / 14

DIY Candy MachineHello Ladies…

Happy Monday, its time for another cute DIY project.

This is a great gift, decoration or just project to hold your candy!

This is an easy Candy machine to make and pretty inexpensive…


What you will need:

Need


This is a super easy DIY project you can do with your kids, or just for fun/gifts!

step 1 paint


So now that the painting is all dry lets make our candy machine look cute!

step 2


Now to finish off our DIY Project lets start Glueing!

step 3

See that was pretty easy! I personally love decorating my house for the holidays no matter how small, it adds some personality to my home…


FINISHED MACHINE


If you recreate this or do it yourself make sure to tag me on instagram #BondbeautyfulCandyMachine


Make sure you check out my social networks & youtube channel!:D

So whats your favorite candy?

Till next time, Remember Beauty Comes From Within so Let it shine!

<3 Love Bondbeautyful


Leave a comment

DIY Name Plate Gift

12 / 24 / 13

Plate 1Hello My Beautyful Ladies!

Merry Christmas EVE… I hope you guys are having a jolly time & are all ready for CHRISTMAS.. Are you still scrambling around to get a gift for a friend or family member? Well I have any easy , inexpensive DIY Gift! It cost me a total of $2 & didn’t take long at all! So here we go …

“>http://youtu.be/S53EMiFRWa8

NEED: Plate 2Glass Plate (From Dollar Store), Easel, & sharpies

Step 1:

Draw the Letter of there last name on the plate , Leave space for the Established .. ( you can use a stencil I just got on my tablet looked up different fonts & Free handed it..)
Plate 3

Step 2: write the Established and the date they were married… (use a ruler to get a straight line)
Plate 4

Step 3: Grab some dimes & Nickles & Trace them with your sharpie along the edges of the plate for a cute decoration!Plate 5Step 4: Write there full last name In the center over the letter..(make sure you let sharpie dry fully before writing over top)Plate 7

Step 5: last bake at 350 Degrees (I preheated it) & 30 minutes (check every 10 minutes to make sure colors aren’t fading)Plate 8Tips: If you mess up use rubbing alcohol to take off sharpie !

Plate 9

Simple as that! I hope you guys found this helpful & easy to do … Have a merry Christmas!

Plate 6Which plate do you like the best?

Till next time,

Remember Beauty Comes From Within

<3Love, Bondbeautyful


Leave a comment

VLOG: Tis the season to be Jolly (Christmas decorating)

12 / 4 / 1312 / 6 / 13

save 7Hello My beautyful Ladies!

Merry Christmas! Its time to jolly up my home… This is my first Vlog that I have done, and I thought you might like to join me as I bring some holiday cheer to my home! Maybe this will give you some holiday decorating inspiration or the very least entertain you! So take a look below to join me as I decorate my home!

So my Tree is a fake tree that is pre lit we got it last year during black friday.. We live in a apartment so Its hard to use real christmas trees but this will do for now..

save 1

Let me tell you Baby Hyrum was so excited when I put up the christmas tree!

save 4

So I have on my tv stand I thought I would so something very simple My husband put some christmas lights around the bottom of it and I just added some candy christmas trees & A nativity little gift I had received last year..

save 10save


So For my Kitchen I got a table runner (From dollar store) and decided to make decorations to go on top… I made candles & these super cute candy/bell holder for christmas..

save 6

I also put a christmas angel that i received last year as a gift and a christmas candle on my stove , as well as my santa cookie jar!

save 3

save 0


I don’t have a chimney but I decided to put my stocking up next to my candle decor in my living room wall.. I just hung them up with some clear hooks that you tape onto the wall…

save 5So I usually Film my videos in my room , so I thought it appropriate to decorate that room as well.. On my rocking chair I added a stuffed santa clause I thought was super cute!

save 11Then In my video area of the room I hung up some christmas ornaments , bells & I spread candy all around between my candles…

save 8

I had a christmas hat that I used to decorate with .. I also  Put some Gigantic candy cane sticks in among my dead wedding flowers !

save 9I also Had a christmas monkey and some left over candy so I put it in my little jewelry tray I made , I put the monkey in this ho ho ho stocking and sat it right on top!

save 2And thats it for my christmas decorating! I do want to get some santa clause chair covers that I saw last year.. So If I get more decorations Ill be sure to let you guys know! I hoped you liked my fun Vlog … Whats your favorite part of christmas? I really hope you are having a good wed! TIll next time!

Remember , Beauty Comes From Within..

<3 Love, Bondbeautyful


Leave a comment

DIY: Soap Dispenser

11 / 27 / 13

43Hello My Beautys

So First off HAPPY THANKSGIVING I hope you are all planning to eat lots of turkey! So I have another DIY for your guys , its been a while since I have done a craft.

9This is a easy to do soap dispenser. You can use any kind of containers you would like , mason jars, lemonade jars, etc.

I made Two soap dispensers and one for my dish soap.. These turned out really cute and it literally cost me less than 4 bucks.

If you want to see how I did this then check out my video.. or keep reading for directions..

What You need…

  • save
  • Container ( Im Using snapple bottles)
  • Glue gun or E6000
  • Paint or spray paint
  • Soap (I got mine from the $1 Store)

3Step 1: Paint the tops of the bottles (If you choose)

save 2Step 2: If your bottle has annoying wrapper then stick it in hot water & soap for 2 -5 Min

5Step 3: Then you can easily remove the wrapper and If there is still sticky residue then use olive oil..

7Step 4: Make A hole big enough to fit the dispenser through, You can use a knife like I did to create a hole or a drill (the hole will be covered so its ok if it looks jagged)

8Step 5 : Make sure the dispenser lid fits then Glue it down.

4Step 6: Add your soap or dish soap & wahla! 10

You now have an amazing home made , cute soap dispenser! See how easy it was! I hope you enjoyed.. HAPPY THANKSGIVING & TIll Next Time..

So do you have any DIY Suggestions?

Remember, Beauty Comes From Within

<3 Love, Bondbeautyful


Leave a comment

DIY Crisco Candles

11 / 7 / 1311 / 7 / 13

3

Hey My Beautyful Friends!

So I finally did my DIY Crisco Candles! They are so easy to make , they burn longer than regular candles & they take no time at all! So hopefully you are as excited as I am! So lets just get right to it!


Need:

  • Crisco 48 oz ( Whole thing makes 4 Big Candles & 2 Baby Candles)14
  • Glass Container
  • Crayon or eyeshadow (to color your candles )
  • Fragrance Oil
  • Candle Wick (amazon 50wicksfor 9.00)
  • Hot Glue Gun

45


So lets get straight to Business….

  1. 6Put Some Crisco in a Beaker ( I did four cups at a time which made maybe one candle )
  2. 7Boil water. Heat the Crisco up until it is completely melted. Stir Occasionally. (I used the double boiler method)(If you are using crayons to color the candles you can add them and let them melt with crisco)
  3. 7 (1)When Completely Melted let Cool For 10-15 Min.
  4. Get your Hot glue Gun & Glue Your Candle Wicks to the bottom of your Candle Jars.
    8
  5. Melt Your crayon and add to mixture or add Eyeshadow for some color9
  6. Add fragrance , 5ml or your choice to the mixture.10
  7. 11 Fill up the candles (you can use sticks to keep Wicks straight or you can just tug upwards while you fill the candles)
  8. 12Let Them Dry at room temperature for 5 Hrs or refrigerate for 35 Min (even when completely dry it still will be kinda soft)
  9. 13Last Just Trim Your Wicks To the Desired Length!

And Thats It , You will have some great smelling, cute ,easy to make Crisco Candles!

23Hopefully You enjoyed this easy to make candle recipe! So Whats your favorite Fragrance Oil? I love the Hawaiian Breeze One fromIWalmart! Till Next time!


Remember, Beauty Comes From Within

<3Love , Bondbeautyful


5 Comments

Haul : beauty + Candle Crafty

11 / 7 / 13

Photo Nov 06, 10 13 35 PM

Hello My beautyful Friends!

I hope You guys are doing well on this beautiful thursday. So I Have been in sort of a video rut , so my answer is to film a HAUL! I have some new beauty products & I got some craft stuff (Im going to make homemade crisco candles). Dont worry I’ll Do a DIY candle Blog Later today for you!

So here are some Pictures Of the things I purchased from walgreens!

Photo Nov 06, 10 18 55 PM


Now that your super excited to see what I got .. Check it out!

So here is my makeup look today! I used this Rimmel Palette that I got in the Haul I used all the colors and I love it.
My Lipstick is also NYC Lipstick & Gloss Duo Charmed

Photo Nov 06, 10 17 10 PM

Photo Nov 06, 10 19 18 PMSo whats your latest purchase? I hope you guys have a good rest of the day and make sure you check out my DIY CRISCO candle blog post coming up next.

Remember, Beauty Comes From Within

<3 Love, Bondbeautyful


Leave a comment

Posts navigation

1 2 Next Page

About

Hi Im Bondbeautyful, I’m a mom of 4 Boys. I like to share my thoughts on makeup & beauty as well as other tidbits. I’m a proud American/Latina beauty influencer & youtuber. I love sharing what I know and have learned with you.

Subscribe Via Email

Recent Posts

  • Green Fun Summer Dress Outfit
  • How to get rid of dry patches on your skin
  • JOAH Truly Yours Natural Finish Foundation Drops Review Swatches Dry Skin
  • Dior Backstage Face & Body Foundation
  • Foundation Week | 7 Days of Foundation

Archives

Pages

  • About
  • BlogBeautyful
  • Disclaimer Page
  • Home
  • My Foundations Shade Matches
Site made with ♥ by Angie Makes
Angie Makes Feminine WordPress Themes
InstagramInstagramInstagramInstagramInstagramInstagram