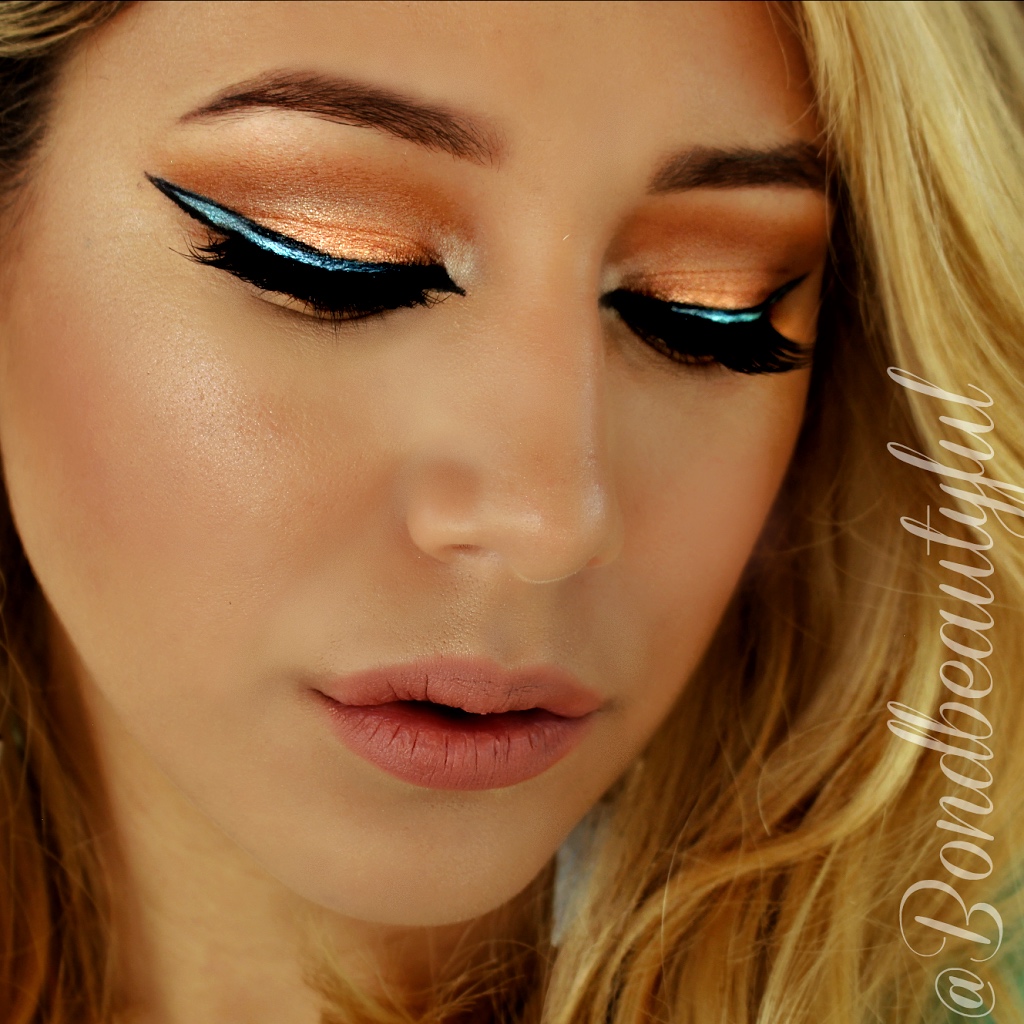
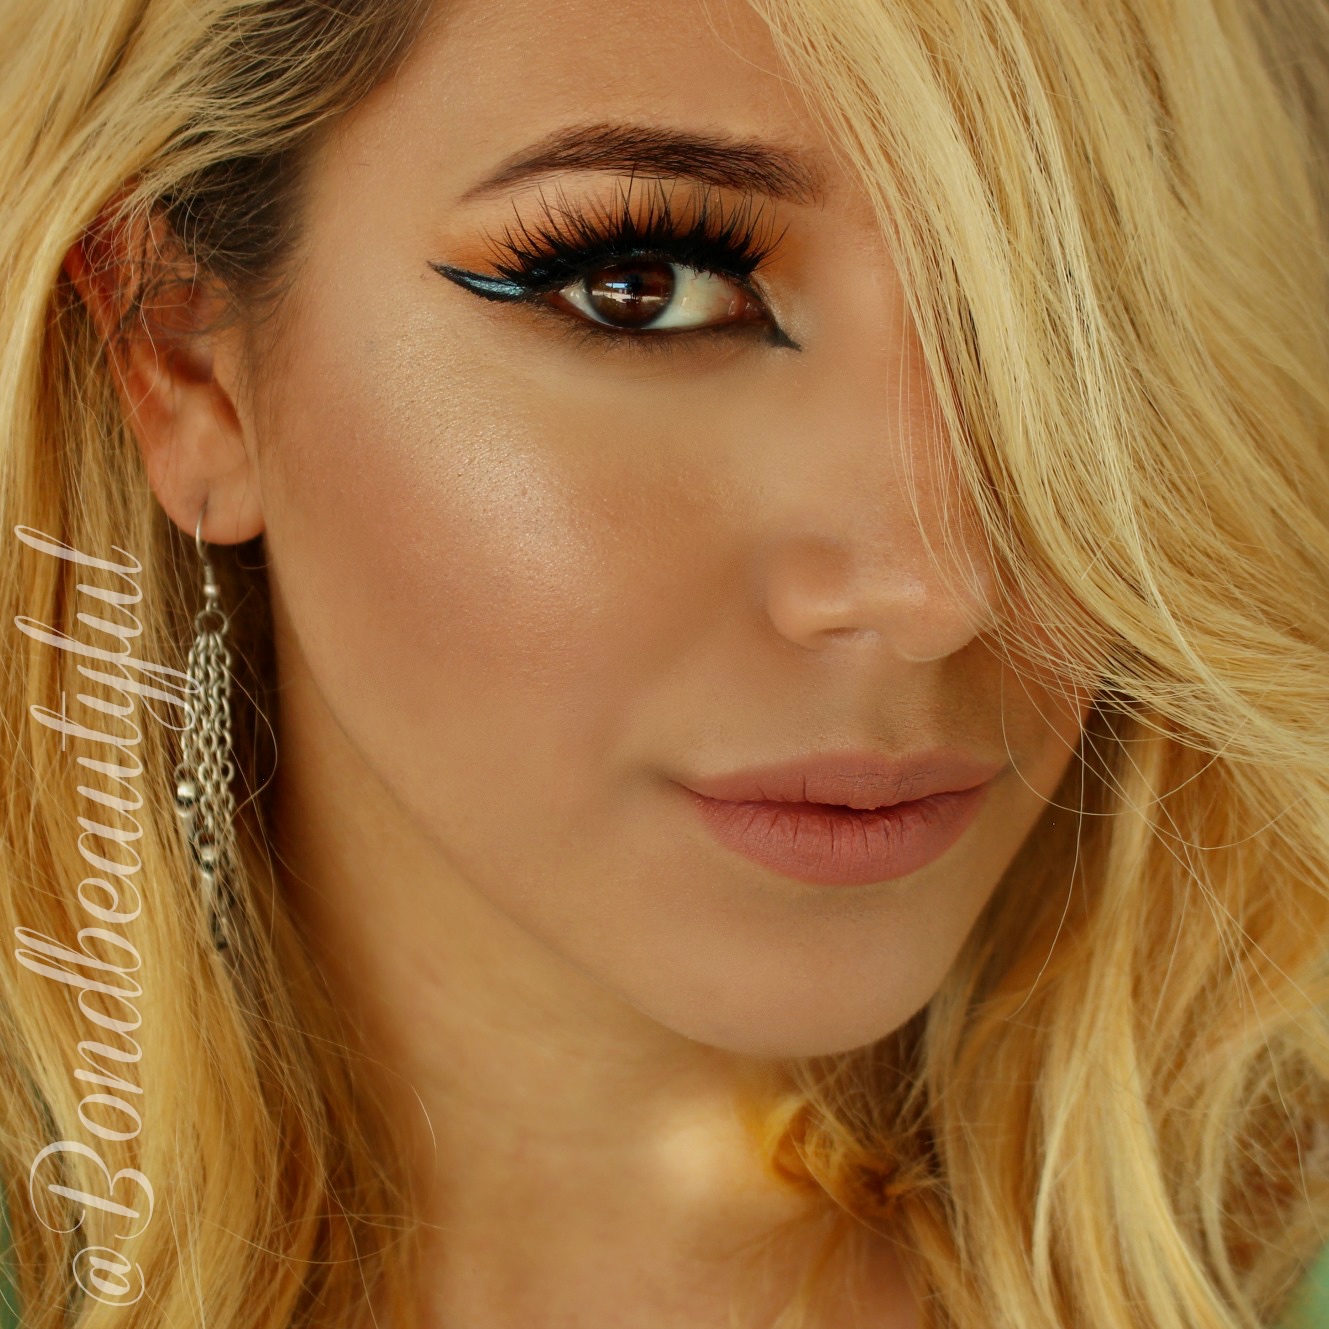
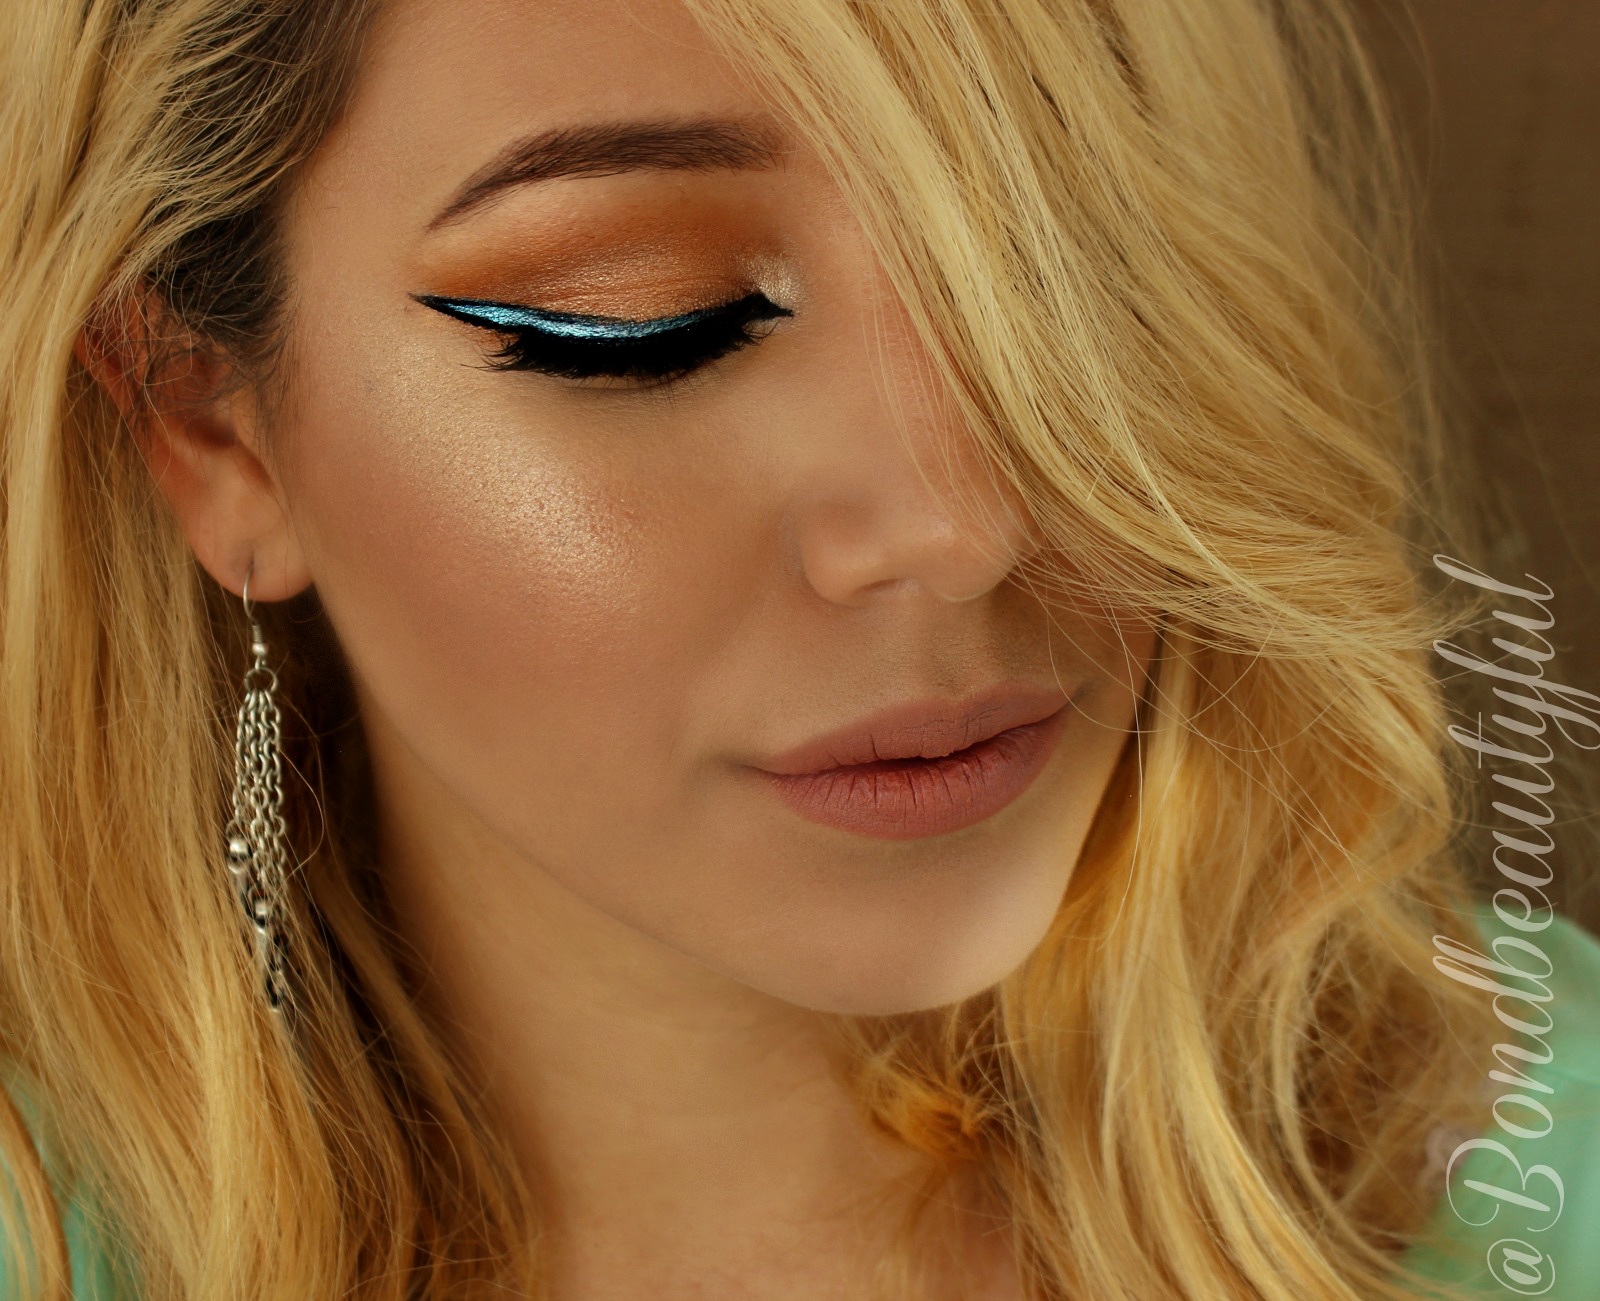
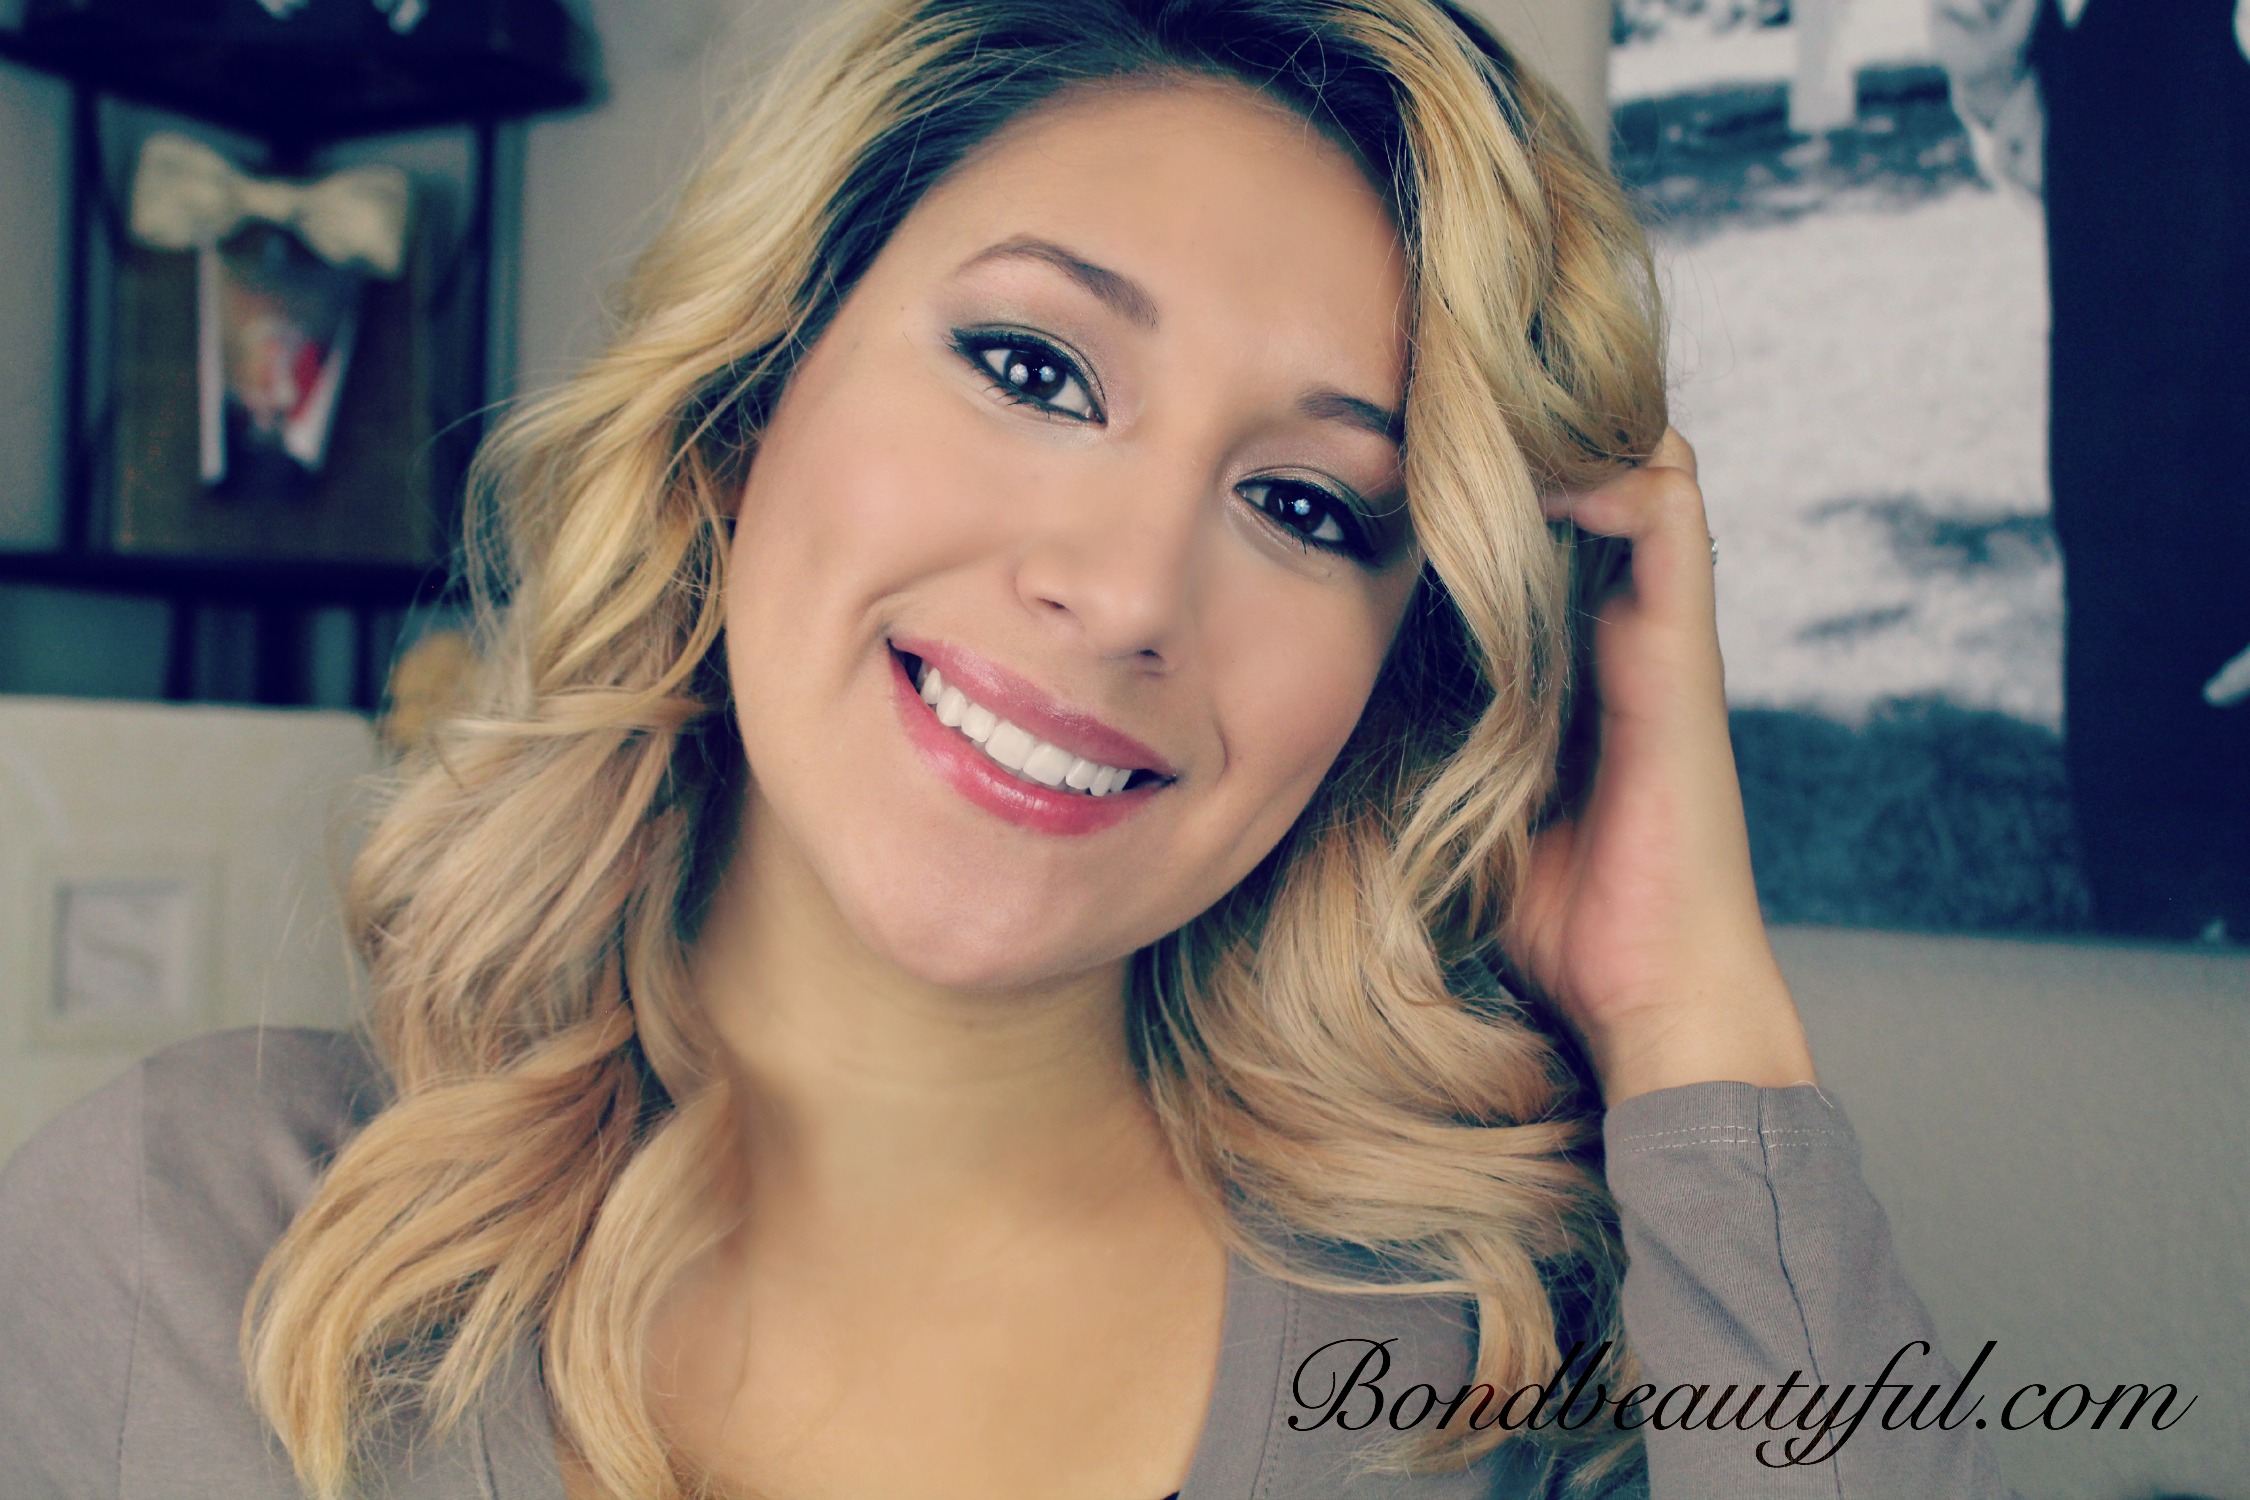
Another beautiful Friday and I’m ready to share this fun, trendy makeup look with you! Im going to cut down on chit chat and lets just get started. I have been obsessing over the Cartoon Eyeliner Trend that has been taking over Instagram. I wanted to recreate a summer bronzey look & combine it with Cartoon Liner. I love how it turned out and I know you will too. (Full Tutorial Below)
I started out with a Gold Bronzey Eyeshadow look and added a pop of color with the liner. Surprisingly Cartoon liner is really simple! I just made a super bold cat eye shape with Teal Gel Liner. Then I outlined it with a black eyeliner. It took time and patience but it was worth it. Take your time, its ok if its not perfect. In the tutorial below I show you how I to fix the lines if they arn’t as straight as you would like them to be.
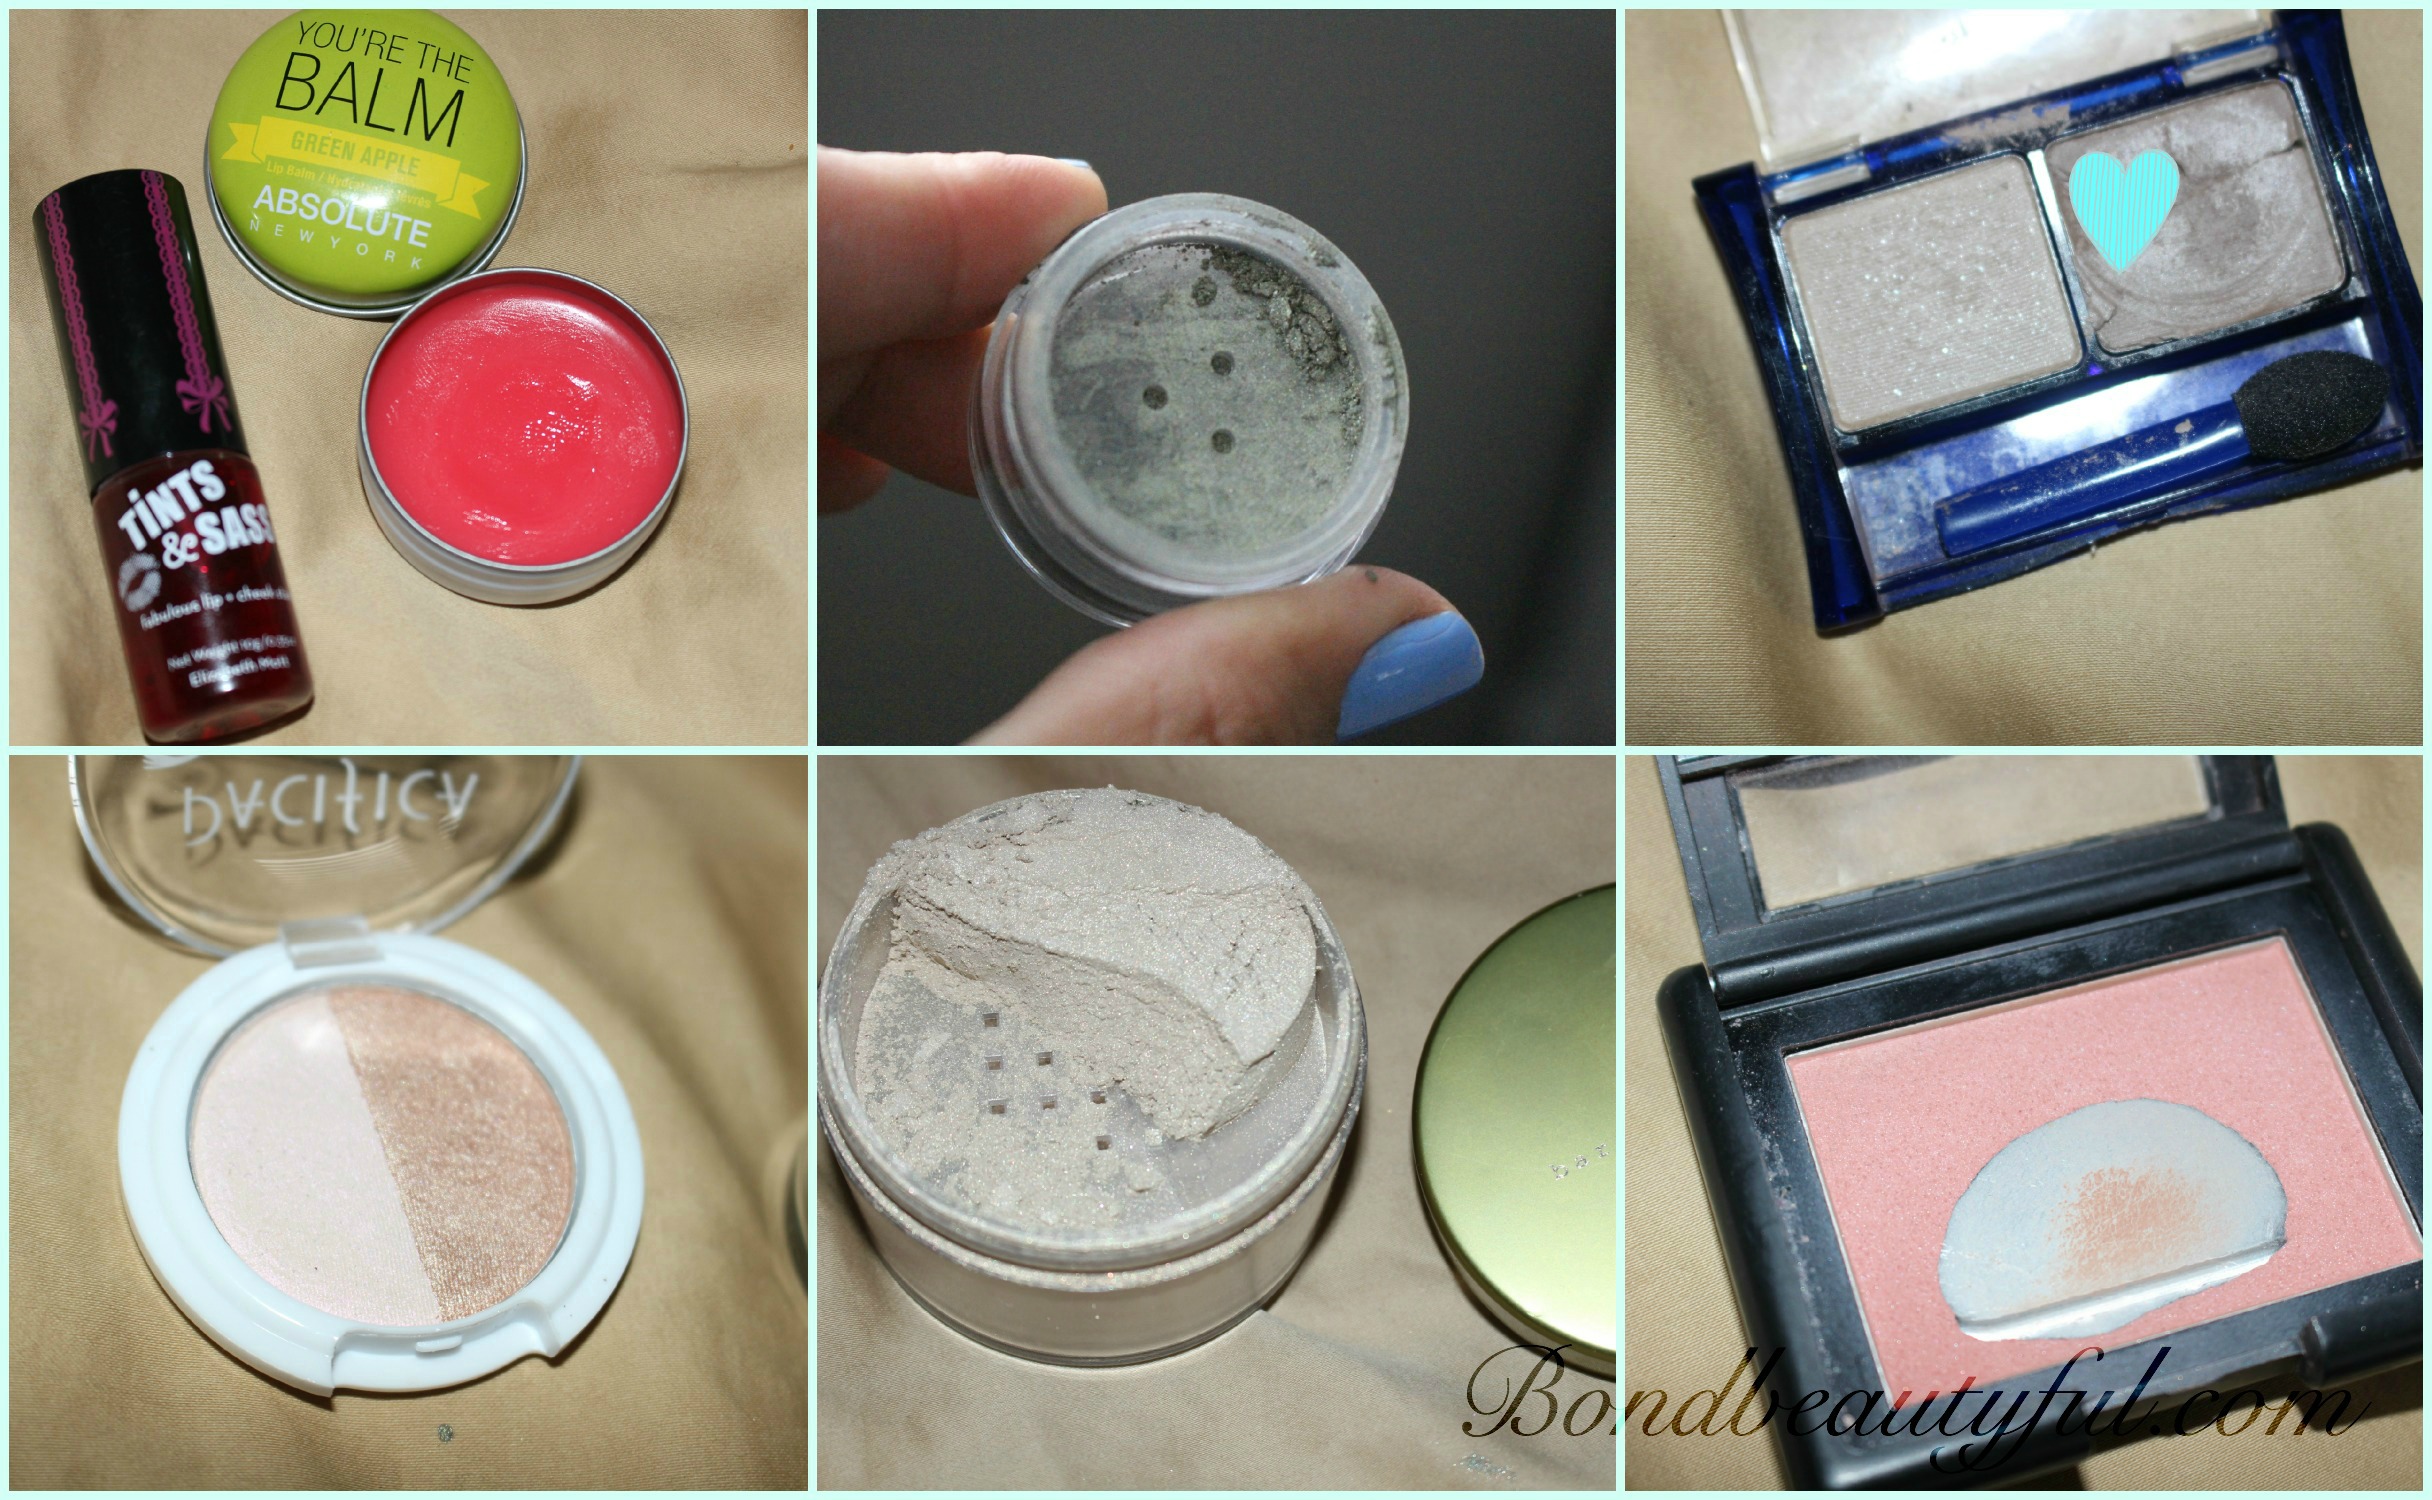
Heres a list of the products I used for this makeup Look.
Too Faced Bronzer Wheel- Summer Love Bronzer & Pink Leopard
Ulta Cheek Color : Flushed
No7 Lift & luminate foundation
Morphe X Kathleen Lights Palette (Use any warm bronzey, gold shades you have!)
L’OREAL Infallible Gel Liner Black
Hua Mian LI Waterproof Liner 11: Wish APP ( Nyx Liners are good too!)
Milani Lipstick Matte Naked
Becca Skin Perfecter OPAL
WetnWild Contour Stick Where’s Walnut
NYX Micro Brow Pencil Ash Brown
Don’t forget to see the tutorial below
Also there is a GIVEAWAY GOING ON. Im giving away a Asavea Gold Titanium Curling Wand All you have to do is click Here to enter. Its free and it going on until July 1st.
So tell me whats your favorite Makeup Trend of the moment? COMMENT BELOW and lets get a fun conversation going!
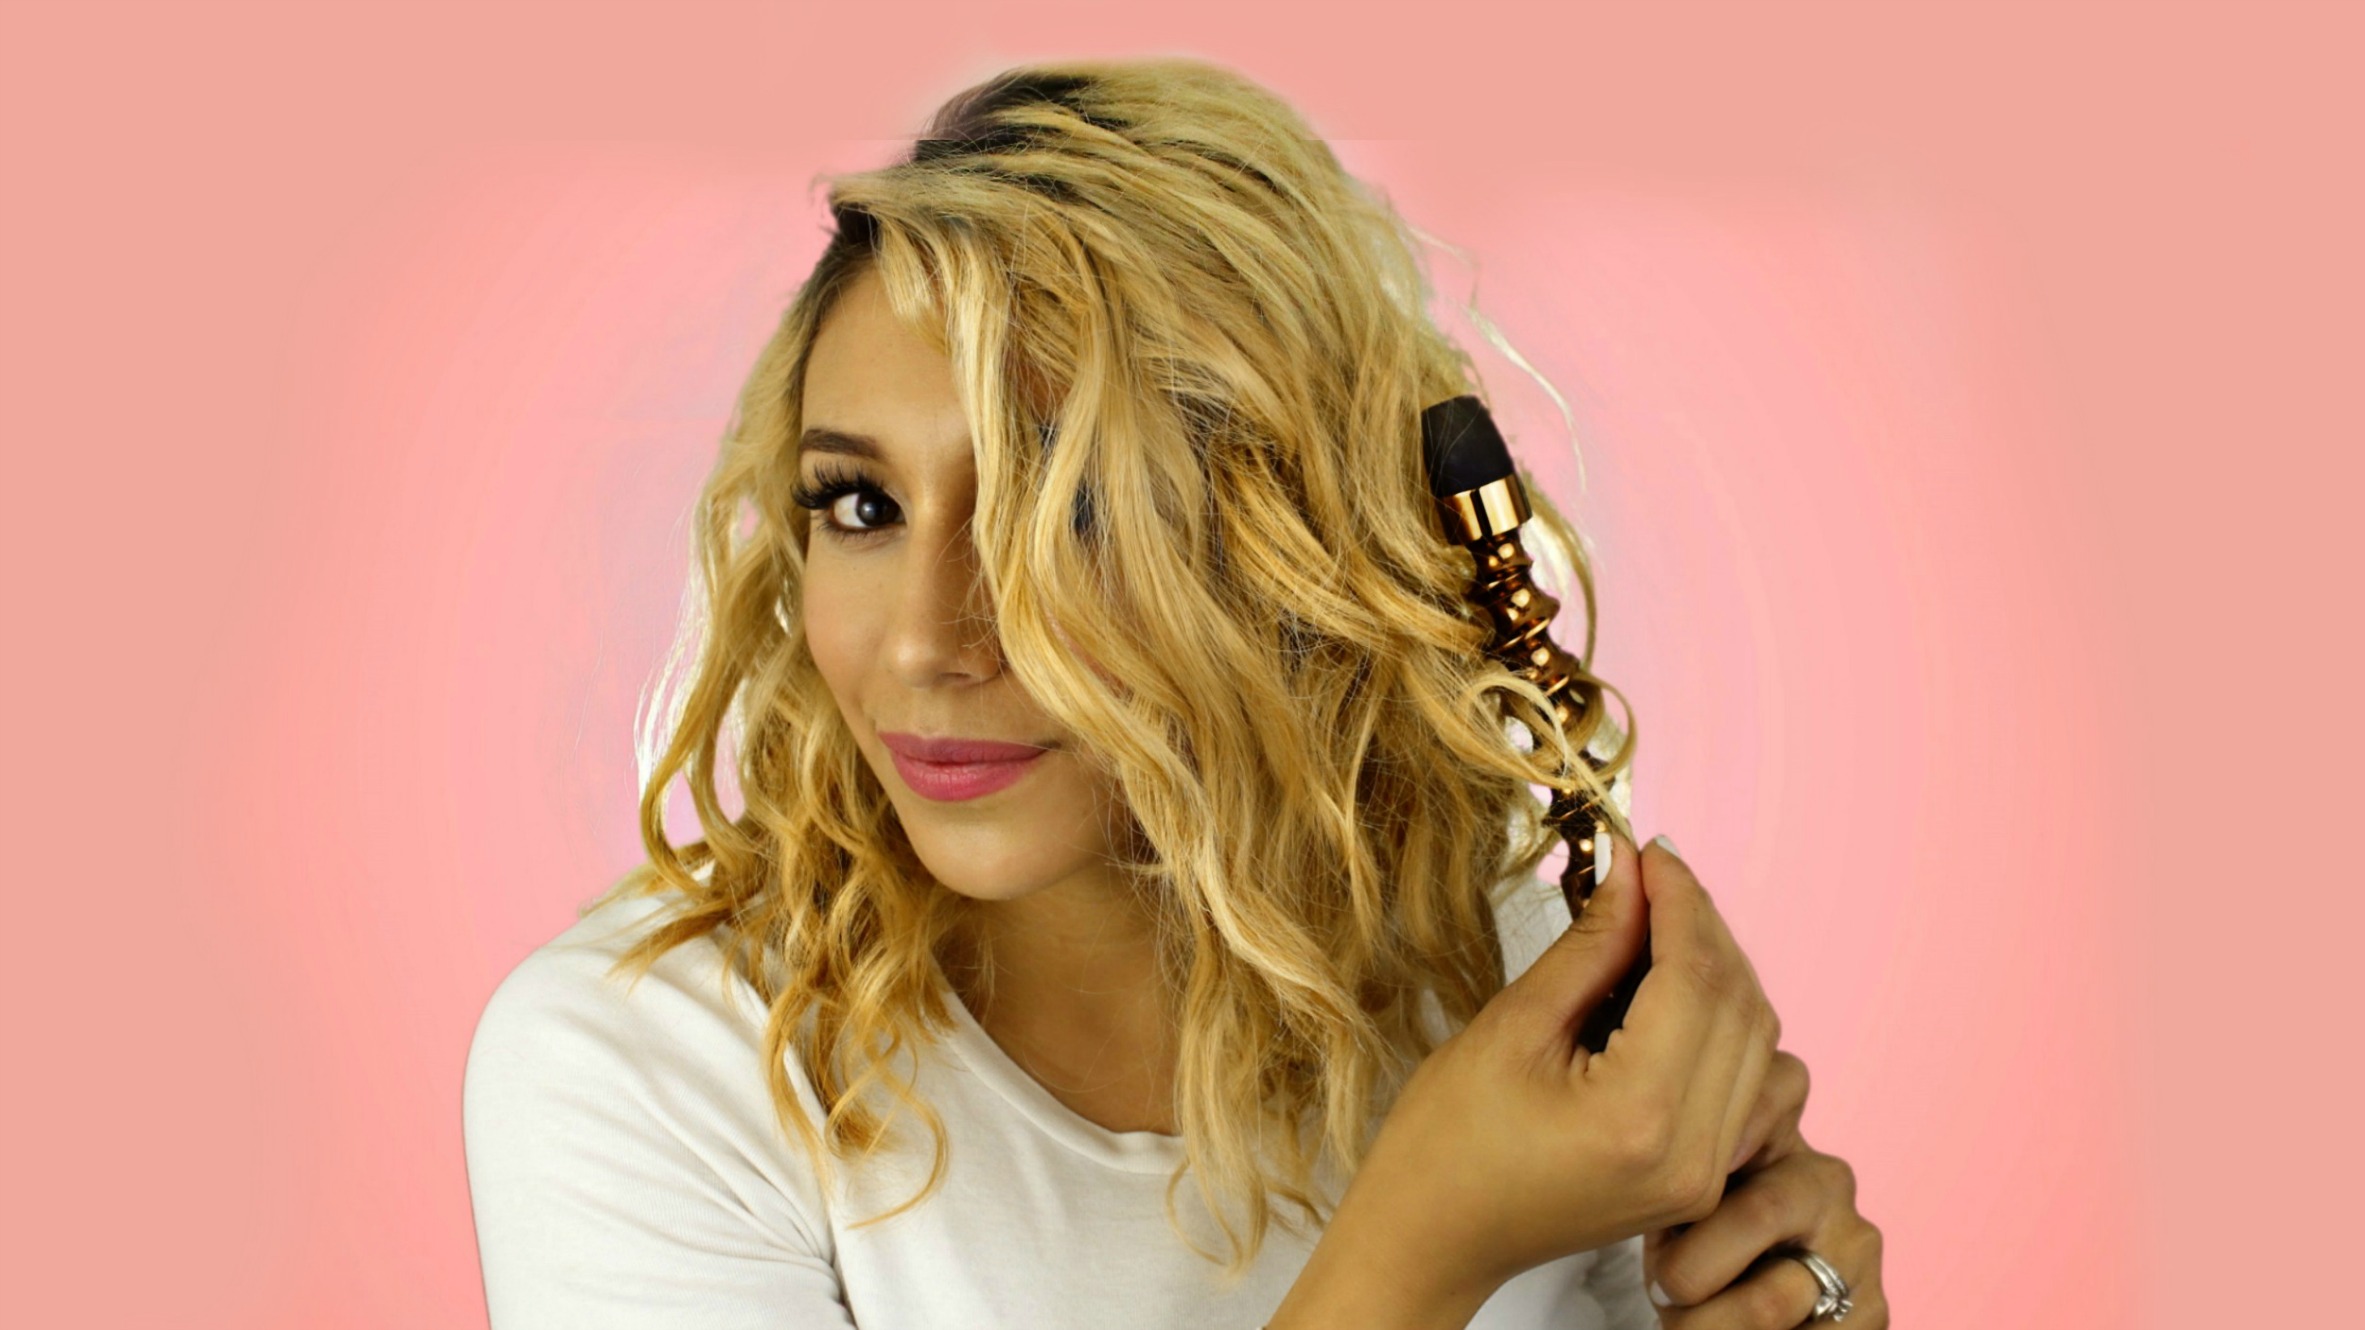
I know its been such a long time, but I promise I’m back and all my technical problems are behind me. So I know what the question is that you probably have.. What have I been doing? Well I’m glad you ask I have been binge watching Pretty Little Liars. I am not kidding in no way shape or form. I have grown rather obsessed with the show. If you haven’t watched it let me fill you in on the plot. Basically in a small town full of secrets where a group of 5 girls keep lots of secrets. One day one of the girls goes missing and a year later is found dead. The whole question is who killed her? and why do the other 4 girls keep getting texts from a person named A. Honestly it has kept my husband and I on our toes.
So what does that have to do with today? Well in Season 3 ,Hanna Marin, A character from the show cuts her hair and has some beautiful hairstyles for short hair. Some of which I want to recreate and show you how to do.
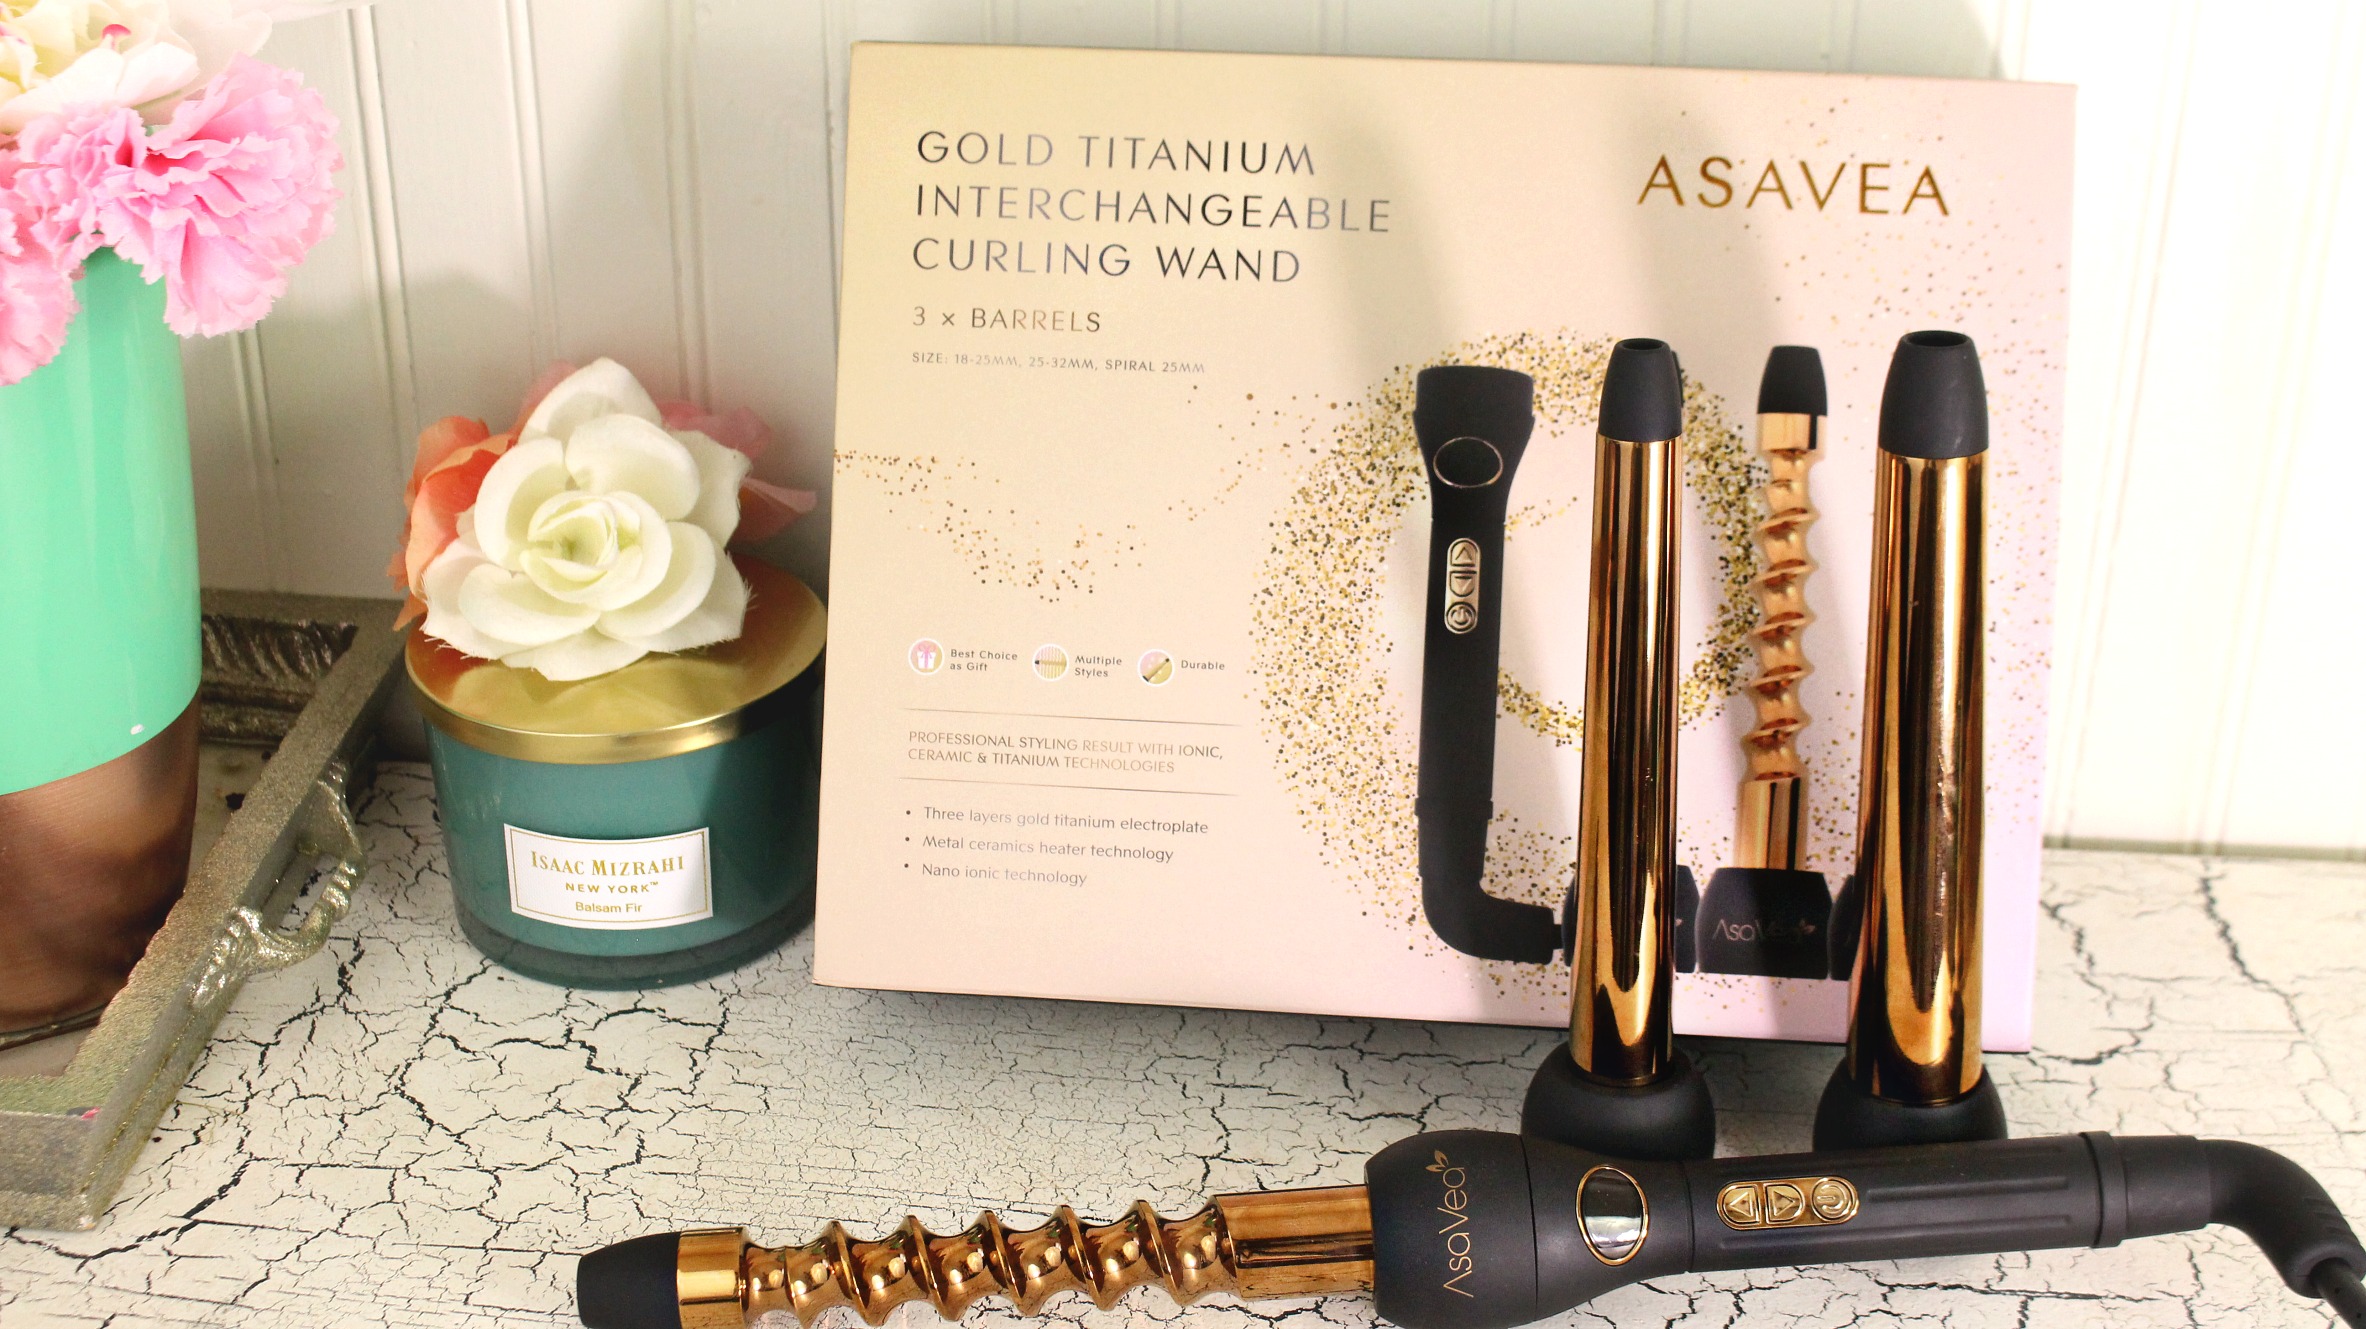
Not only do I want to show you these hairstyles, but I also partnered up with Asavea * To bring to you todays video & blog post. They recently launched a new Hairstyling tool and you guys seemed to really love it when I shared their hairstyling straightener brush. So I thought I would also share this beautiful Gold Titanium Hair Curling Wand.
(* This video & post is sponsored, so I do receive compensation for sharing this product with you. But all my opinions are honest and I truly do love this Hair Curler and recommend it.)
So think of this as a review & hair tutorial in one! Also stay tuned to the very end because, just like with the Straightening brush post, I will be GIVING ONE of these AWAY.
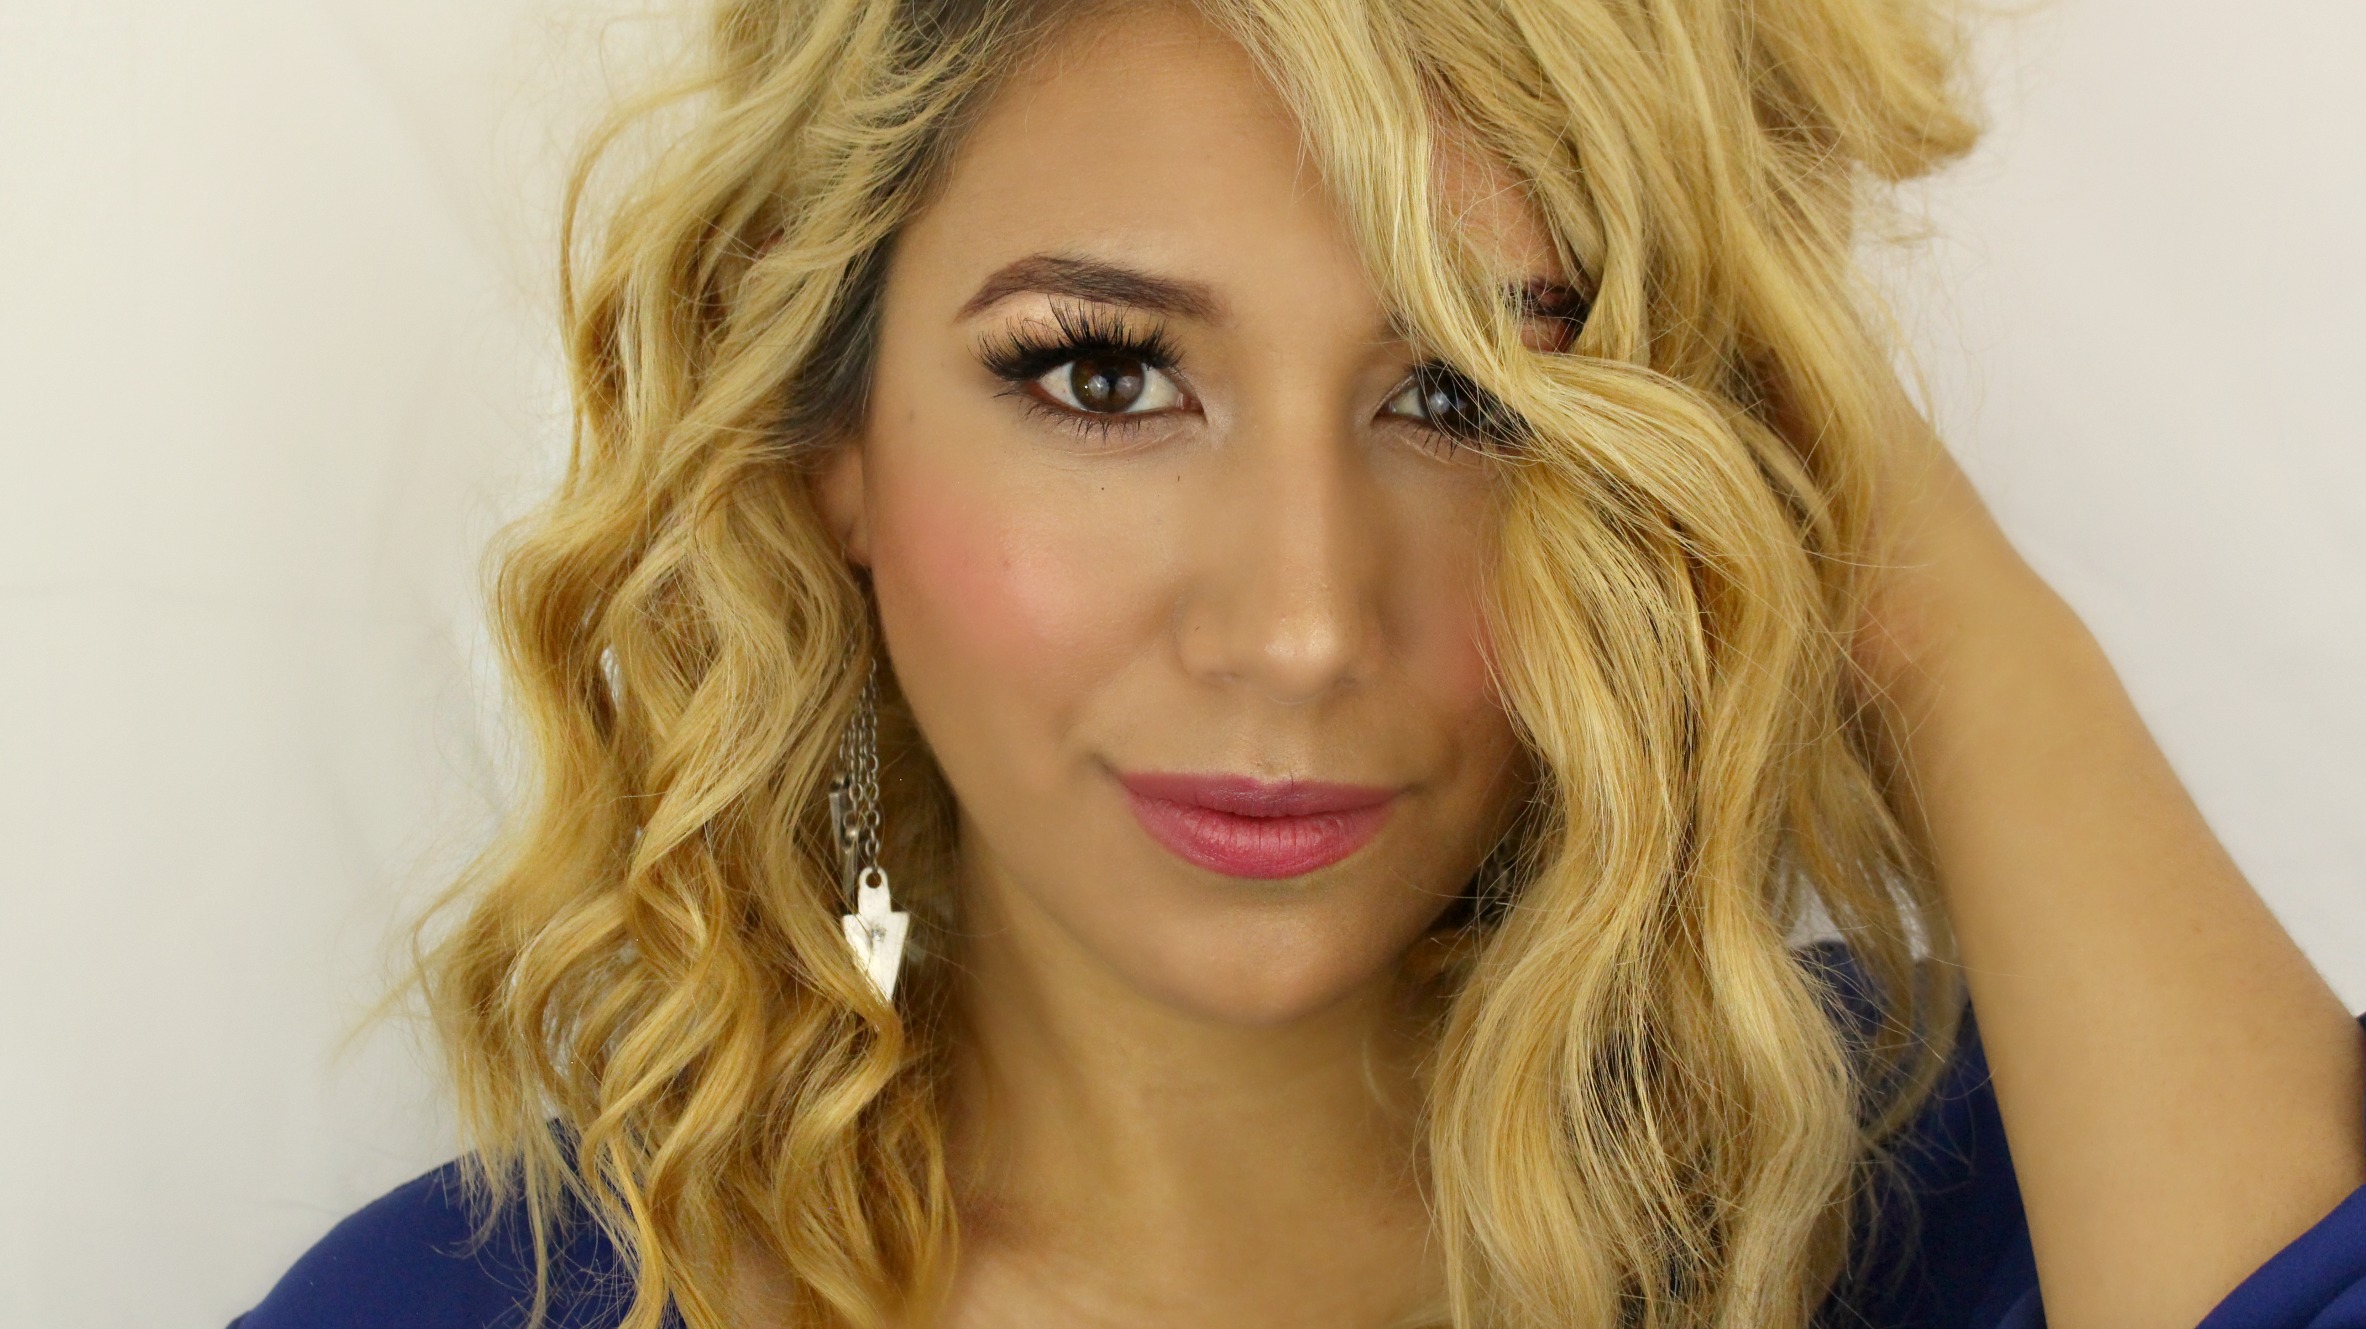
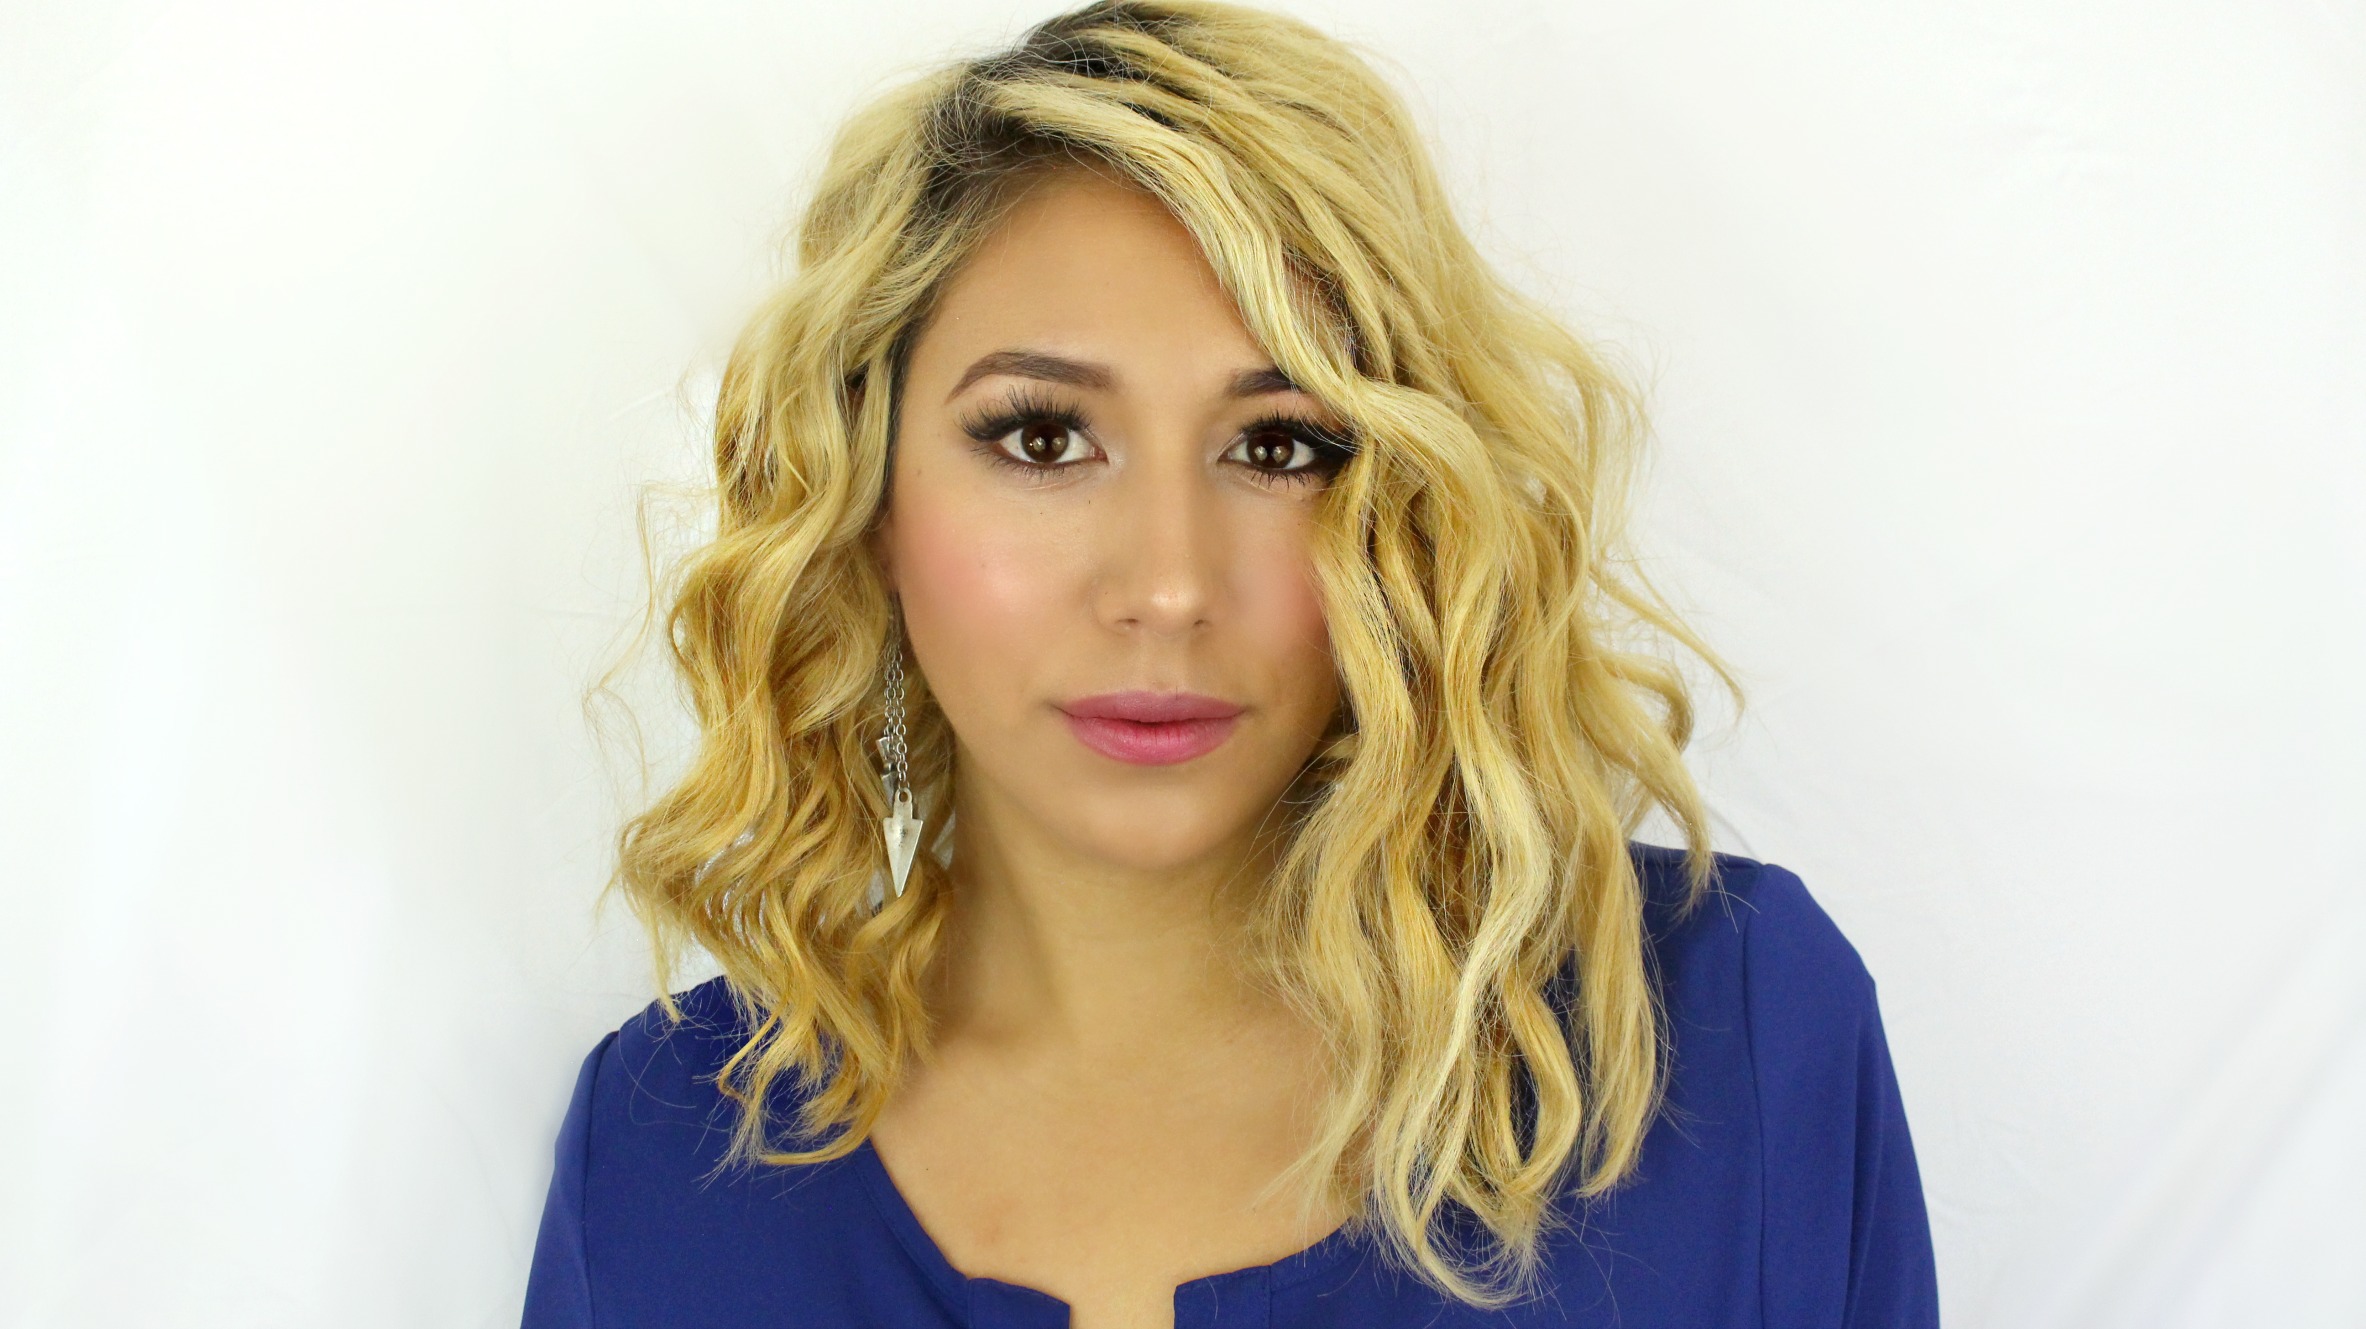
In the video below I will be showing you how to do this textured, curly, messy Lob hairstyle. This is a iconic Hanna Marin Hairstyle. She rocks this textured lob more than any other hairstyle.
This was so easy to do and surprisingly quick. I used the Spiral Barrel to achieve it and I love how it turned out. What I love most about this hairstyle is that you can really dress it up or down just by adding more texture and breaking it up more with your fingers.
So here are some of the Asavea Hair curler Pros:
The Gold & Ceramic material help to keep your frizz under complete control
It heats up quickly and cools down quickly
Your hairstyle lasts longer than other curlers (or at least it did for me, It lasted me 3 days and I didn’t have to recurl my hair at All!)
Its beautiful! I know you love the GOLD!
It has a Swivel Cord so Its easy to use without the cord getting caught or in the way.
The controls are easy to use and you can decided how hot you want the curler to be.
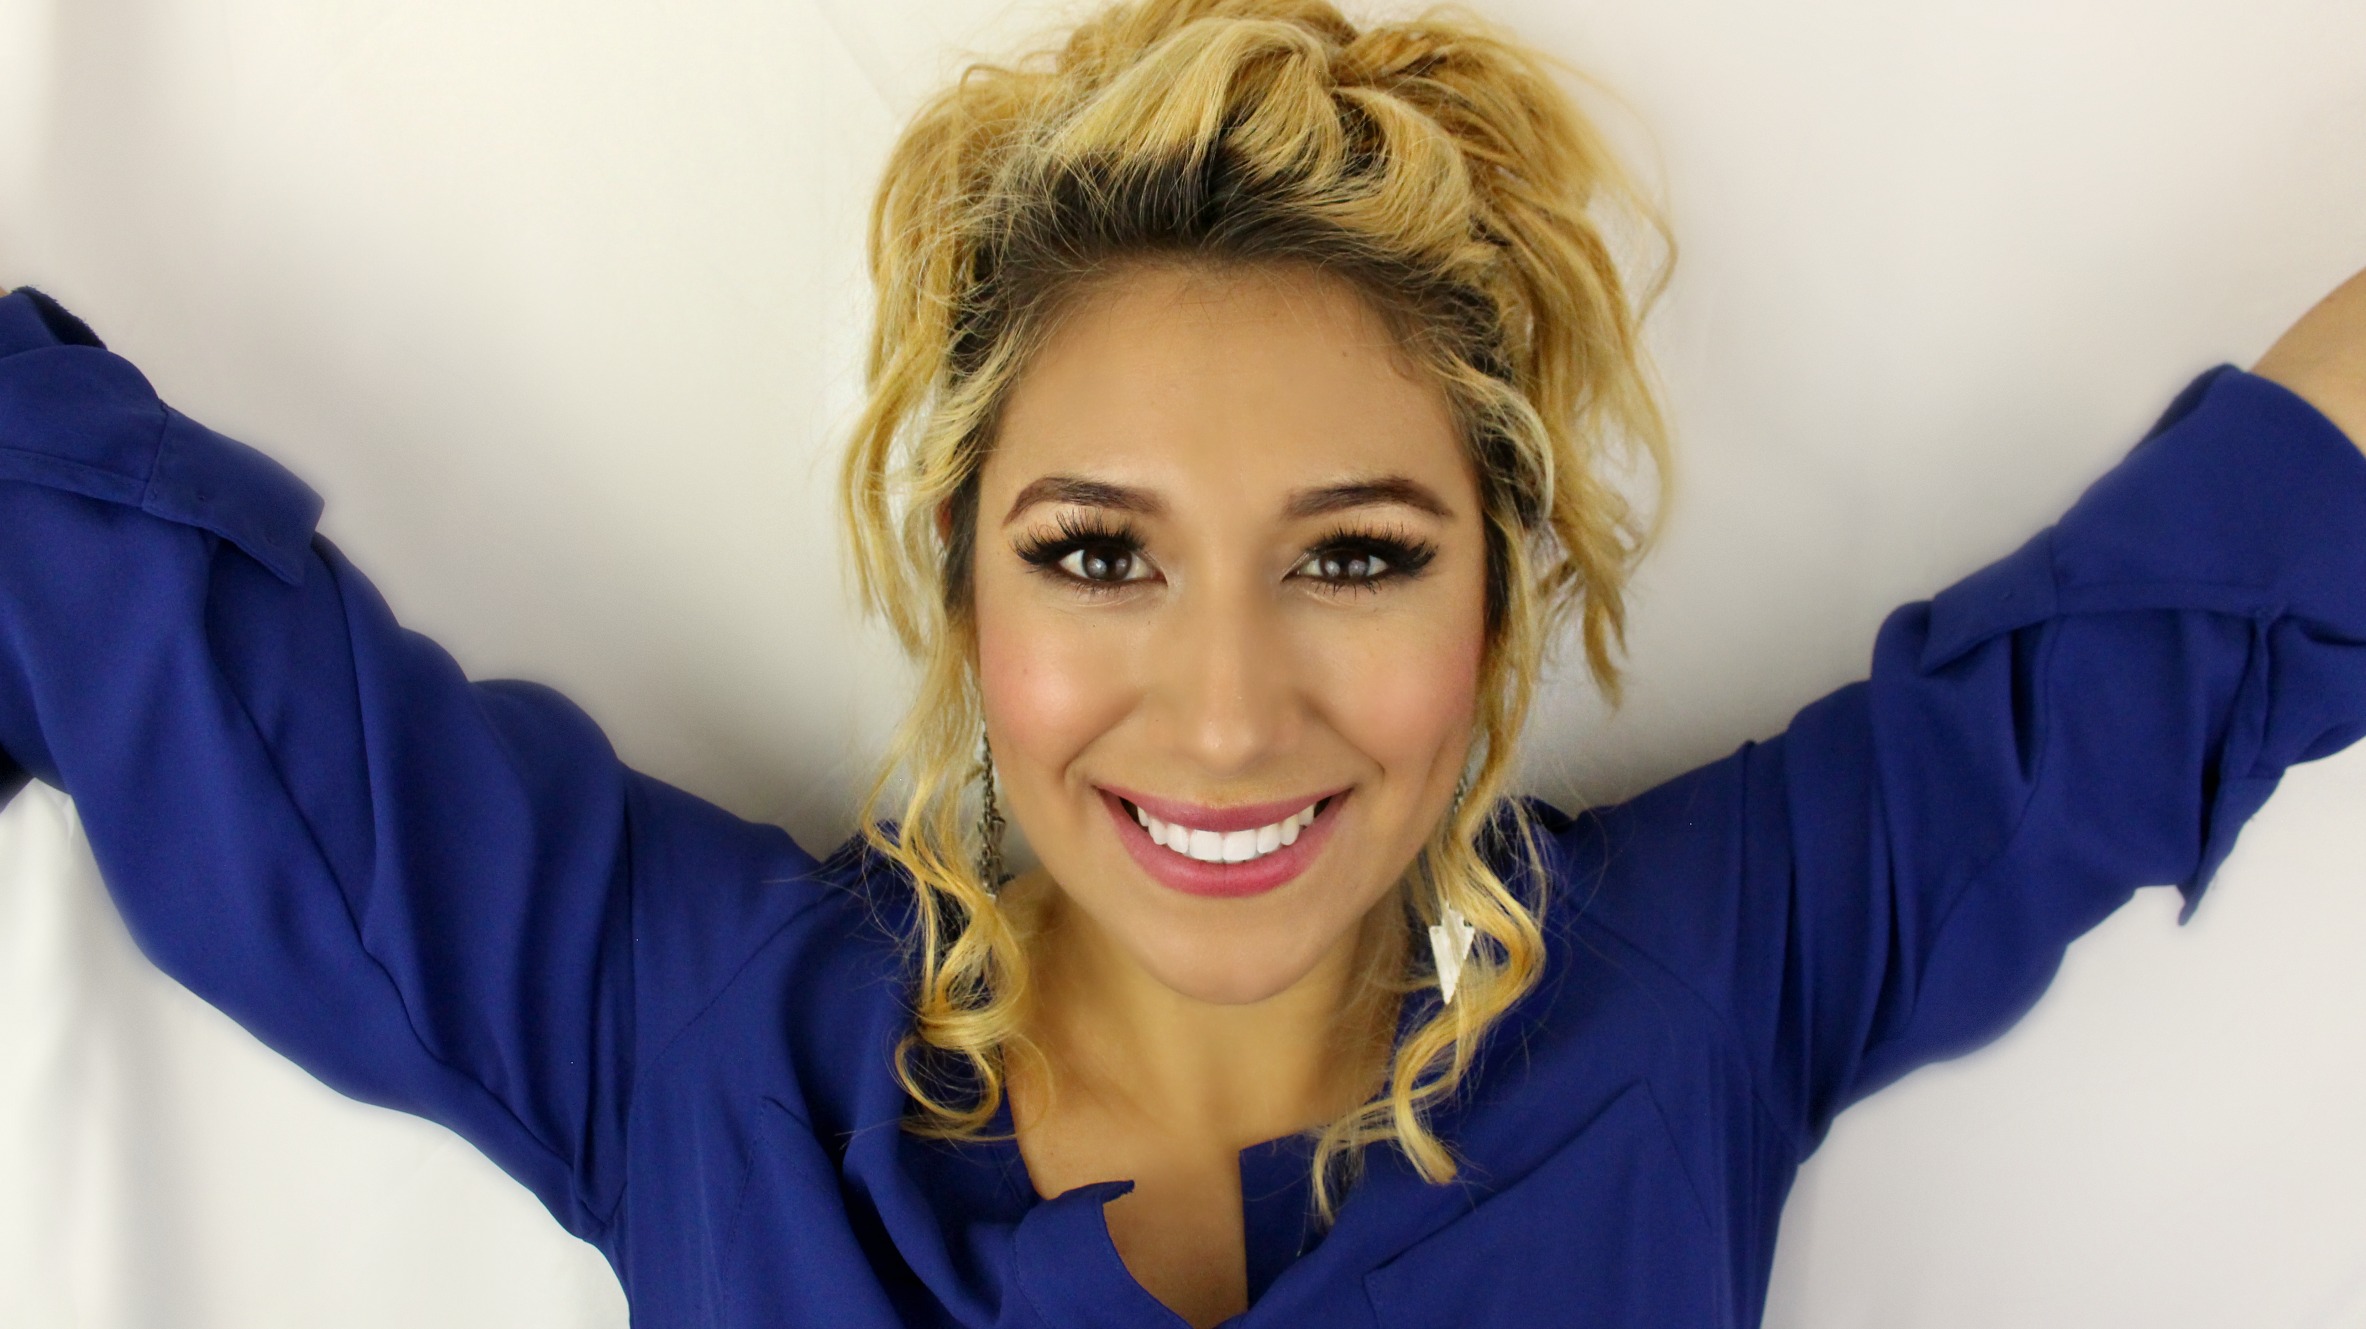
The Second hairstyle I did is a messy, easy undo. I like to do this on day three when my curls are still intact but maybe not as voluminous and I feel like putting my hair up. All you need for this hairstyle is a teasing comb & some bobby pins.
I love this because you can again make it as messy or as formal as you want. Its perfect for short hair because the braided back keeps all those little short layered hairs into place without bobby pins.
Ok ok, pictures are nice but lets see how to actually accomplish this. I promise it looks like I spent a lot of time doing this hairstyle but I really didn’t!
Happy Friday, today is a special friday because its my wonderful husbands birthday! I wouldn’t be where I am at today, and I wouldn’t have this blog if it wasn’t for him. So Thank you!
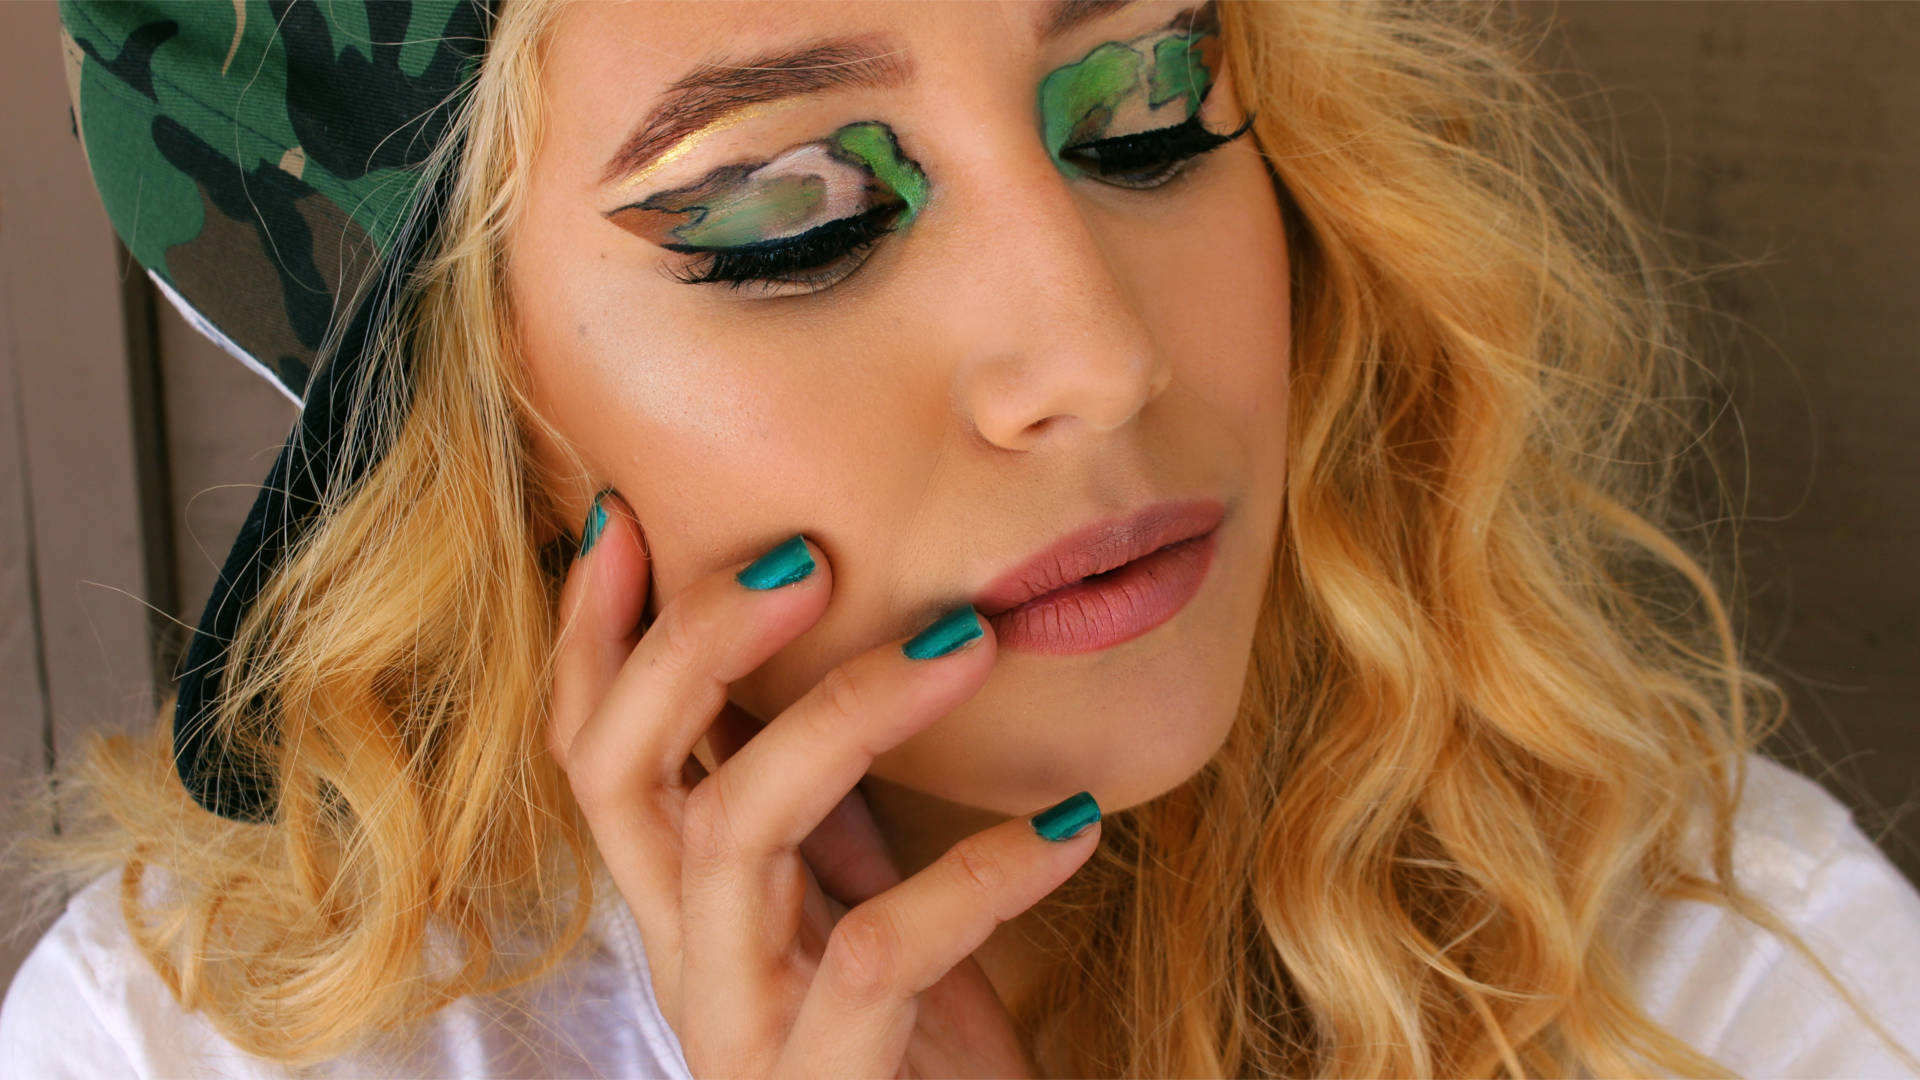
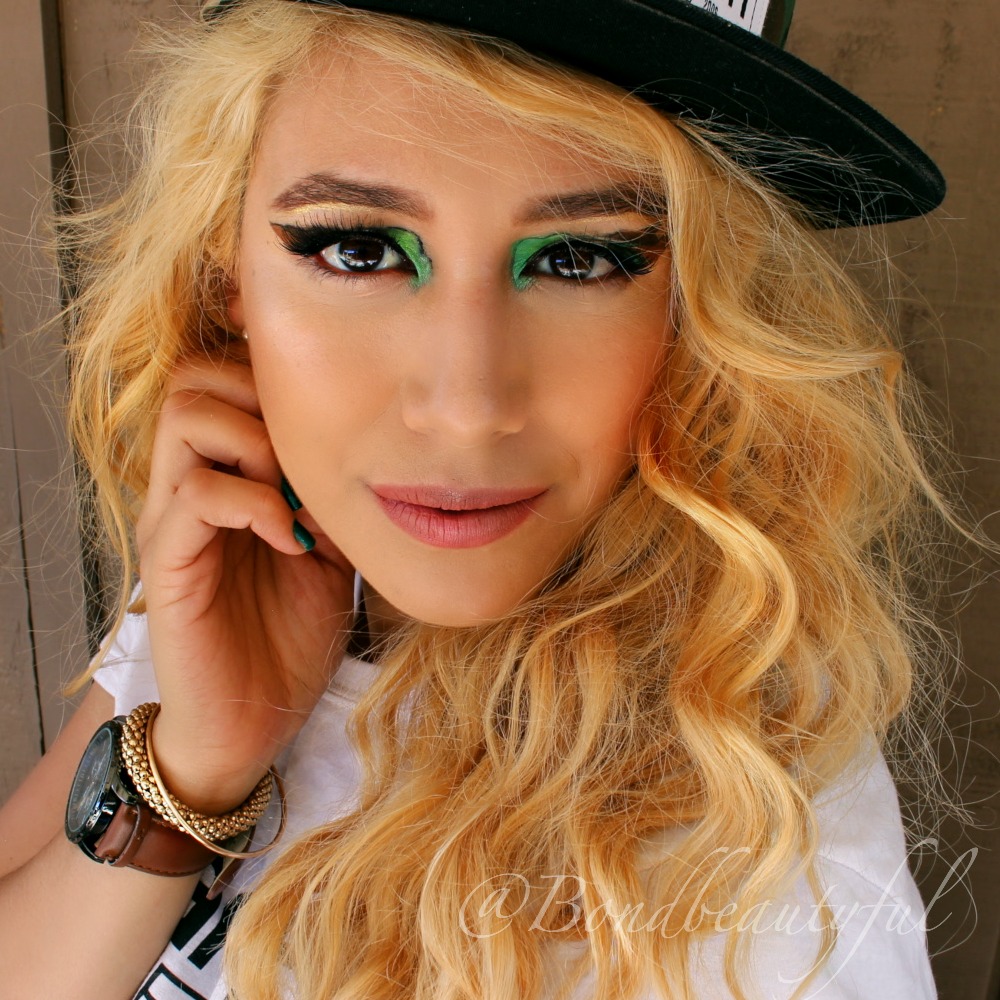
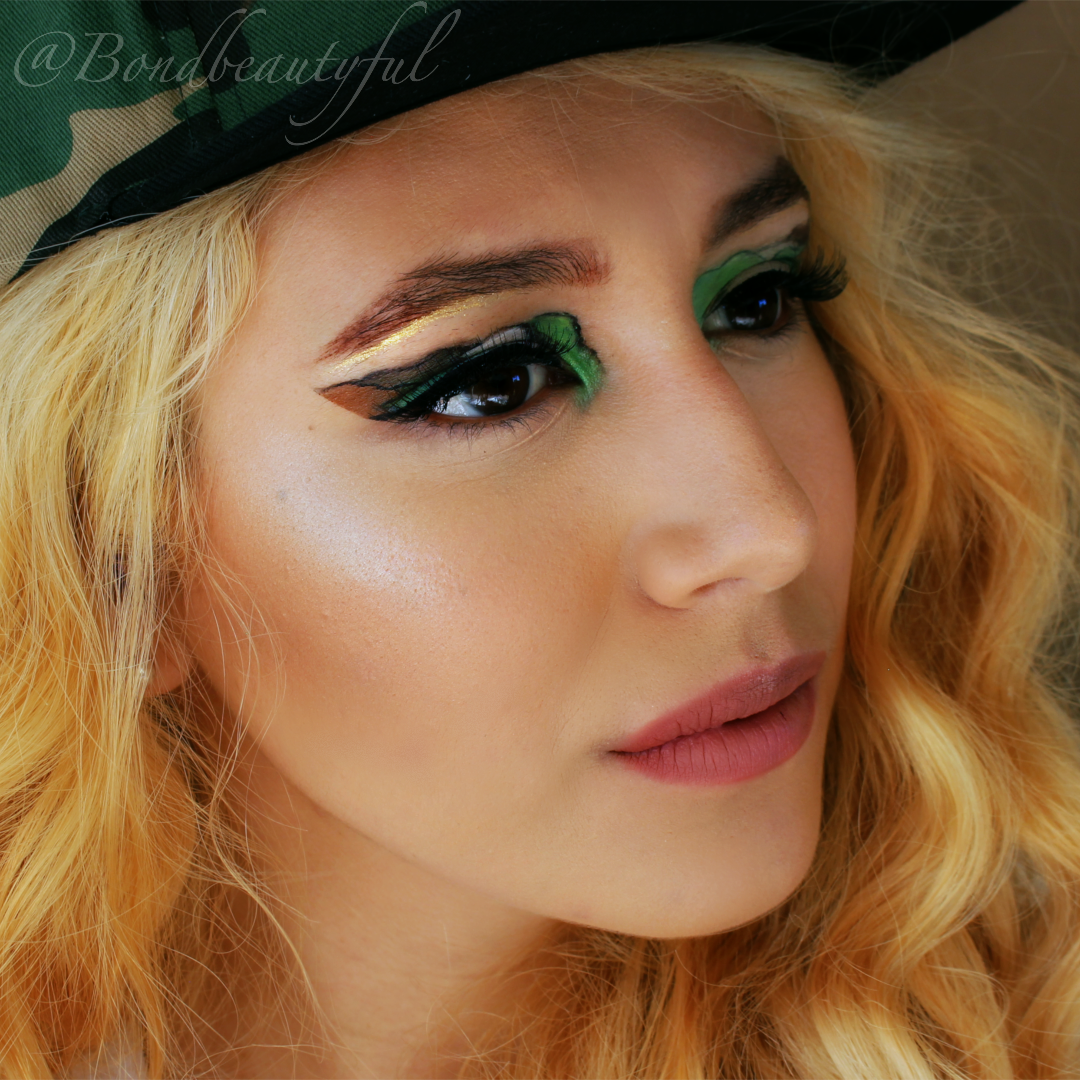
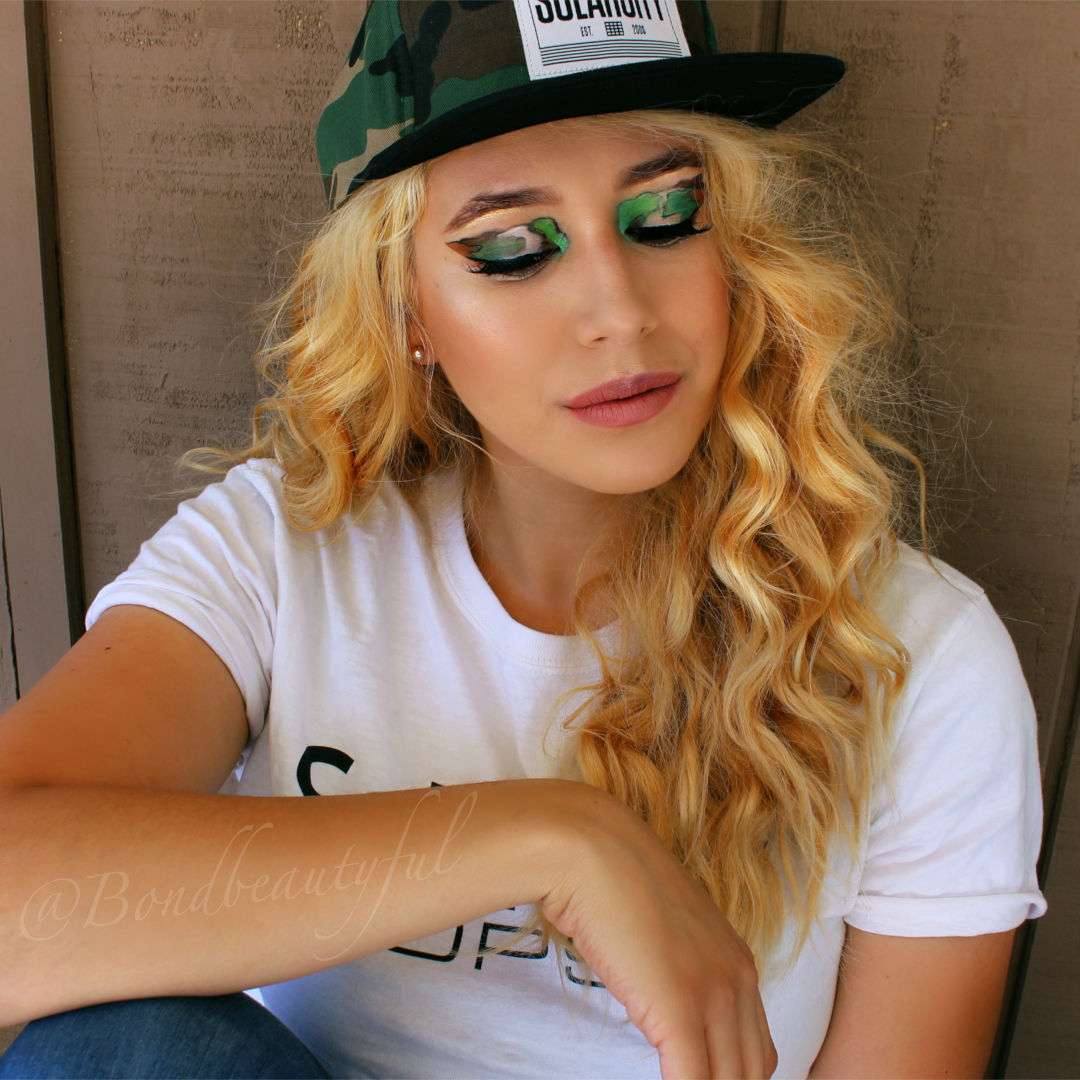
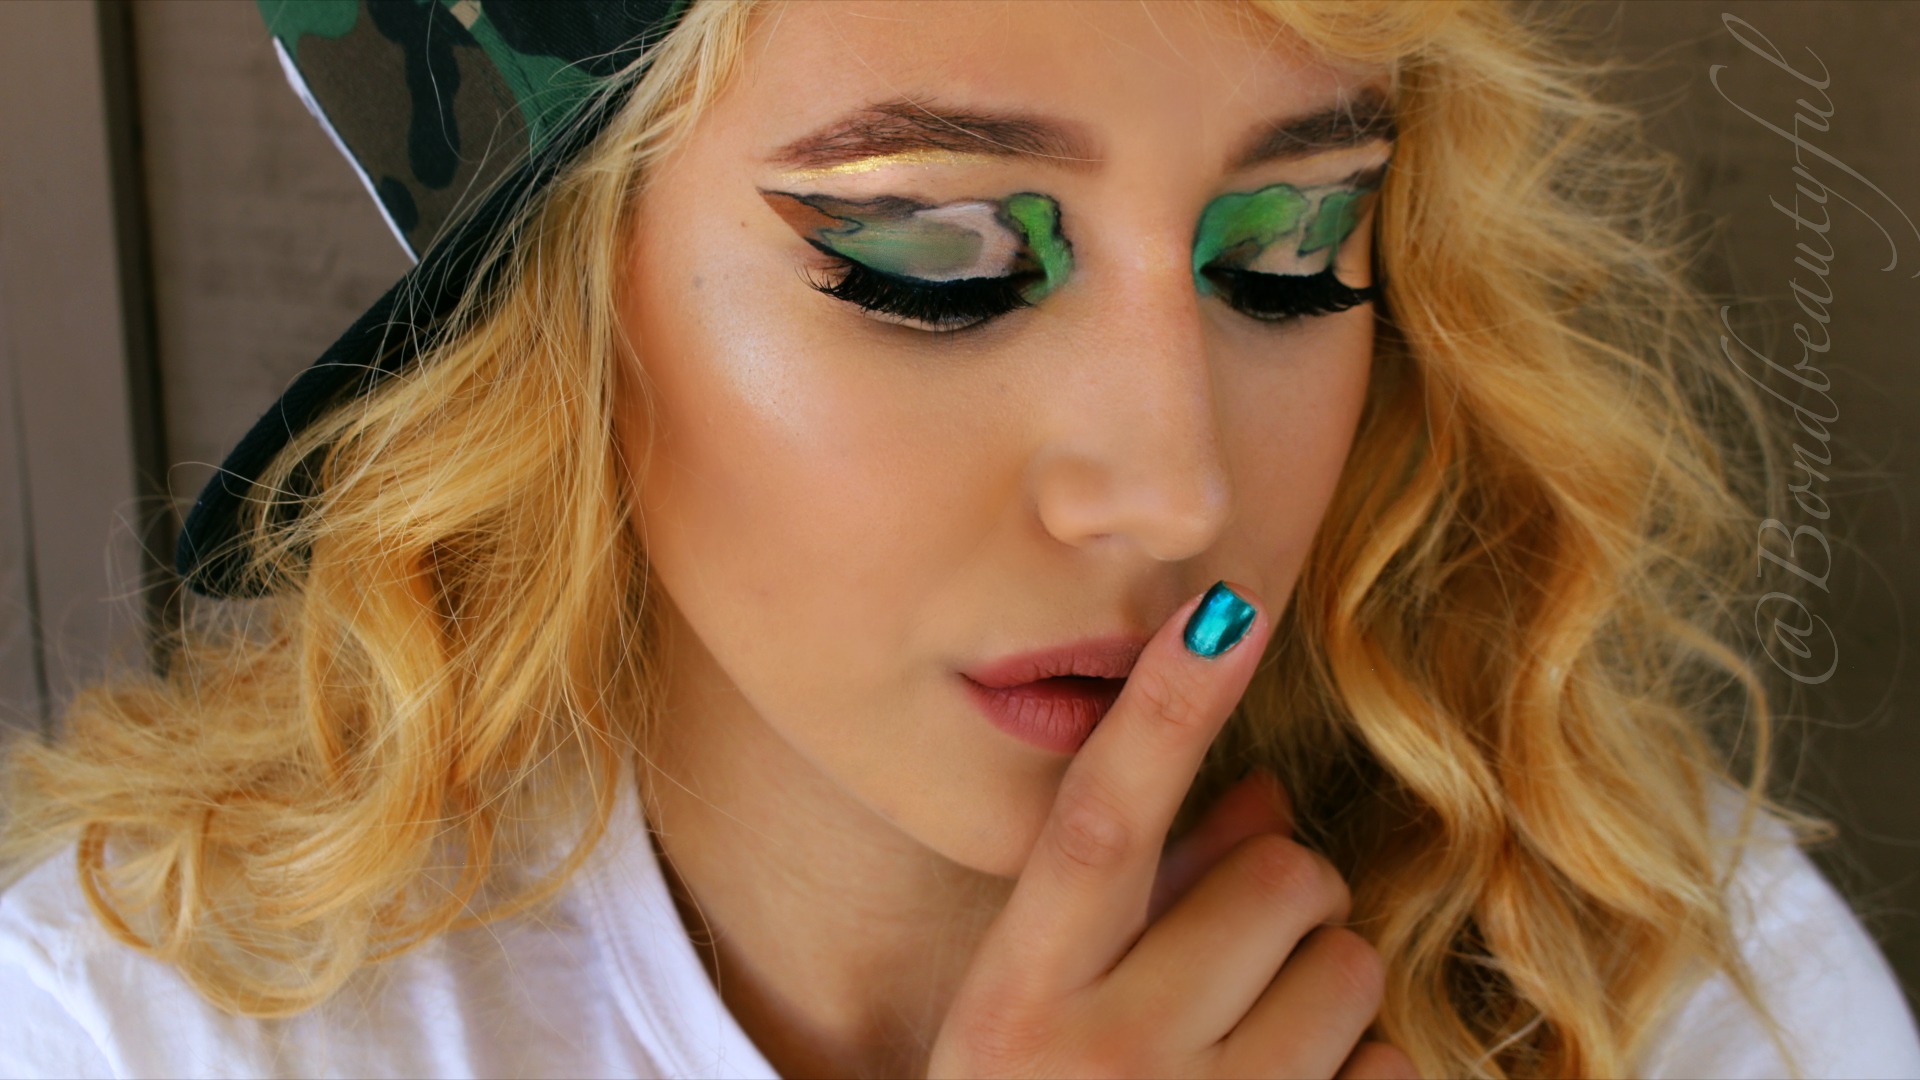
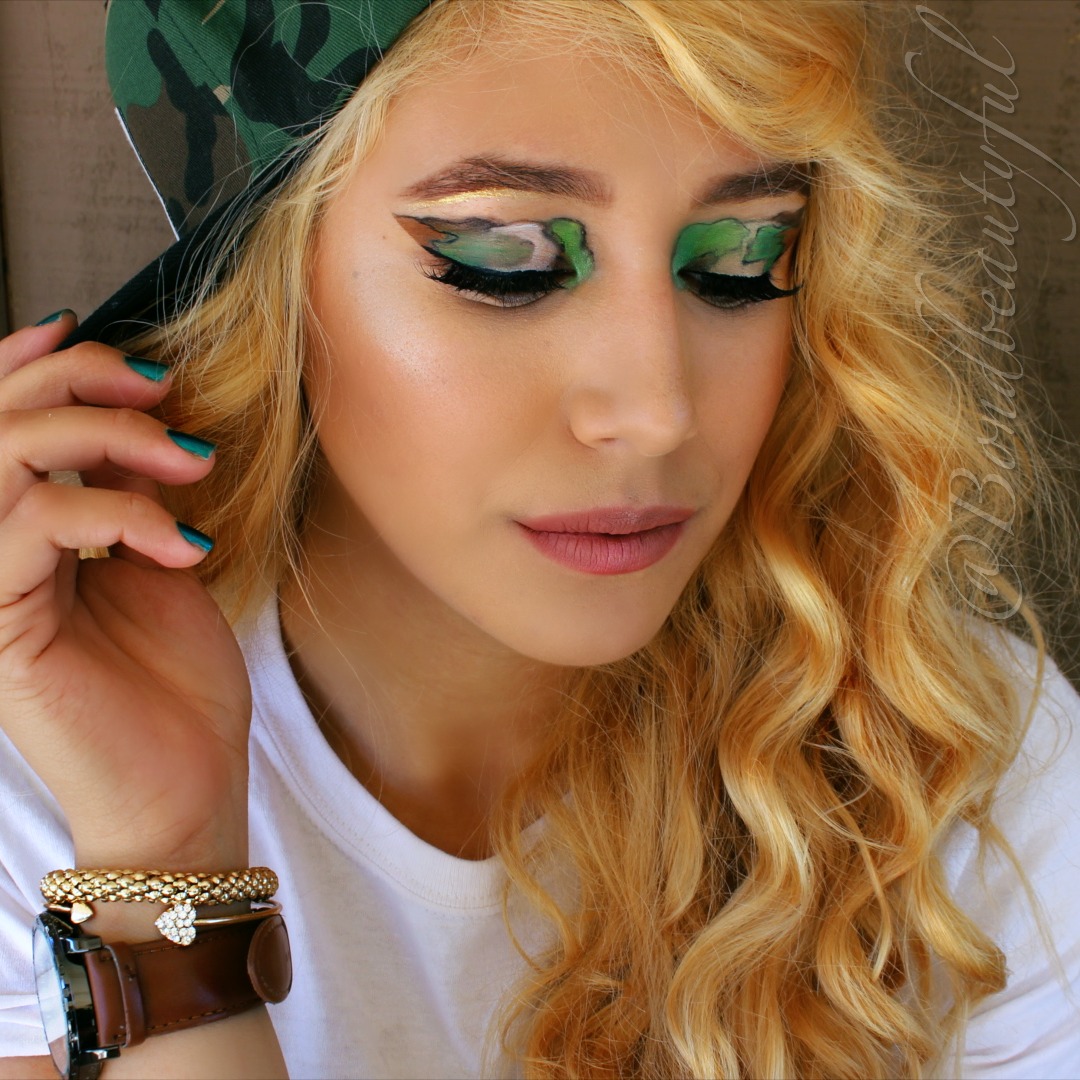
Im so excited to share another InstaTutorial with you guys. So what this is for those of you that are new; On Instagram I sometimes like to do fantasy/editorial/themed Makeup looks that will just look beautiful in pictures. Sometimes when I do these I like to turn on the camera and film it in a tutorial form. But, whats different than other tutorials is that at the very end I share some of my edited picture and you can vote in the comments on which pic you like. And which pic you think I should put on my Instagram Feed! This is a fun way to kind of join both the youtube & instagram platform. Don’t worry I’m going to be showing you those pics and you can vote too, right here!
For this look I was super inspired my my camo that I love to wear. Yes its a SolarCity Hat :). No I’m not sponsored I just have a bunch of SolarCity Gear and out of all the hats my husband owns this one is my favorite. So I thought why not turn it into a amazing eye look that I have never seen done before. Hence this makeup look was born.
So before I share my tutorial below I thought I would share the Pictures so you can vote, and give you all the makeup details. This look actually turned out to be quite easy.
(1st Picture)
1. I started off by shaping a bold, square brow.
2. I traced out the pattern that I wanted with the black from the Imagic Flash Palette.
3. I filled in the different portions with different Army colors from the flash palette, brown, dark brown, army green,bright green, & cream
4. I set all those creams with powdered Eyeshadow that matched.( below all palettes used)
5. I then went back over the black outline with a thin eyeliner brush & the cream shadow again.
SolarCity Shirt
SolarCity Camo Hat
Silver Stud Earrings : Forever 21
Watch & Bracelets RUE 21
Nail polish: Zoya : Giovanna
*I do receive compensation if you use my links, if you choose not to feel free to google these makeup products.
This was super fun to do for you guys, I hope you will take a look at the video tutorial I did for it, even if its just the fun intro!
Thank you guys so much for all your sweet comments & support! You are truly amazing! Don’t forget true beauty comes from within, so let your beauty shine!
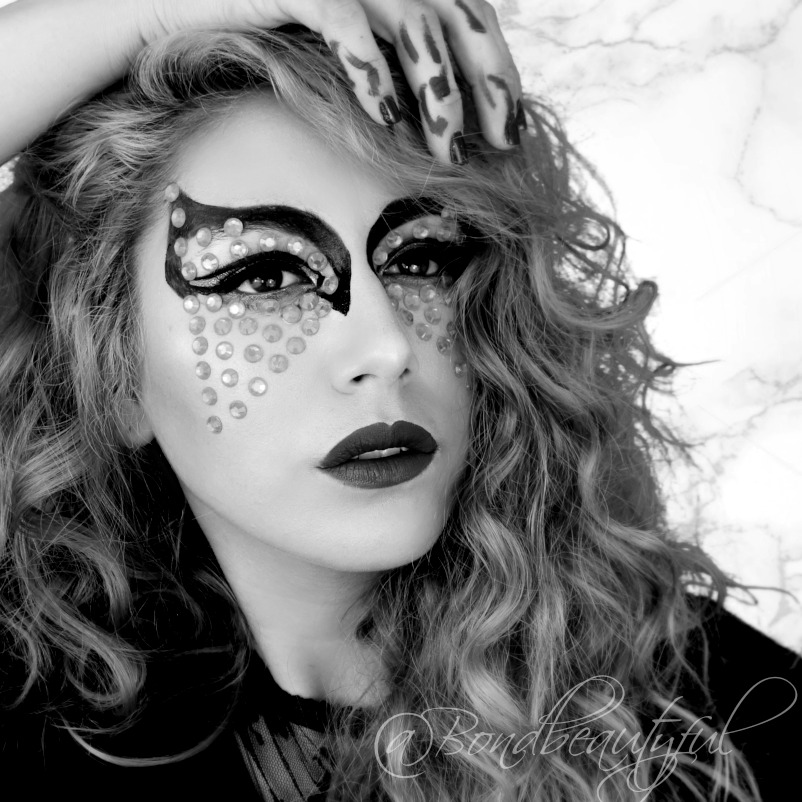
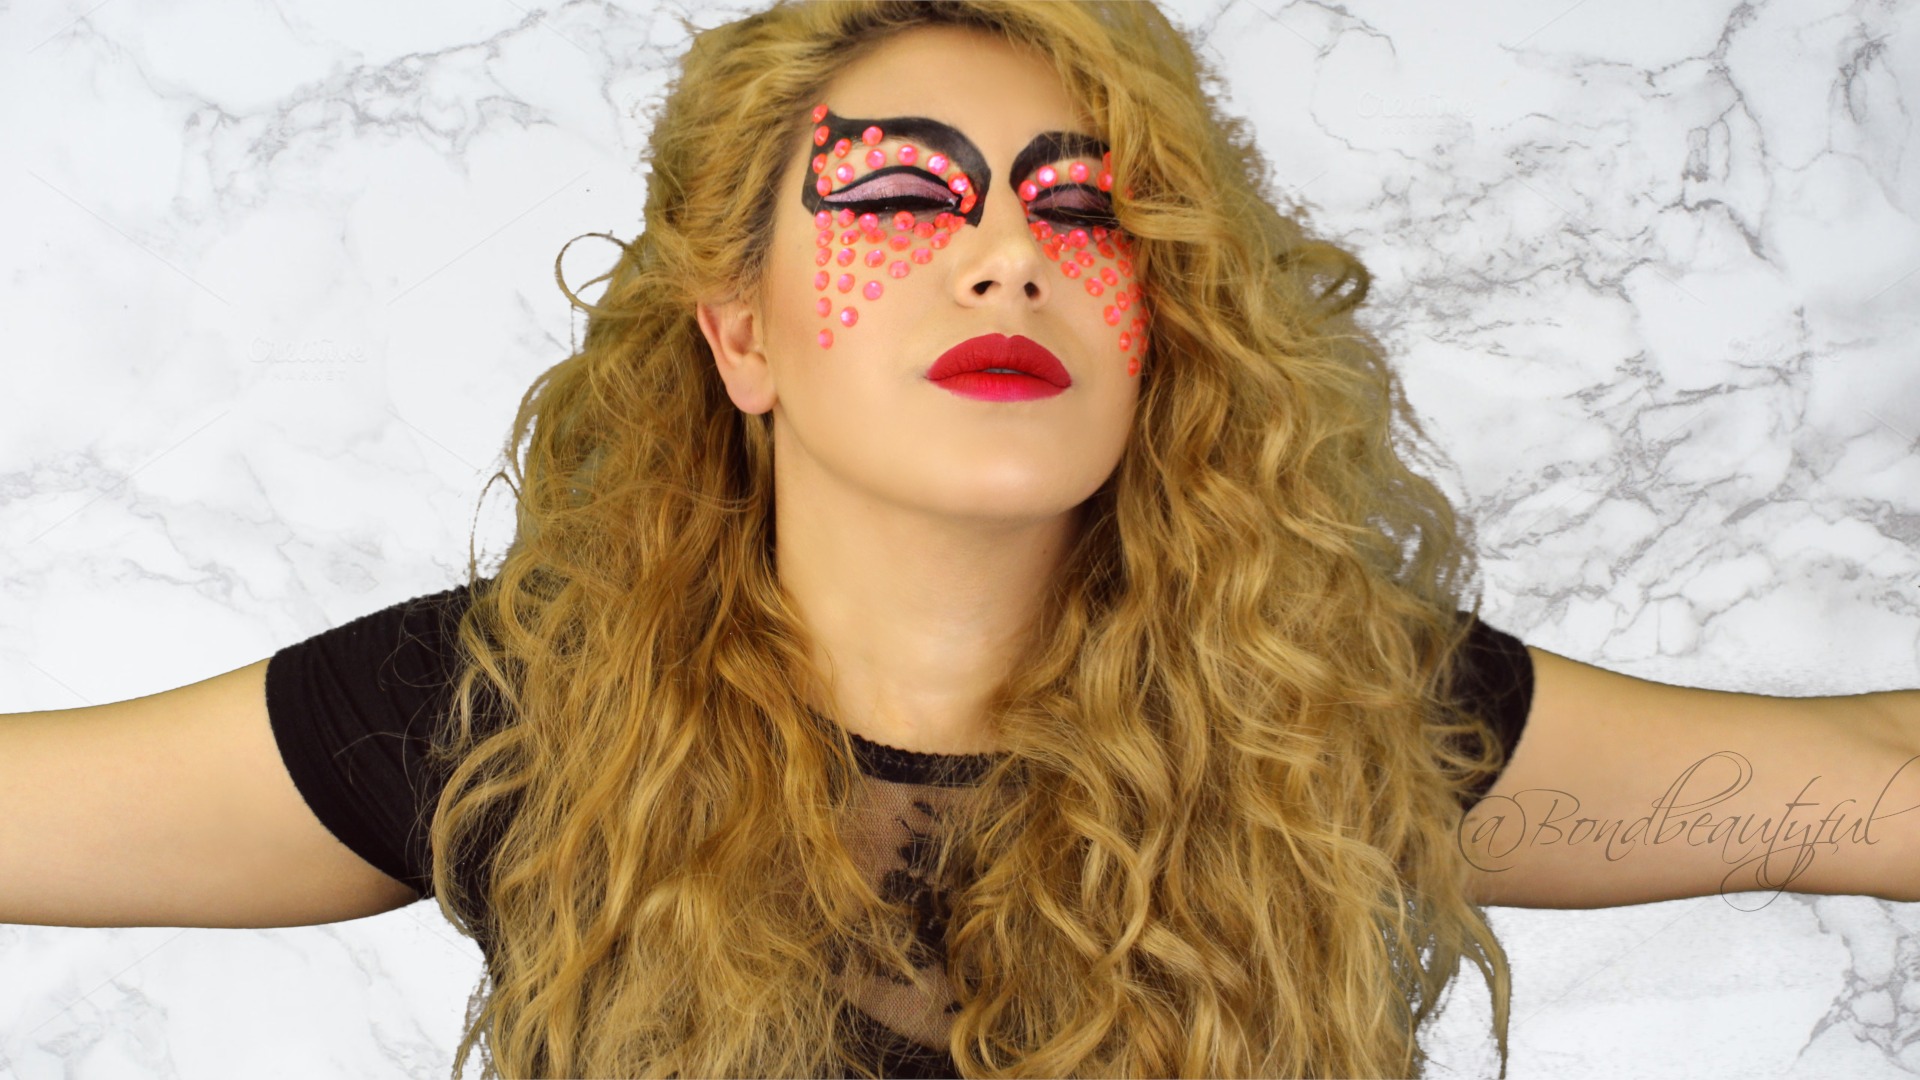
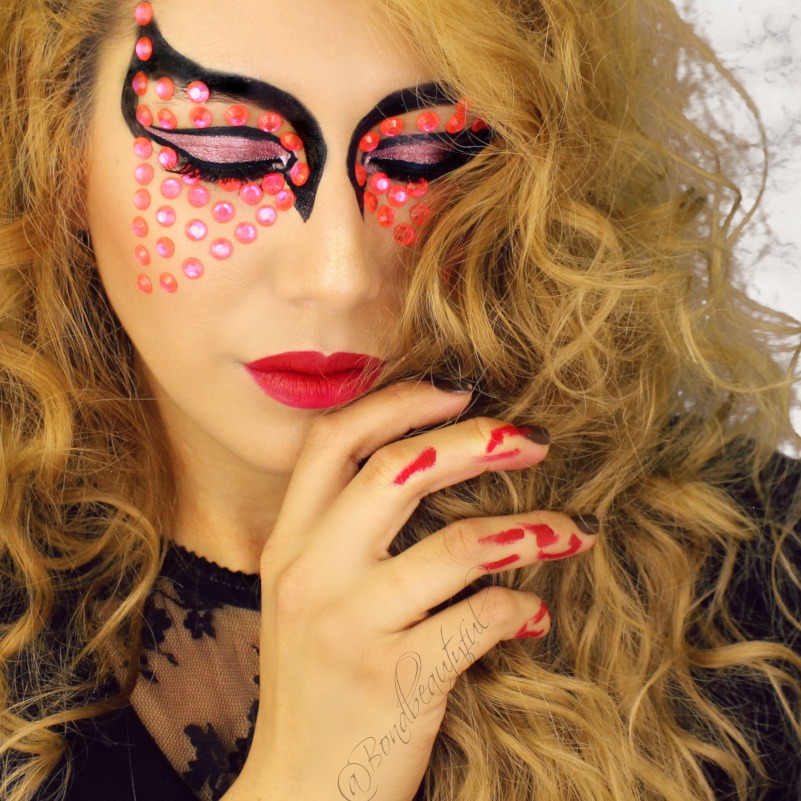
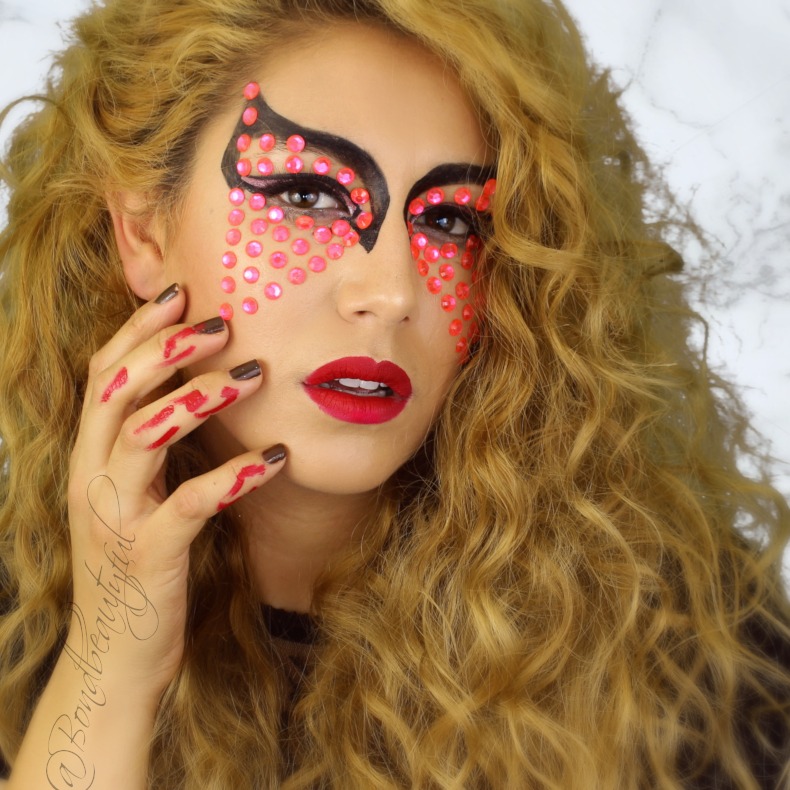
I have missed you guys! I know I have been gone a while so sorry, life has twisted and turned on me. But here we are I am back and happy to be here. I wanted to do a fun post for you guys since I haven’t done on in so long. I know all of you watched the Super Bowl or at least the half time show. Lady Gaga performed and she came out with a strong makeup look. I wanted to recreate this mainly because it was requested on my Instagram, but also because it is unique and fun.
So I went ahead and recreated it for you but I added my little twist to it. Instead of Red Gems I did pink, also I didn’t add the netting like she had. Her whole eye , gem & Black outline was actually a sticker. Because I did mine by hand I left out the netting through out the gems. Either way hers looked gorgeous and I think I did it justice. So I have a full video tutorial for you below, also I shared my edited Instagram Ready Pictures and I would love for you to vote in the comments and tell me which of all these pictures in this post you love best!
Products:
Dermacol Foundation 221
Clinique Blush Fig
Tiny Beauty Eyeshadow Tint: Violette
Elf Baked Eyeshadow : Burnt Plum (lid)
Hard candy Lookpro Matte Eyeshadow Palette (crease)
BhCosmetics Be a bombshell Bronzer Diva
Gems from Walmart & Kiss Lash Glue (Clear)
Milani Stroblight Highlighter Sunglow
Wetnwild Catsuit Missy & Fierce, Pink Really Hard
Milani Make it Dewy Setting Spray
Milani Make it Last Setting Spray
NYC Liquid Liner
Jordana Fabuliner
Kiss Lashes Ritzy
StarLooks Gem Pencil Amethyst
It was all actually easy to do, especially when I don’t have to do so many straight lines with eyeliner. So for all my visual learners, or those who are just curious on how I accomplished this look, check out the Tutorial.
Before you go COMMENT below and tell me which pictures do you like best from this post?
Thank you guys, and Im so excited to be back! I have lots of tutorials,reviews, hauls & more coming soon!
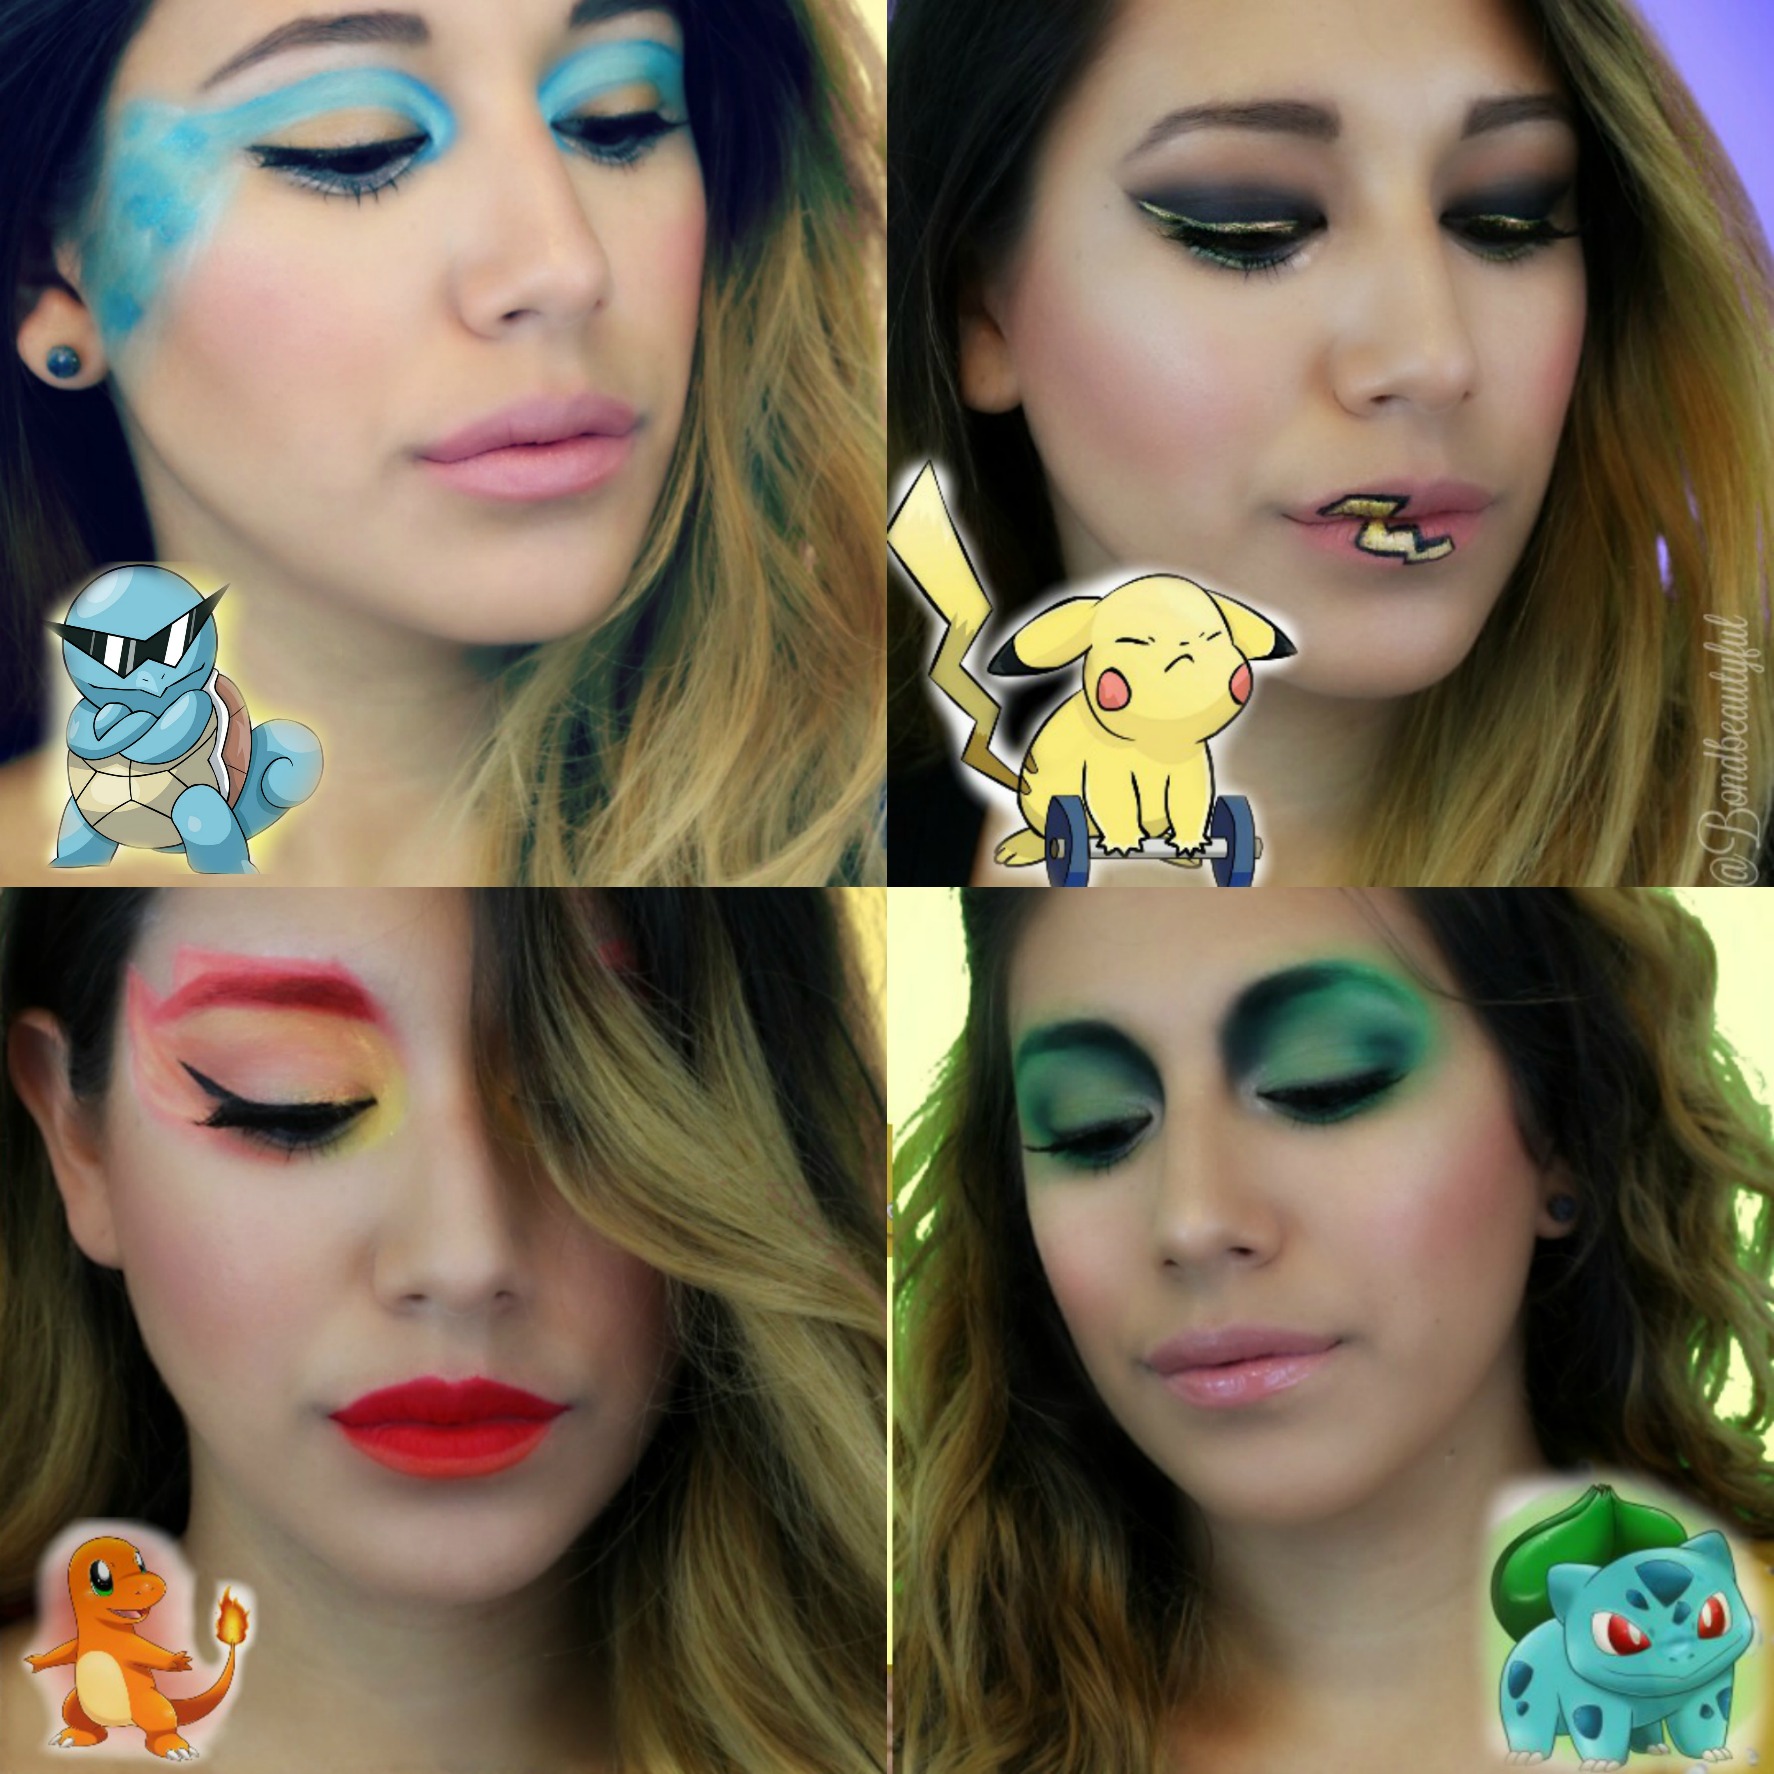
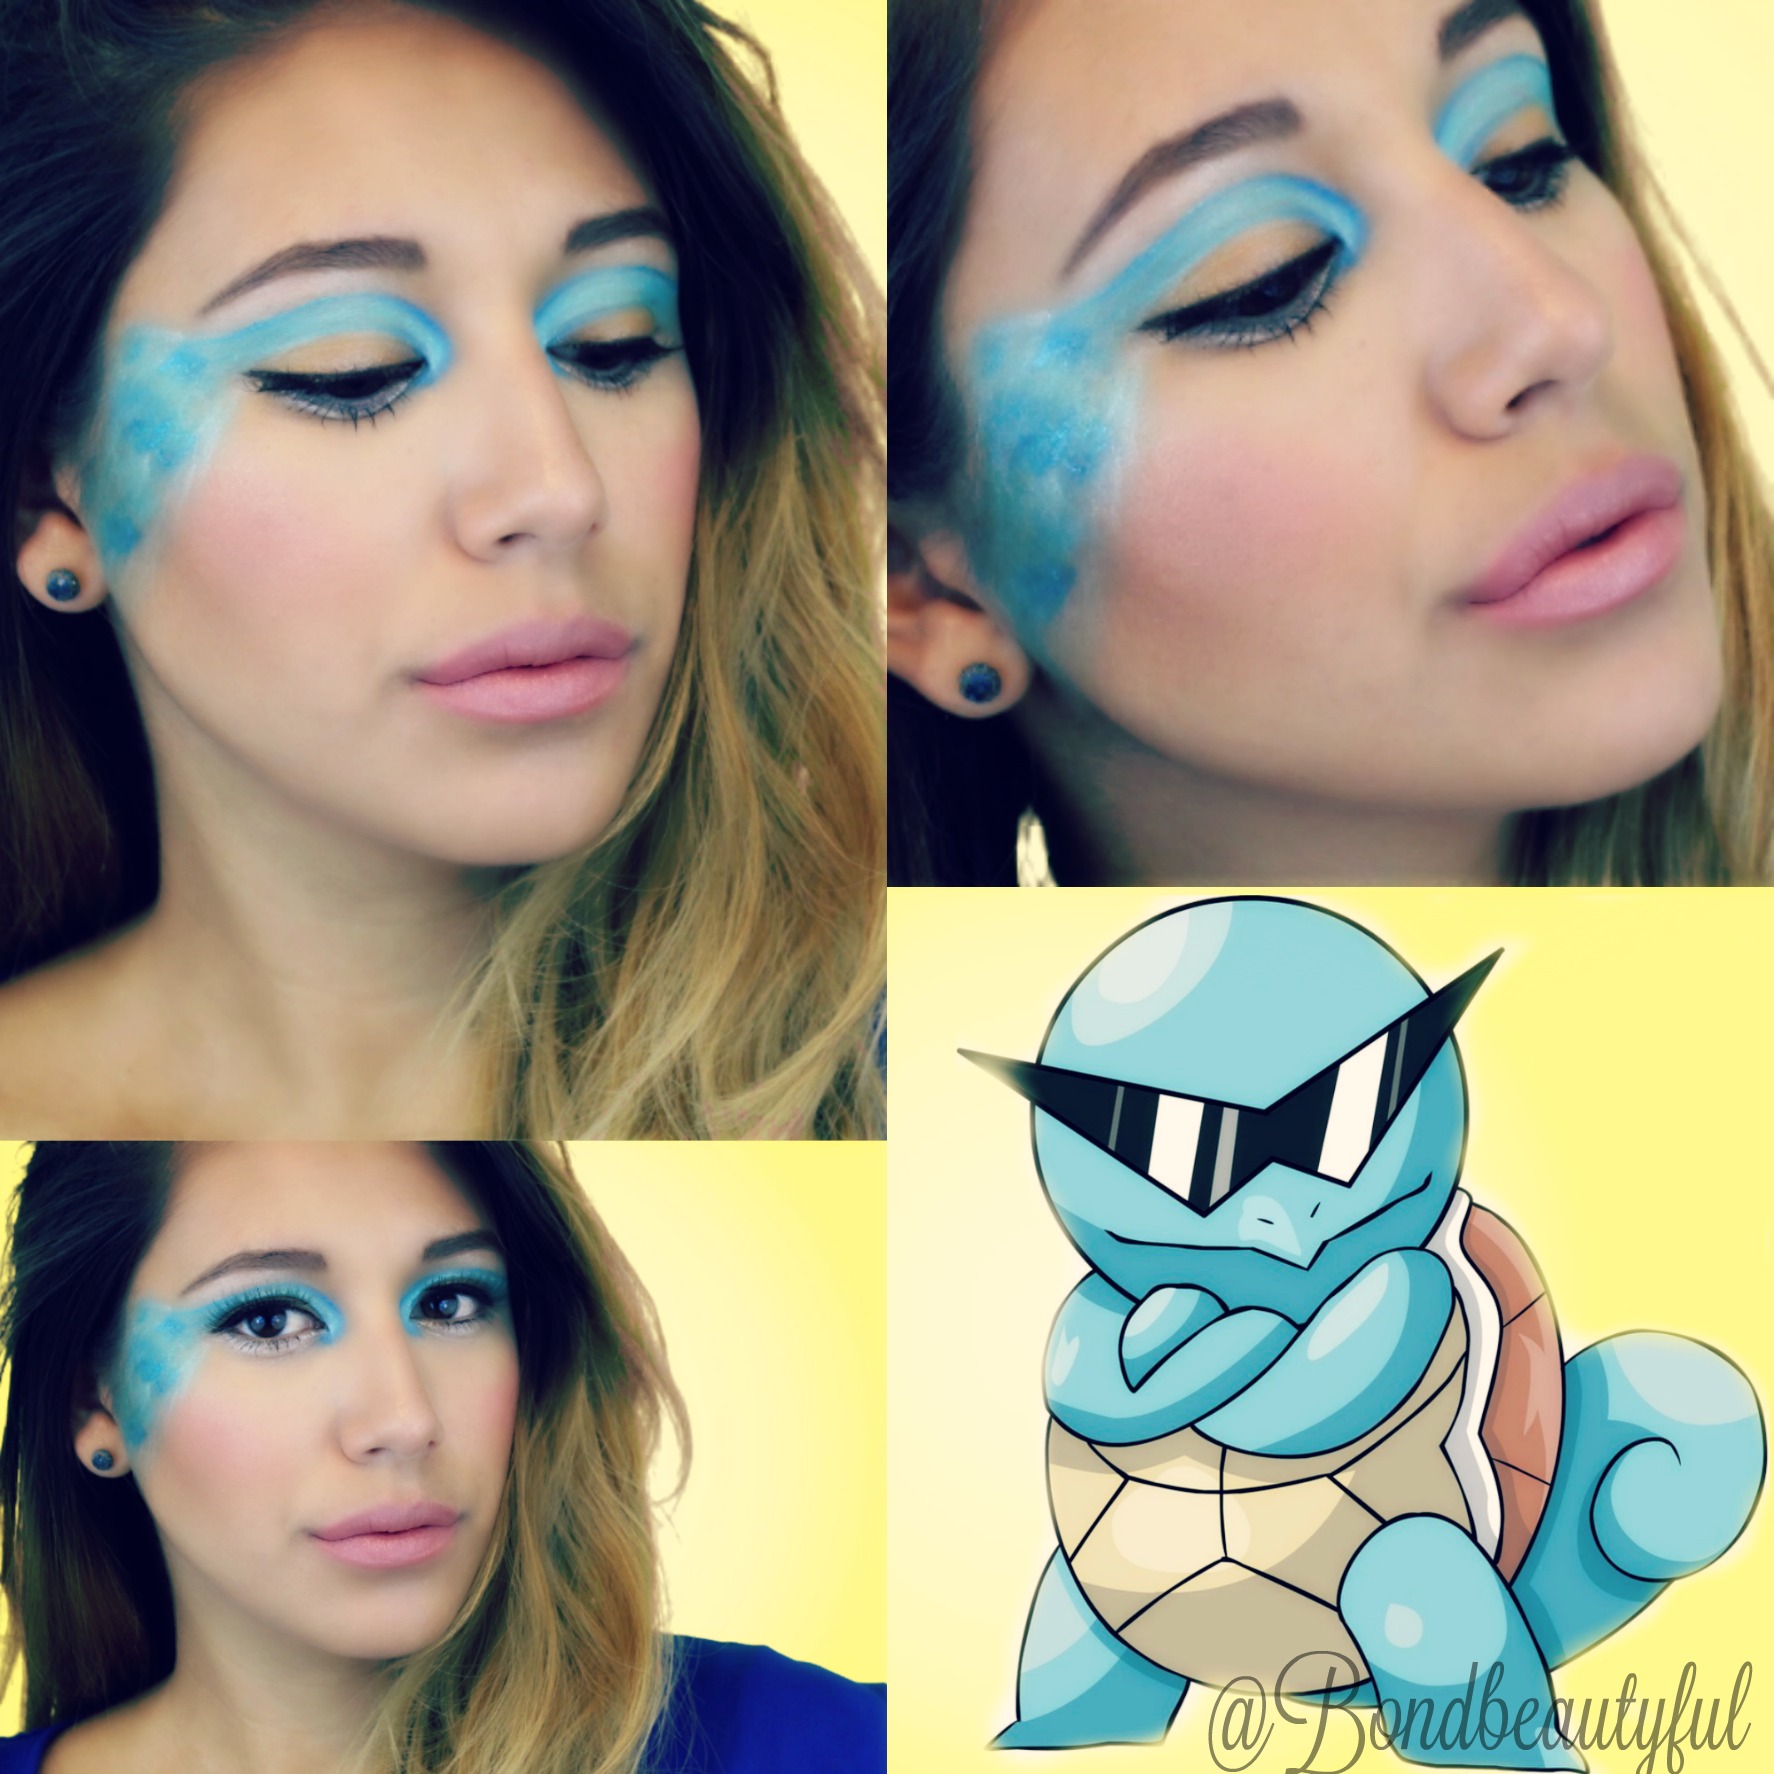
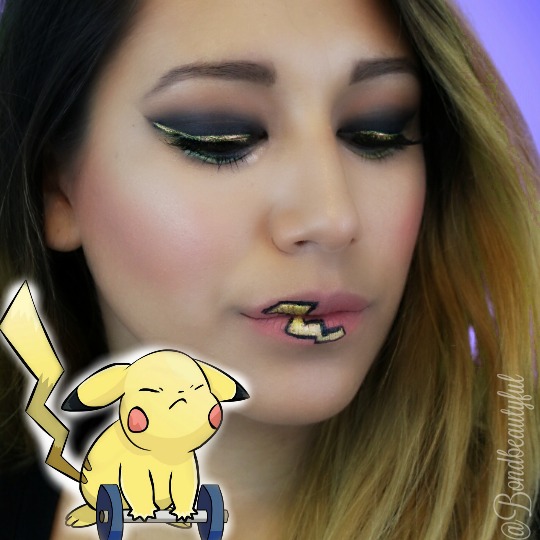
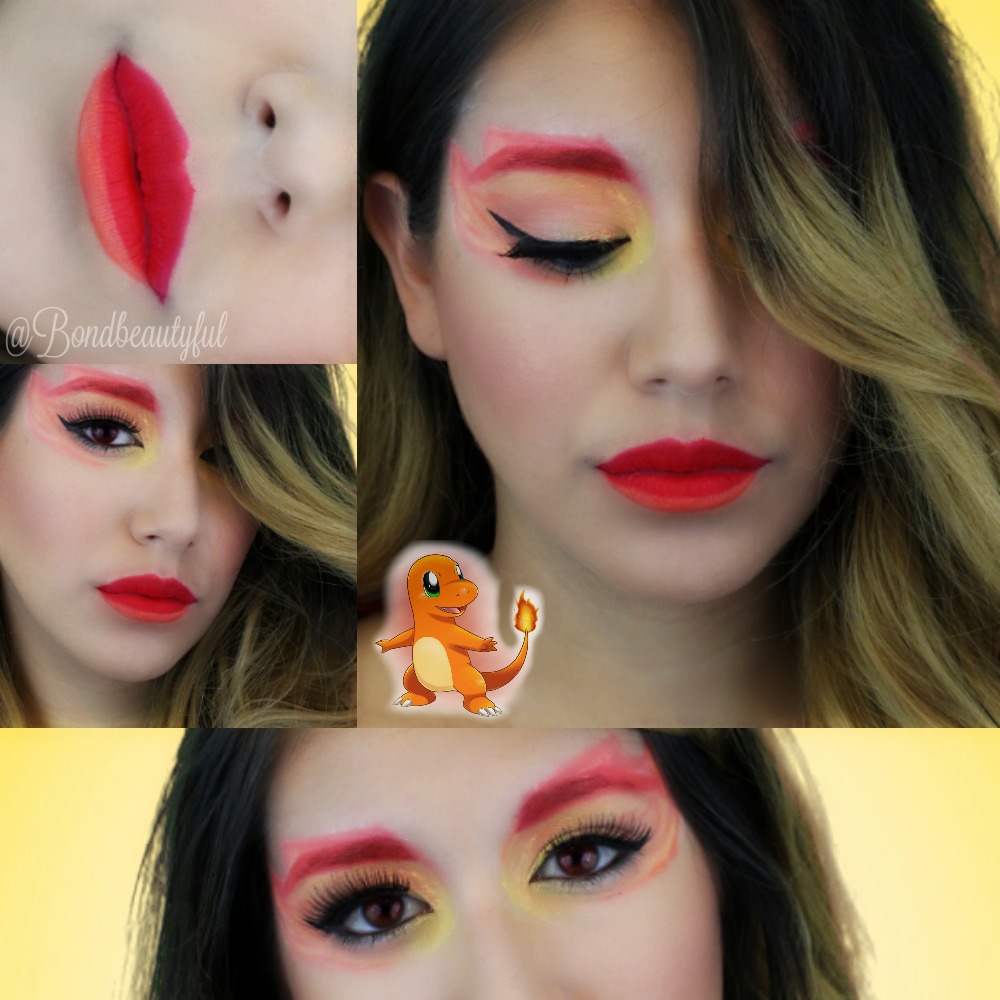
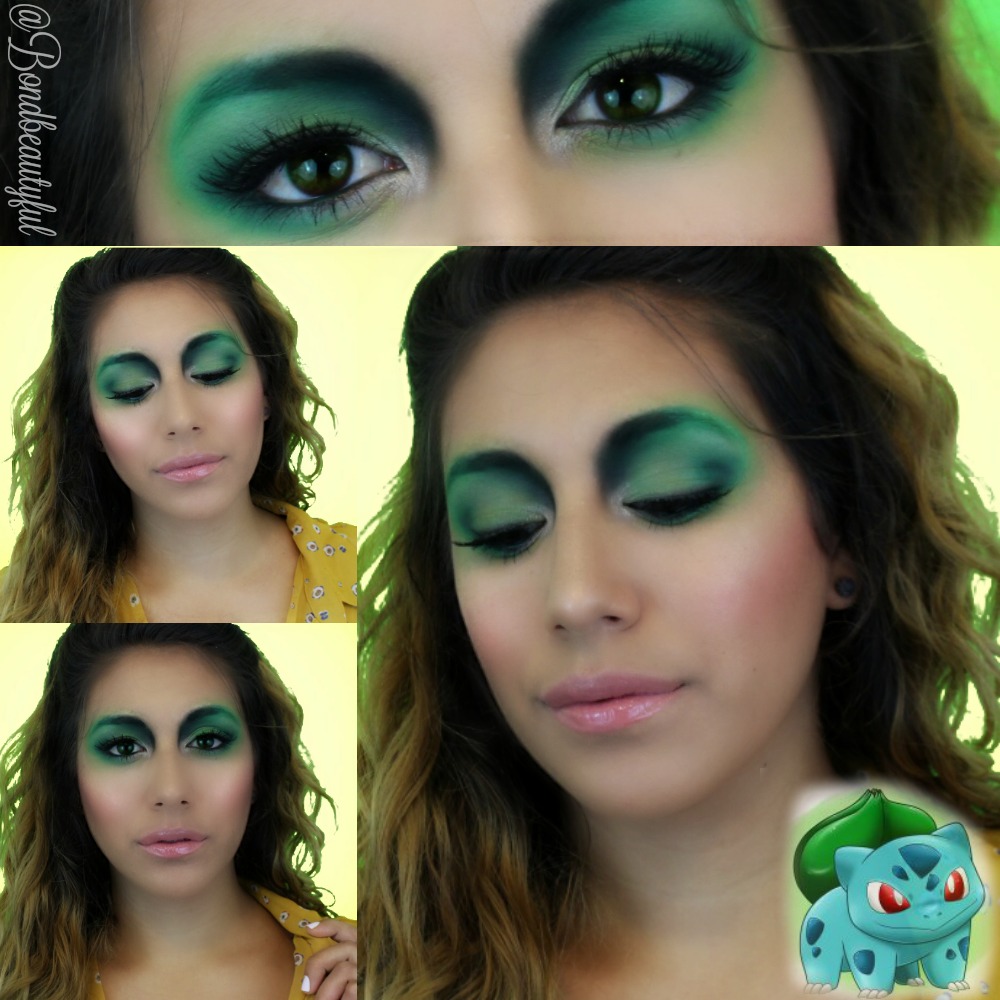
Today I am sharing with you 4 Pokemon Go Inspired Makeup Tutorials: Squirtle, Pikachu, Charmander & Bulbasaur. I have been so astonished by the rate Pokemon Go is becoming popular. So I wanted to create some makeup art type of looks for you guys.
These are easy to follow videos, which are divided into 3 easy steps face , eyes & lips.
If you like these then make sure to visit my Instagram for more fun pictures. I am doing 100 days of makeup, which means creative makeup looks everyday!
I really enjoyed creating these, it was fun and I was able to use products I don’t use very often. I also loved using color! Its not often that I get to do a flame eye look.
Any who here are the tutorials with their Instagram photo.
Squirtle
Pikachu
Charmander
Bulbasaur
I really like how these Pokemon Makeup turned out I hope you did too! Which one was your favorite?
Its early , I’m up and the kids are cozy in their beds still. Perfect time to share this makeup look with you beauties. I was recently looking through my makeup and realized that their is a lot of IPSY products that I have not tried yet! What!! I know pretty crazy, so I took everything out that I have not tried yet & made this beautiful makeup look with it. I also did a easy video tutorial to go along with this post for all you visual learners!
So the star of the show today is the Olive Green pigment , it is gorgeous! As soon as I saw it I new I had to make a look around this color! You don’t usually see wearable olive green eye makeup, but I think that this look turned out pretty darn wearable!
They Key to making a intense eye look wearable is making your face makeup & Lips look as natural as possible. So here are the products I used & the steps to create this look. Again If you are more visual then check the tutorial!
Step #1 : Prep
It is so important to prep your skin for makeup! Taking care of your skin is so important because it keeps your skin look smooth & less aged. Nobody wants to look 40 at 25!
1. Moisturizer first
2. Face Primer second
3. Exfoliate those beautiful lips too!
Step #2 : Makeup
Its time to apply some makeup & create a beautiful unique olive eye look. (which makes all eye colors look gorgeous especially brown or honey eyes!)
Eyes:
1. Apply a warm brown eyeshadow pencil to the lid & crease, then use your finger to blend it out. (this will be your base.. Do the eyes first so if you have any fall out it won’t mess up your face makeup.)
2. Then use a Midtone Cool brown (Blue heart) to apply into the crease & blend it out real well. (this is going to act as our transition color which will help blend the olive out better)
*the key in this eye look is blending really well so take your time doing this with a fluffy CLEAN blending brush!
3. Apply the olive green with a eyeshadow brush onto the out half of the lid & toward the crease. I used this pigment dry so instead of swiping with the brush just pat the color onto the lid; slowly building up the color.( don’t worry about fall out thats why we didn’t do our face makeup first!) Then blend the green and the crease color together using a Clean blending brush.
4. Apply the light pink in the duo underneath the brow to highlight & in the inner most corner of the eye.
5. Apply the Gold in the duo in the inner half of the lid and with the eyeshadow brush you are using carefully blend the olive green and gold together to make a smooth transition.
Face: (im skipping to the face next but I will be back to finish the eyes later!)
1. Apply your concealer & foundation
2. apply a brightenng concealer in an inverted triangle shape under the eyes to brighten , then powder your face
3. apply a bronzer to the hallows of your cheeks for a subtle contour
4. use a light natural pink blush
5. highlight your cheek bones for a beautiful glow
6. apply a lip stain to your lips (this is what gives your look such a natural effect the stain looks natural!) also apply the stain to the apples of your cheeks to add a naturally flushed appearance.
Eyes: (go back to the eyes to finish )
1. apply the eyeshadow pencil to lower lash line & blend with finger.
2. apply the mid toned brown to the lower lid & add the gold shadow to the inner ⅓ of lower lid
3. apply a black eyeliner to the tight line & a green eyeliner to the waterline
4. apply a liquid liner to the upper lashes making a cat eye winged liner.
5. apply mascara & false lashes if needed!
Thats it , I know it seems like a lot of steps because I really broke everything down so that I could be more detailed. This really is a fast look to accomplish and anyone can do this look! I hope you will try it out & use the hashtag #bondbeautyfullooks so that I can see too!
I hope you guys like seeing video tutorials & step by step instructions, if you do I will definitely do more!
What kind of looks are you personally interested in? Wedding, everyday, under 5 min, colorful, neutral .. let me know so that I can do more!!!!!! Your opinion matters so give it to me!!:D
Don’t forget Beauty Comes from within so let yours shine!
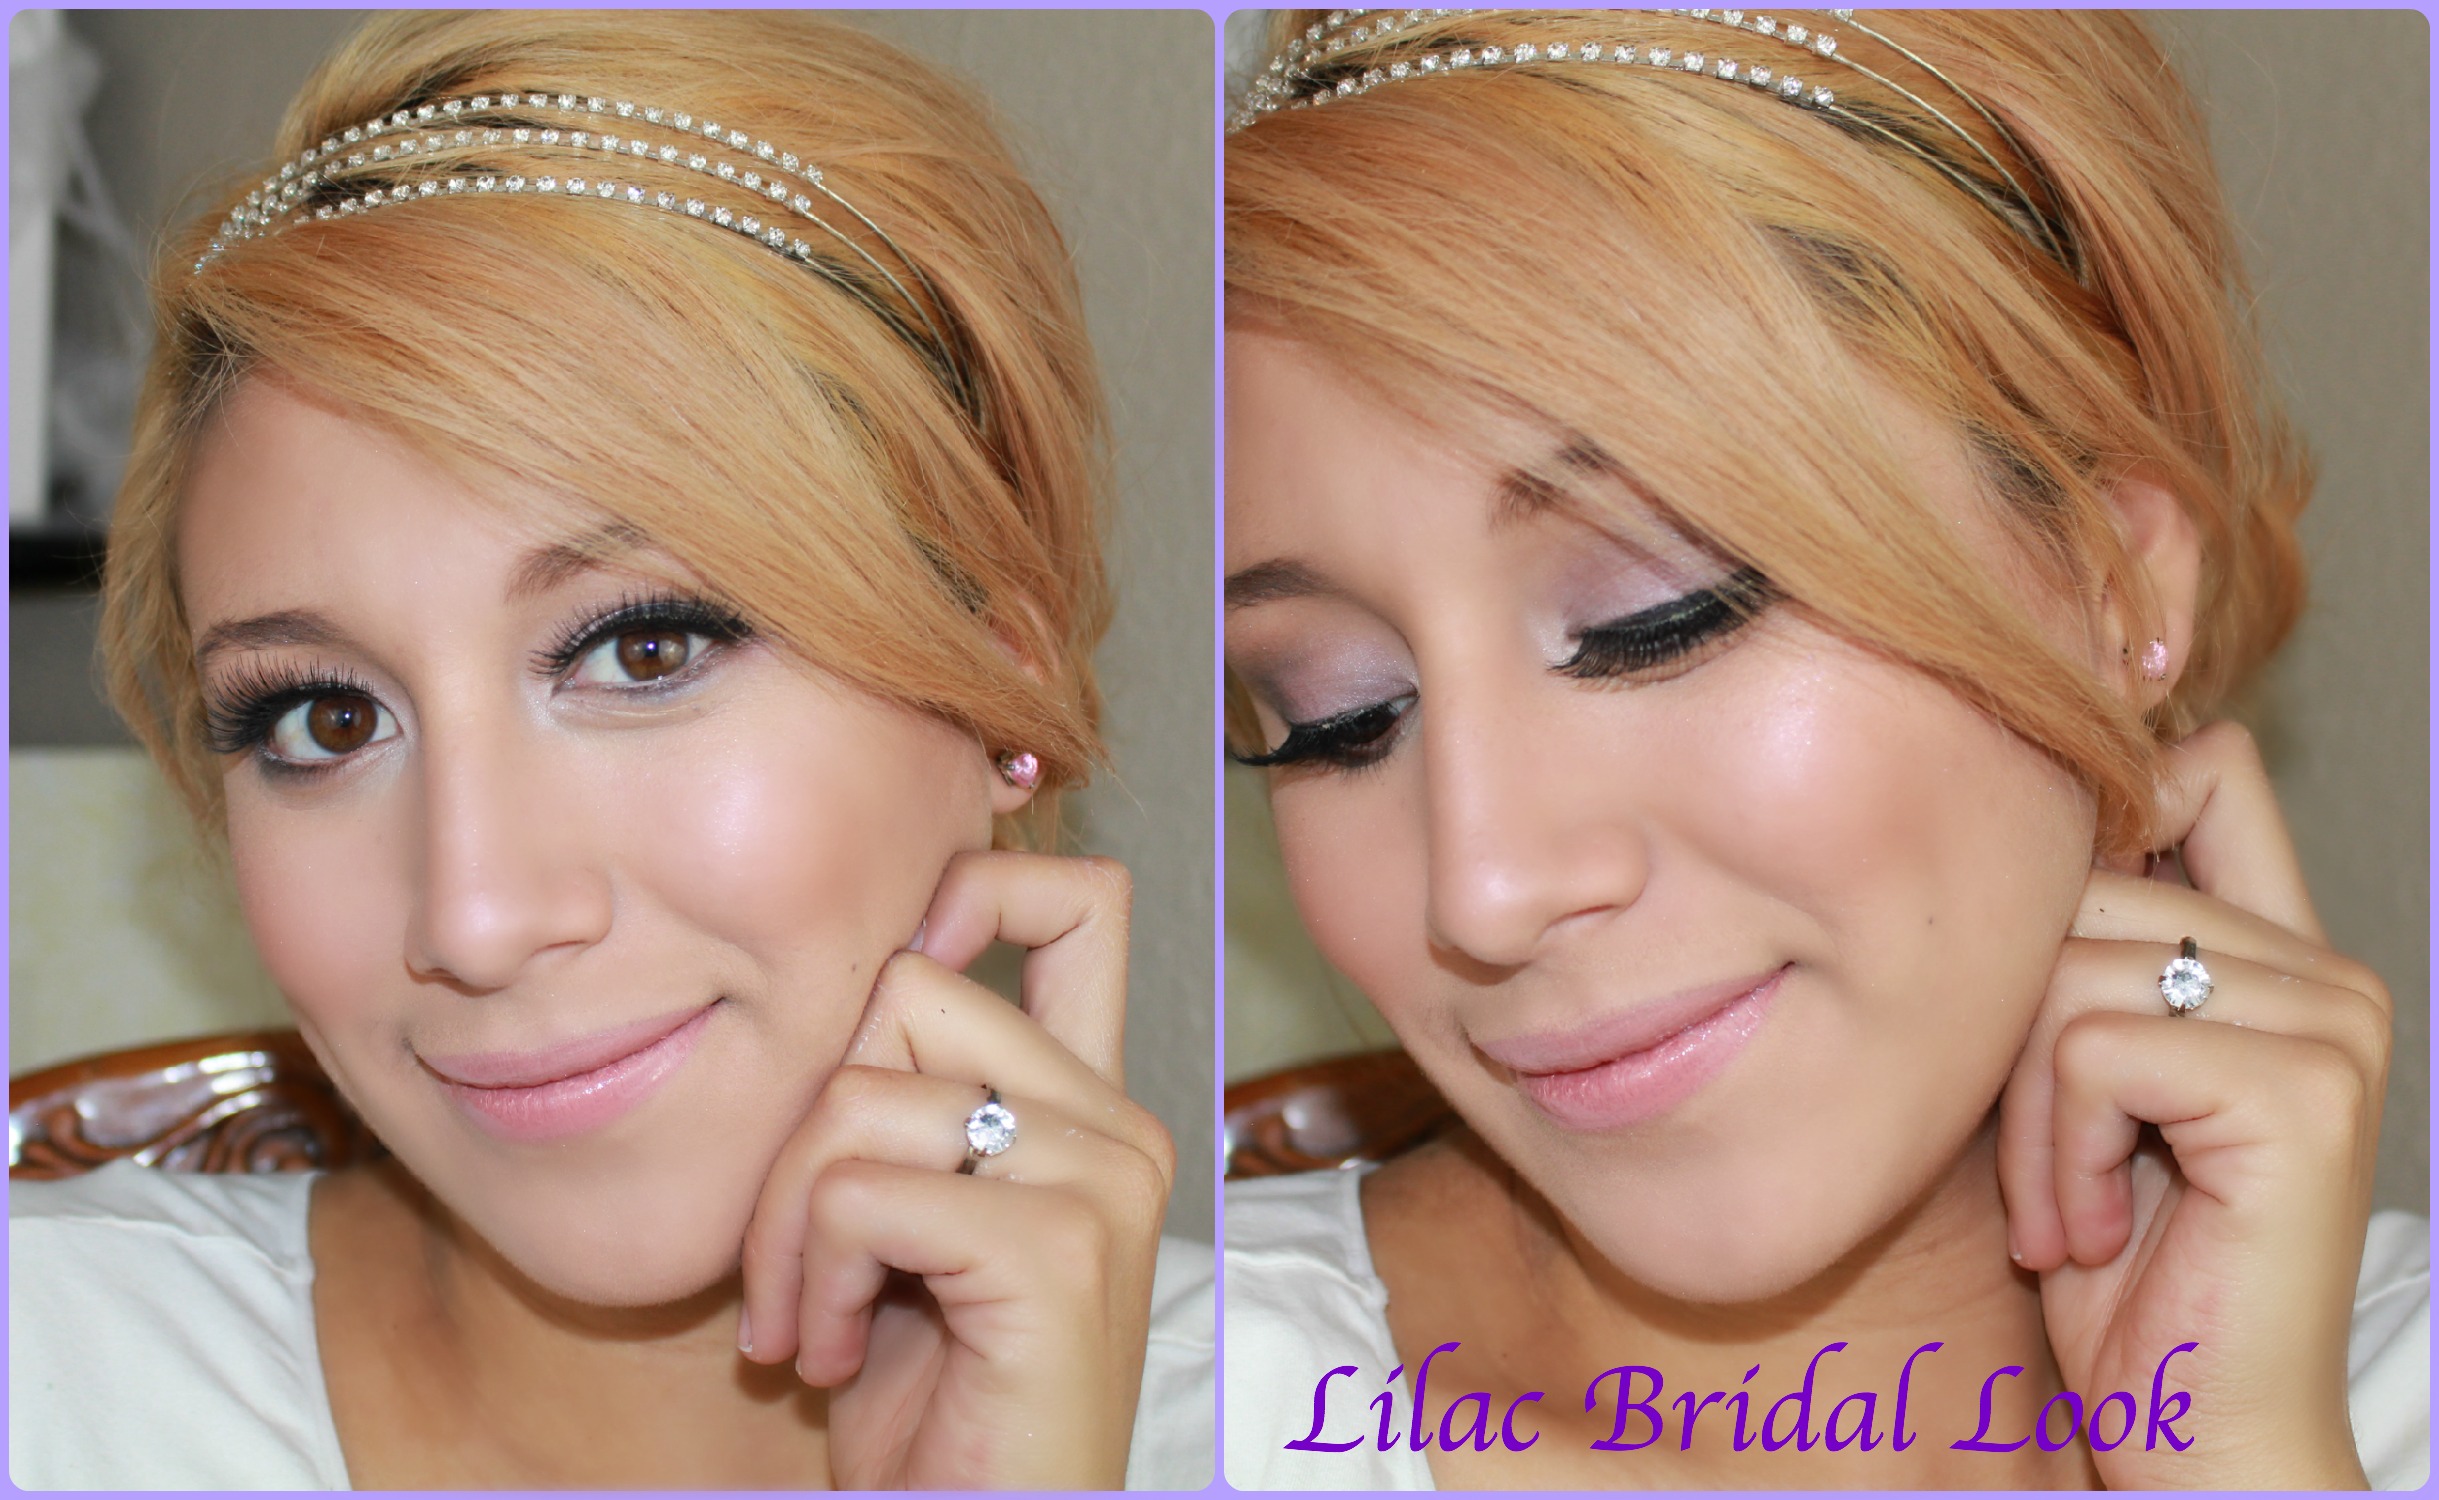
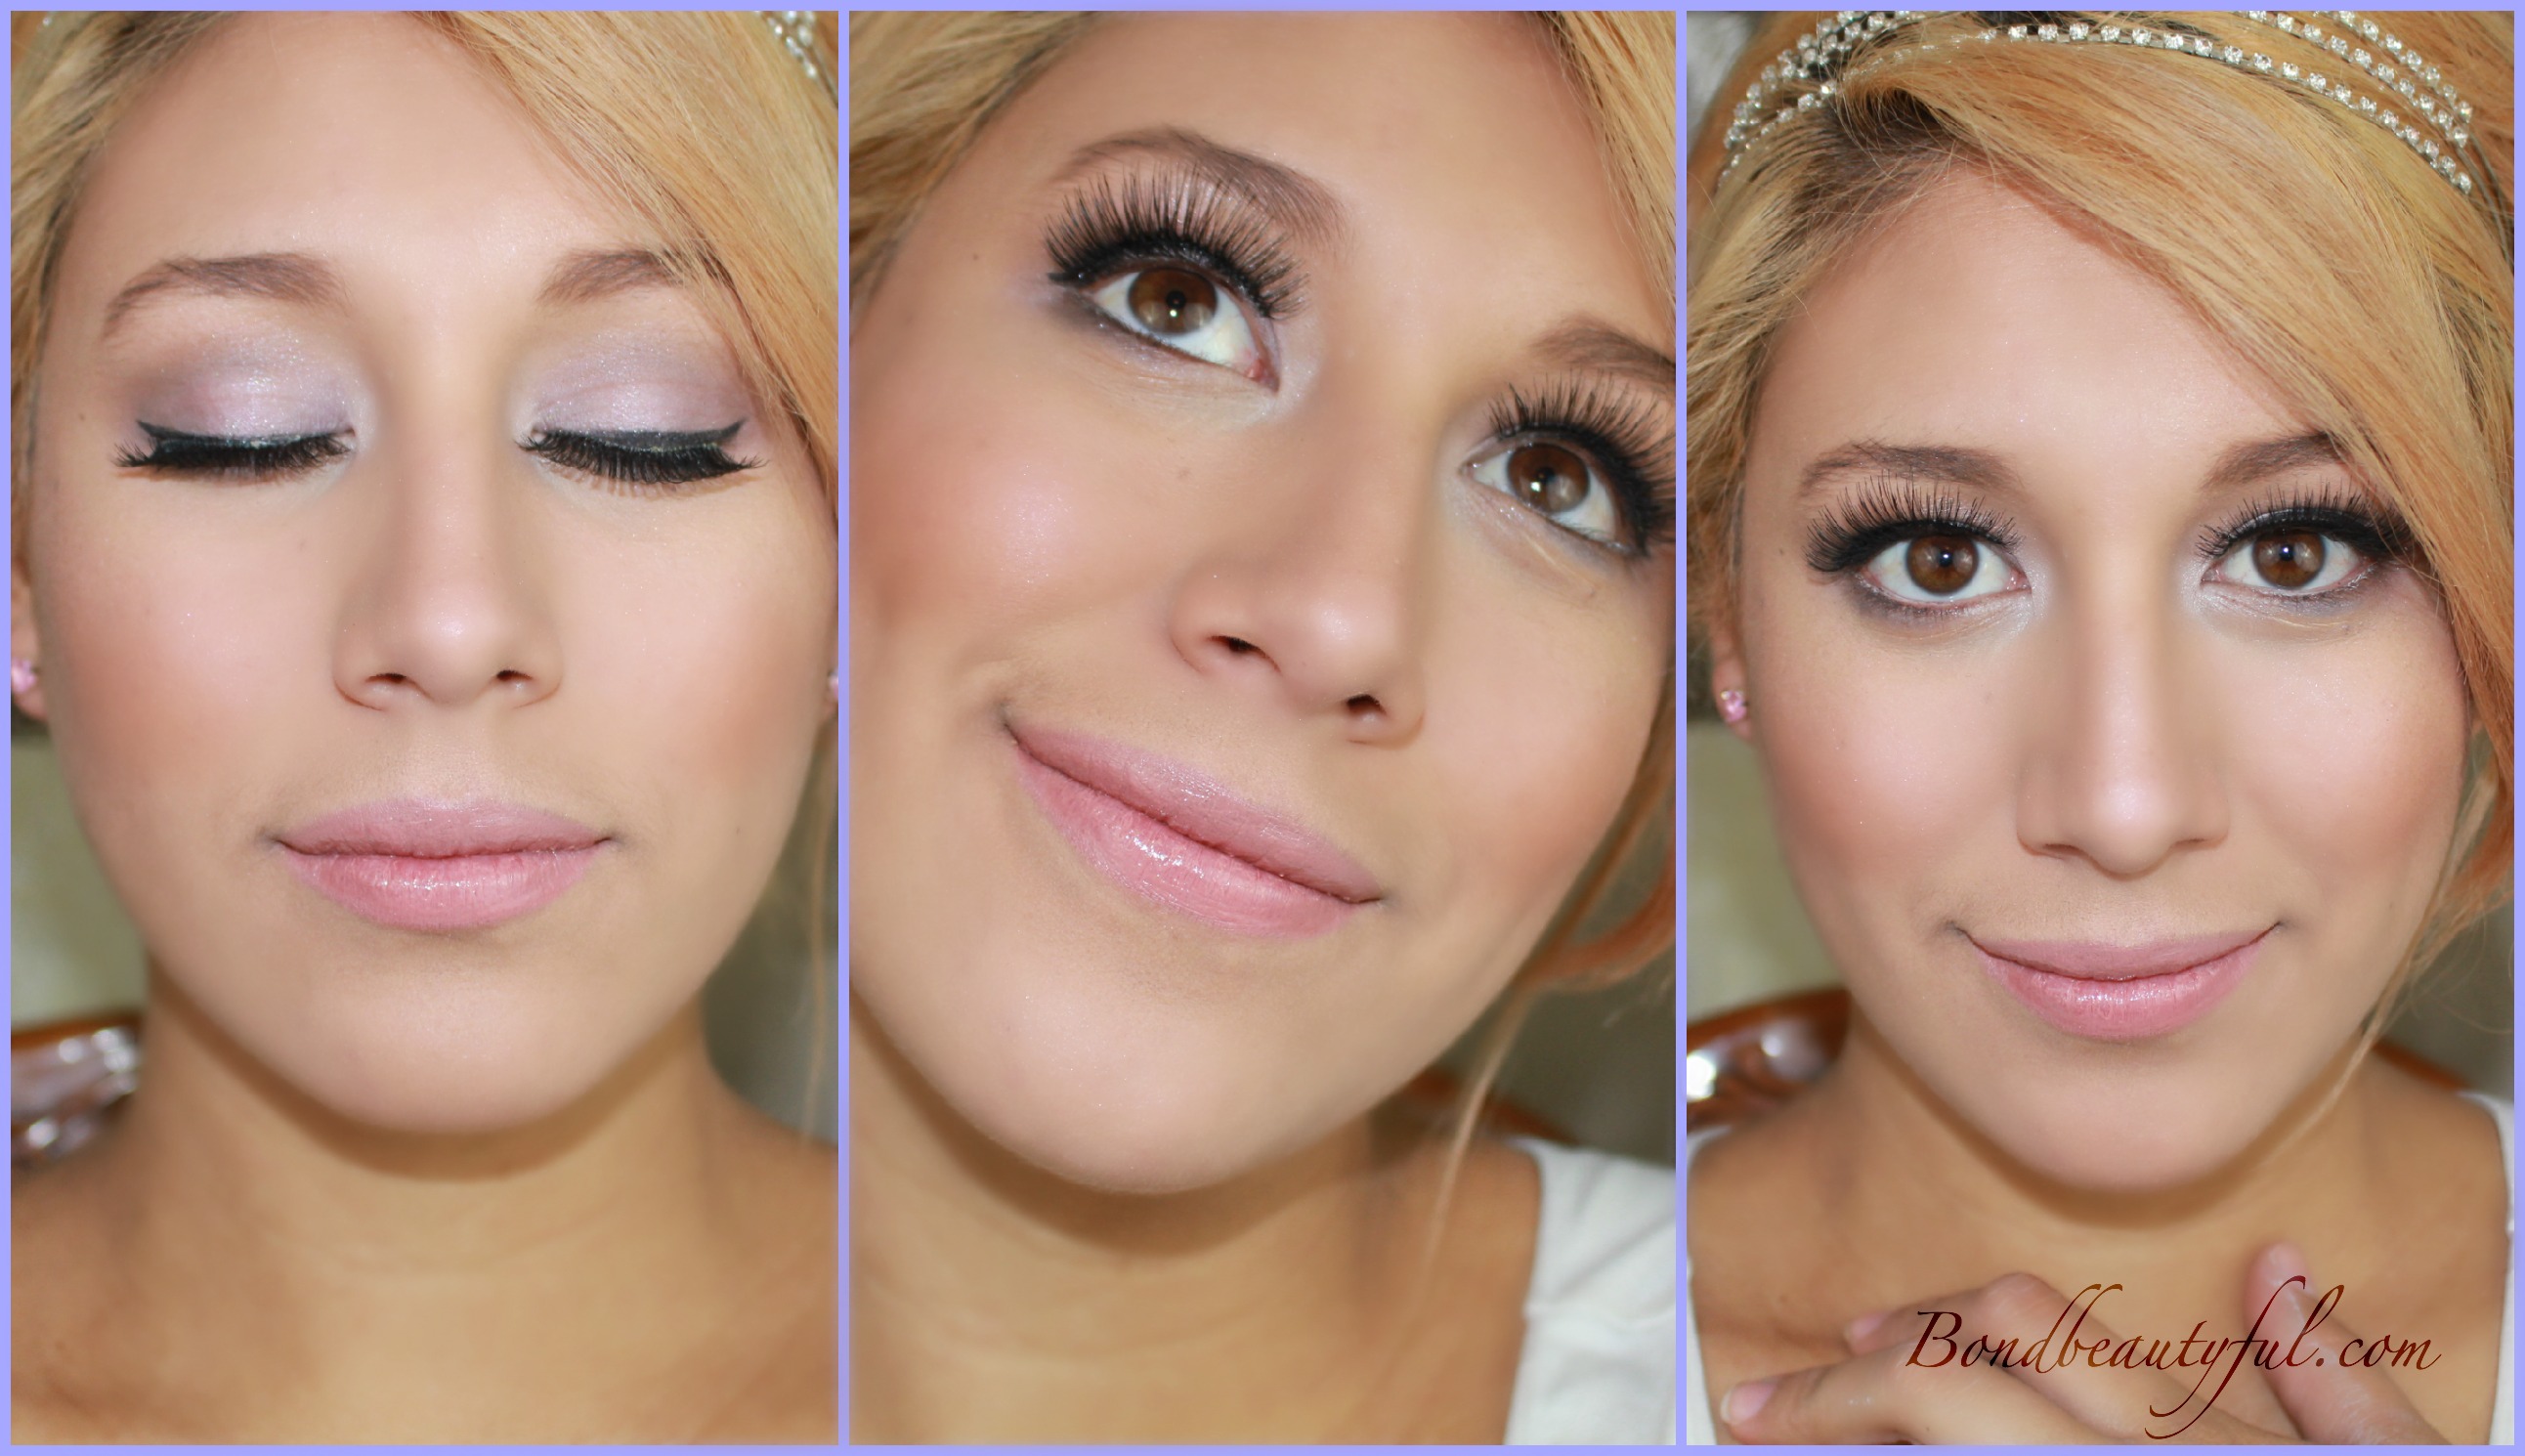
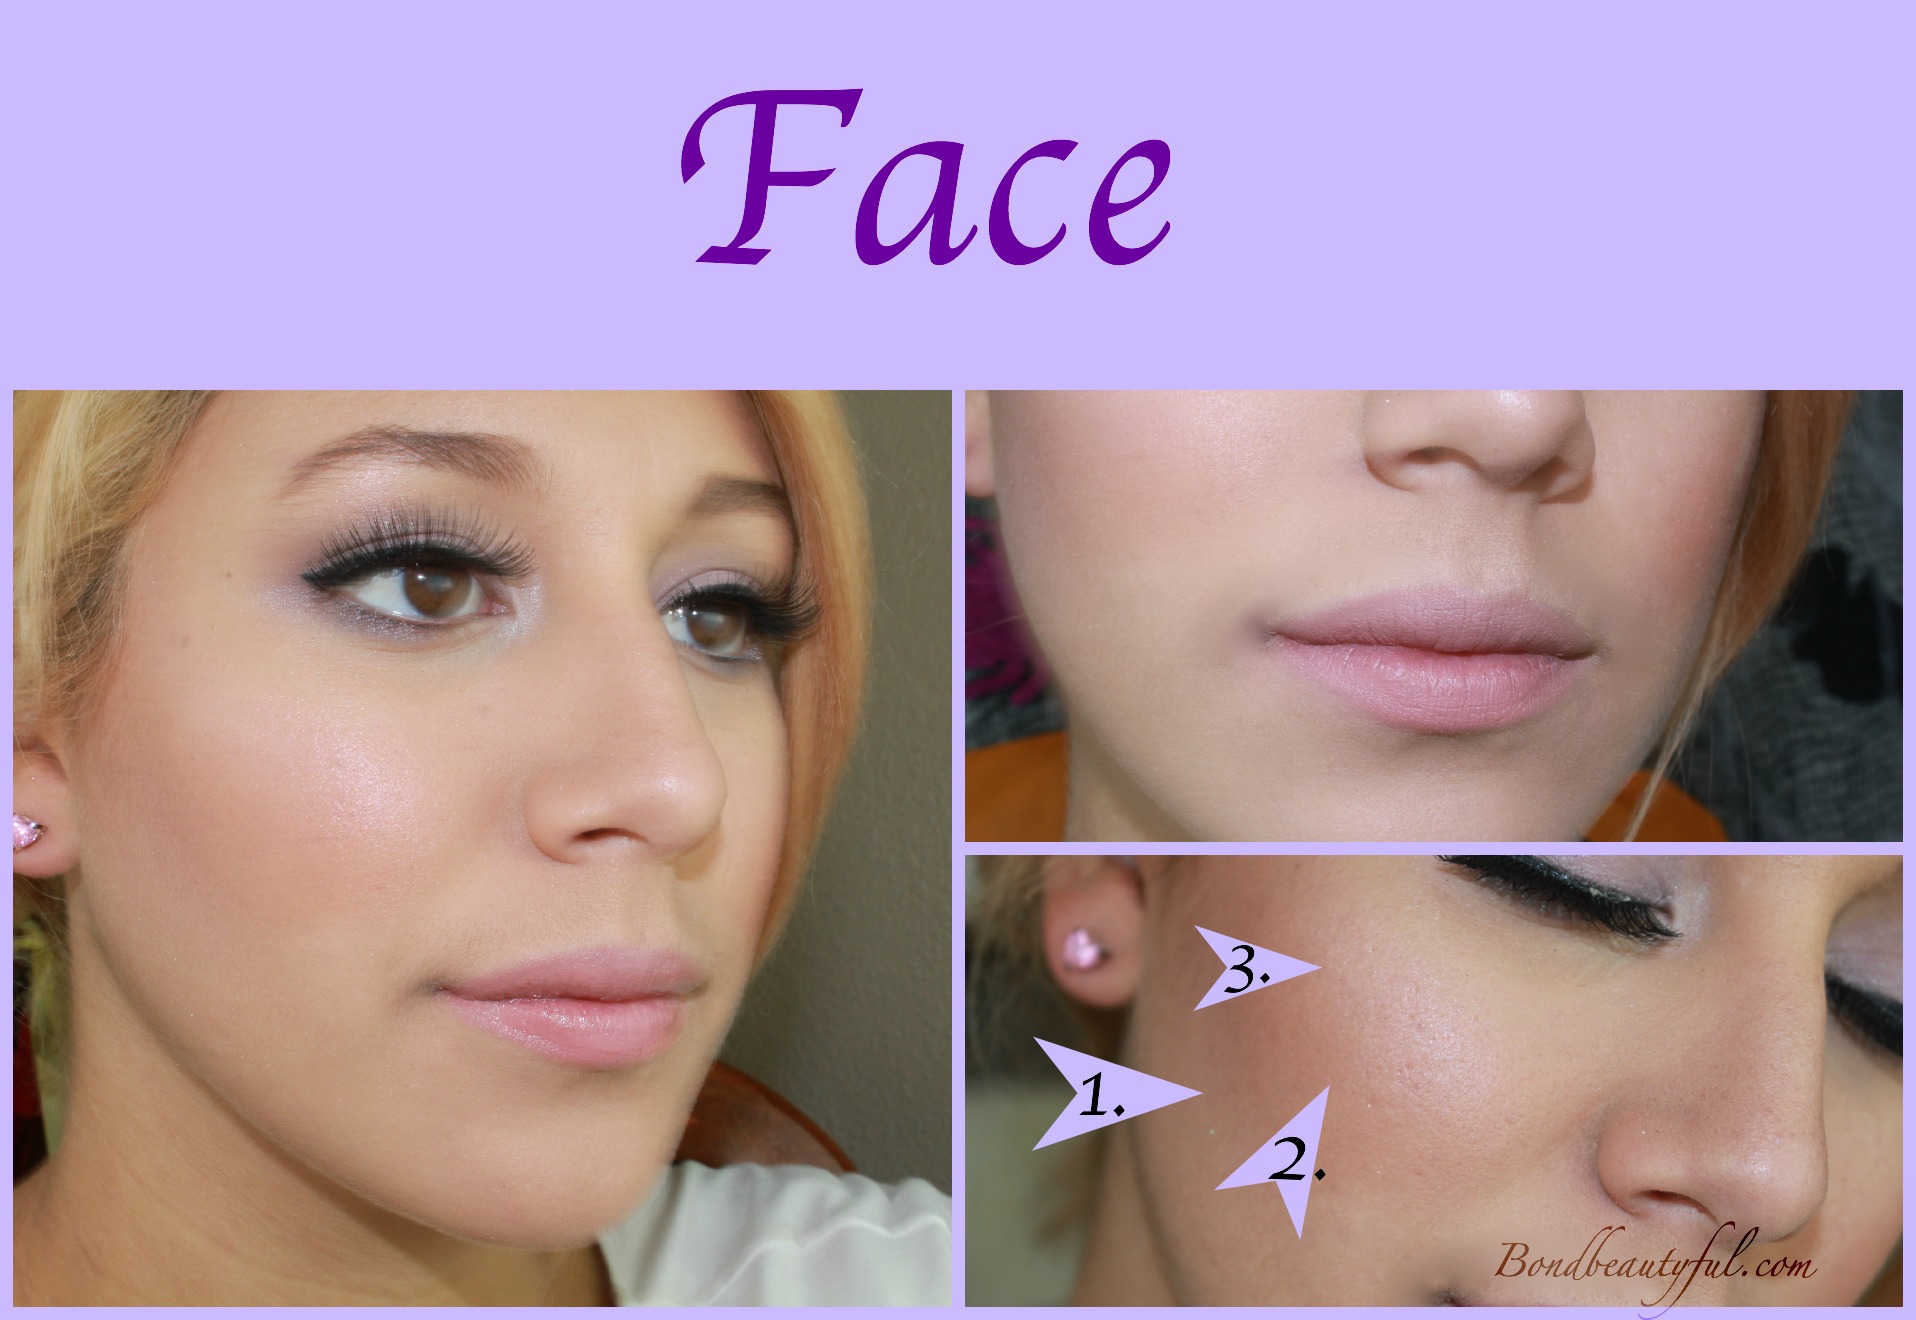
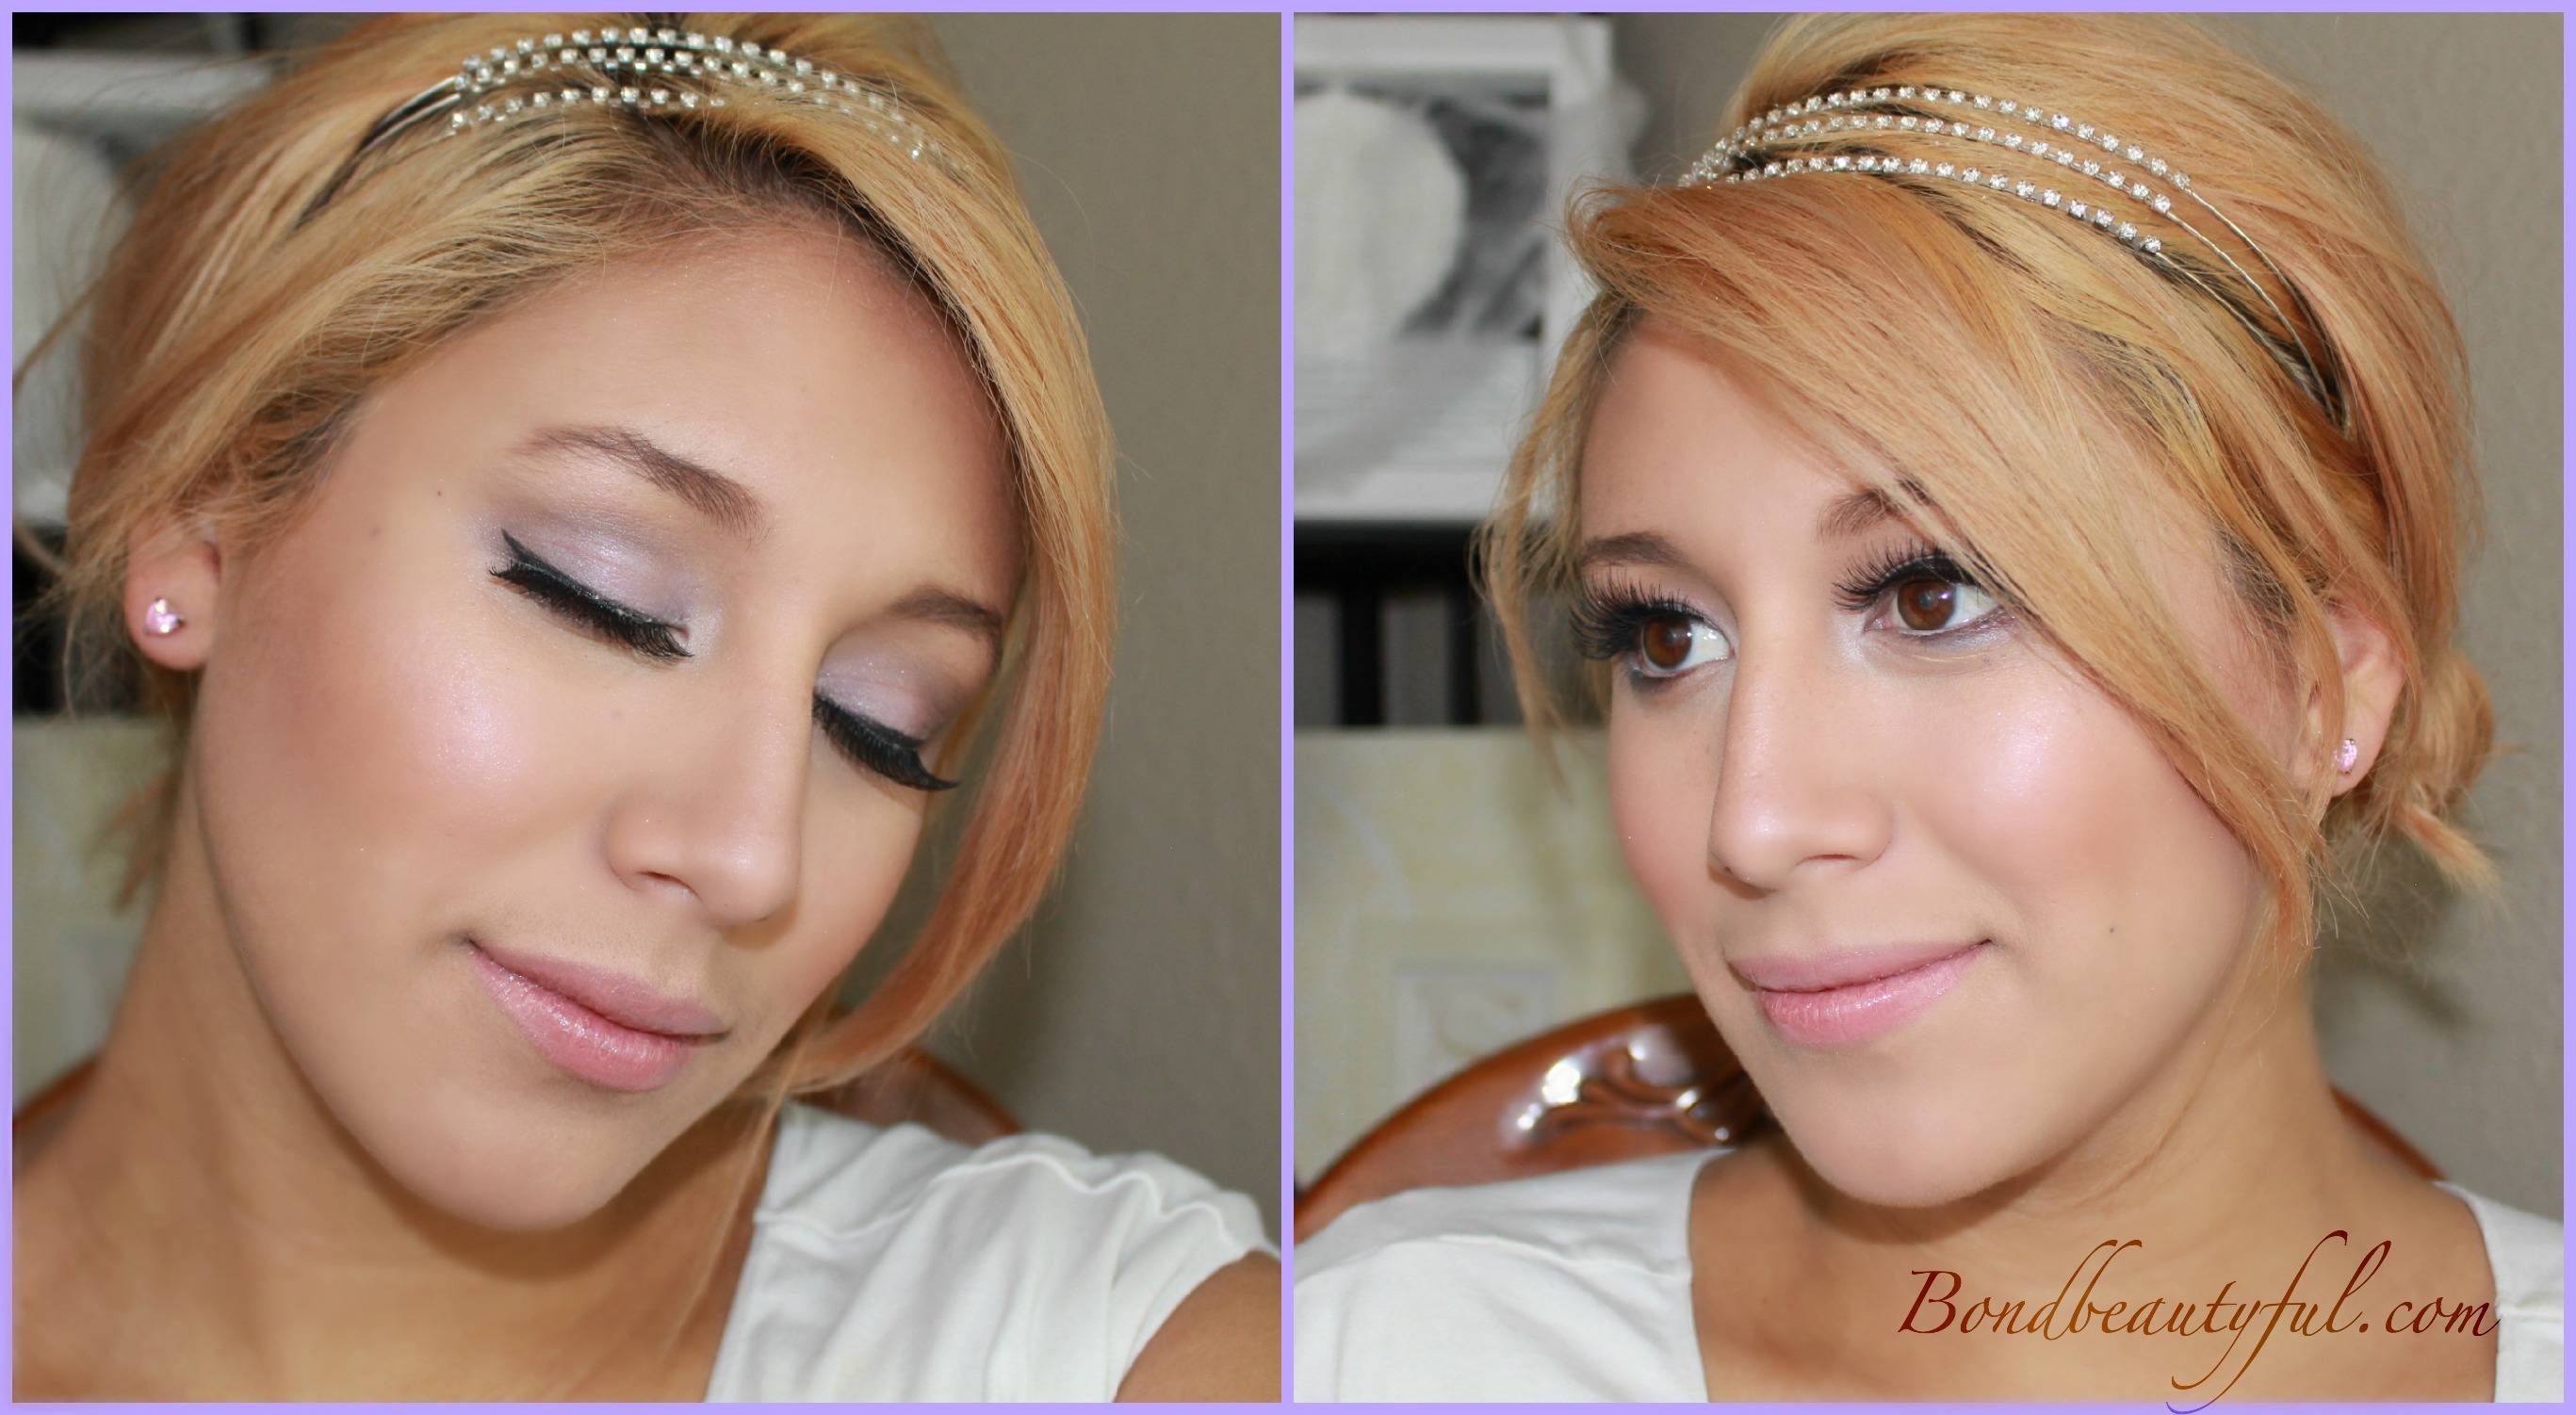
I am so excited to share this Bridal Makeup Look with you guys ! For this look I paired up with Lover.ly , which is a online one stop shop for brides. I was really surprised when I visited their website, it really is a one stop shop! I wish this was around when I got married it would have made wedding planning a whole lot easier!
They sent me pictures of three different dresses and I immediately got inspired by the beautiful strapless dress with purple detailing at the bottom. The first thing I noticed on this dress was the beautiful ombre fabric on the dress. It turned this dress into a non- traditional wedding dress. This gave me lots of leg room for what type of makeup to do. Usually bridal makeup is more neutral and natural; but for this look I wanted to add a modern twist by having lilac eye makeup instead of the usually browns. It added flavor and a modern twist to this bridal look without making it look informal. The sweetheart neckline gave me even more of a reason to use a such a feminine color on the eyelid.
This Lilac Bridal Look that I have created for you will compliment this dress perfectly. The Lilac eye makeup really ties the makeup and the gown together nicely. I wanted this look to be fun and flirty but still elegant. I wanted you to notice the makeup but I didn’t want to take away from how stunning the dress looks. So enough of all the blabbing lets get started with how to accomplish this look. (List of the products used will be below).
First I applied a white cream eyeshadow base to the Eyelid area. (to help the lilac color show up more vibrantly.)
I then applied a cream matte shade to the brow bone for a subtle highlight. (because the dress is so eye catching I didn’t want to distract with shimmery makeup!)
Then I applied a matte Lilac Shade to the Eyelid. (Using patting motions for the most color payoff).
Next I applied a Light Cranberry Shimmery Shade on the outer half of the lid. (Blend the two shades together)
Apply a Medium Brown shade to the crease with a crease brush.
To deepen the crease I used a Matte Grey shade in the crease and lightly to the outer third of the lid. Then make sure to blend with a fluffy blending brush.
I Also added that same Grey in the lower lid. I also added a pearly white shade to the inner corner of the lid. (doing this opens your eyes more and it looks stunning in pictures)
Next is winged liner. I also added a dark eyeliner to the tight line and in between the upper lashes to add volume. Then in the waterline I added a white eyeliner pencil to open up the eyes even more!
No Bridal look is done without adding lashes! (Lashes really show up beautifully in pictures so even if you are not a lashes girl I would highly recommend them for your wedding pictures).
Since the dress is a strapless dress it adds a sexy vibe to the bridal look ; so I wanted to incorporate that into my eye makeup with a winged eyeliner. Having your eye makeup done is only half of it, next is having flawless face makeup.
First I applied a Matte Bronzer underneath the cheek bone for a nice contour. (Even if you never contour or highlight your face doing so on your wedding will make such a difference in your pictures. Don’t you want that bridal glow?!)
Next I applied my blush, I chose a blush that is more of a natural Pink shade. (you don’t want to much purple or it won’t look natural and will take away from the dress.)
Last I applied a pink highlight shade to the tops of my cheek bones, nose & cupid bow.
For the Lips I decided to do more of a nude pink shade . I used a matte lipstick and then later added a lipgloss for that shiny finish. (Matte or Shiny is up to you, they both photograph beautifully).
This makeup look is so easy you can do it at home. If you are getting it done by a makeup artist make sure to do a trial run. I hope you guys like this look, if you do feel free to pin these pics on your Pinterest for later! Thank you so much for all your support and also thanks to Lover.ly for featuring me on their website! Make sure to check out their website!
Products I Used:
Face:
Covergirl Stay Fabulous Foundation
Rimmel Stay Matte Powder
Instant Age Rewind Neutralizing Concealer (Under the eyes inverted triangle shape)
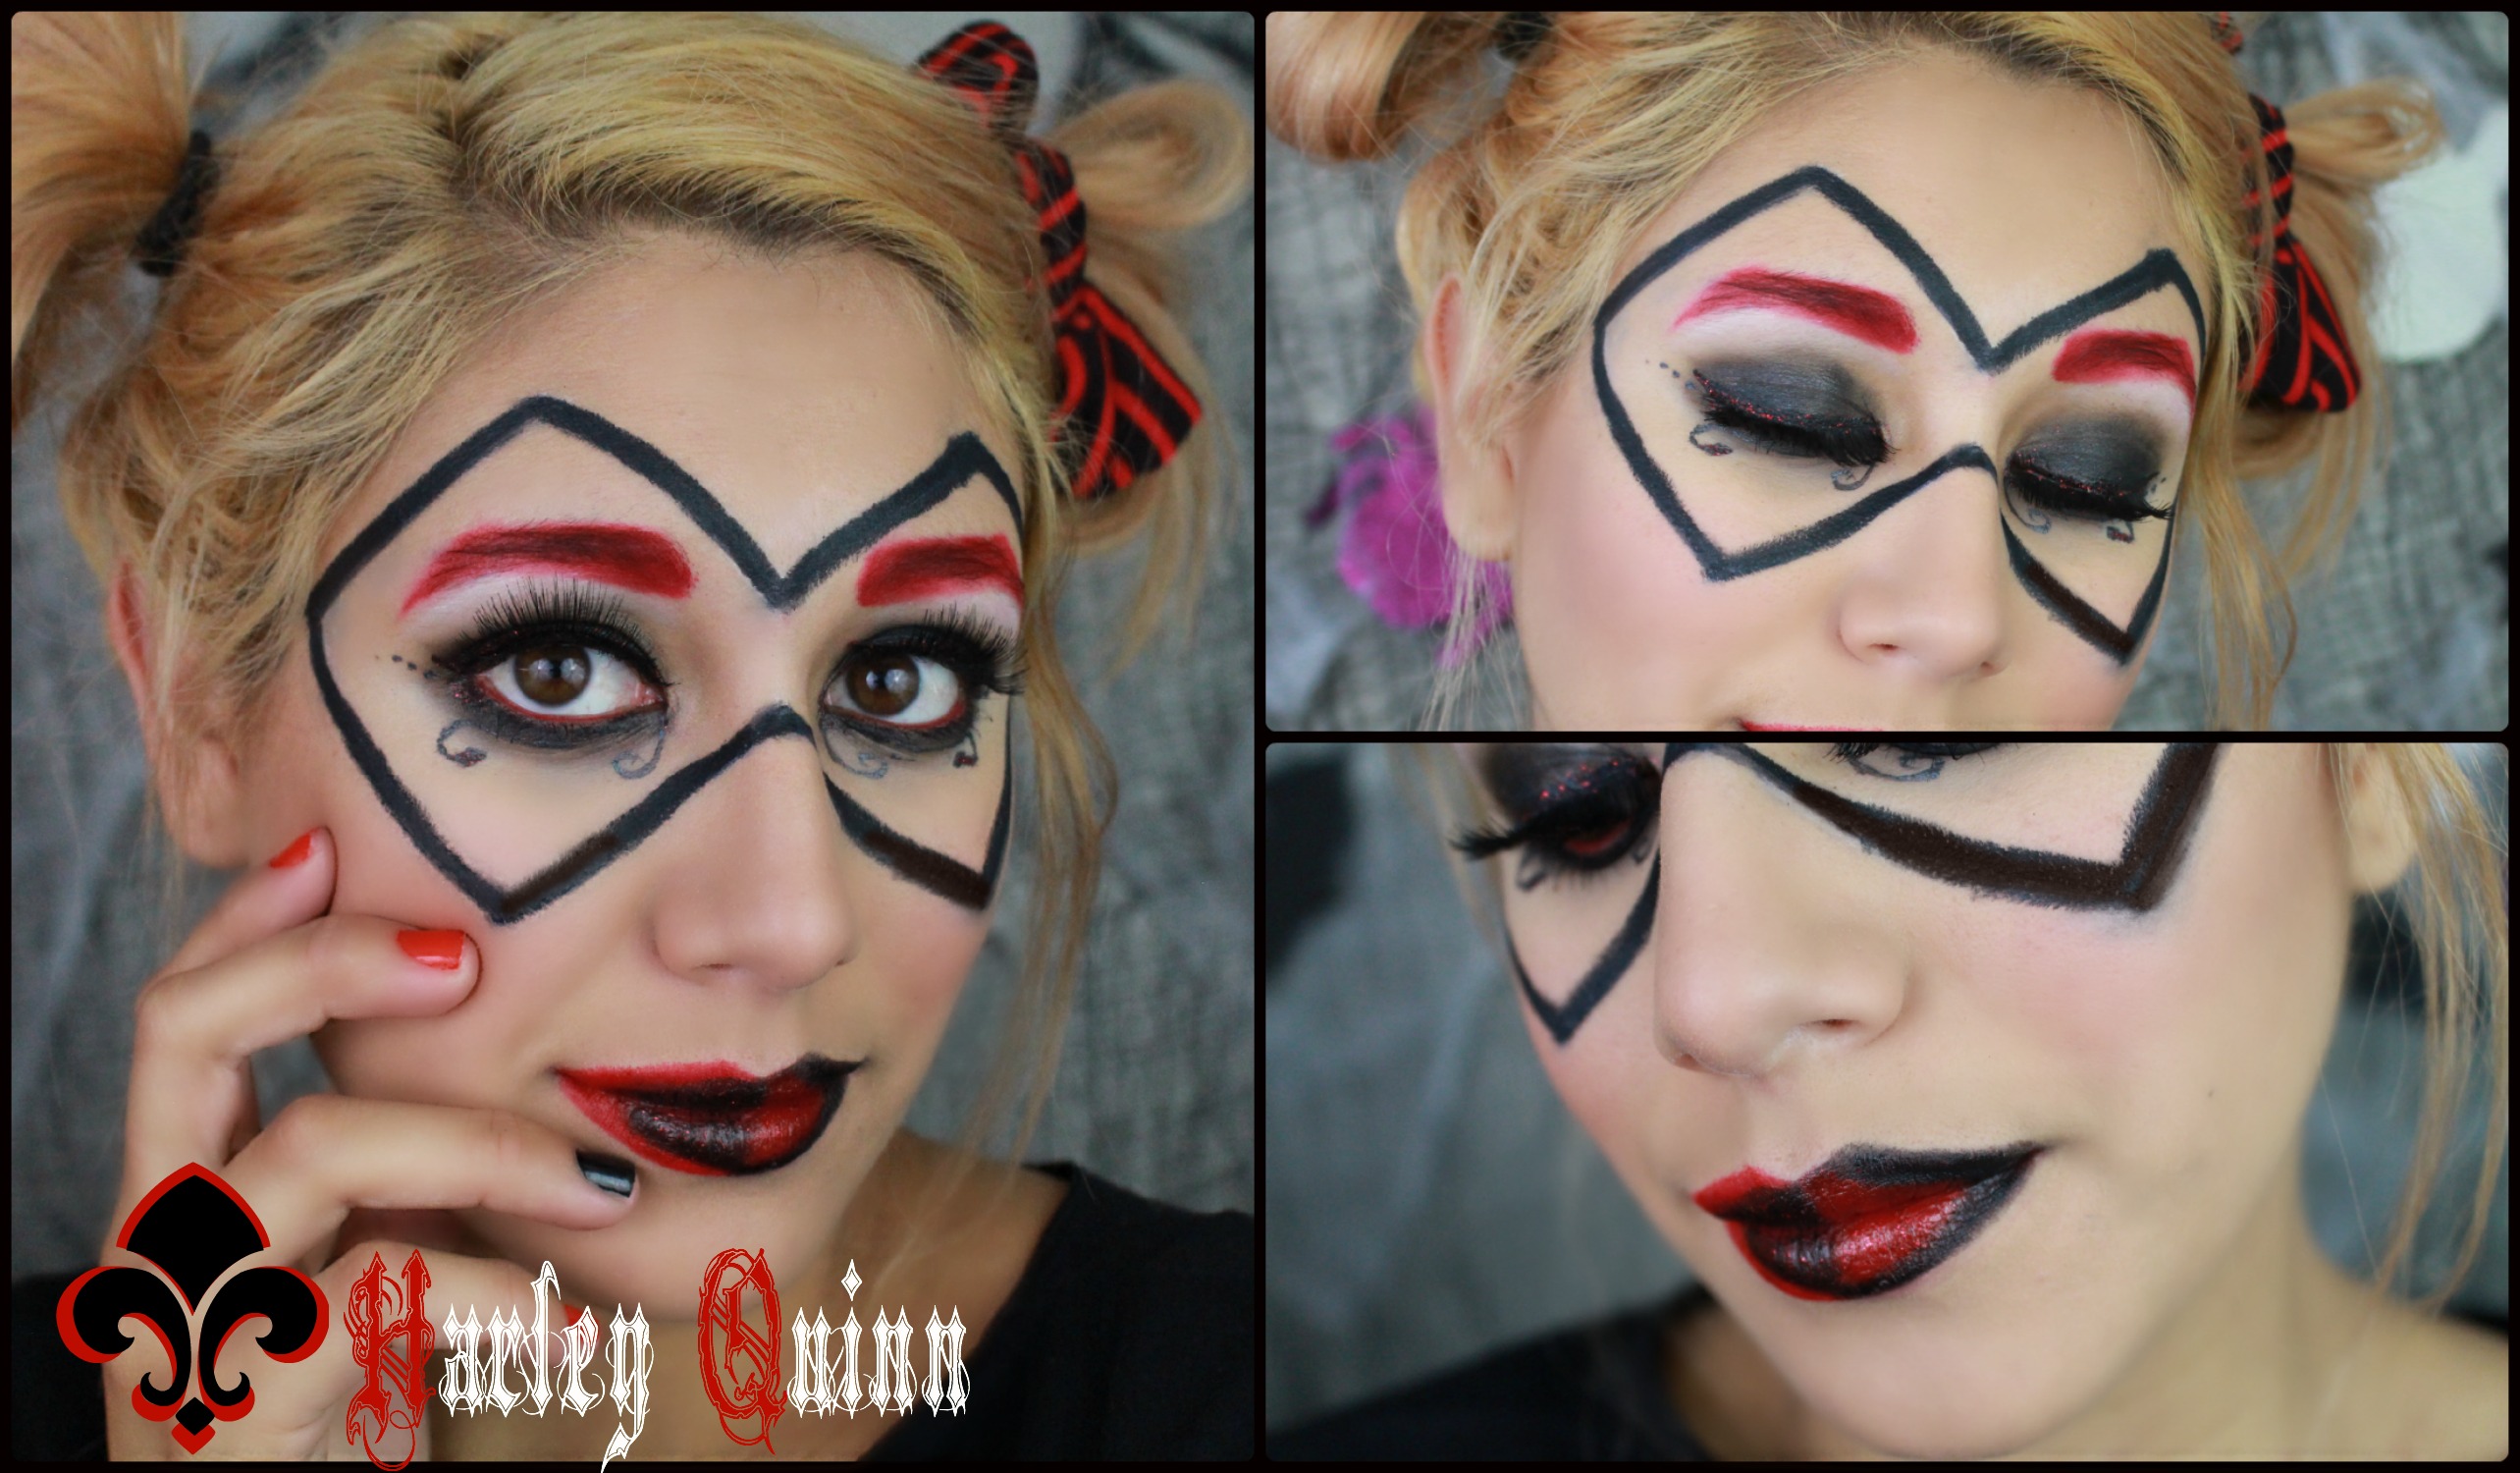
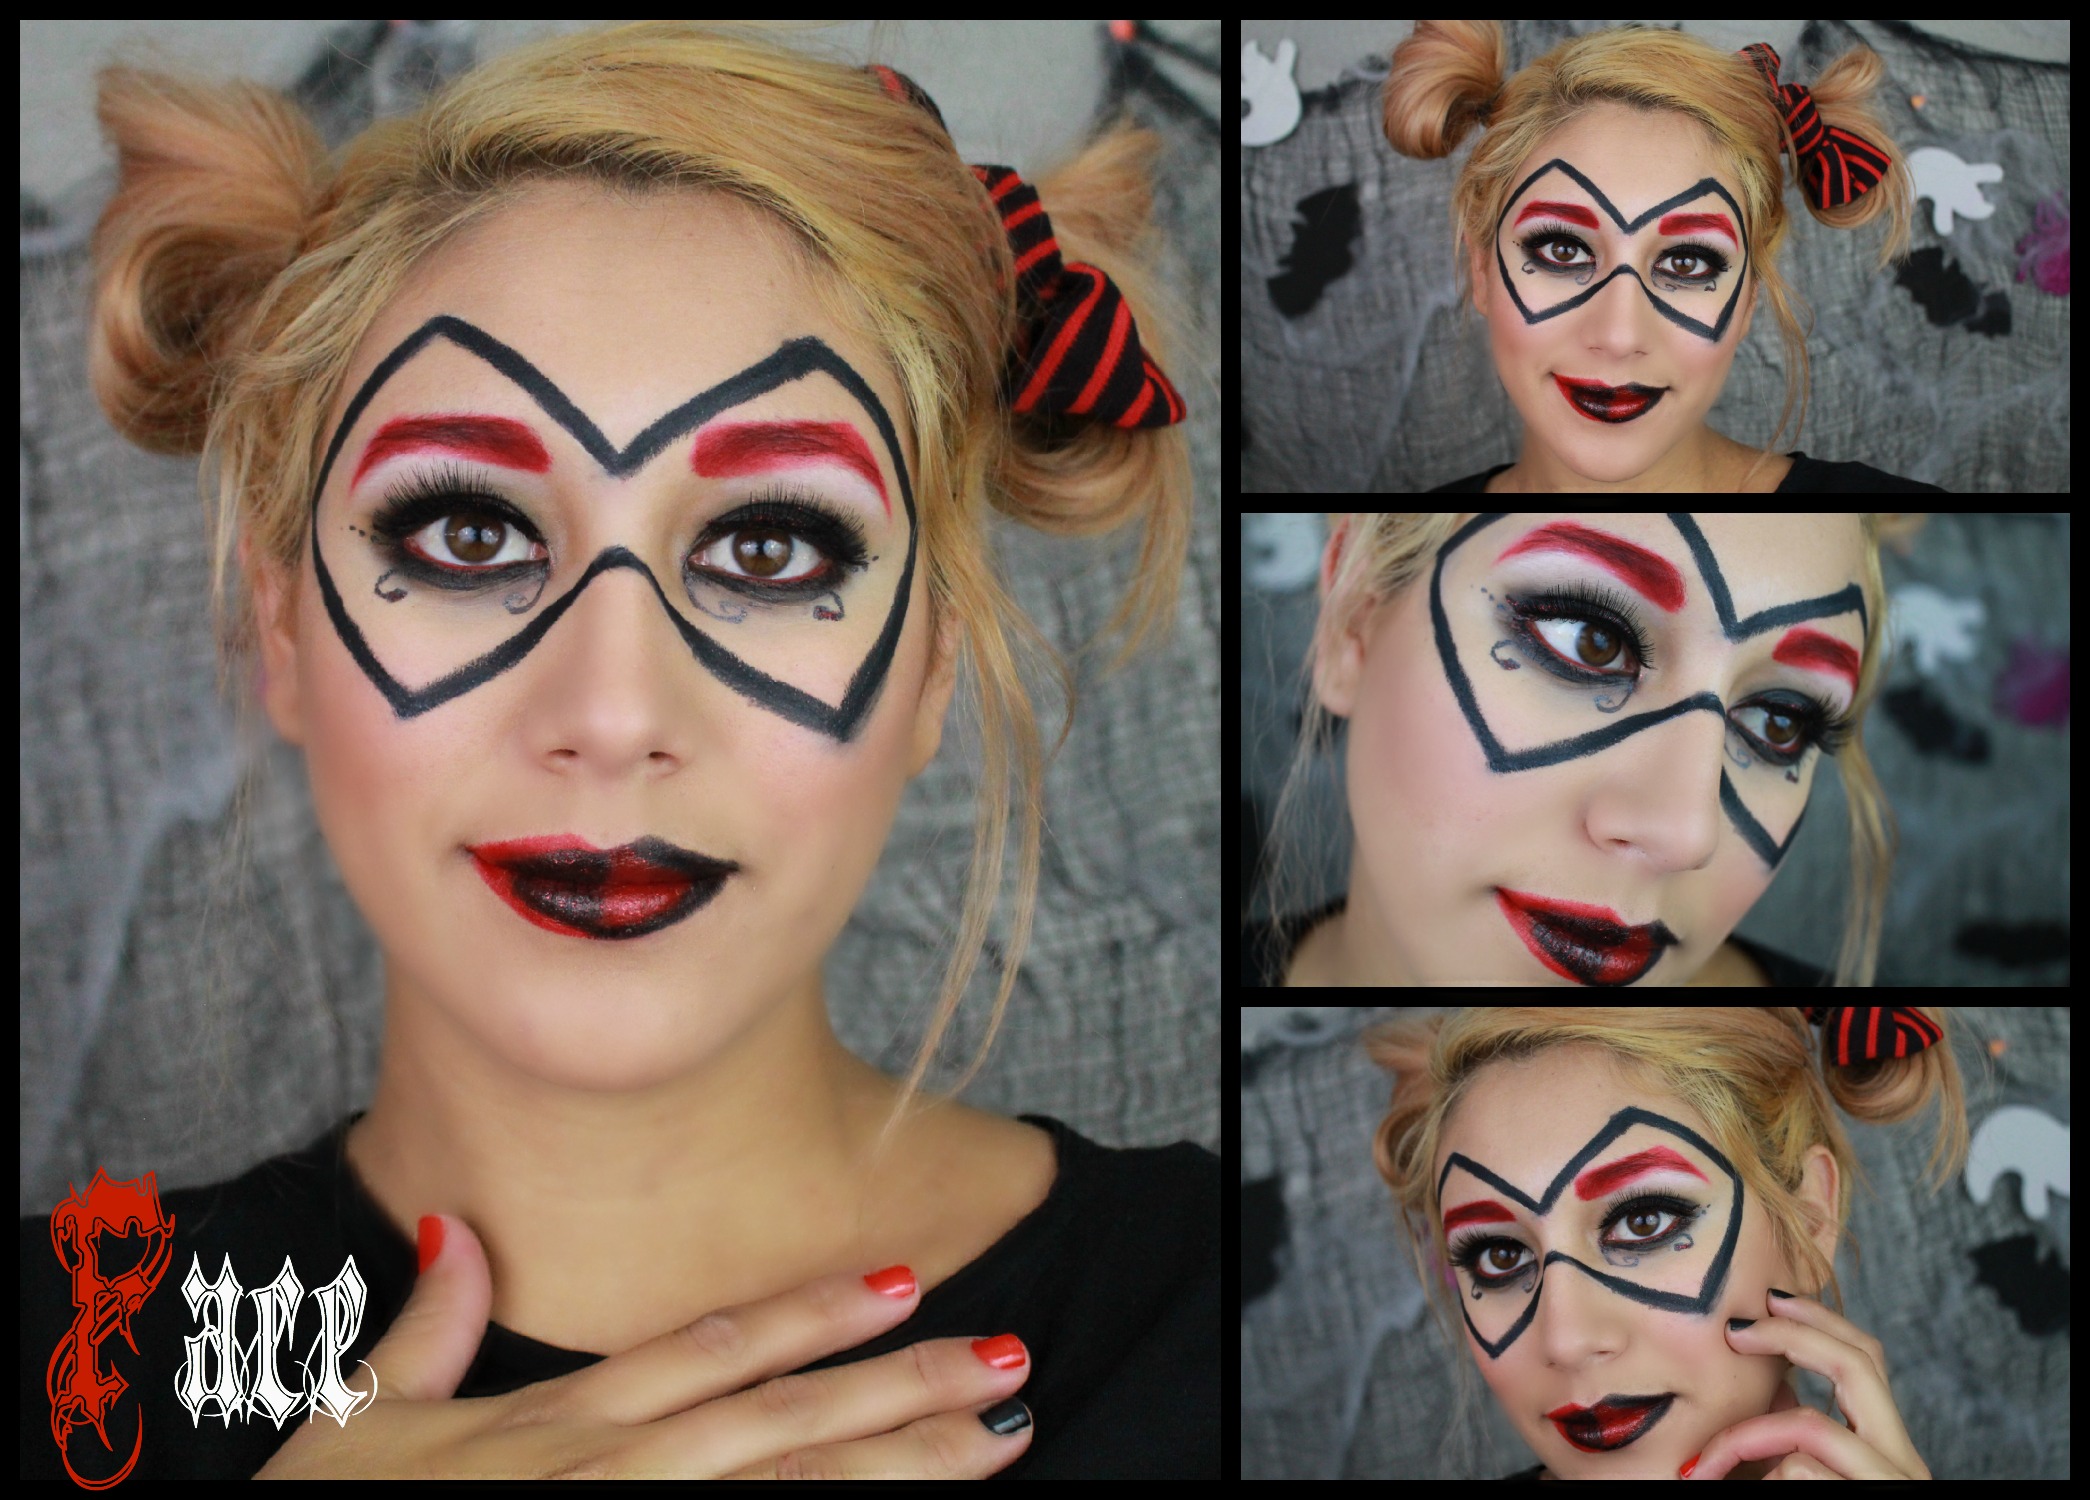
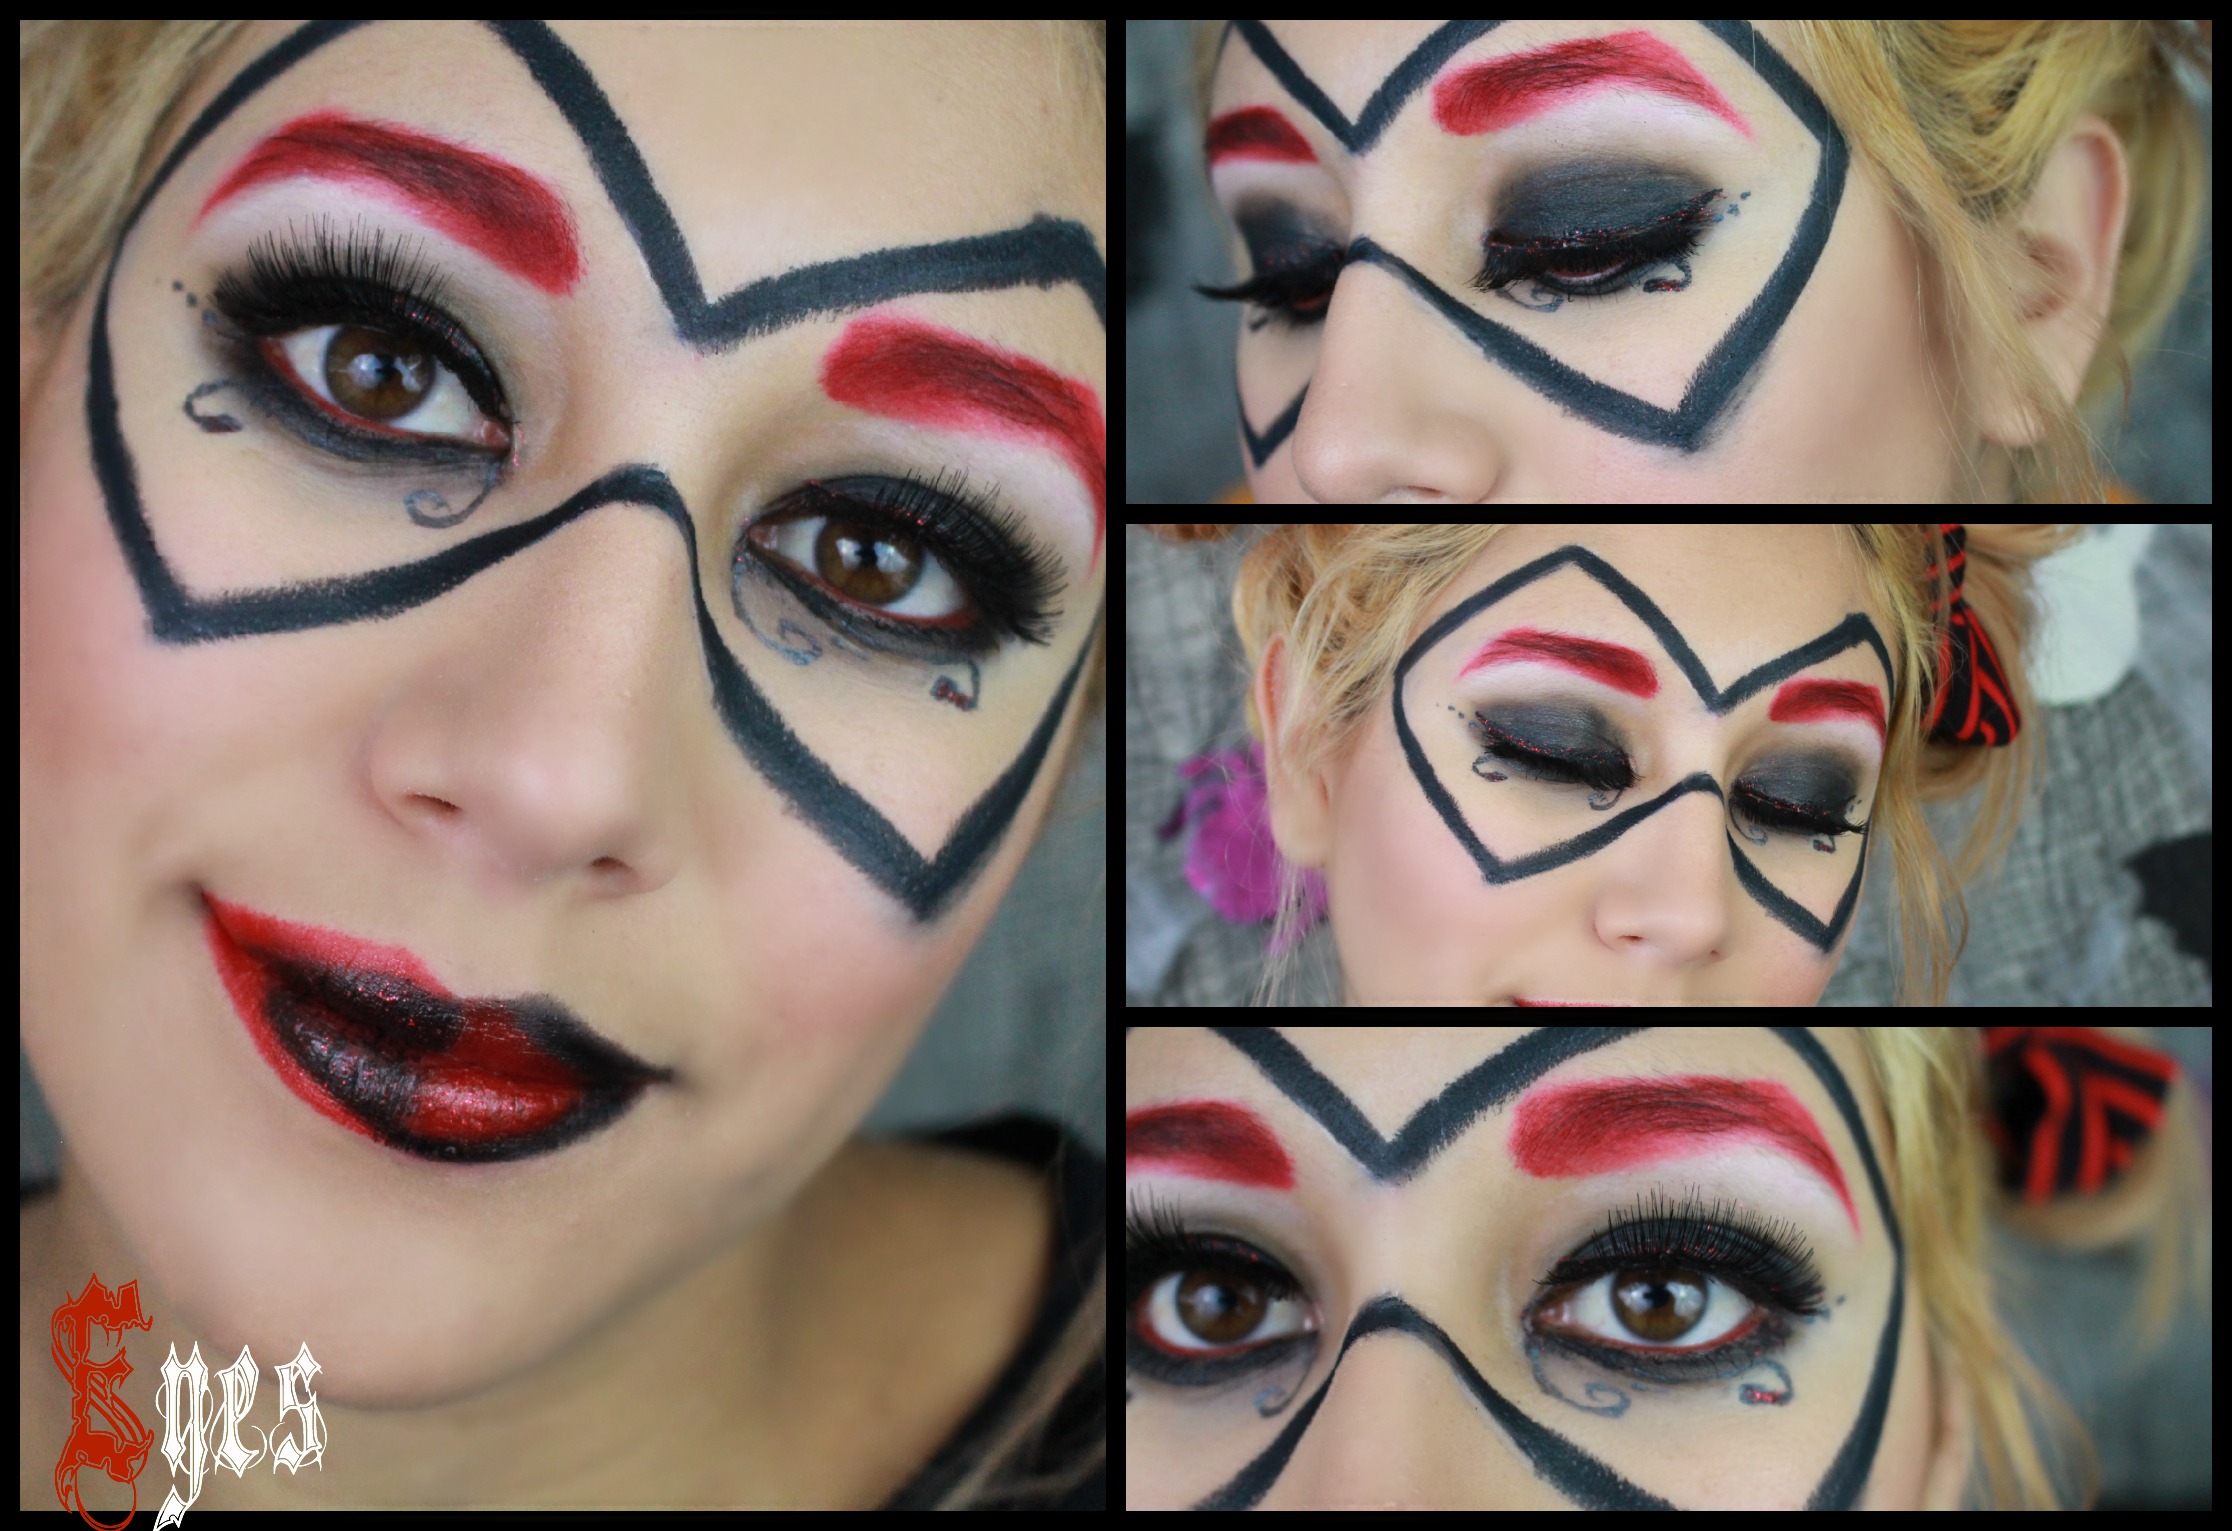
Yes , I am doing another halloween makeup look. This time I am doing a collab with another Beauty Guru on youtube , we decided to each pick a villain from the Batman Comics. I decided to do Harley Quinn and she is doing Poisen Ivy. I am so excited I loved the Batman Comics as a kid and still do , last year I did do a cat woman Halloween look too. A video is so much easier to do for this because of all the steps.
I hope you enjoyed the tutorial. This was actually a pretty easy look to do it just took a few steps ; but I felt like it turned out great.
For the face I decided to use my reg ular foundation and concealer rather than a white face paint. I really wanted Harley Quinn to still have her pretty look rather than look ugly. So all I did was apply my concealer & foundation, then I used a red blush on the cheeks.
The eyes are a little bit more complicated. I decided to do a black smokey eye on and smudge black eyeliner on the lower lid. Harley Quinn’s costume is half black and half red so I decided to incorporate the red in with the eyebrows. I just used a Lipliner and then applied red shadow on top to make it more long lasting. I did notice that my lashes got lost in all the black so falsies are definitely going to be your friend with this look. I think that all the curvy lines and dots really added to her look and made it seem more like her.I did decided to do a winged eyeliner on the upper lash line & fill in the waterline with a red lipliner. (Any time you use lipliner make sure to top of with red eyeshadow.) I also went onto of my winged liner with a glittery eyeshadow to add some sparkle and red into the eye look.
The mask was pretty easy to do with an eyeliner, if it is easier for you just map out your lines with a white or nude eyeliner first. I really wanted to keep the diamond trend going on the face because her costume has lots of diamonds on it. So thats why I made my mask look more like diamonds.
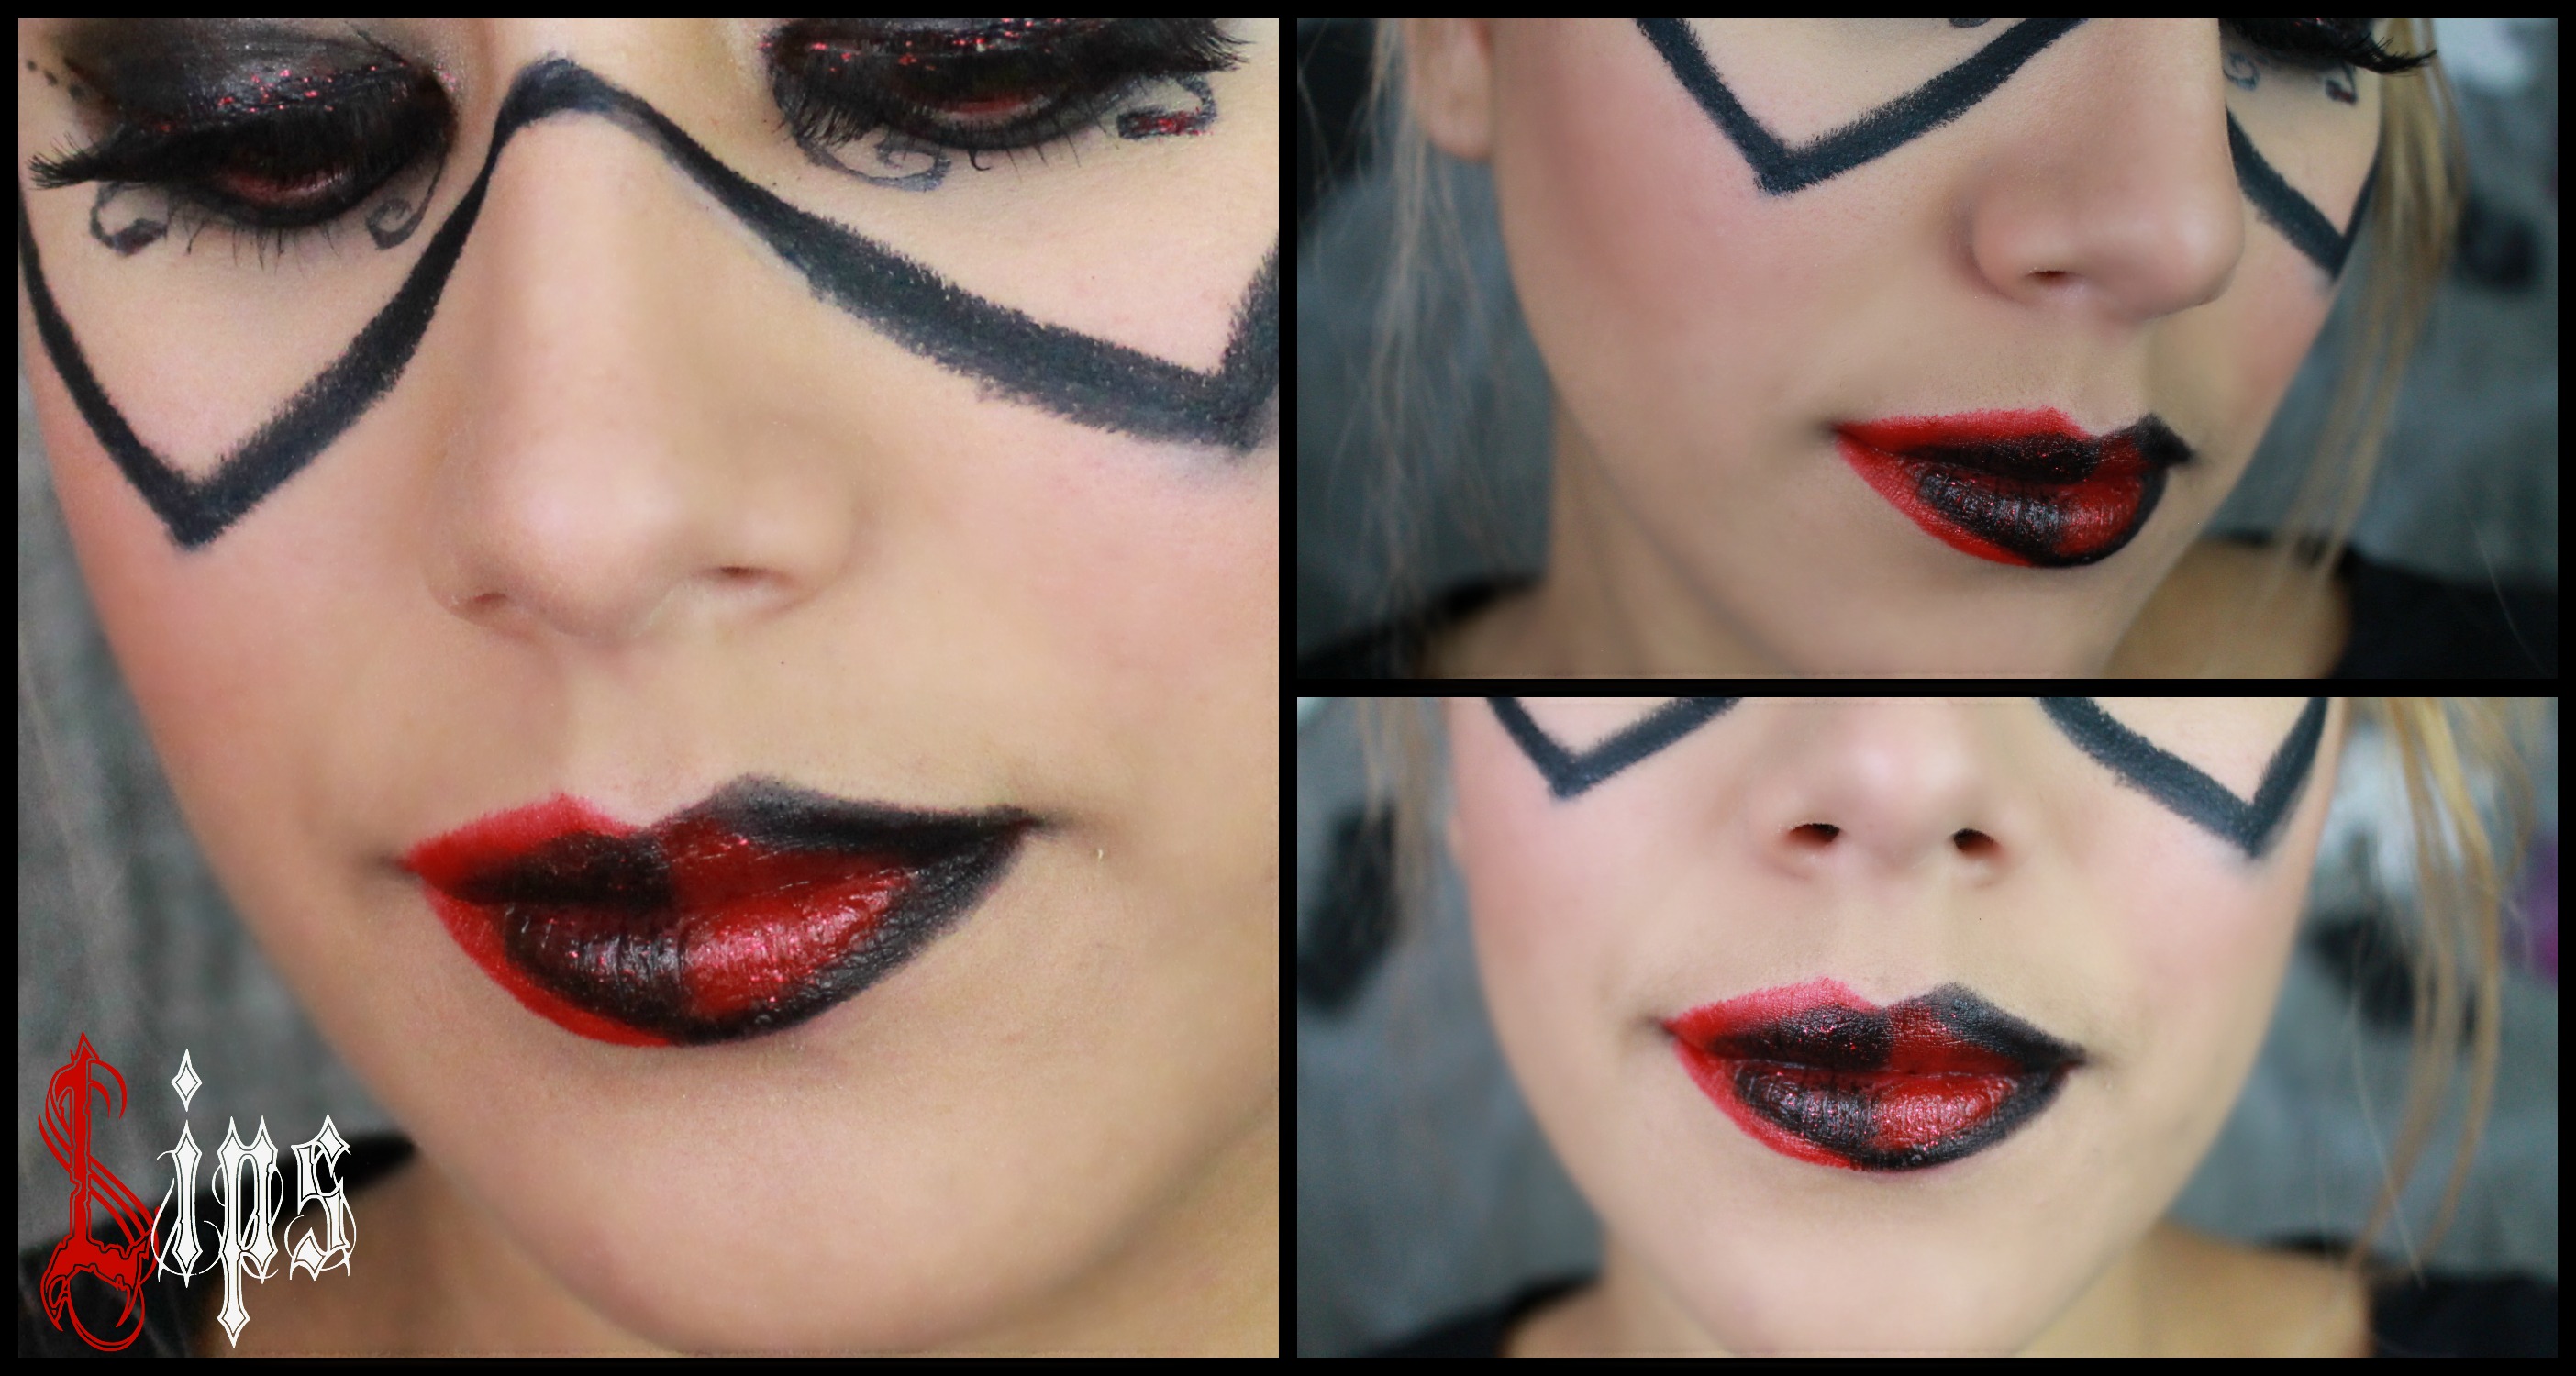
I wanted the Lips to be a big eye opener so I decided to do a diamond in the center of the lips but make it half black and half red. Then on the outside of the lips I used the opposite colors. I did decided to make my lips more pointy and a little thicker than my actual lips to play up the costume.
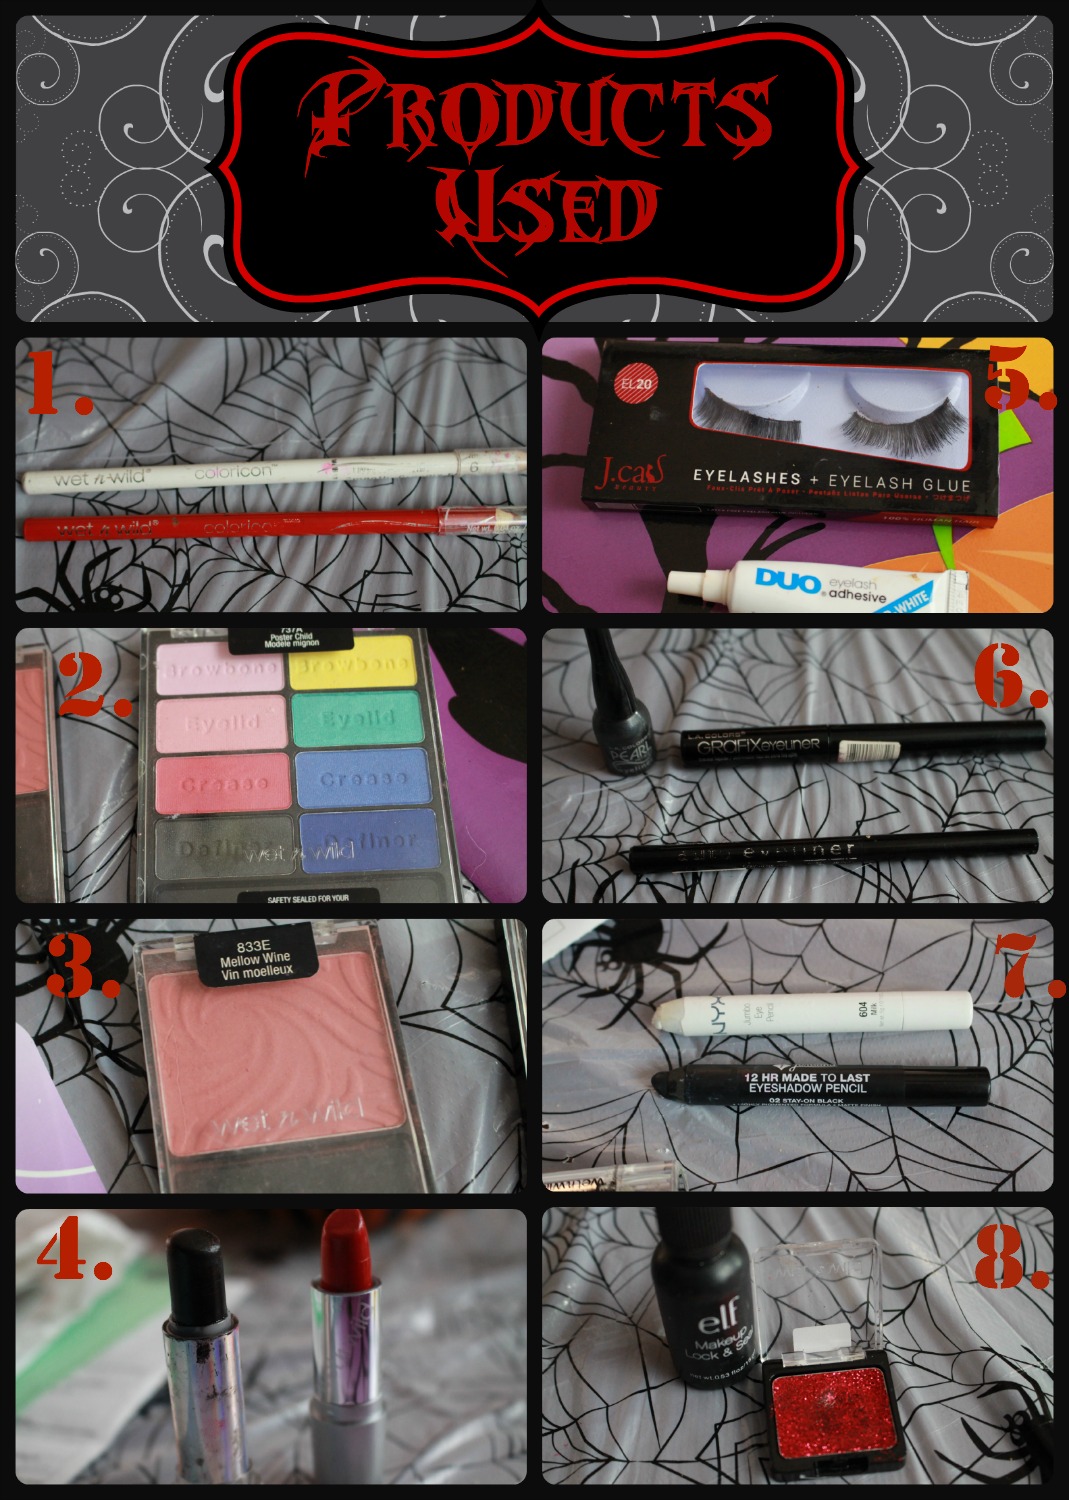
Wet N Wild Eyeliner : White , Wet N Wild Lipliner: Berry Red
Wet N Wild Palette: Poster Child (Red & black)
Wet N Wild Blusher: Mellow Wine
Wet N Wild Lipstick: Cherry Frost 514a , Wet N Wild Fantasy Lipstick: Black
J Cat Beauty Lashes: EL20 , Duo Lash Glue: Clear
LA Colors Pearl Eyeliner, LA Colors Grafix Eyeliner, LA Colors Automatic Eyeliner
Jordana 12 hr Eyeshadow Pencil: Stay on Black , Nyx Jumbo Pencil : Milk
Elf Makeup lock & Seal, Wet N Wild Single Glitter Eyeshadow: Vices
I hope you guys enjoyed this Halloween Look, I had so much fun doing this collab with Gemma! Make sure to subscribe for my youtube for more videos & like my Facebook Page!
Don’t forget Beauty Comes from Within so let yours Shine!
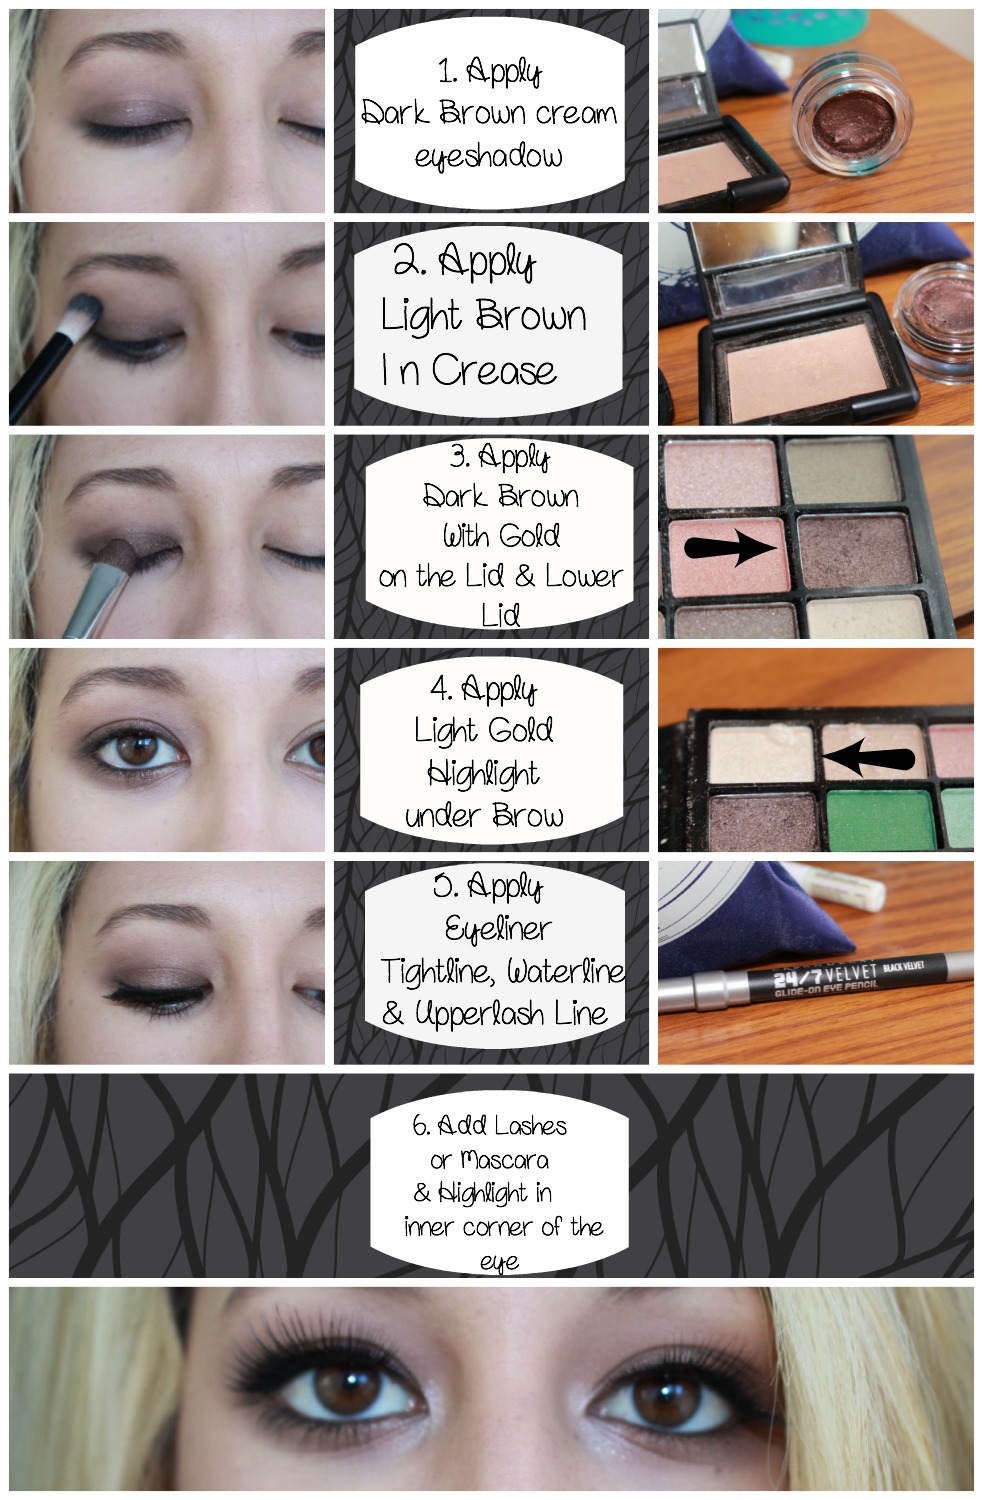
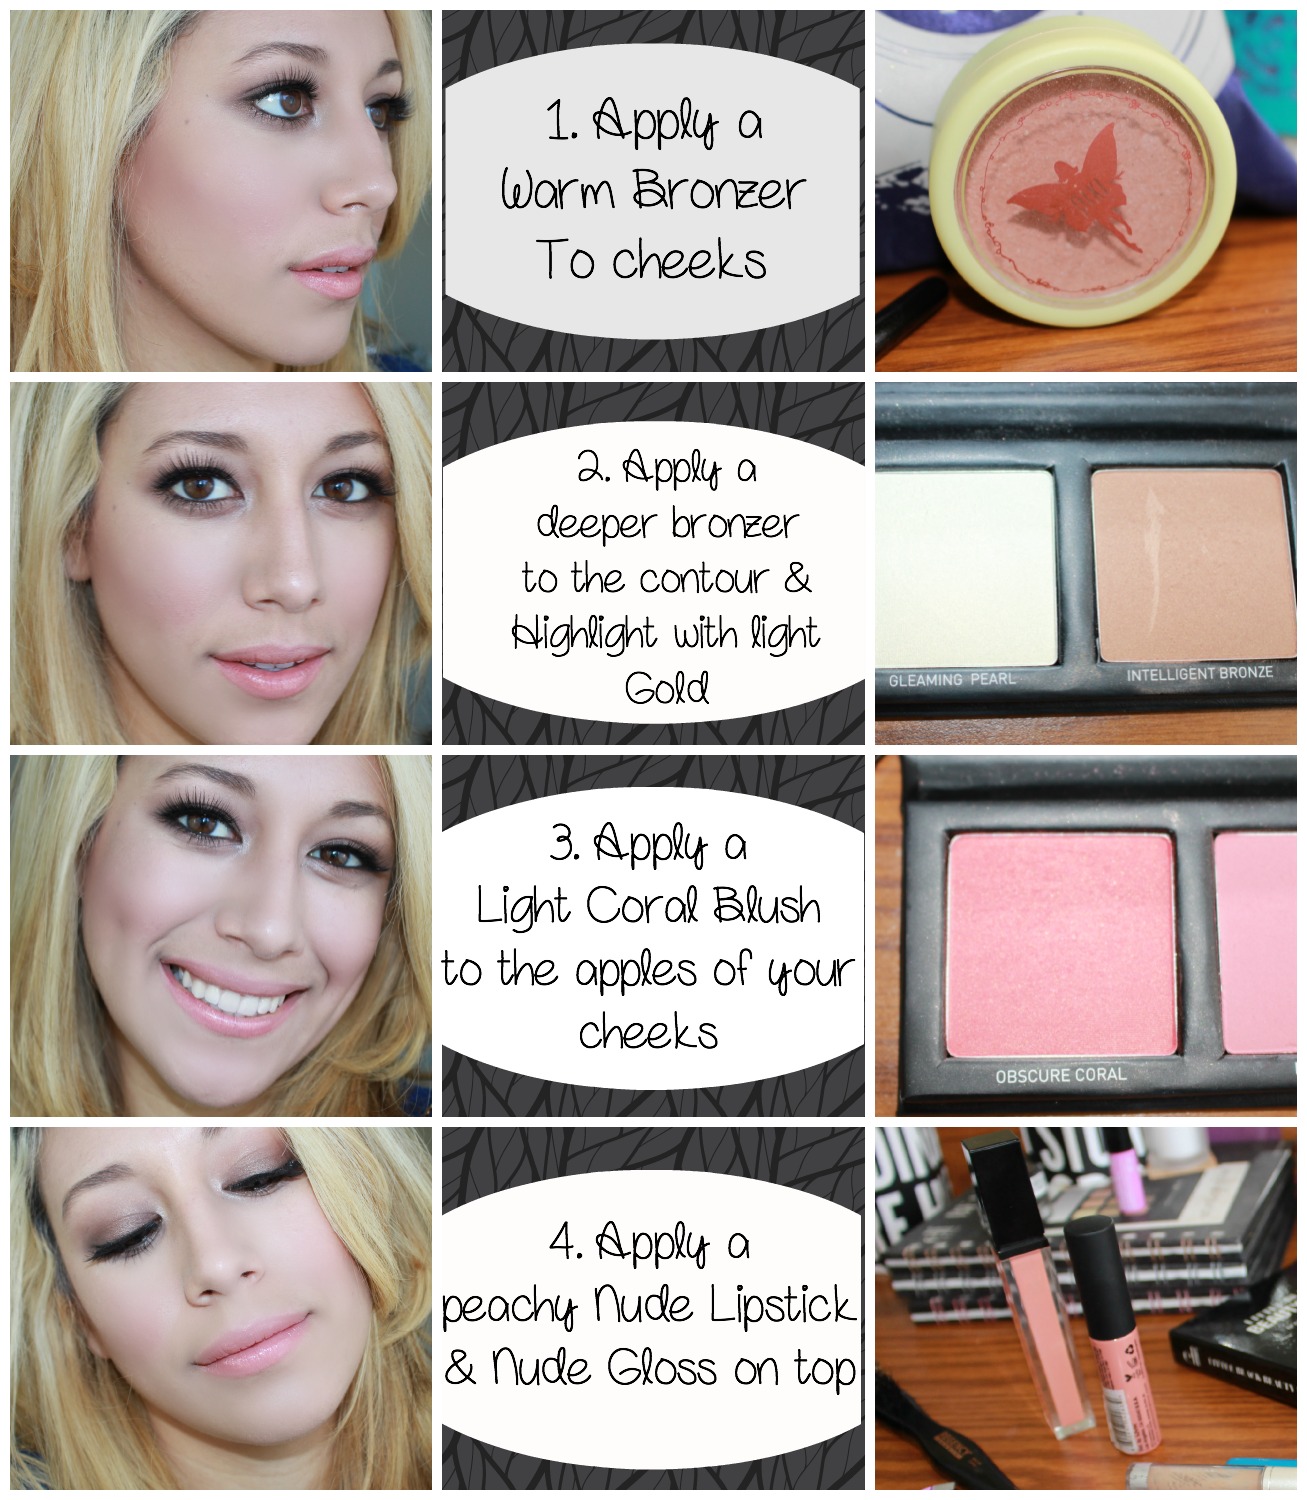
I am sorry I have been gone for a couple months , but I am back and I have been itching to show you guys how to recreate Melinda Gordons famous Brown Smokey eye! If you want to see what look that was exactly then click here.
Like always I did do a video tutorial for you guys , but I also decided to take real detailed pictures for you guys to pin for later or for you to do right now!!!
If you guys like my videos then make sure to subscribe to my youtube channel!
Ok so lets get started with the makeup. (List of the products used will be at the end)
* She is almost always rocking this Dark golden brown smokey eye & of course you can’t forget her fake lashes that make her eyes look doe eyed! Its actually super simple to recreate.
*For her face she kept it simple. She warmed up her complexion and added a very soft coral blush. She does always contour her cheeks & highlights to bring out her bone structure. Then for her lips she used a nude or a slightly natural pink lipstick & gloss.
So thats it, as you can see it is pretty simple. I tried to use more affordable products , the only high end product is the face palette.
So I recently reviewed and swatched the Limited Edition Divergent Collectors Kit and I wanted to show you how to create a really neutral day time look. This Kit is amazing and it is still available at Sephora so if you want it click here. This is a simple look and Very beautiful for spring and summer so lets do this!
In this makeup look I used the Erudite Palette, the Abnegation Palette, The divergent Face Palette, and the Fear Not lipgloss that came in the kit.
Eyes:
Apply Radiant Initiation in the crease and Blend really well.
Apply Golden Honesty All over the Lid
Apply Peaceful Shimmer in the inner half of the lid and blend the gold and the peach really well..
Apply Almond color under the brow & blend
Apply Bold Expresso in the crease to add definition there (use a light hand) Then blend with radiant initiation (cool brown)
Face:
Apply Foundation, powder & Concealer like you regularly would
Apply the bronzer underneath the cheek bones for a contour and blend really well You want it to look natural
Apply a Coral shimmery blush from the palette with a blush brush . on the apples of the cheeks then blend it back towards your ears.
Apply a beautiful highlight above the cheek bones for a glow!
Lips:
Apply Wet N Wild Mega Slick Balm Stain in Rico Mauve all over your lips.
Top it off with Fear Not lipgloss from this palette!
There you have it , an Abnegation Inspired , easy , Spring neutral Makeup look! I hope you enjoyed this, don’t forget to pin it so you can try it later!! If you would rather watch me do this, then check out the video above!
Remember, Beauty Comes From Within So let it Shine!!!


