Today I am sharing a very special look, this is the look I did for my Wedding! I was married on May 11,2012 so on behalf of this being my anniversary month, I thought I would share this special Makeup with you! I am using all the exact products I used on the day 2 years ago! Lets go…
I did my own makeup for my engagement pictures and my wedding, you can do it too. This look will last you all day , look great in pictures and its easy to do. This is also a great Prom look, graduation look, or any special event .
I chose to do a more natural look for my engagement pictures so I skipped eyeshadow and went for a natural flush on the cheeks and lips … For My wedding I made sure to do a full face makeup, pictures tends to fade what you have on so you have to apply a little more makeup then you normally would..
So are the Products I used:
Maybelline 24 hr Super Stay Foundation
Elf Face Primer
Elf All Over Face Color: Pink Lemonade
Rimmel Stay Matte Powder
Divergent Highlight (Gold Highlight for the cheeks)
Elf Warm Bronzer
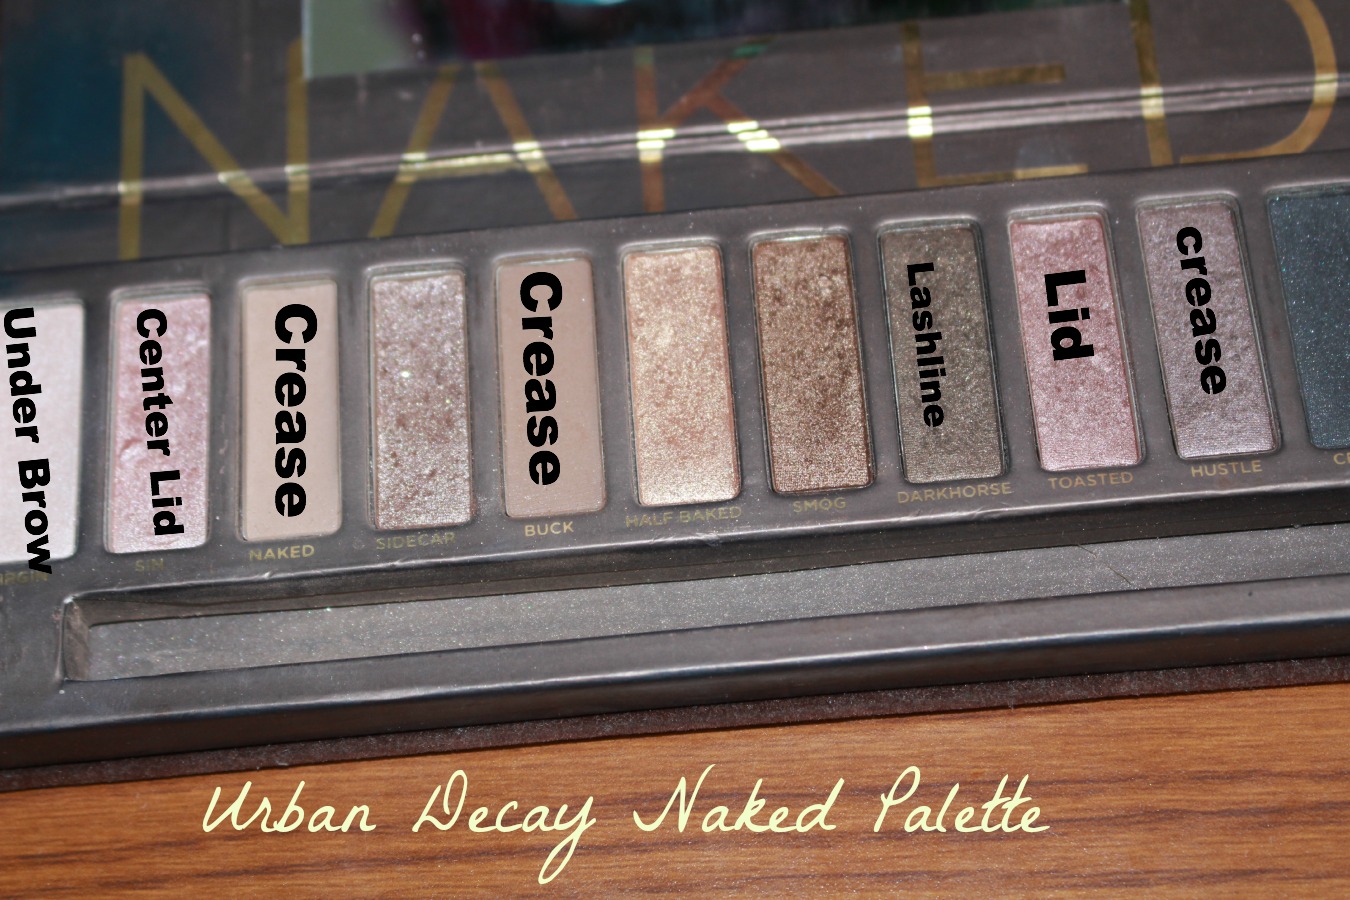
Naked Palette
Urban Decay 24/7 Pencil (Black)
Maybelline Butterfly Mascara Water proof
Essence I <3 volume mascara
NYC Lip Stain : Fuchsia
Covergirl Lipstick: Demure
Elf Makeup Mist & Set Spray
This makeup look lasted me all day with minimal touch ups. All I had to do was use some powder (because we had taken pictures outside, you get oily) and some lipstick.
I hope you find some inspiration in my makeup look… Share my blog or Facebook page….
Remember Beauty Comes From Within so let yours shine!
So I recently reviewed and swatched the Limited Edition Divergent Collectors Kit and I wanted to show you how to create a really neutral day time look. This Kit is amazing and it is still available at Sephora so if you want it click here. This is a simple look and Very beautiful for spring and summer so lets do this!
In this makeup look I used the Erudite Palette, the Abnegation Palette, The divergent Face Palette, and the Fear Not lipgloss that came in the kit.
Eyes:
Apply Radiant Initiation in the crease and Blend really well.
Apply Golden Honesty All over the Lid
Apply Peaceful Shimmer in the inner half of the lid and blend the gold and the peach really well..
Apply Almond color under the brow & blend
Apply Bold Expresso in the crease to add definition there (use a light hand) Then blend with radiant initiation (cool brown)
Face:
Apply Foundation, powder & Concealer like you regularly would
Apply the bronzer underneath the cheek bones for a contour and blend really well You want it to look natural
Apply a Coral shimmery blush from the palette with a blush brush . on the apples of the cheeks then blend it back towards your ears.
Apply a beautiful highlight above the cheek bones for a glow!
Lips:
Apply Wet N Wild Mega Slick Balm Stain in Rico Mauve all over your lips.
Top it off with Fear Not lipgloss from this palette!
There you have it , an Abnegation Inspired , easy , Spring neutral Makeup look! I hope you enjoyed this, don’t forget to pin it so you can try it later!! If you would rather watch me do this, then check out the video above!
Remember, Beauty Comes From Within So let it Shine!!!
So I am super excited, just like all of you, for the Divergent movie! When I heard that Sephora released a LIMITED EDITION Divergent Makeup Kit I was too excited and I purchased it right away. I have had it for a little over a week now and I am ready to tell you what I think, Show you swatches & Show you how to do this Dauntless Smokey eye look I created. So if you want to get it for yourself then just click here. (If it is out of stock then check your local sephora near you , or wait for it to come in stock again!)
* I was not paid or asked to do this, I just am really excited and want all of you Divergent Fans to know about this!
If you want to see swatches, my thoughts & How to do a smokey eye using this kit then click below.
So this kit cost me $59.50 , It comes with three eye palettes, a face palette, four lip glosses and a double ended brush.
It even Comes with little cards that help you create a Dauntless, Erudite, or Abnegation Day & Night look. First off the Packaging is great it is a strong card board material that doesn’t give at all! Not only that but I know that us girls want cute packaging on our stuff and this has it! So lets see what all this stuff looks like..
The Cheek Palette is called the Divergent Cheek Palette. It comes with a blowy coral blush, a matte rose blush , a champagne highlight & a matte warm bronzer. All these are so creamy and pigmented. They feel nice and I was really impressed with how nice they wear on the face as well. I love that It has a matte and a Glowy/shimmer blush.
The Three eye palettes are the Abnegation palette,Erudite palette, and Dauntless palette. All these shadows except for the transformer shades are really pigmented they feel silky soft and the color pay off is amazing. I find myself being super gentle when I dip my brush in and when I apply it . These feel to me like Urban decay quality shadows, they are worth every bit of the money I spent on this kit. If you have a chance to go to sephora and swatch them , they are seriously really good quality. The transformer shades are the first eyeshadow shades in each palette. With exception to the Dauntless palette transformer shade, they are not pigmented. They are used to add shimmer but no color. If you use them wet though they do add a great highlight to your look and it picks up a lot better. ( They are made to be used wet)
Last are the four lip glosses and double ended brush.
The brush is really soft and I feel like it does a great job blending . It feels like a higher end blush so I was pleased with it. The only thing is that because it is double ended I have to store it horizontal if you don’t like to do that then you won’t like this brush.
The glosses are sheer with a subtle tint of color , as you can see on my arm. They feel really soft and silk , not stick or tacky. I personally don’t like sticky gloss and I was really happy to see that these are not that way. These smell minty but they don’t tingle, so they are not plumping or anything like that. The shade from top to bottom are: Fear not, Natural Virtue, Supreme Ritual , and Temptations Choice.
So this is the look I came up with , this is actually what I picture a Dauntless woman to look like when I read the book. It is a very smokey eye with some mahogany color in it as well. This is super easy to recreate !
add a black base close to the lashes and blend onto the lid.
Apply Radiant Initiation (Erudite Palette) into the crease as a transition shade and blend really well.
Put Serene Vanilla (Dauntless Palette) underneath the brow for a matte highlight.
Apply Burnt Mahogany (Erudite palette) All over the lid and up towards the crease but not passed it. blend with some of the Radiant initiation shade and a blending brush. Also blend it in the lower lashes.
apply Dauntless Ink (Dauntless palette) Very close to the lash line and smoke it out so that it looks like there is an easy transition from the mahogany to the black.
Apply Choose wet in the inner corner of the tear duct for a glowing effect.
Apply a liquid eyeliner to the upper lashes , with a subtle wing.
Apply a black pencil in-between upper lashes and tight line.
apply a skin tone liner on the waterline.
Apply mascara and you are good to go.
For the Face I applied the bronzer as a contour shade , I used the highlighter on my cheek bones for a highlight , and I used Misty rose on the apples of my cheeks.
For my hair I curled my hair with a 1 ½ inch curling wand then I teased the root of my crown area. Next I made three twists and I pinned them with bobby pins. Super easy hairstyle again a perfect Dauntless hair look. Its easy to do but yet it looks fierce.
Thanks you guys for taking the time to support me and to check out all my posts and videos! I hope you guys enjoyed this and let me know if you have seen the movie yet and what you think!?
Till Next time,
Remember, Beauty Comes From Within so let yours SHINE!
<3 Love, Bondbeautyful
Happy thursday, today I’m going to show you how to do a very spring/day appropriate makeup look. Spring is right around the corner, for some of us its here already so lets celebrate. I am using all the things I got in my March Ipsy today if you want to sign up for yourself then click here.
So I did do a video for you so if thats easier then just click the video below if not then keep reading…
So here are the things I got in my March Ipsy plus some of the main products I used to create todays spring inspired look…
I was really impressed with this months IPSY Bag.. If you don’t know what Ipsy is it is a subscription service that cost $10.00 a month, they send you deluxe sample products plus a glam bag. * I am subscribed and I pay every month with my own money. I love it and I like to show you what I get and how to create a look with what I got…
So this is the makeup look I came up with.
Eyes: I used the Be a Bombshell Bora Bora Palette…
Taupe: In the crease & Outer V also in the lower outer half of lower lash line.
Gold: In the inner half of the lid + Inner part of the lower lash line
Copper: blended it in the outer half of the lid and the middle of the lower lash line… Make sure to blend
Teal: Used this smudged on top of all the other shade on the lower lash line (make sure to blend) Add a green eyeliner to lower lash line to help blend it all together..
L.A. Colors Pearl eyeliner for the winged out liner..
Its So Big Mascara for the lashes
L.A. Colors Auto Eyeliner in Black on tight-line & In between Lashes..
Face:
Perfect BB Cream all over the face , blend with your fingers
ELF Brightening Concealer : underneath the eyes to brighten it up.. Blend with a foundation brush or finger
Elf Cream Bronzer: St Lucia used my finger to apply then blended with a contouring brush
Profusion Eye Brightening palette 06: mixed all together for a blush
Rimmel stay matte powder to top it all off and prevent oiliness..
Lips:
Bareminerals Lipstick : Moxie which is absolutely gorgeous and very creamy
Rush Lipgloss: Slice of Heaven to top it off with some beautiful shine!
Thats it simple as that and you have a spring beautiful look.
I did curl my hair with the Cortex Curling wand , I used the reverse barrel and used different size sections curling away from my face.
If you recreate this I would love to see , you can tag me on instagram, or Facebook!
So what pop of color are you going to be modeling this spring & summer?!
I am really loving teal right now!
Till Next time,
Remember, Beauty Comes From Within SO let yours SHINE!
How are you guys doing? I have been trying to put up this blog since tuesday and for some reason it just has not worked! I figured out what the problem was and so here we go lets talk about IPSY. IPSY is a subscription service kind of like a magazine except instead of a magazine you receive a bag full of beauty products each month . It costs $10.00 a month, and they have a quiz you can take so that you get products that work for you. Everytime I receive an IPSY glam bag I am pleased with the content I received. If you want to sign up yourself then just click here.
So Lets like I said I’m sorry I am posting this up so late, I know its march already but this is an Ipsy unbarring + a look in one!
February IPSY:
Skyn Ireland Clay Mask
Zoya Nailpolish: Dot
Tini Shadow Tint: Violette
Pop Beauty Lipgloss: Fuchsia Freesia
Lashes
Ok so lets talk about my look and how I achieved it combined with other products..
Other Products Used:
Bh cosmetics Liquid Foundation
Elf Brightening Concealer : Under the eyes to brighten my dark circles and a little on my nose to highlight
Elf Baked Highlighter: Cheek Bones for a subtle Highlight
Pixi Bronzer: Sublty Sun Touched -as my blush
Eyes: Lancome Sensational Effects Palette- Used a light champaign under my brow, medium cool brown in the crease, The shadow tint on the lid, a pink shimmer color in the inner to middle eyelid area, then a dark shimmery warm brown on the outer v area to add some depth.
Joranna 24 hr Eyeshadow pencil in Black on the lash line & smudged it out, waterline & Tight line.
Its so big mascara to finish off the Eyes!
Super easy spring time look !
So what lip product are you sporting today? Let me know in the comment section!
Till next time,
Remember, Beauty Comes From Within, So let yours SHINE!
Happy Valentines Day, Because tomorrow is the Day of Love I wanted to show you two choices for valentines day. One is more casual and the other is fancier for a nice dinner. If you want to see me show you how to do this then click on the video below.
Casual:
1. You can curl your hair or have it straight. (I curled it the night before & this is what it looked like today! I wanted it to look messy & real slummy).
2.Braid your bangs into a rope braid & pin it underneath some hair to hide the bobbypin.
3. Make A Half pony tail & with your thumb create a hole. Then flip the pony tail in the hole 2 times to create a twist.
4.divide the pony tail into two parts & braid each part.
5. Flip them over & above the twist & pin them in a heart shape!
Thats a super easy casual hairstyle perfect for the day of LOVE.
Fancy:
1. Seperate your bangs & face framing bits of hair . Then pin it out of the way.
2. Take out 1 inch strand of hair behind your ear & braid it.
3. Pull your hair to one side & twist it in the back .
4. tie your ponytail & braid a strand of hair, wrapping it around the base of the pony tail.
5. put the braid behind your hair in between a bobbypin & sew it through the twist you made.
6. Last use a 1 1/2 inch curling iron & curl your bangs, & ponytail.
* Dont forget to use hairspray to insure that your hairstyle lasts all day!
I hope you guys have a good valentines & if you need help finding a makeup look that is perfect for tommorow check out my makeup tutorials for valentines day!
So whats your favorite curling iron?
Mine is the Cortex 4 in 1 curling wand!
Remember, Beauty comes From within so Let it SHINE!
Happy Monday, Valentines Day is right around the corner so I paired up with a fellow beauty guru on youtube and we decided to give you two great Valentines Day Makeup Options. I am showing you how to do a soft smokey eye and nude lip. She is doing more of a flirty pink Valentines Day Look. If you want to check out her video you sure can, here is her channel link
Lets talk makeup, this Eye look was super easy. I wanted to do a smokey eye, but I wanted to make sure that it was wearable. You can wear this look in the day time because it is so soft, or night time. I decided to go with a nude pink lip & a shiny gloss so that the eyes would appear softer..
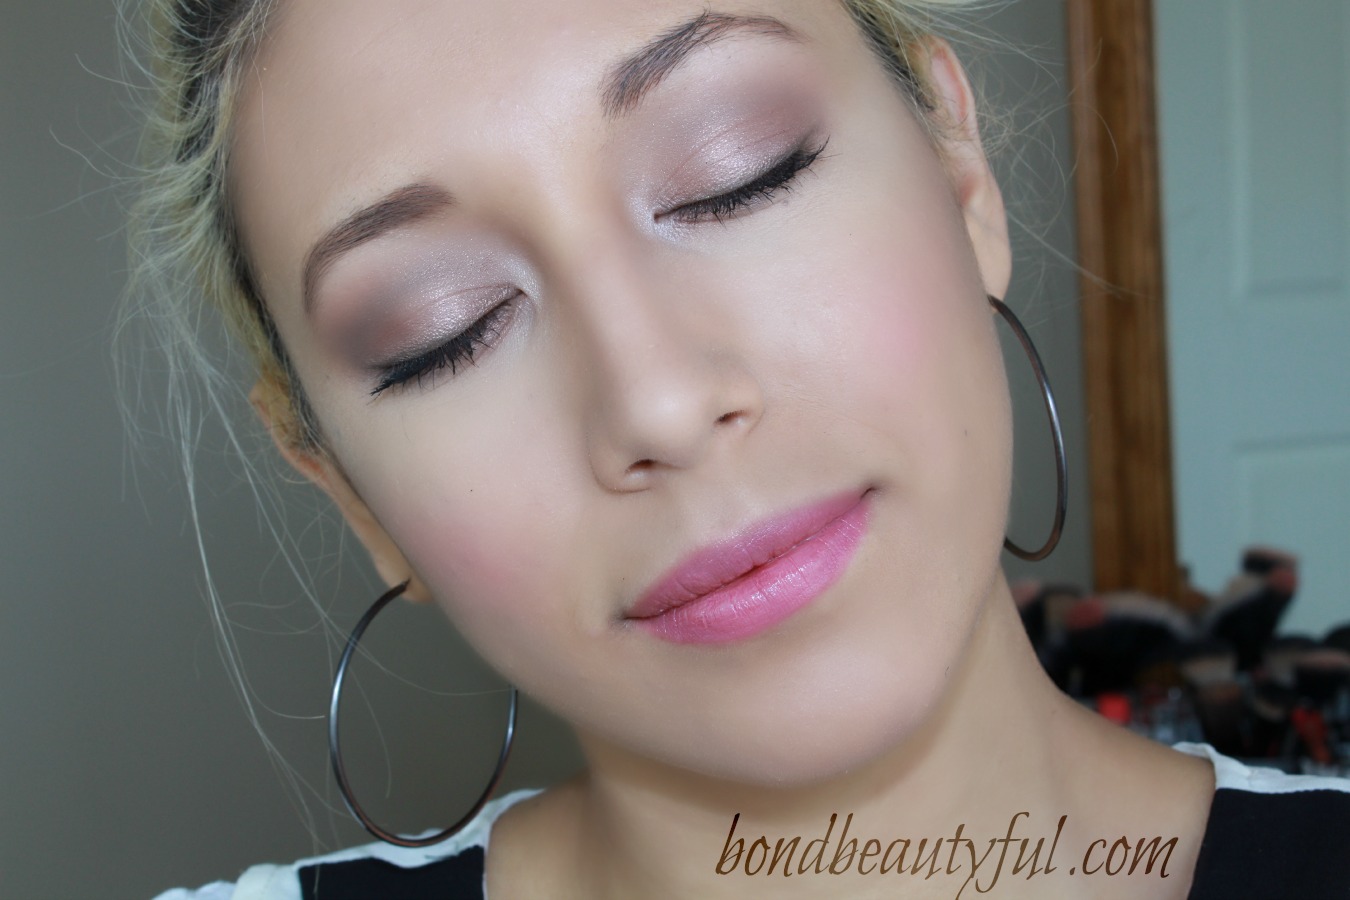
First , I applied the Highlight shade Virgin underneath the brow lightly.
Then I used the duo end pencil (brown side) and I applied it to the crease and made a V in the outer edge of the lid.
Next I blended it out with a crease brush
Then I applied Sin all over the Lid
Next I applied Buck everywhere that I used the Brown Pencil with a crease brush , I also applied it to the outer half of the lower lid
Then I went in with creep and only applied it to the deepest part of my crease. Use a very light hand, this makes the crease look deeper & your eyes look more defined.
Then with naked I blended with a blending brush softly you just want to smoke it out.
Next I used the Jordana 12 hr eye pencil on the upper lash line & smoked it out with a smudge brush.
Last I lined my water line & tight line with a black pencil . Don’t forget to curl your lashes and apply mascara. Your all finished.
Now Lets talk Hair!
I Curled My hair with a 1 ½ inch Curling wand . I curled away from my face & I used 1 inch sections. * Make sure to spray your curls with hairspray after each curl is curled individually.
Then I let it completely cool down. * Don’t skip this important step or else your curls will not last all night.
Then I hairspray my entire head again.
Next I Used silk serum & applied it to my ends to add shine. I also ran my fingers through my hair softly to open up the curl a lot more.
Tease the Hair to add volume.
I took a 1 inch section on my right side and twisted it. I then pinned it to the back.
Now on the left side, where my bangs are combed to I am going to do two twists & pin them.
I do not like flat hair so I tugged on the crown a little to make it more voluminous. You can hairspray it again if you like but its all finished.
Simple Hair & Makeup for valentines day!
I hope you guys are as excited about the day of love, as I am!
What are you going to do for Valentines Day?
If you try this look or hair out make sure you tag me on instagram , twitter or Facebook! I would love to see!
Thanks you guys for all your support & have a fun and safe Valentines Day!
Remember, Beauty Comes From within So let it Shine!
So today I thought I Would do another makeup tutorial, This one is inspired by Frozen a popular Disney movie. Elsa is the Frozen Queen , so why not recreate her makeup. Valentines day is just around the corner so here is a beautiful option for you gals. Yes I did a video tutorial for you to see, so take a look.
Products I Used:
Covergirl Outlast Stay Fabulous Foundation
Starlooks Obsidien Kohl Pencil
Elf Pressed Powder Eyeshadow: Miss Popular
Elf Blush : Berry Merry
Flamed Out mascara & Its So Big Mascara
Elf Lip Exfoliator
Elf HD Lifting Concealer
Elf Long Lasting Lustrous Eyeshadow: Soiree
Be a Bombshell : Shameless
Ultra Brow Powder Maybelline: Light Brown
Rimmel Stay Matte
Elf Mineral Infused Face Primer
Elf Little Black Book : warm Edition
Profusion Neo Perle Palette (Purple edition)
Eyes:
Apply a Cream Eyeshadow (Cranberry shade) , Blend with your finger
Apply a light matte shade underneath the brow
Apply a Cranberry Shimmery Shade on the lid , using patting motions
Apply a Taupe shade into the crease &Lower Lash Line
Blend it out with a light pink shade
Liner your upper lash line, bottom Lash Line, Waterline & Tight Line with a black pencil (Pencil liner is softer)
Apply Mascara
Fill in your eyebrows with a Brow Powder (This makes the eyebrows look soft)
Face & Lips:
Apply a Silicone based Primer to fill in your fine lines & Pores. This gives your the flawless “look”.
Apply a long lasting full coverage foundation
Apply a brightening concealer in a inverted triangle shape underneath the eyes. Blend with your foundation brush
Apply A powder over top of the concealer & along the Tzone if your oily
Apply a Cranberry “frost bite” Type of blush, you can also add some on your nose to make you look like you just came in from a cold night.
Apply a Shimmer light pink highlight to the top of you cheek bones to give you the Frosty Elsa look.
Last, Apply a Cranberry Semi Matte Lipstick, All Done!!!
Hair:
Curl Your hair with a 1 ½ inch curling want, curl them outwards
run your hand through the curls once they have cooled , & spray with hairspray
Tease & Pin up your crown with bobby pins, to add volume
Gather your hair & start twisting the hair around the face all the way around to the desire side. (Leave hair out to frame your face)
Now start braiding your side bride.
Last to add volume tug on the braid to make it look thicker & messier. Wala your all done with the Elsa Hair!
Music: “Let It Go” : Jun Sung Ahn, Www.Juncurryahn.com
https://www.youtube.com/user/JuNCurryAhn
I hope you guys enjoyed my video tutorial, Make sure you take a look at all my social networks! So what are you planning for valentines day?
Im currently planning to go to dinner at The Chocolate Factory! Yum ..
Till Next Time ,
Remember, Beauty Comes From Within So let it SHINE!
So today I’m going to show you how to do a very natural makeup look using neutral colors. This looks very natural & its comfortable for all you moms, teens or ladies that like to look more natural and fresh! Come SEE how I did this!
http://youtu.be/kSTstxD6z7c
So here is what this makeup look looks like!
Products Used:
Bronzer: Elf Warm Bronzer … I contoured with the darkest shade & an angled Brush
BLush : Bombshell The One stick: Girl Crush
I used this as a base for my blush , it a really nice light pink shade
Blush: Wet N Wild : Mellow Wine Blusher
Ontop Of the Blush base I used this pretty blush to add some rosyness to my cheeks!
Base: Nyx Eyeshadow Pencil: pure gold.. You can definitely use a primer if you want or a eye pencil..
Pop Beauty Natural Babe Trio: I used the lightest shade all over the lid, then the middle shade on the outer half, then the darkest shade in the crease & Outer ⅓ or the lid. I then used the darkest shade on the lower lash line and the lightest shade on the inner corner & inner part of the lower lash line…
Profusion Dazzle me petite kit: I used this matte brown shade on the lower right hand corner to blend the crease..
Lips I used ElF Lip Color: Natural & This holiday hugs lipgloss on top!
Thats basically the whole look! I added some liner with the jordana fabuliner Bold . Last Applied some mascara!
This is such a simple look I hope you guys enjoyed ! Don’t forget to Subscribe to my youtube channel if you like my videos tutorials!
Make sure that if you love my blog posts you Press the Like button -> Thanks for all of your support it means the world to me!
So what kind of day are you guys having? Lazy day? Date night maybe?
Remember beauty comes from within So let it SHINE!

 I chose to do a more natural look for my engagement pictures so I skipped eyeshadow and went for a natural flush on the cheeks and lips …
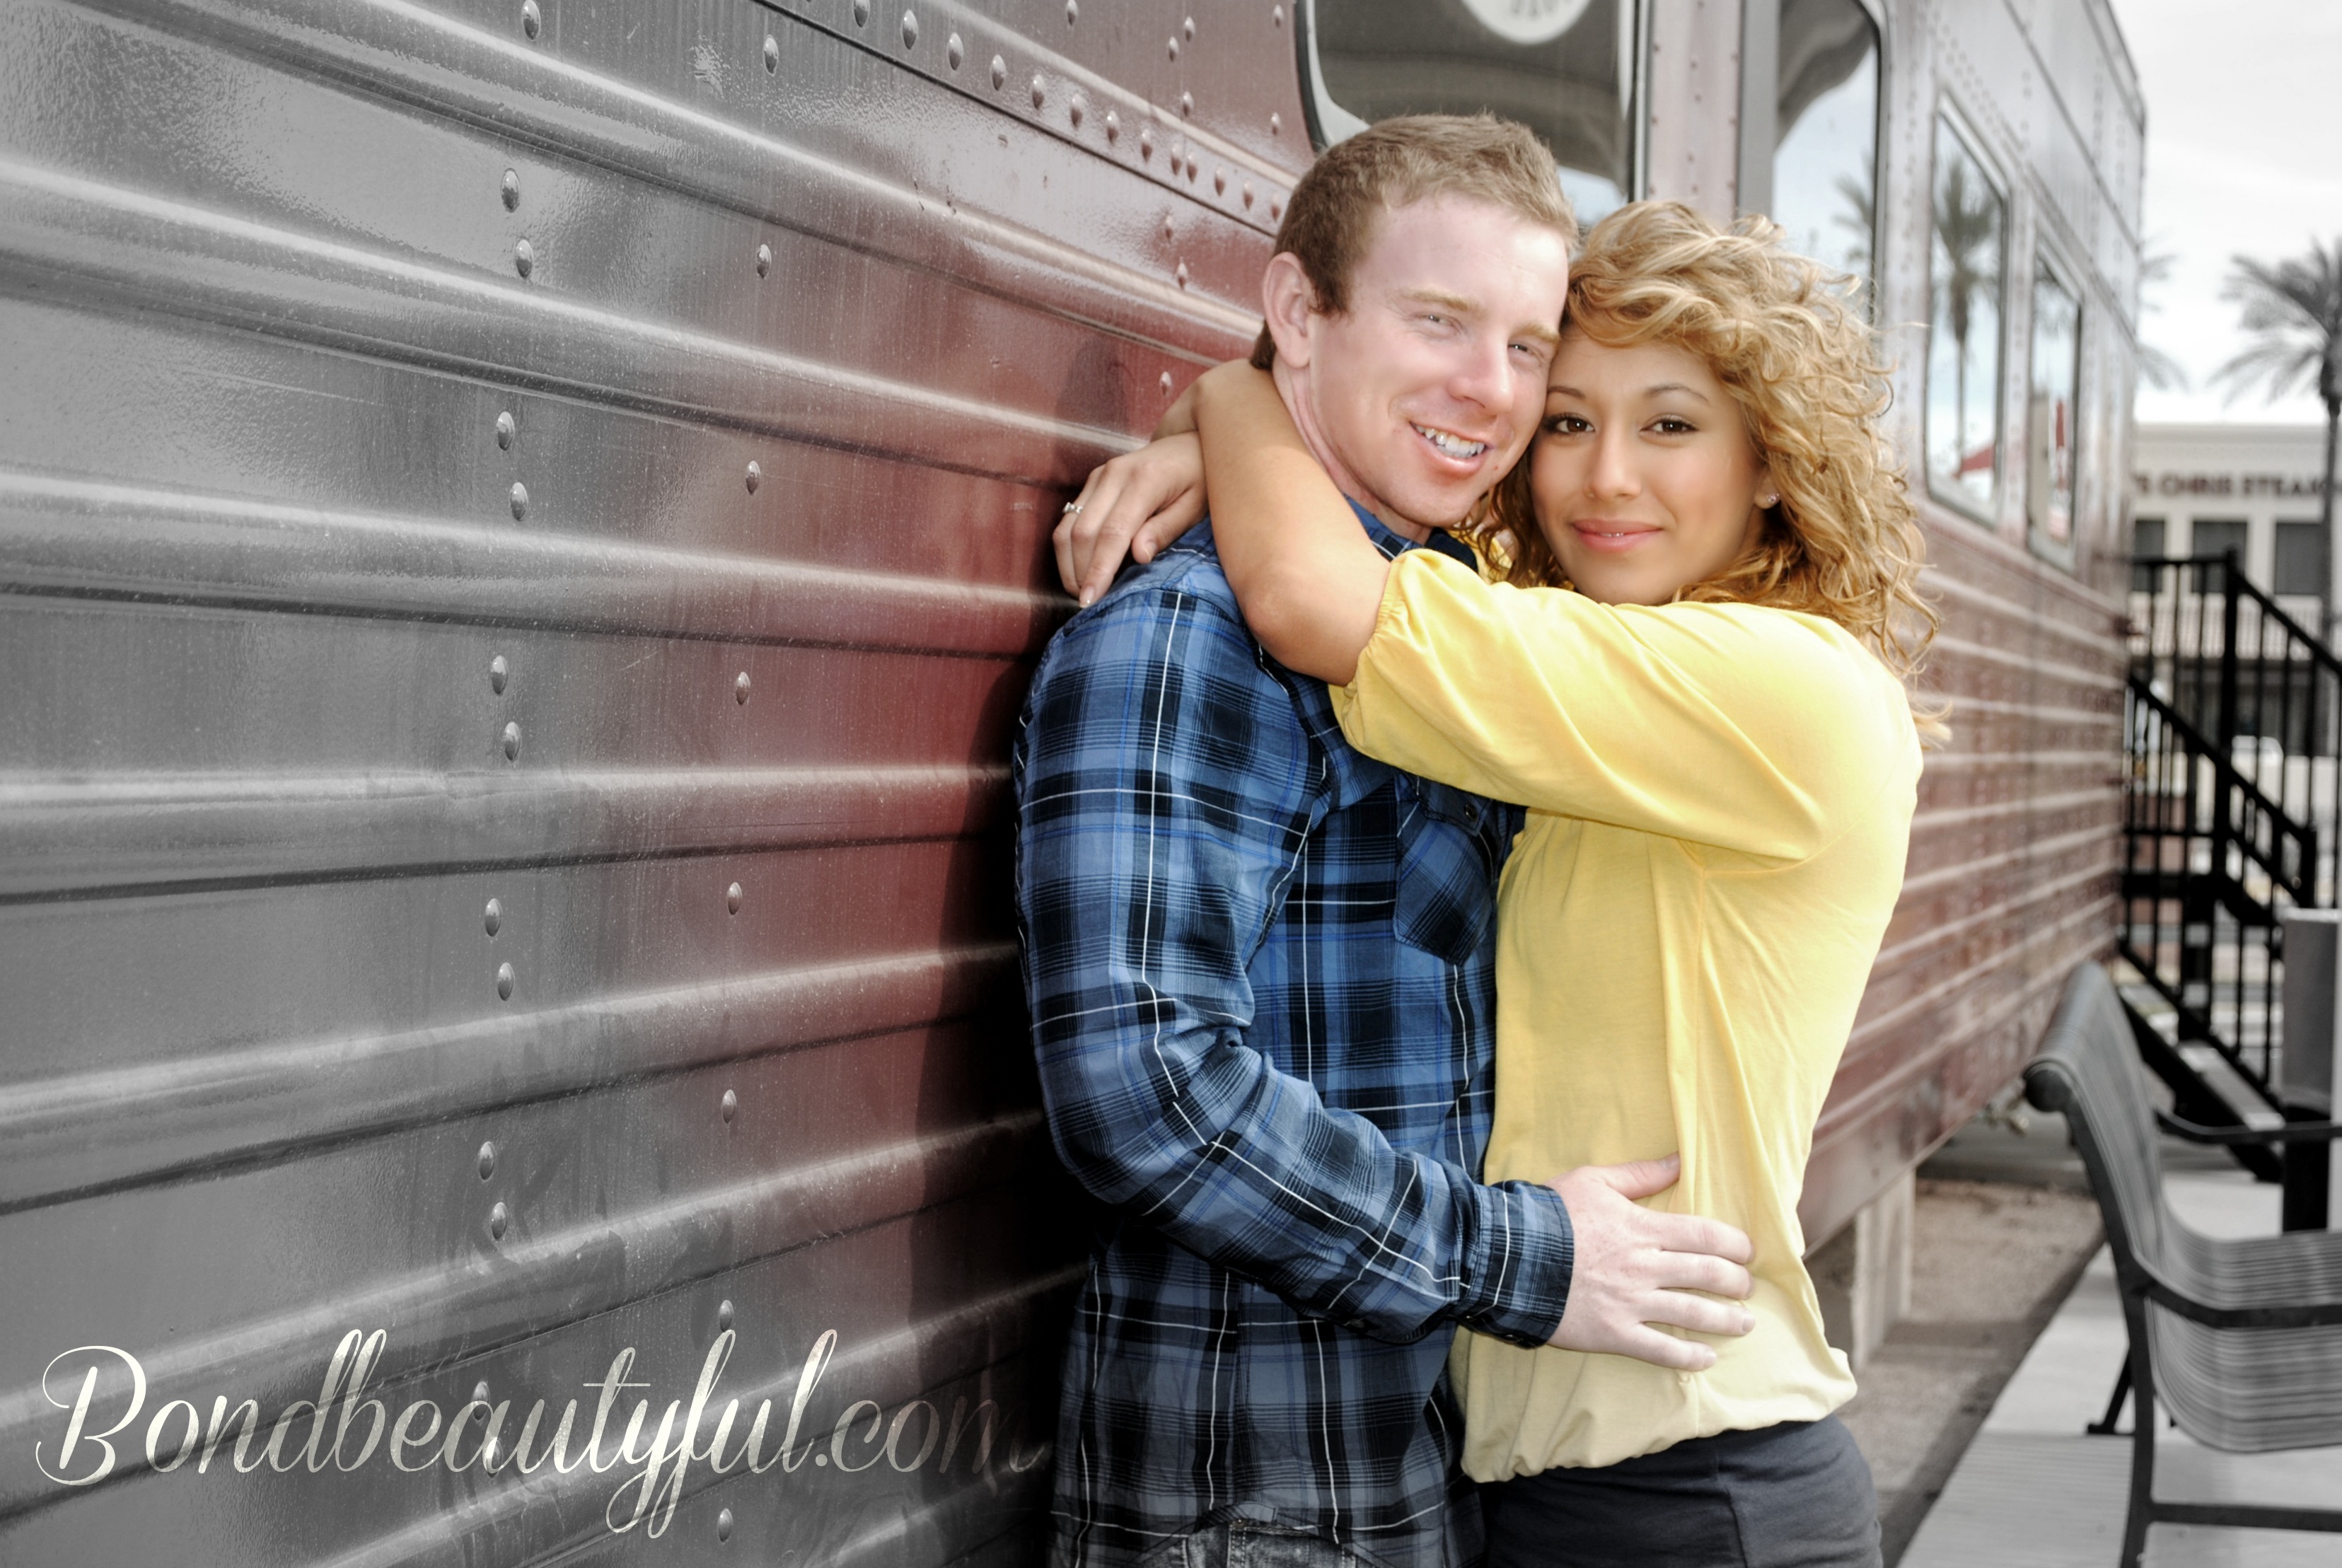
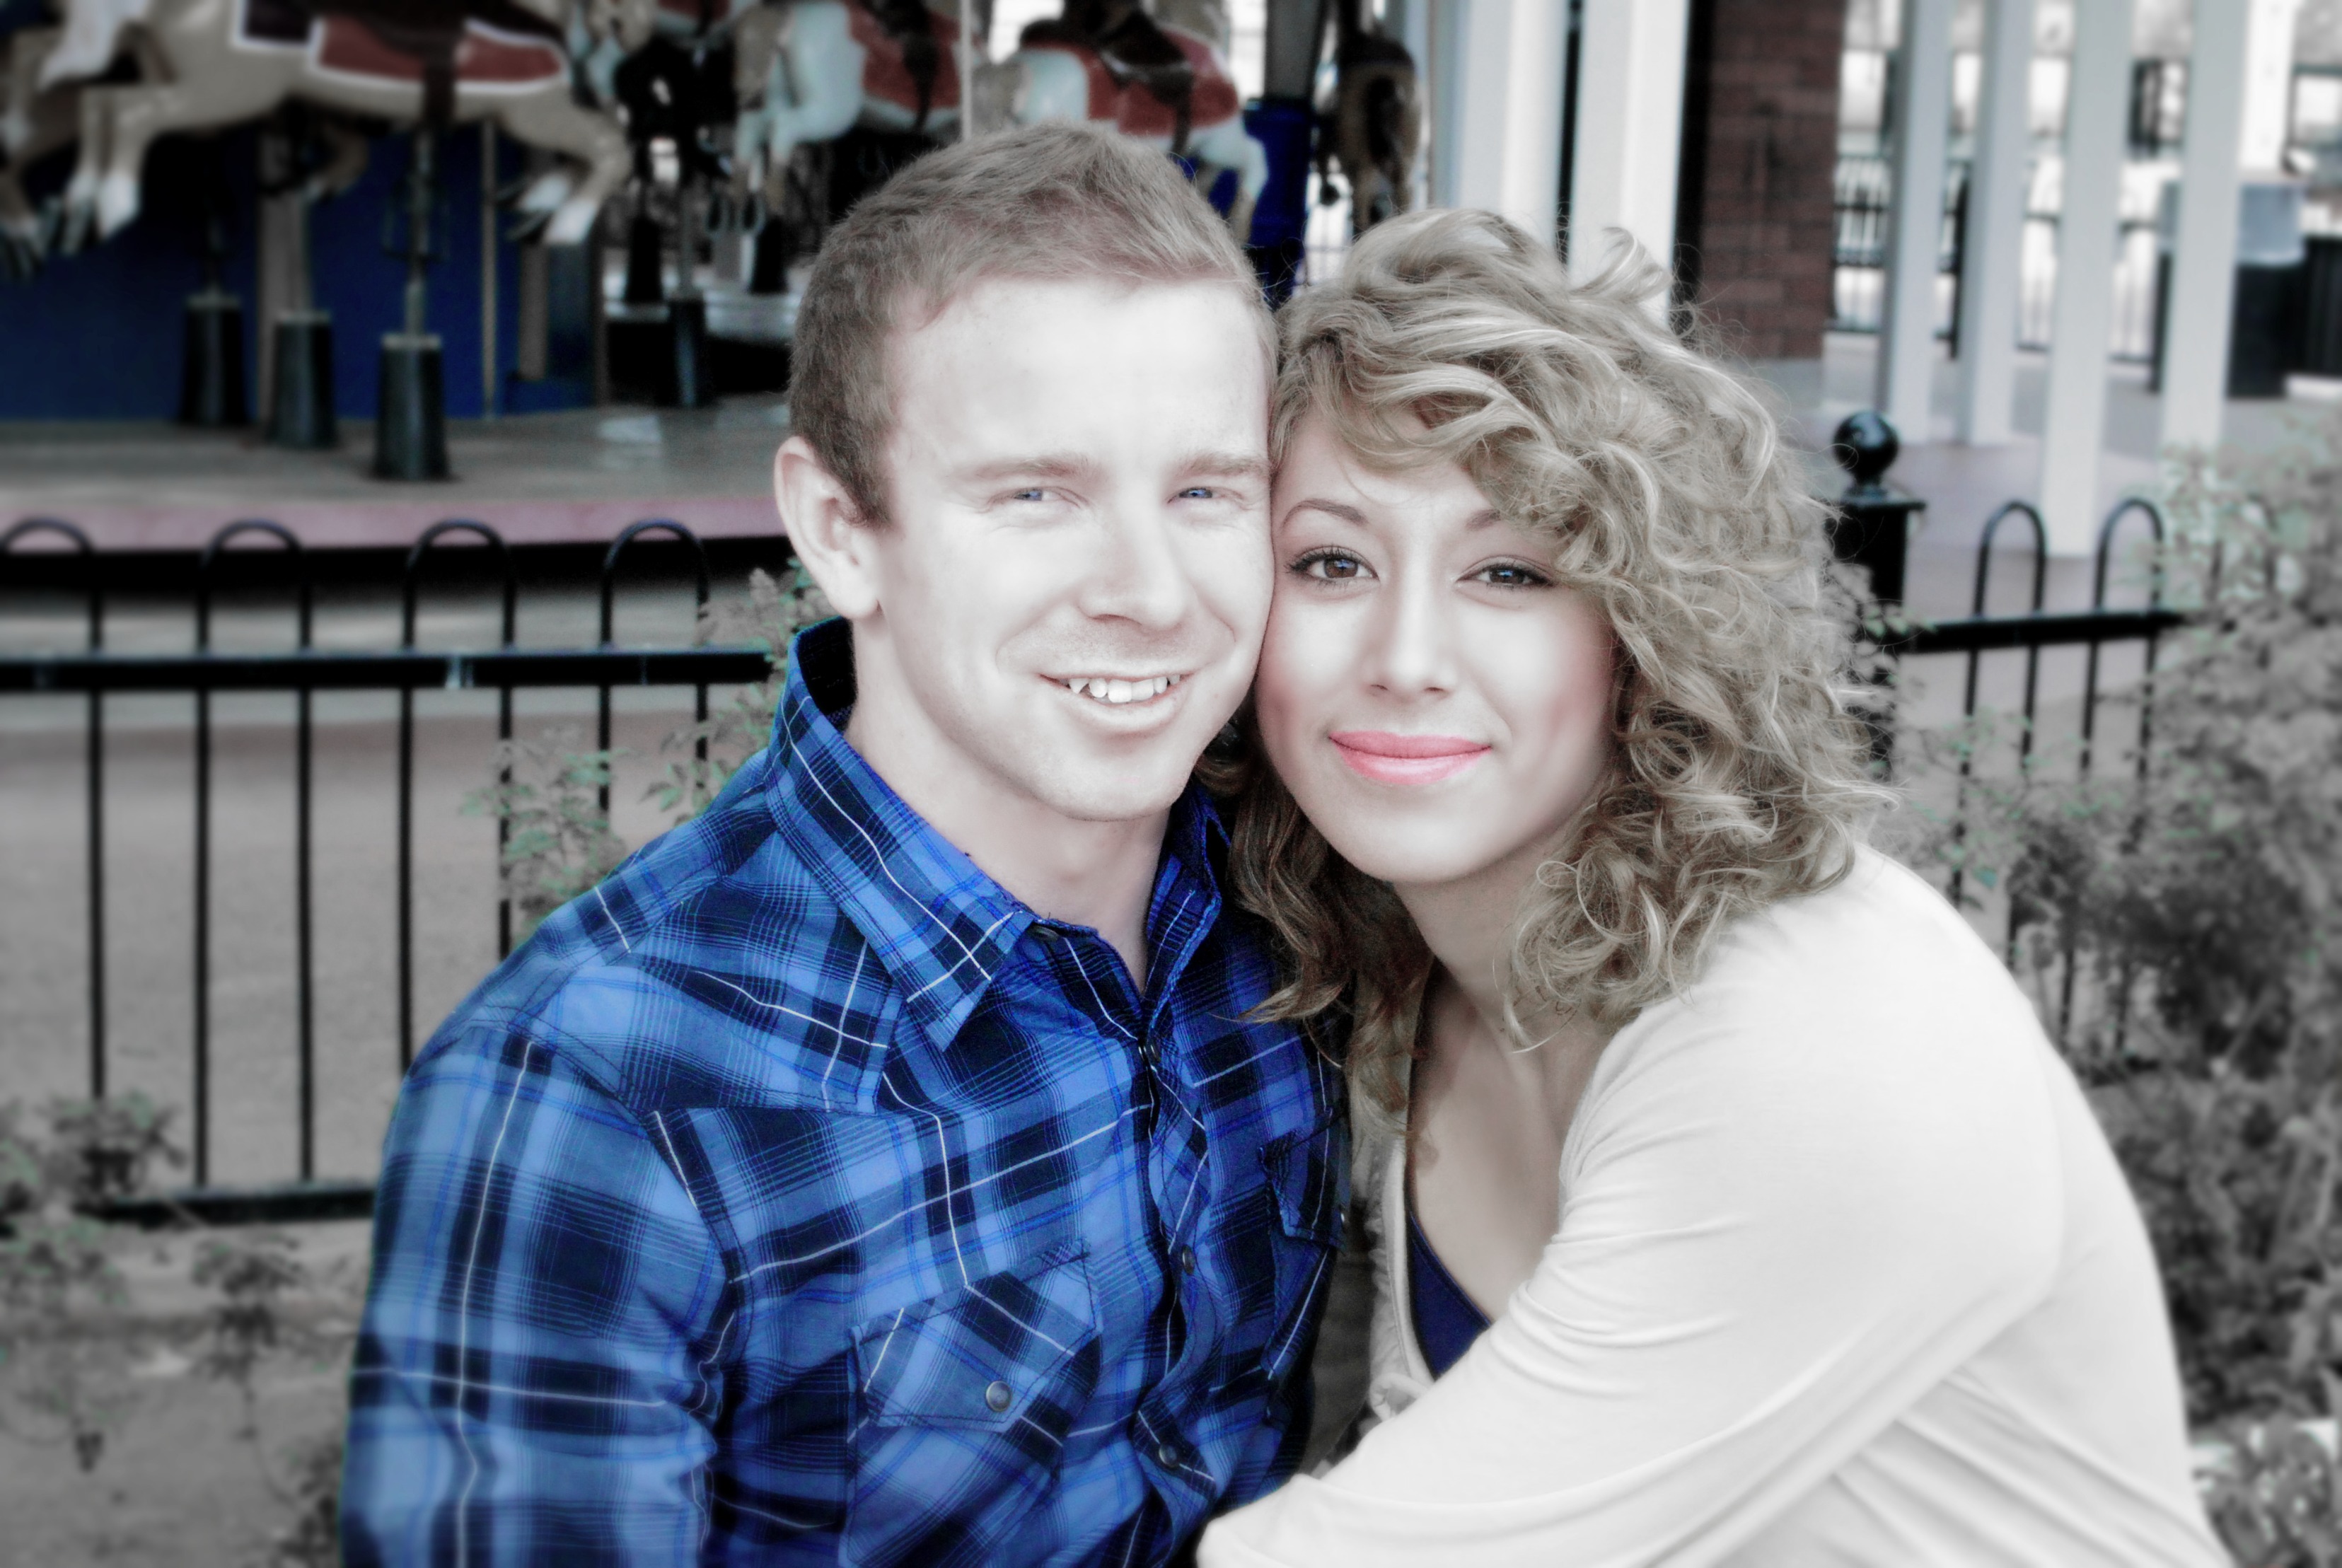 For My wedding I made sure to do a full face makeup, pictures tends to fade what you have on so you have to apply a little more makeup then you normally would..


