Lets do a summer friendly makeup tutorial. This is perfect for summer because of the bronzey glowy cheeks & the popsicle red lips. This is super easy to do and I am going to show you how!
If you would rather watch me do it than read about it , then click below!
https://youtu.be/UvFdiP910rk
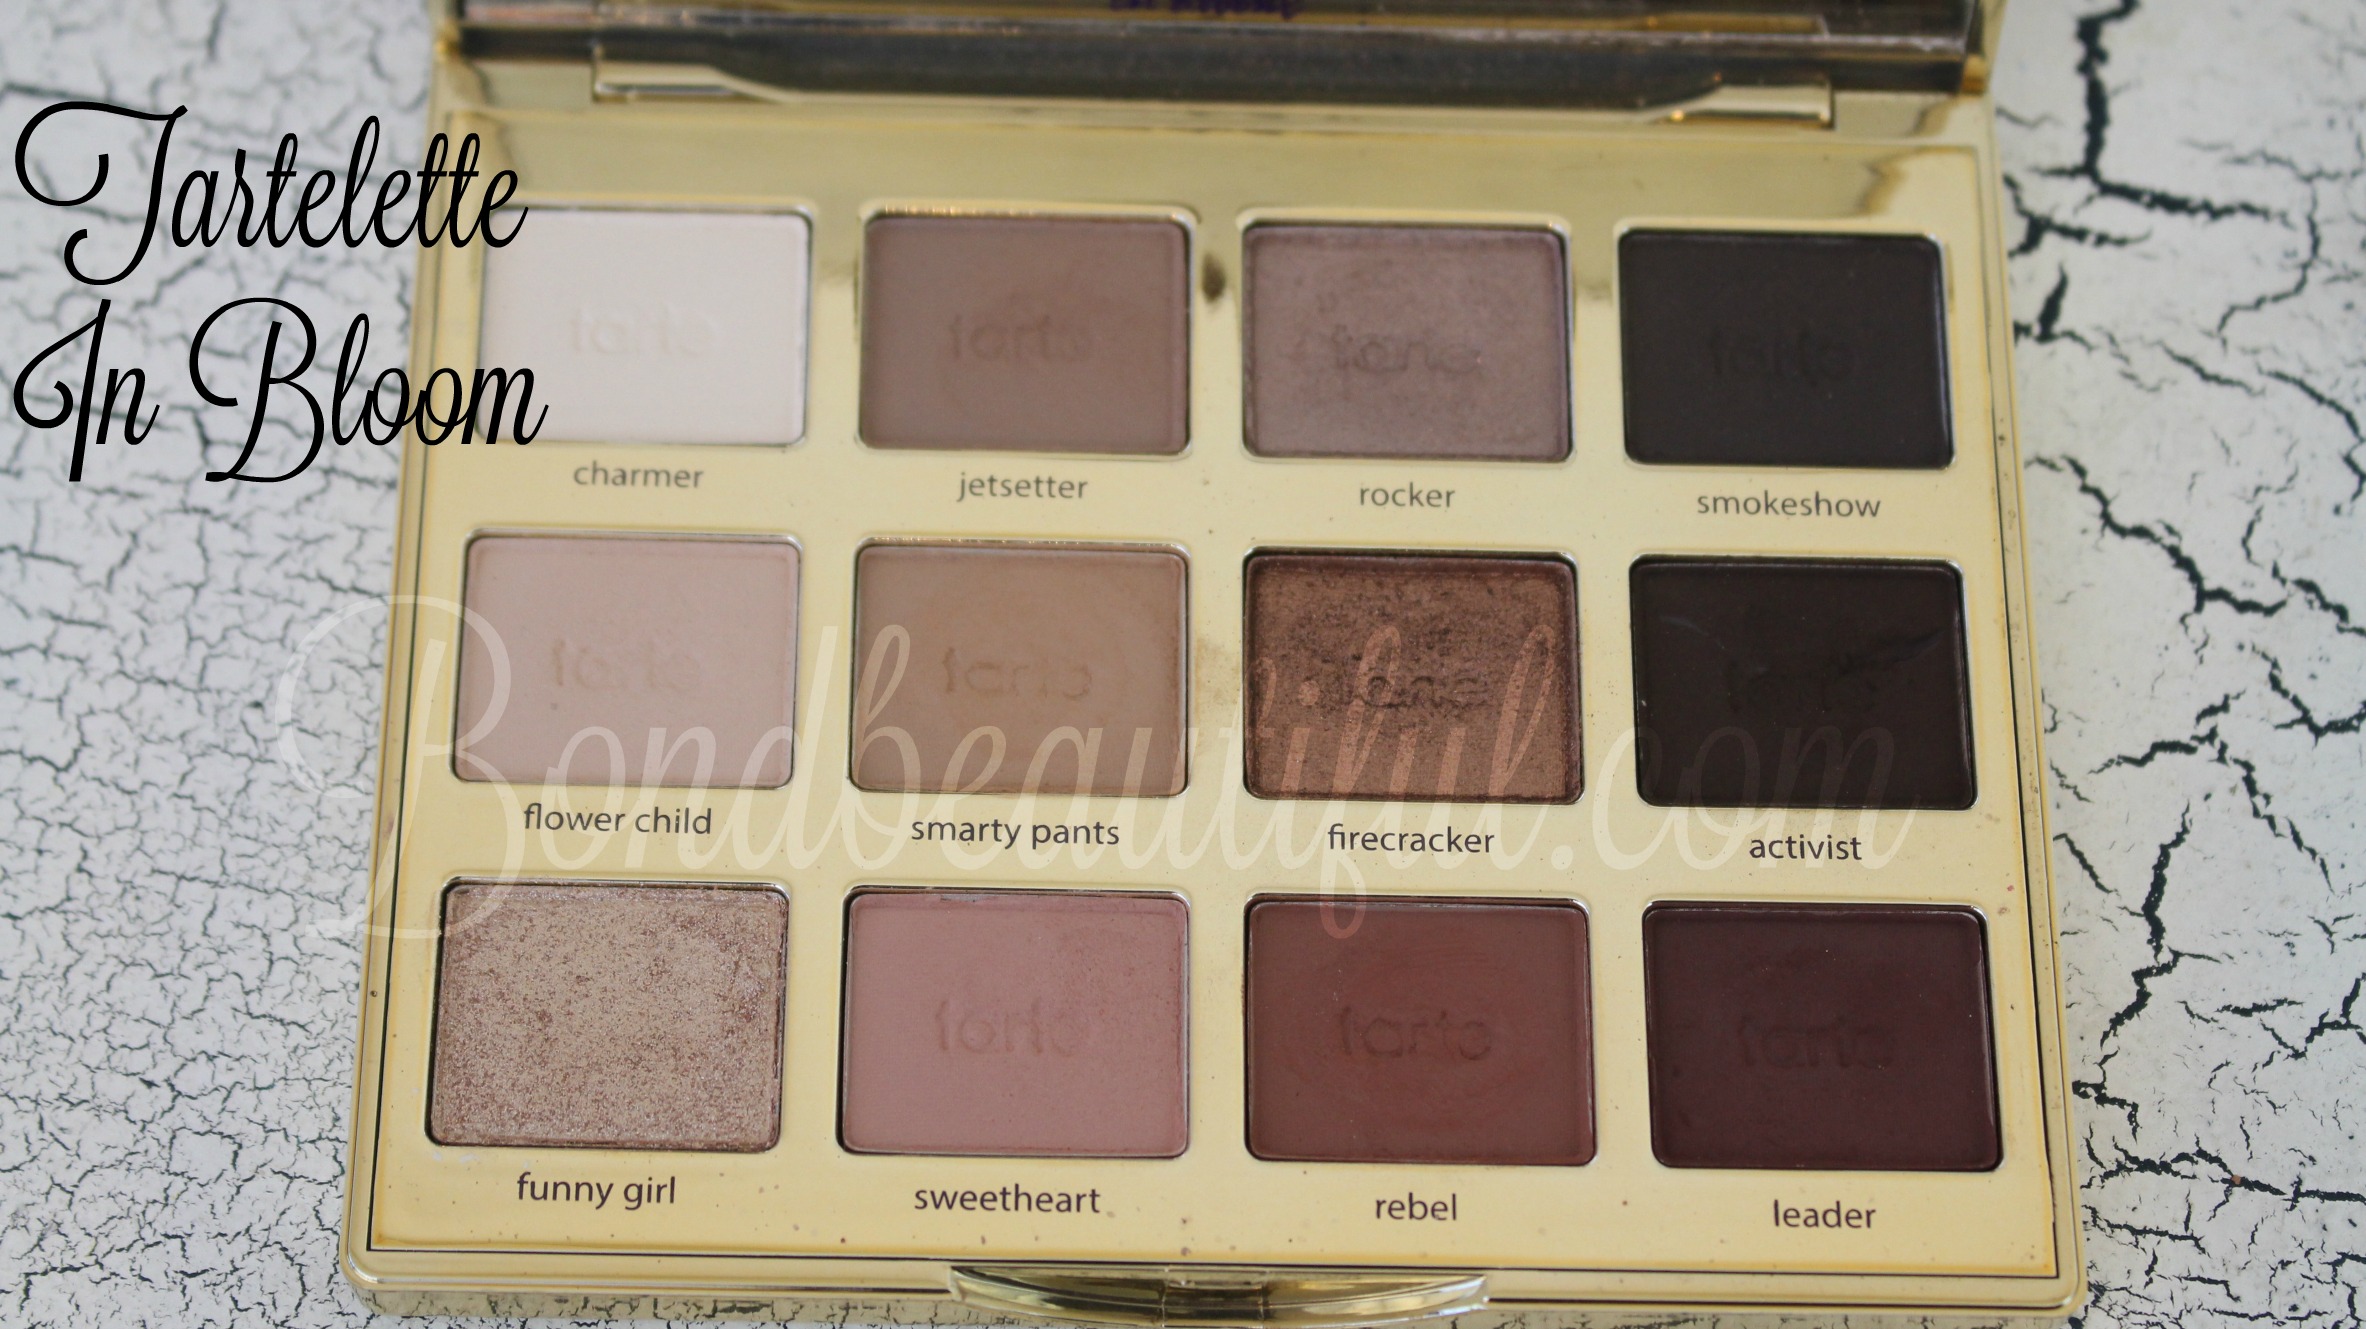
I am using all the products that I talked about in my may favorites post. All of these products are my favorites because they work so great for such an affordable price!
Eyes:
Smarty Pants into the crease with blending brush
Mix smarty pants & rebel together and add it into the crease with a crease brush
Blend with a clean blending brush
Add Sweet heart & Flower Child(mixed) onto the lid
Add Funny Girl into the center of the lid & into the tear duct area for a highlight
Add Charmer right underneath the brow
Apply rebel to the lower lid close to the lashes
Add wing liner (If you so choose) & mascara
The face is very simple lots of glow & a flush of color !
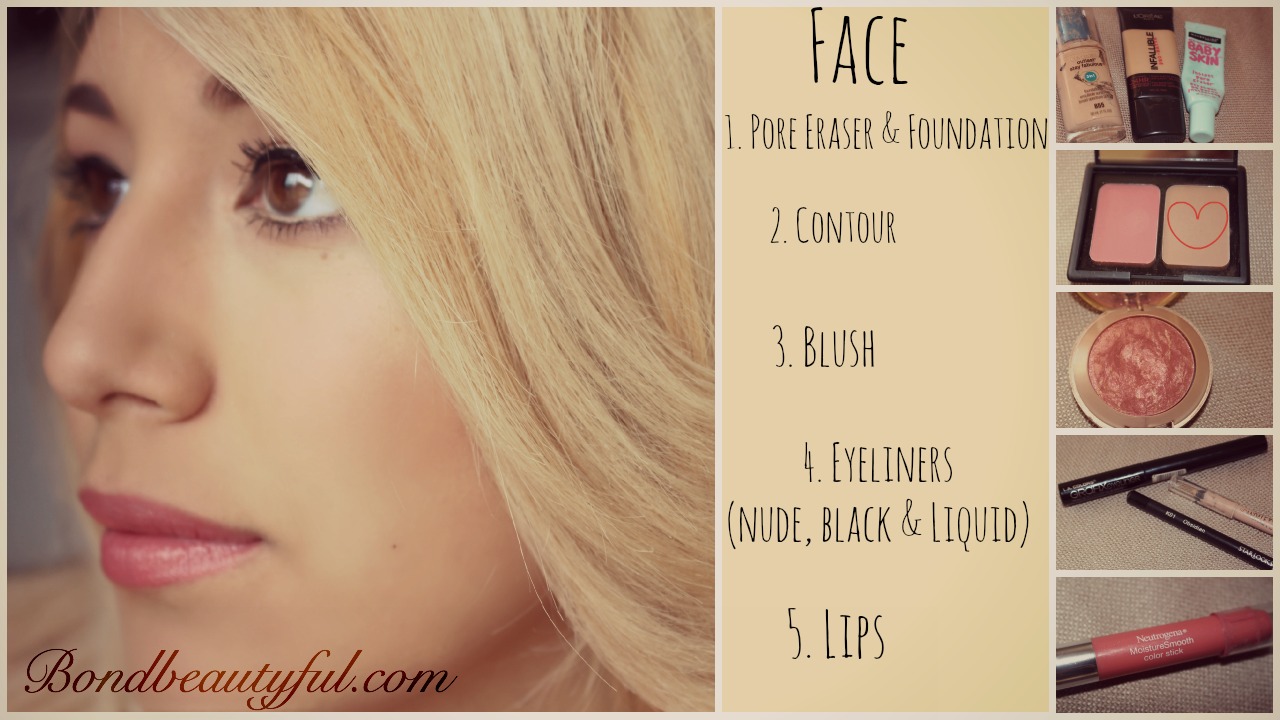
Face:
Foundation
Conceal your under eye circles & apply powder to set everything
Contour
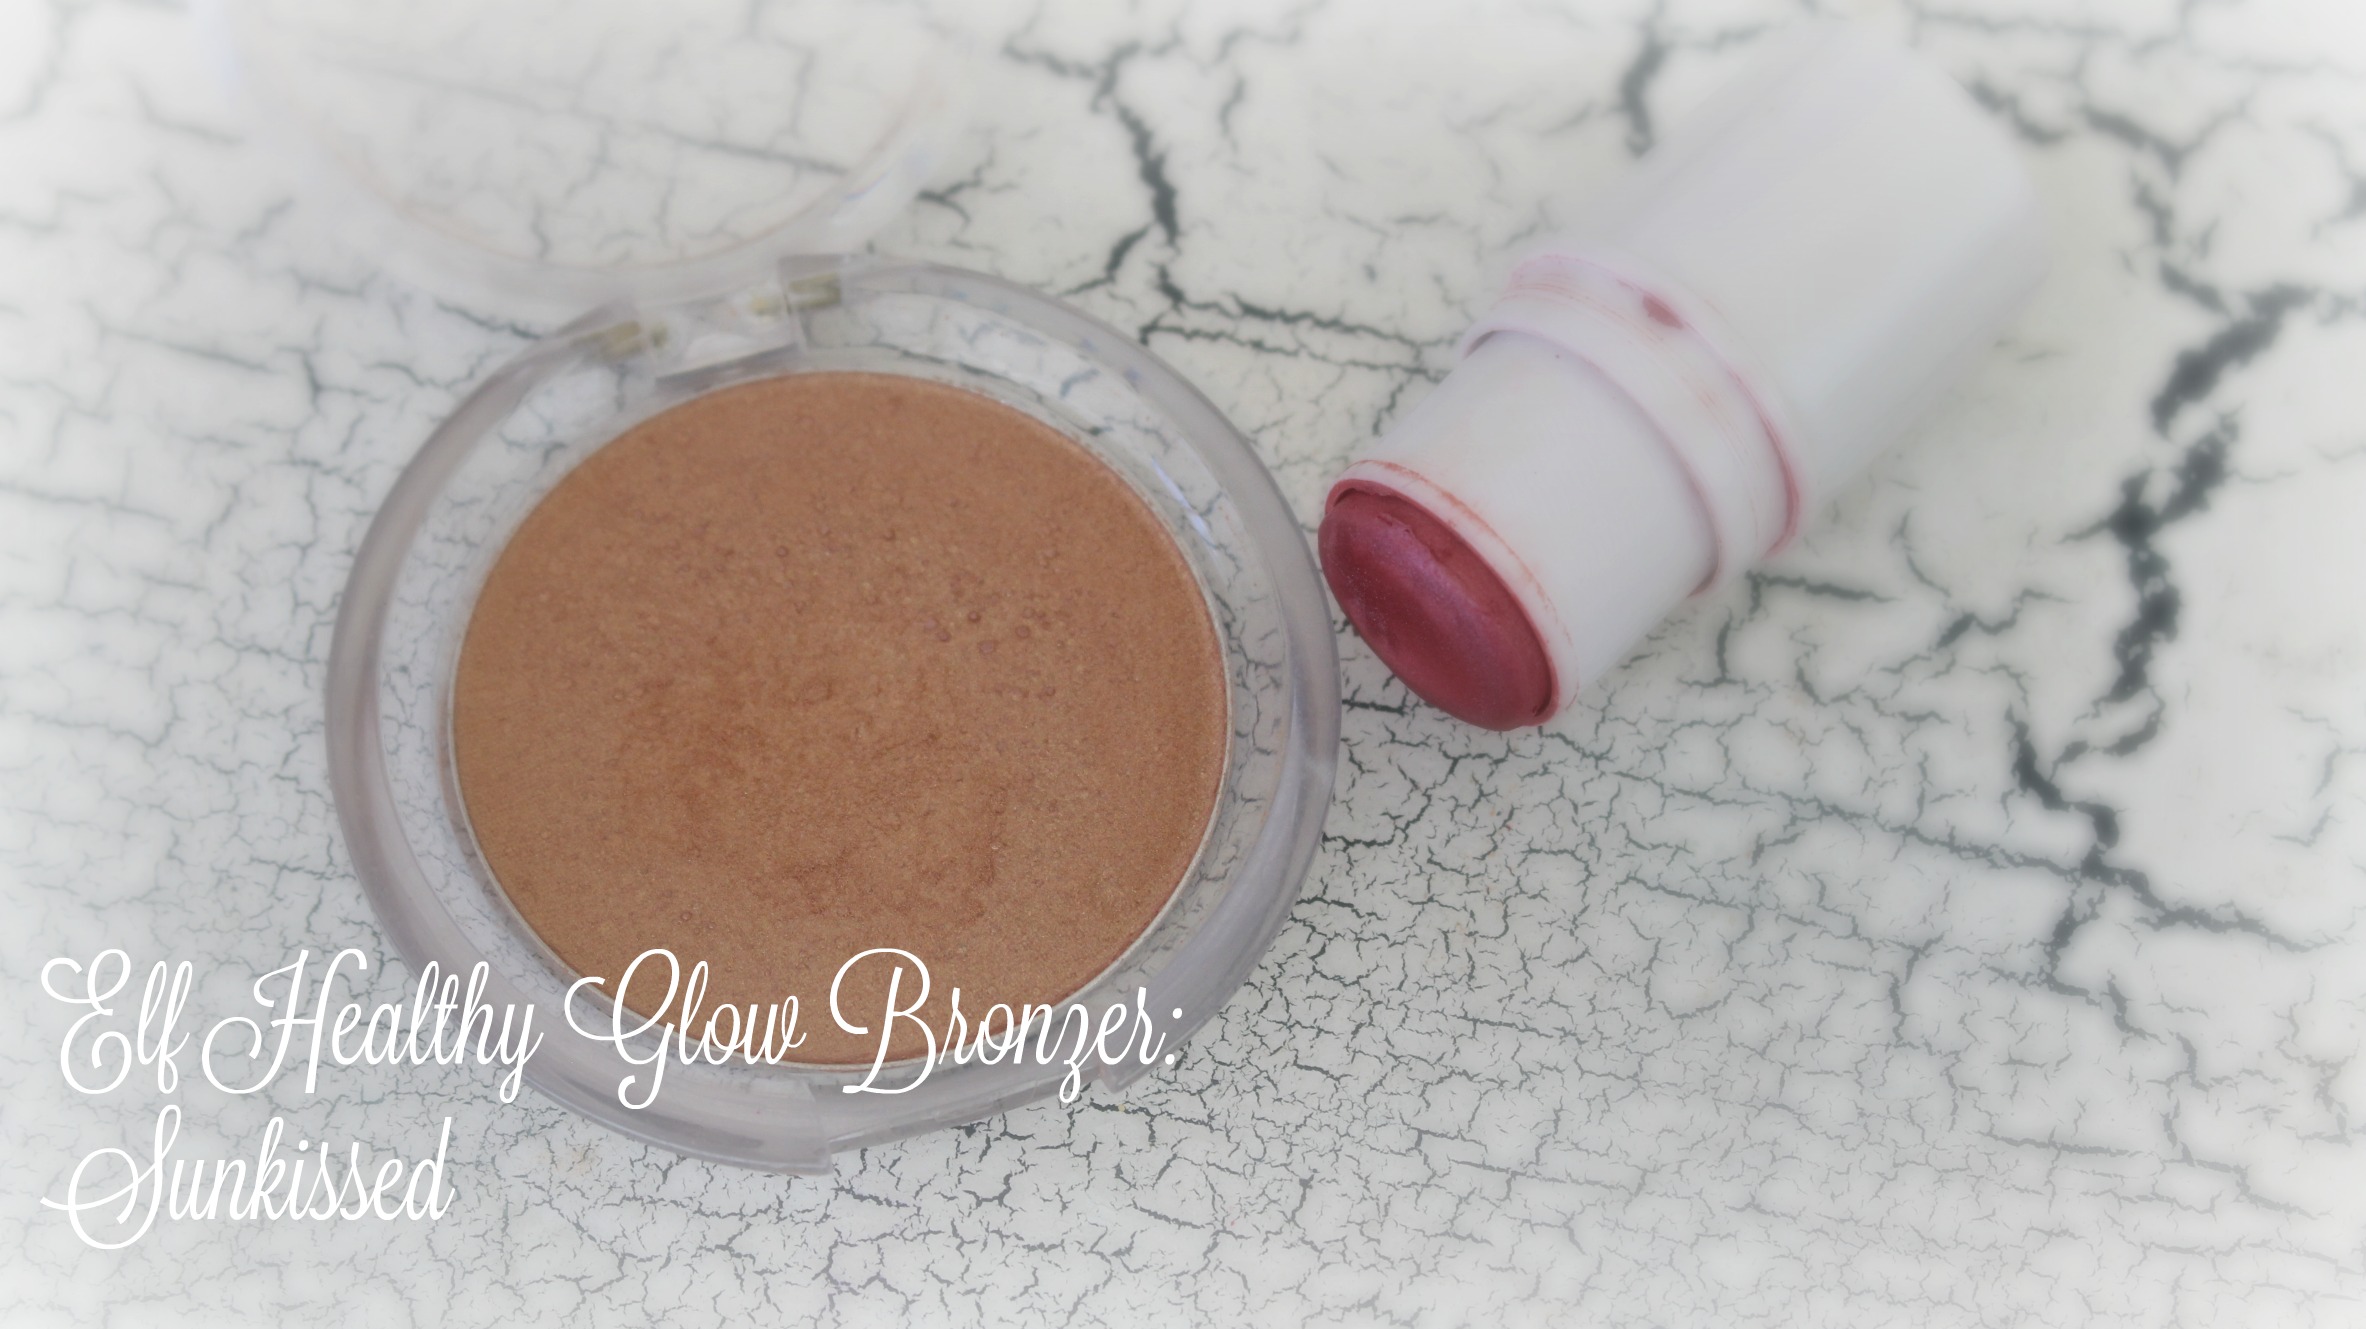
Add a glowy bronzer to the cheek area , forehead & tip of the nose
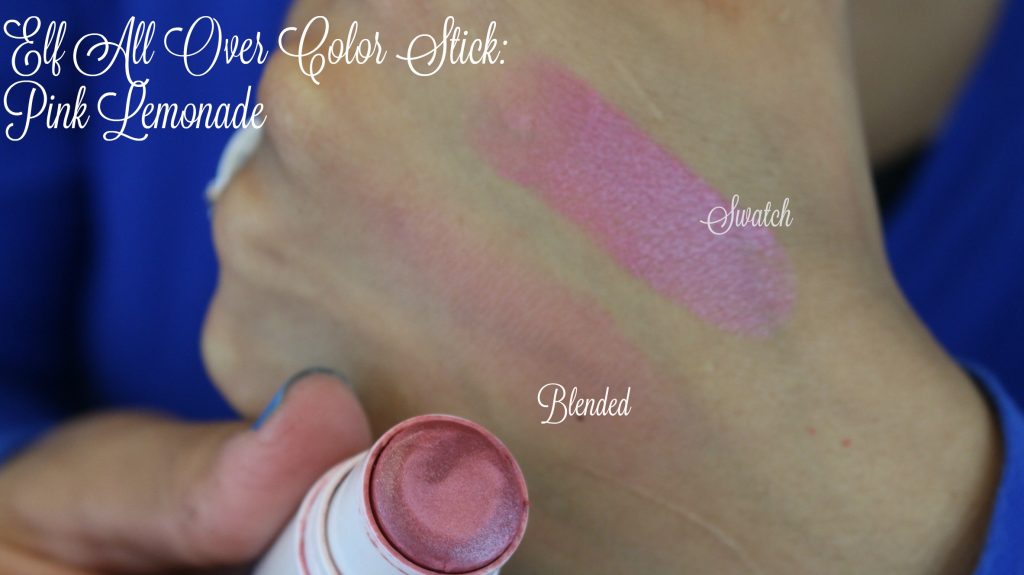
Add blush to the apples of your cheeks and sweep it back
Apply a tiny bit of the glowy bronzer again to the apple of the cheeks for a highlight
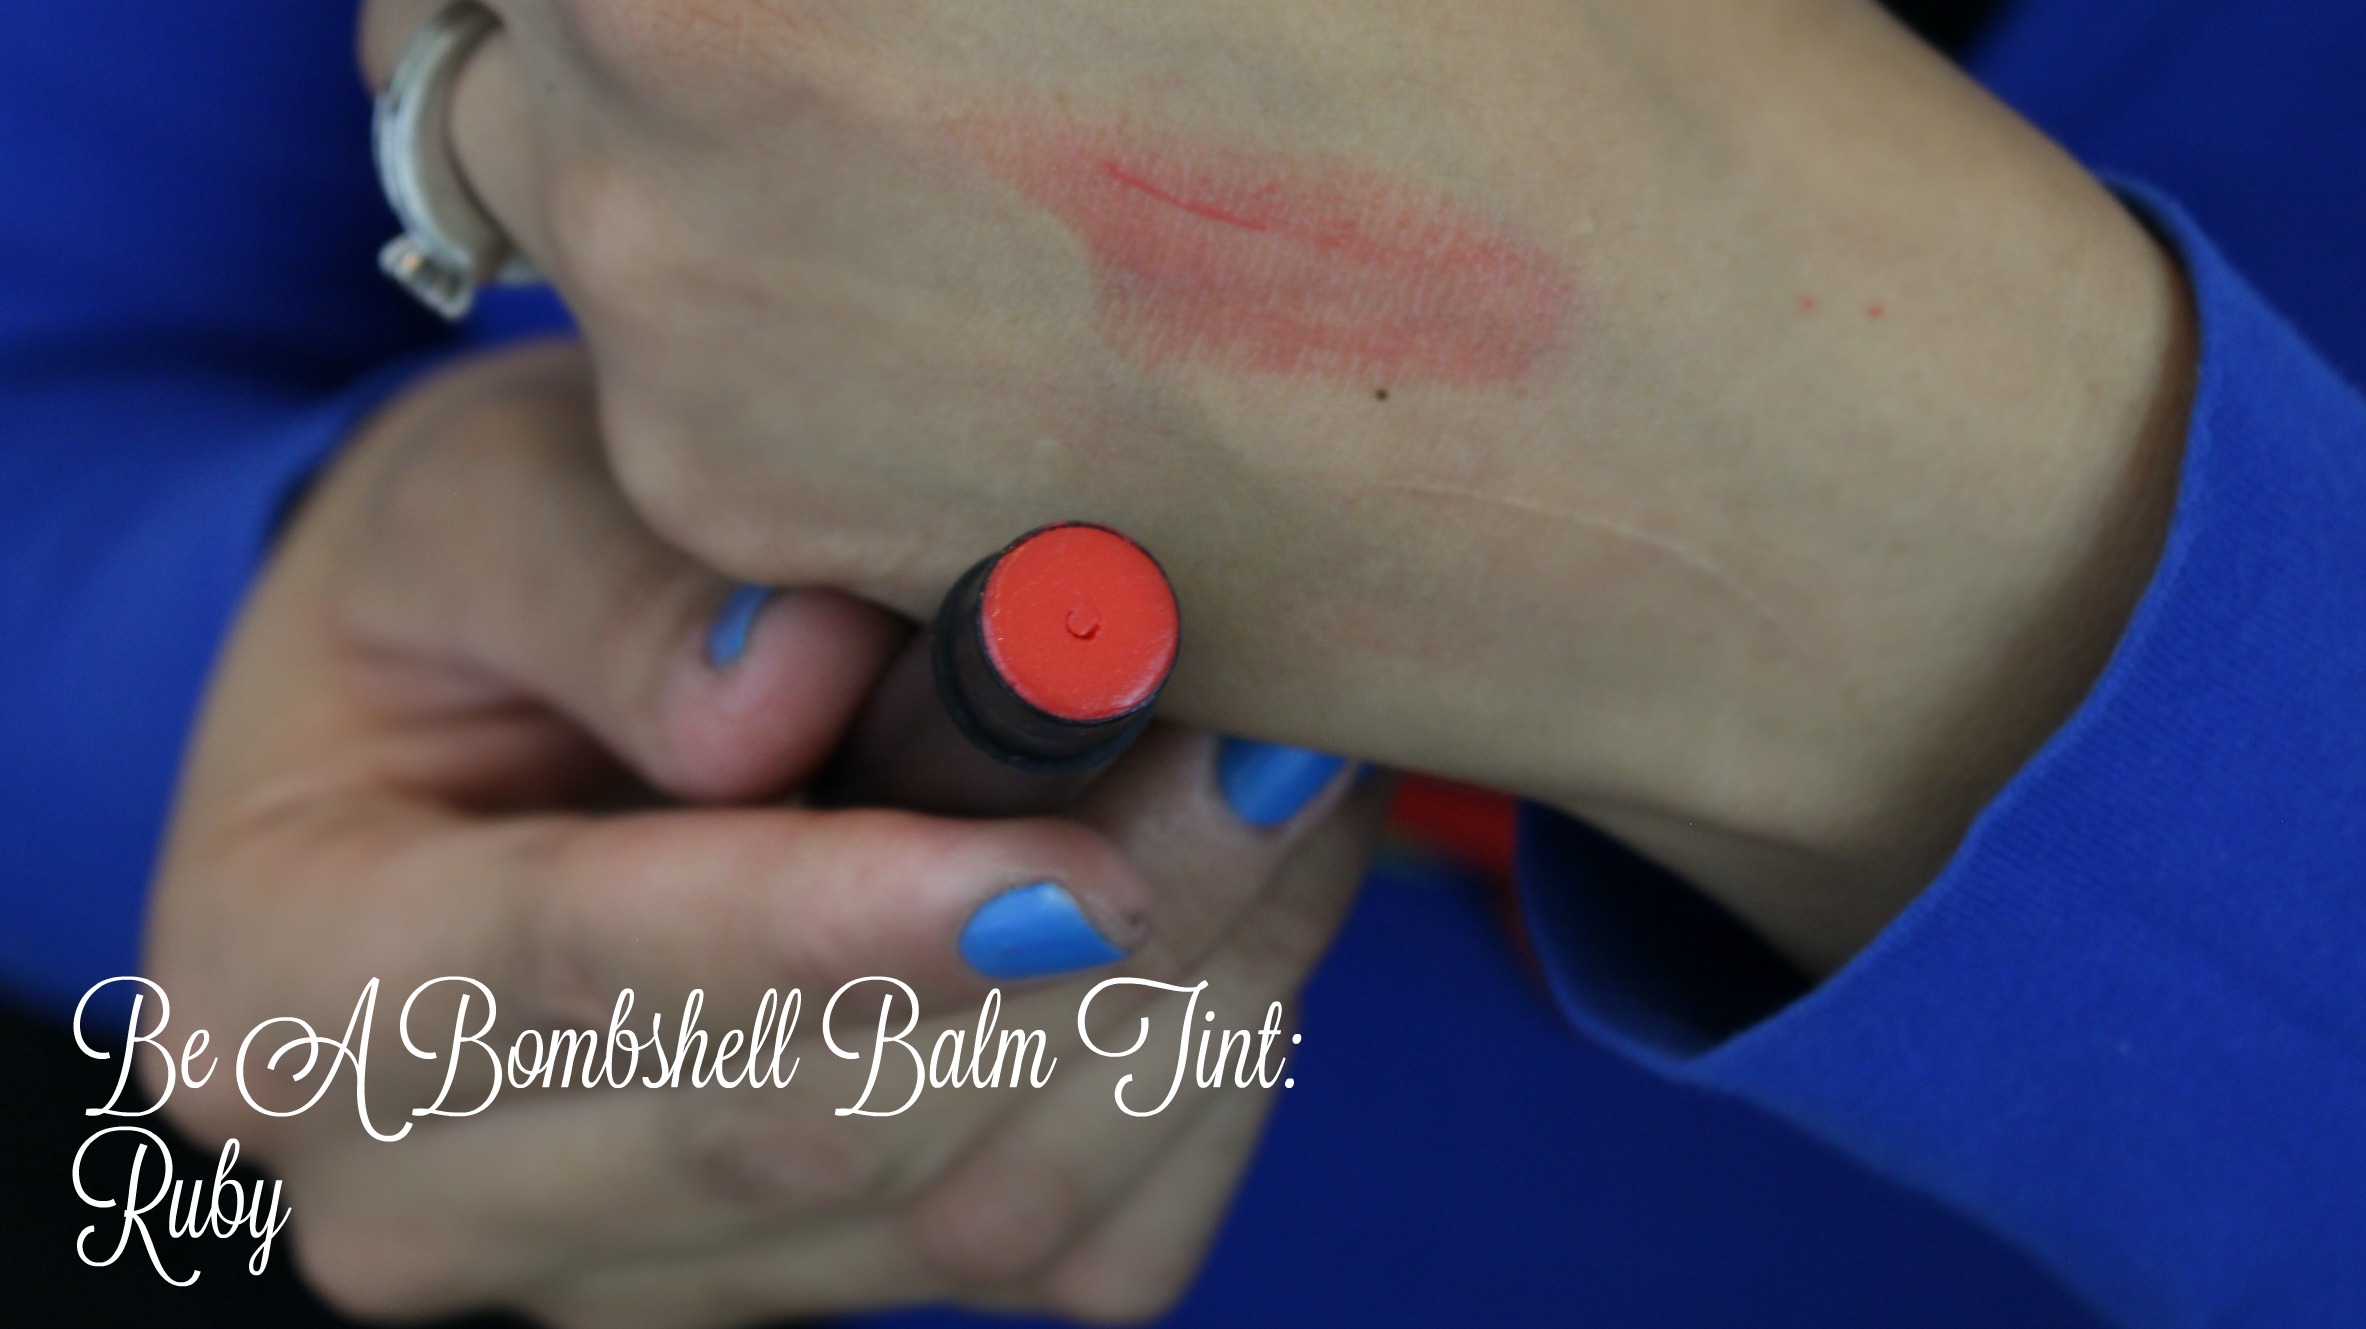
The lips are very easy all I did was apply a lip stain. & this balm tint over top. So simple and perfect for the summer!
Now that your ready for the summer what are you planning on doing this summer?
I am super excited about todays post! I have been thinking lately about how I want my blog and videos to be something that anyone can enjoy no matter age. Most of the makeup looks I come up with I think would look good on younger or older women. Sometimes it doesn’t seem that way so to help you see how this makeup look looks on younger or more mature women I invited my mom to join us! Todays makeup tutorial is how to do a basic smokey eye that is perfect for all ages!
This smokey eye is very appropriate for this summer time , in fact it is perfect for anytime of year because it is not too dark. This is also such an easy look to create because I am only using 3 eyeshadows! Obviously when doing makeup on younger skin and older skin there are little tweeks you have to make. For example I am wearing a nude lipstick on my mom I used a light natural pink lipstick. I also used this particular blush because its glowy without being shimmery which is looks great no matter your age!
Personally I love this makeup look for date night, special occasions,weddings, pictures things like that . So lets get started with the eyes! ( I recommend starting with the eyes because we will be using black and that can sometimes get everywhere).
For the face makeup I purposely used a blush that has no shimmer but has a beautiful glow because it is more versatile for all ages! This coral blush really warmed up the face for the summer. Now remember everyones skin tone is different so you might need to pick a lipstick that fits your undertone and skin shade better. For my mom I picked a Pink lipstick from Elf -Mink Pink and I think it looked better than the nude lipstick that I am wearing.
Products Used
Face:
NYC Loose Powder Translucent
Loreal True Match Lumi Foundation W6 Sun Beige
Maybelline Instant Age Rewind Eraser For Dark Under Eye Circles: Neutralizer
Elf Blush & Bronzer Duo: Fiji Matte
Elf Mineral Blush Cabo Cabana
Eyes:
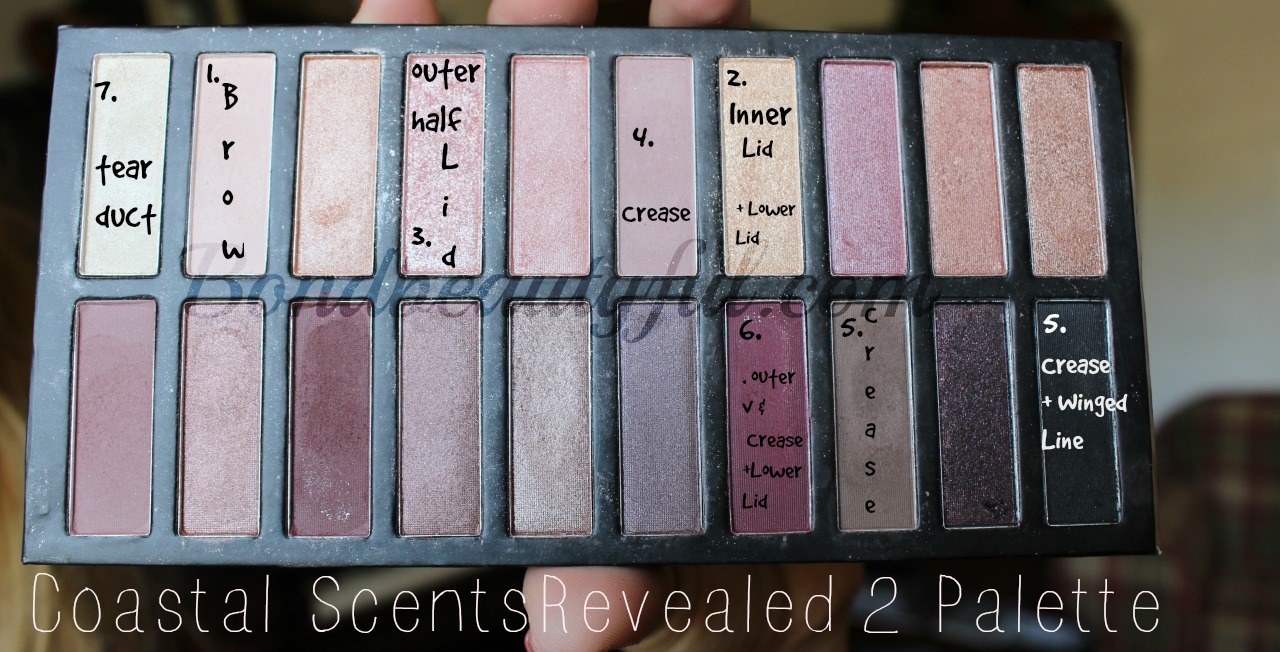
Coastal Scents Revealed 2 Palette (Light Pink for Under the Brows & Black)
NYC 24 Hr Eye Primer
Elf Smudge Pot: Aint that Sweet
Elf Single Eyeshadow: Pink Ice
Nyc Liquid Liner Black
BH Cosmetic Brushes
I hope you guys found this tutorial helpful and easy to follow. If you do recreate this look I hope you will use the hashtag #Bondbeautyslook so I can take a look at what you did! You guys are so awesome and beautiful! I challenge you to try this smokey eye out this weekend or whenever!
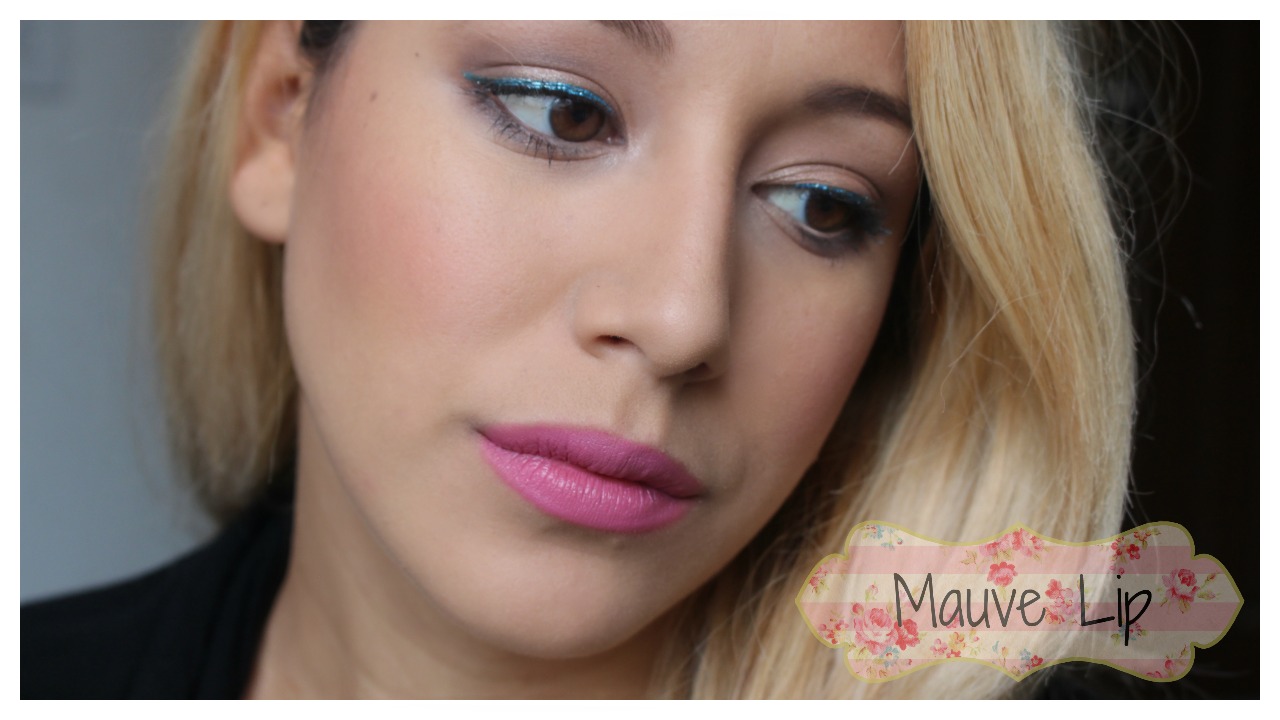
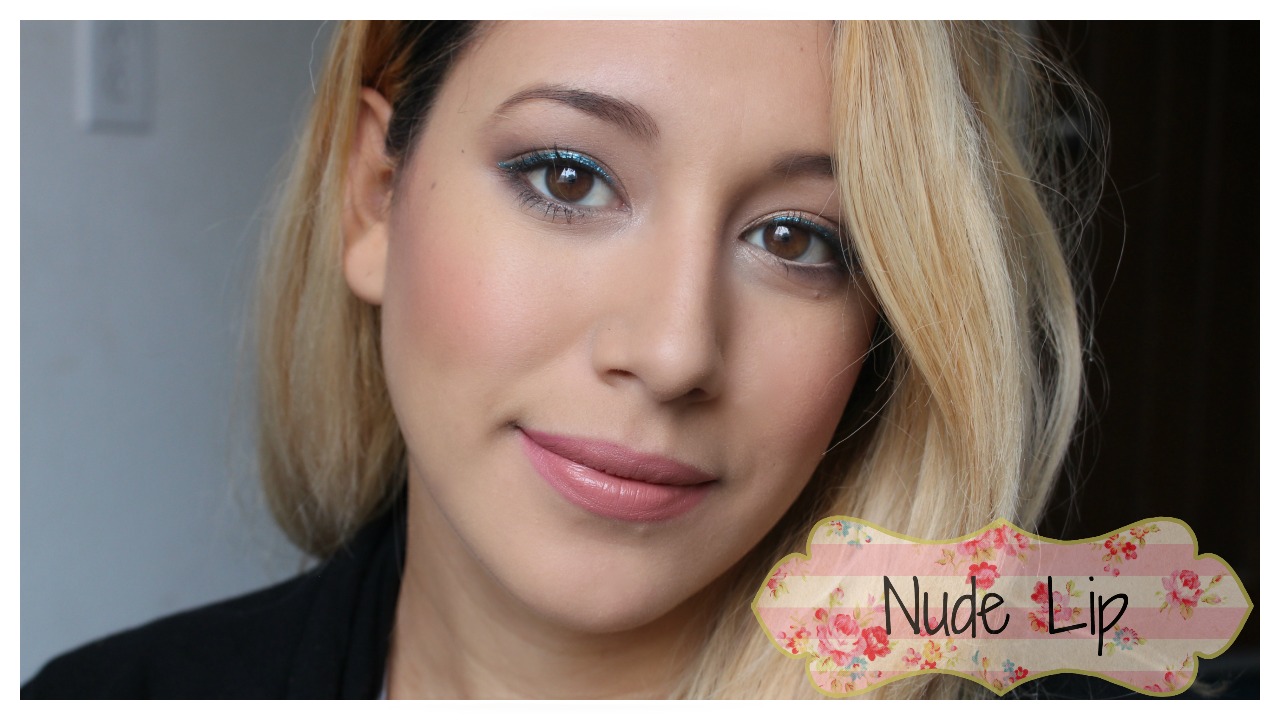
Today I wanted to show you guys this beautiful summer appropriate Smokey eye. Its really easy and it has a fun pop of blue eyeliner to finish it off. Some of you may want something a little more toned down than this bright eyeliner with the mauve lip so I give you a nude lip option that really makes it more wearable.
Personally I love Smokey eyes and I will even rock Smokey eyes in the summer! Date night is a Smokey eye night, its romantic, mysterious and perfect for a night out. So this weekend when you are heading out why not try out this look! So enough blab and let me show you how I did it!
I personally Love this look for t Summer I think it looks amazing and Is a fun look to do! If the Mauve is too much color then try the nude lip option. I personally love these Wet N Wild Megalast Lipsticks because they are Matte and they feel very comfortable on the lips!
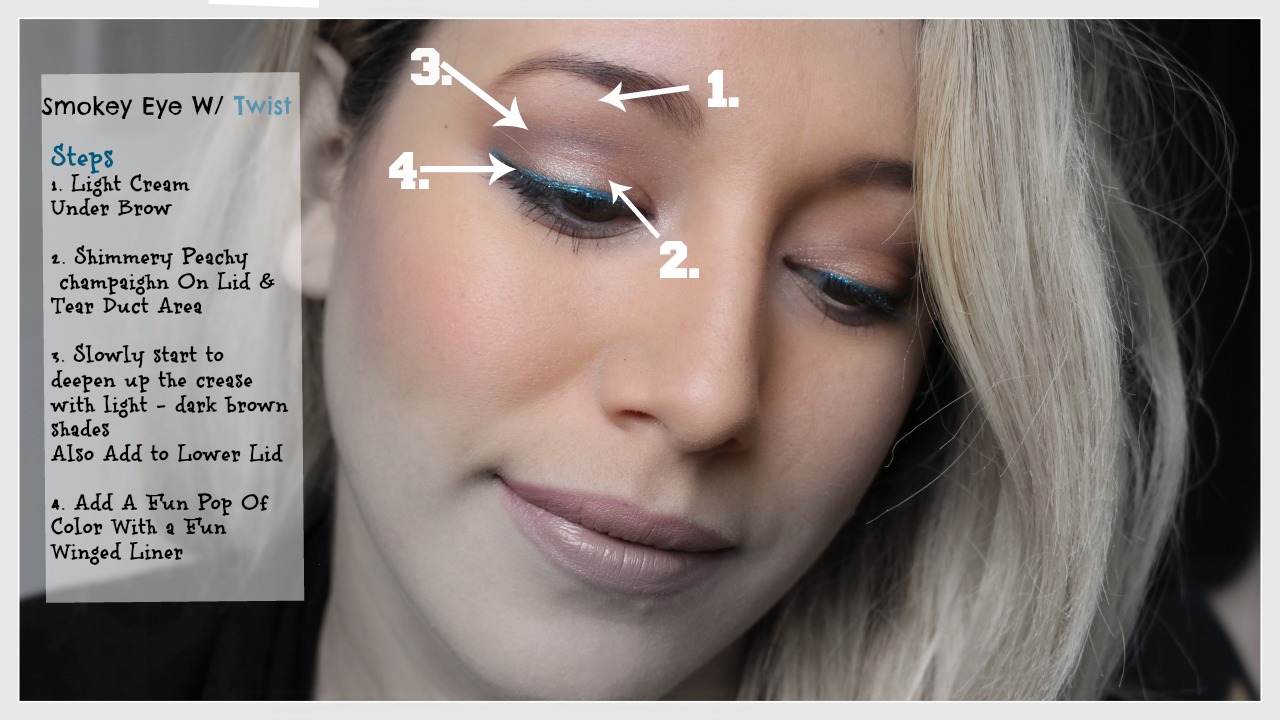
I wanted to make this eye look as simple as possible , If you want more detail and see the eyeshadows I used check out the video above. Here are the four easy steps I used and you can use which ever eyeshadows you love!
If you like my videos then Subscribe to my Youtube channel! If you like my blog posts and want to see more make sure to enter your email above! What type of looks do you want to see this summer ? Pops of color or natural?
Todays post is a how to of sorts. This last month I have been really experimenting with the Coastal Scents revealed 2 eyeshadow palette. I came up with a look that I consider to be Romantic & my favorite with this palette so far. So today Im going to show you how to do this Romantic Eye!
This look is actually very simple as in there really is no special technique.
Eyes:
Prep- Prime the lids with a primer , then add a base (elf smudge pot, to help the colors really pop & last all day)
Put the Light Pink underneath the brow (to highlight that part of the eye) with a eyeshadow brush.
But this gold in the inner 1/2 of the lid & the inner 1/3 of the lower lid
Add this pink to the outer half of the lid & blend it with the gold we added first.
Put the Fiji Matte Bronzer shade (a matte medium brown) into the crease with a blending brush using wind wiper motions. Then add this light purple shade in the crease with a crease brush.
Mix the dark brown and black and darken up the crease just a little.
Then use this cranberry shade to darken up crease & make a side ways V on the outer part of the lid and lower lid (make sure to blend)
Then Make a winged line with the black from the palette. And add this light shimmery shade to the tear duct area (this will brighten your eyes up)
That’s it you can add liquid liner to make the winged line more intense or just add mascara and be done with it. I personally did add a nude color eyeliner in the water line & a black in the tight line.
Hello my Bondbeautys, This month Mr. Bond and I celebrated our 3 year anniversary! I am so happy and lucky to have such a wonderful husband. In honor of this exciting time I filmed the “getting ready” portion before we went out for dinner and I am sharing it with you now! I am going to show you how I did my makeup for my Anniversary. He worked most the day so we just went to dinner at Cheesecake Factory which is one of my favorite places to eat! I had such a good time with him , specially since we were kid free for a while! So lets talk about face makeup..
You can go from bare skin to Date Ready quickly with this real romantic makeup look!
Maybelline Infallible Foundation (Sun Beige) http://go.magik.ly/r/BondBeautyful/8d04/
Maybelline Baby Skin Primer http://go.magik.ly/r/BondBeautyful/8d03/
LA Colors Lipgloss & Lipstick Duo Sensual (Dollar Tree)
Now the eyes I wanted to do a romantic type of eye look so I went with the Revealed 2 Palette . I like this palette because the shades are very similar to the Naked 3 Palette except it is more affordable. I also think that these shadows have great pigmentation.
E.L.F. Smudge Pot Aint That Sweet http://go.magik.ly/r/BondBeautyful/1364/
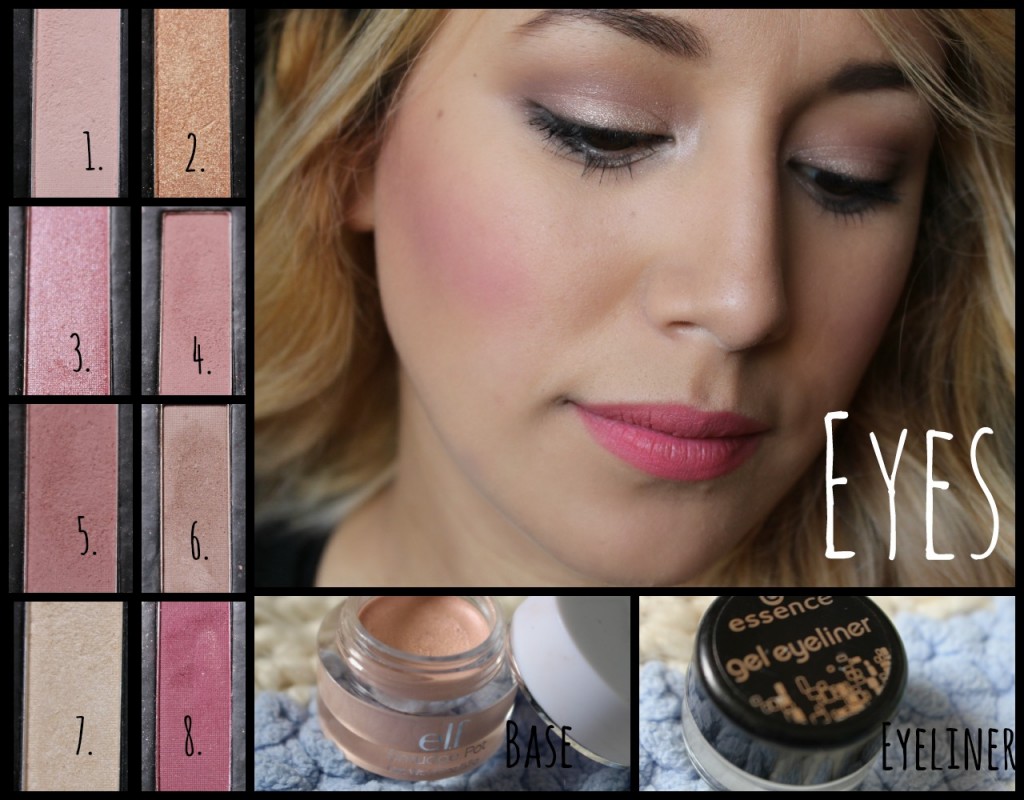
1. Put the smudge pot on as a base. Aint that sweet smudge pot by ELF
2. Put the light pink under the brows for a highlight (#1)
3. Put this peachy gold on the outer 2/3 of the lid (#2)
4. Use your bronzer and add with a blending brush to the crease.
5. Add this pinky shade to blend out the line between the peach and smudge pot. (#3)
6. Add this purple light matte shade into the crease and outer part of the lid.(#4)
7. Mix the #5 & #6 which are both matte and deepen up the out part of the lid & crease. Then make sure to blend the crease with a big fluffy brush.
8. Add the #4 light purple to the lower lid & you can mix it with this beautiful cranberry shade aswell. (#8)
9. Last add the #7 which is a shimmer light shade to the inner corners to brighten up the look.
Then you are all done just add liner & Mascara!
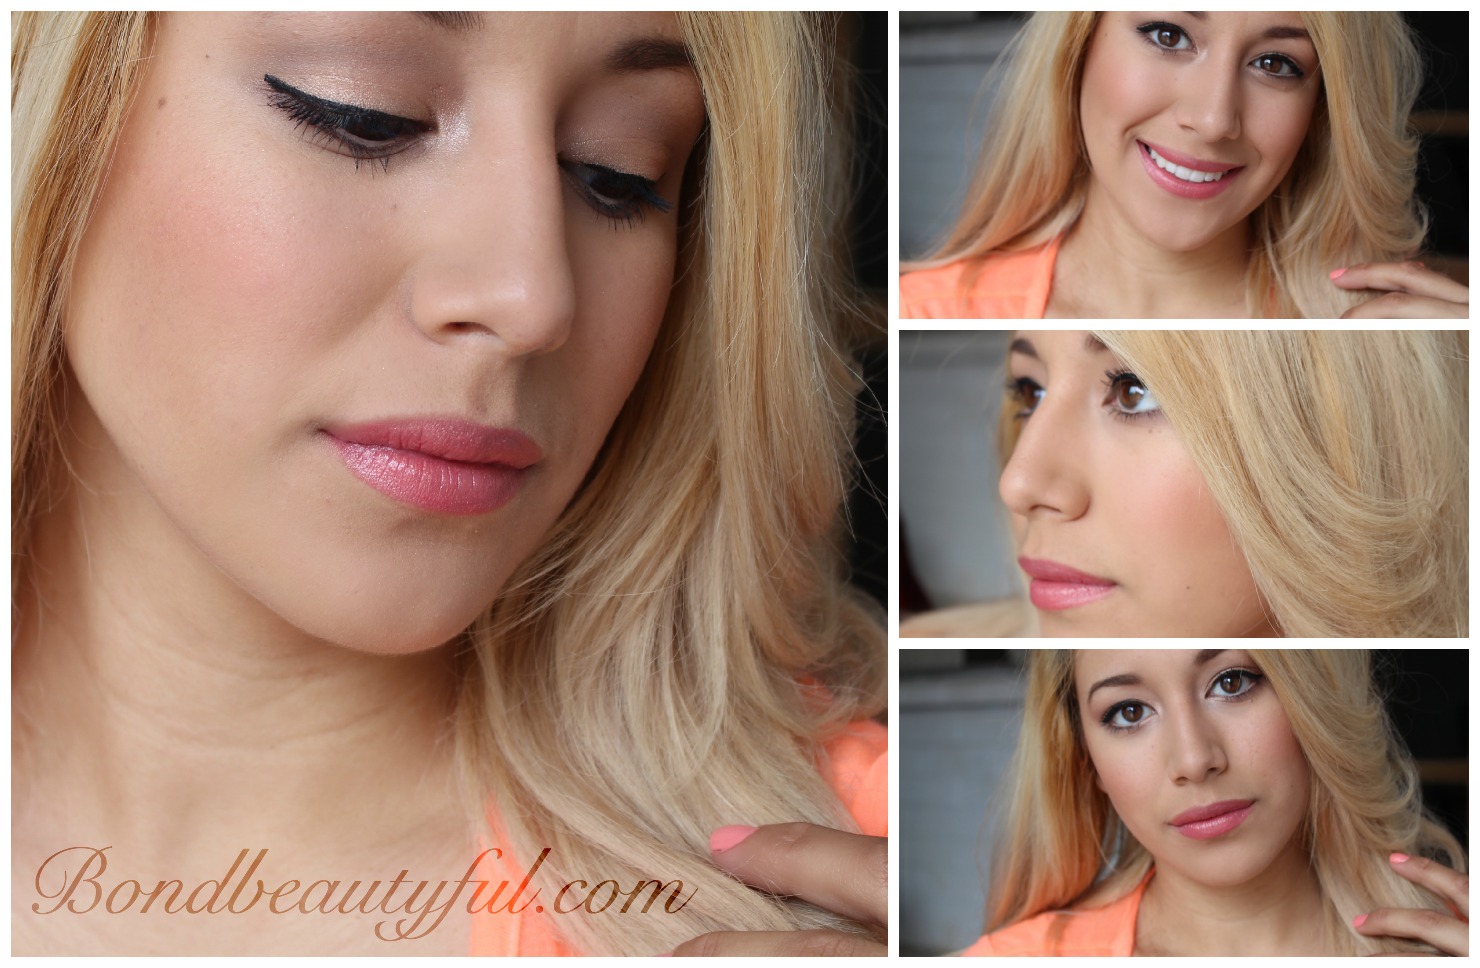
This look is perfect for an occasion like this because it is romantic, day or night appropriate and it is made to last all day long. Here are some fun pictures of us on our way out the door..
So today I am starting a new series where I show you my monthly favorite makeup look , in a tutorial form, every month to go along with my monthly favorite products video. Im super excited because I get to show you how I create my look using my favorite products.
By the way I’m so excited because we finished knocking down our house wall and we have the beam up. It looks so awesome I am so excited that the hard stuff is over. Soon we are going to paint and add flooring !
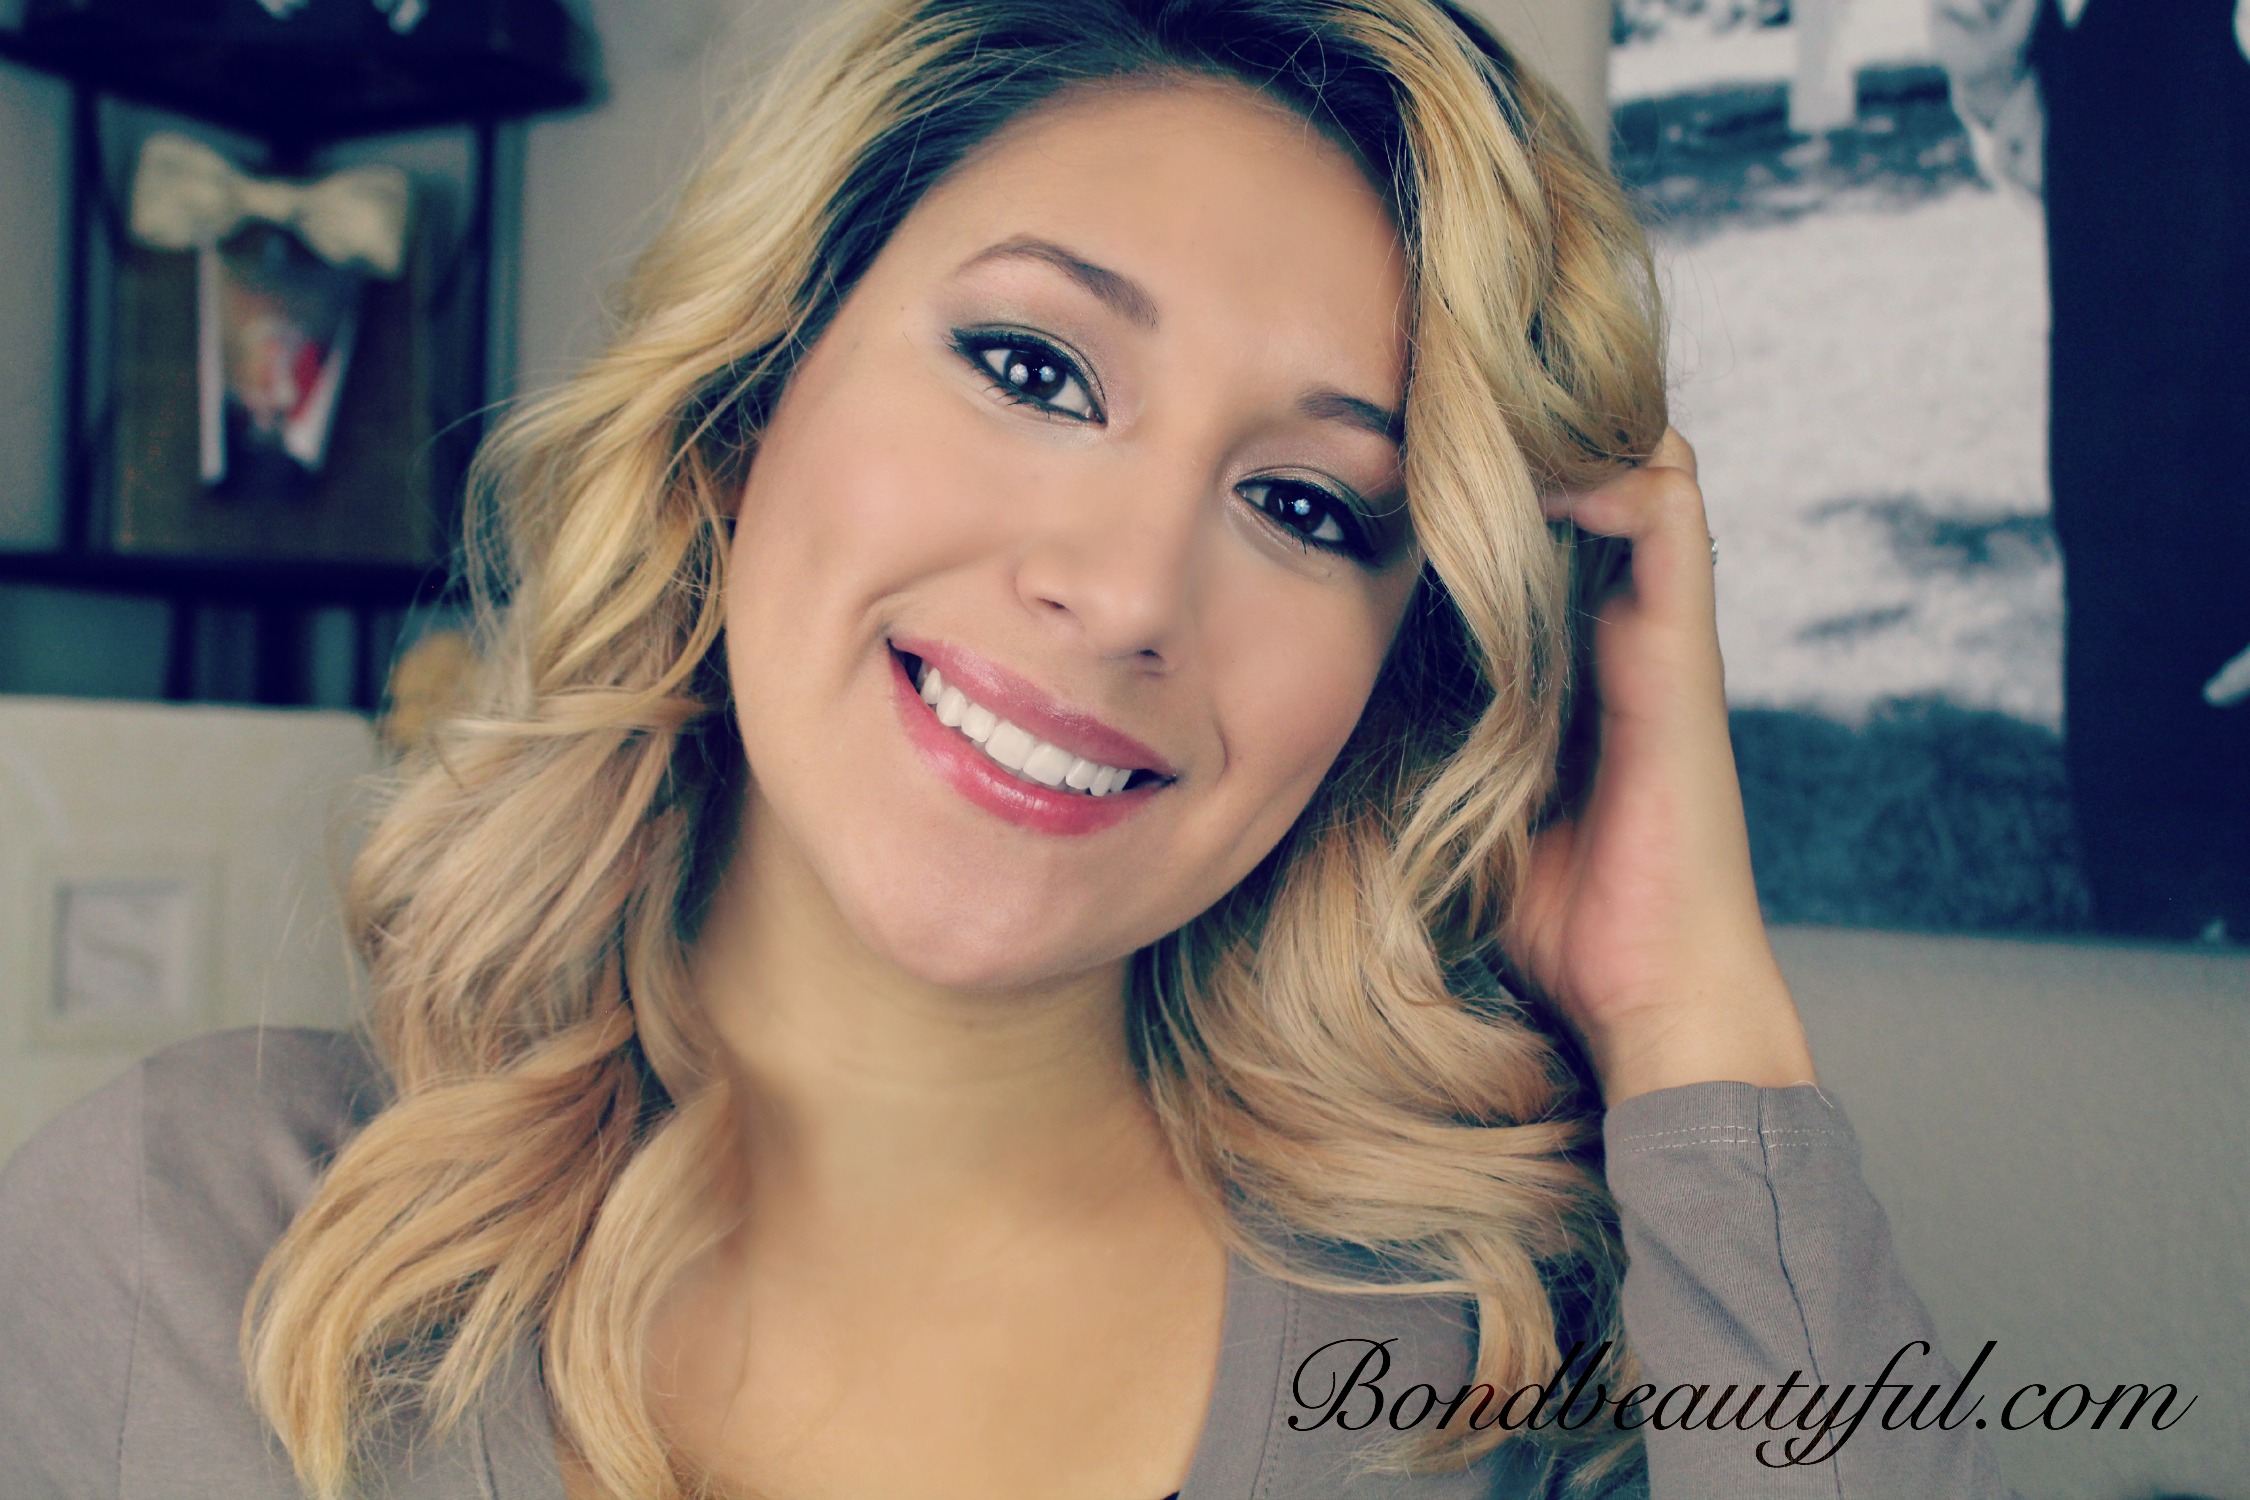
Todays look is a super easy summer/spring appropriate every day makeup look. I love how the coral blush & gold tones in my eye makeup just go together so perfect. I feel like this makeup looks so fresh , clean and beautiful.
I did use the Divergent Collectors kit Erudite & Abnegation Palettes. You do not have to use these ones I showed you close ups of the eye shadows so you can find eye shadows that are similar! But for those of you who do have the collectors kit already I thought it would be neat to use it! The Hard Candy Natural Eyes palette has very Similar shades.
For the rest of my face I kept it pretty natural and fresh. I love using my real techniques sponge because it applies my foundation flawlessly. A trick I like to do is contour my cheek bones. This makes me look a lot thinner which I need ( Specially since I just had a baby). I have been loving the Bh Cosmetics Sculpting kit Contour Brush. Ill put links to where you can find everything I used today if you are interested.
Divergent Palettes- ( I saw one on ebay but it is super expensive) Find eyeshadows similar! Hard Candy Natural Eyes Palette is very Similar- http://a.chipp.us/r/BondBeautyful/6d94/
Milani baked Blush: Rose D’Oro – http://a.chipp.us/r/BondBeautyful/82b2/
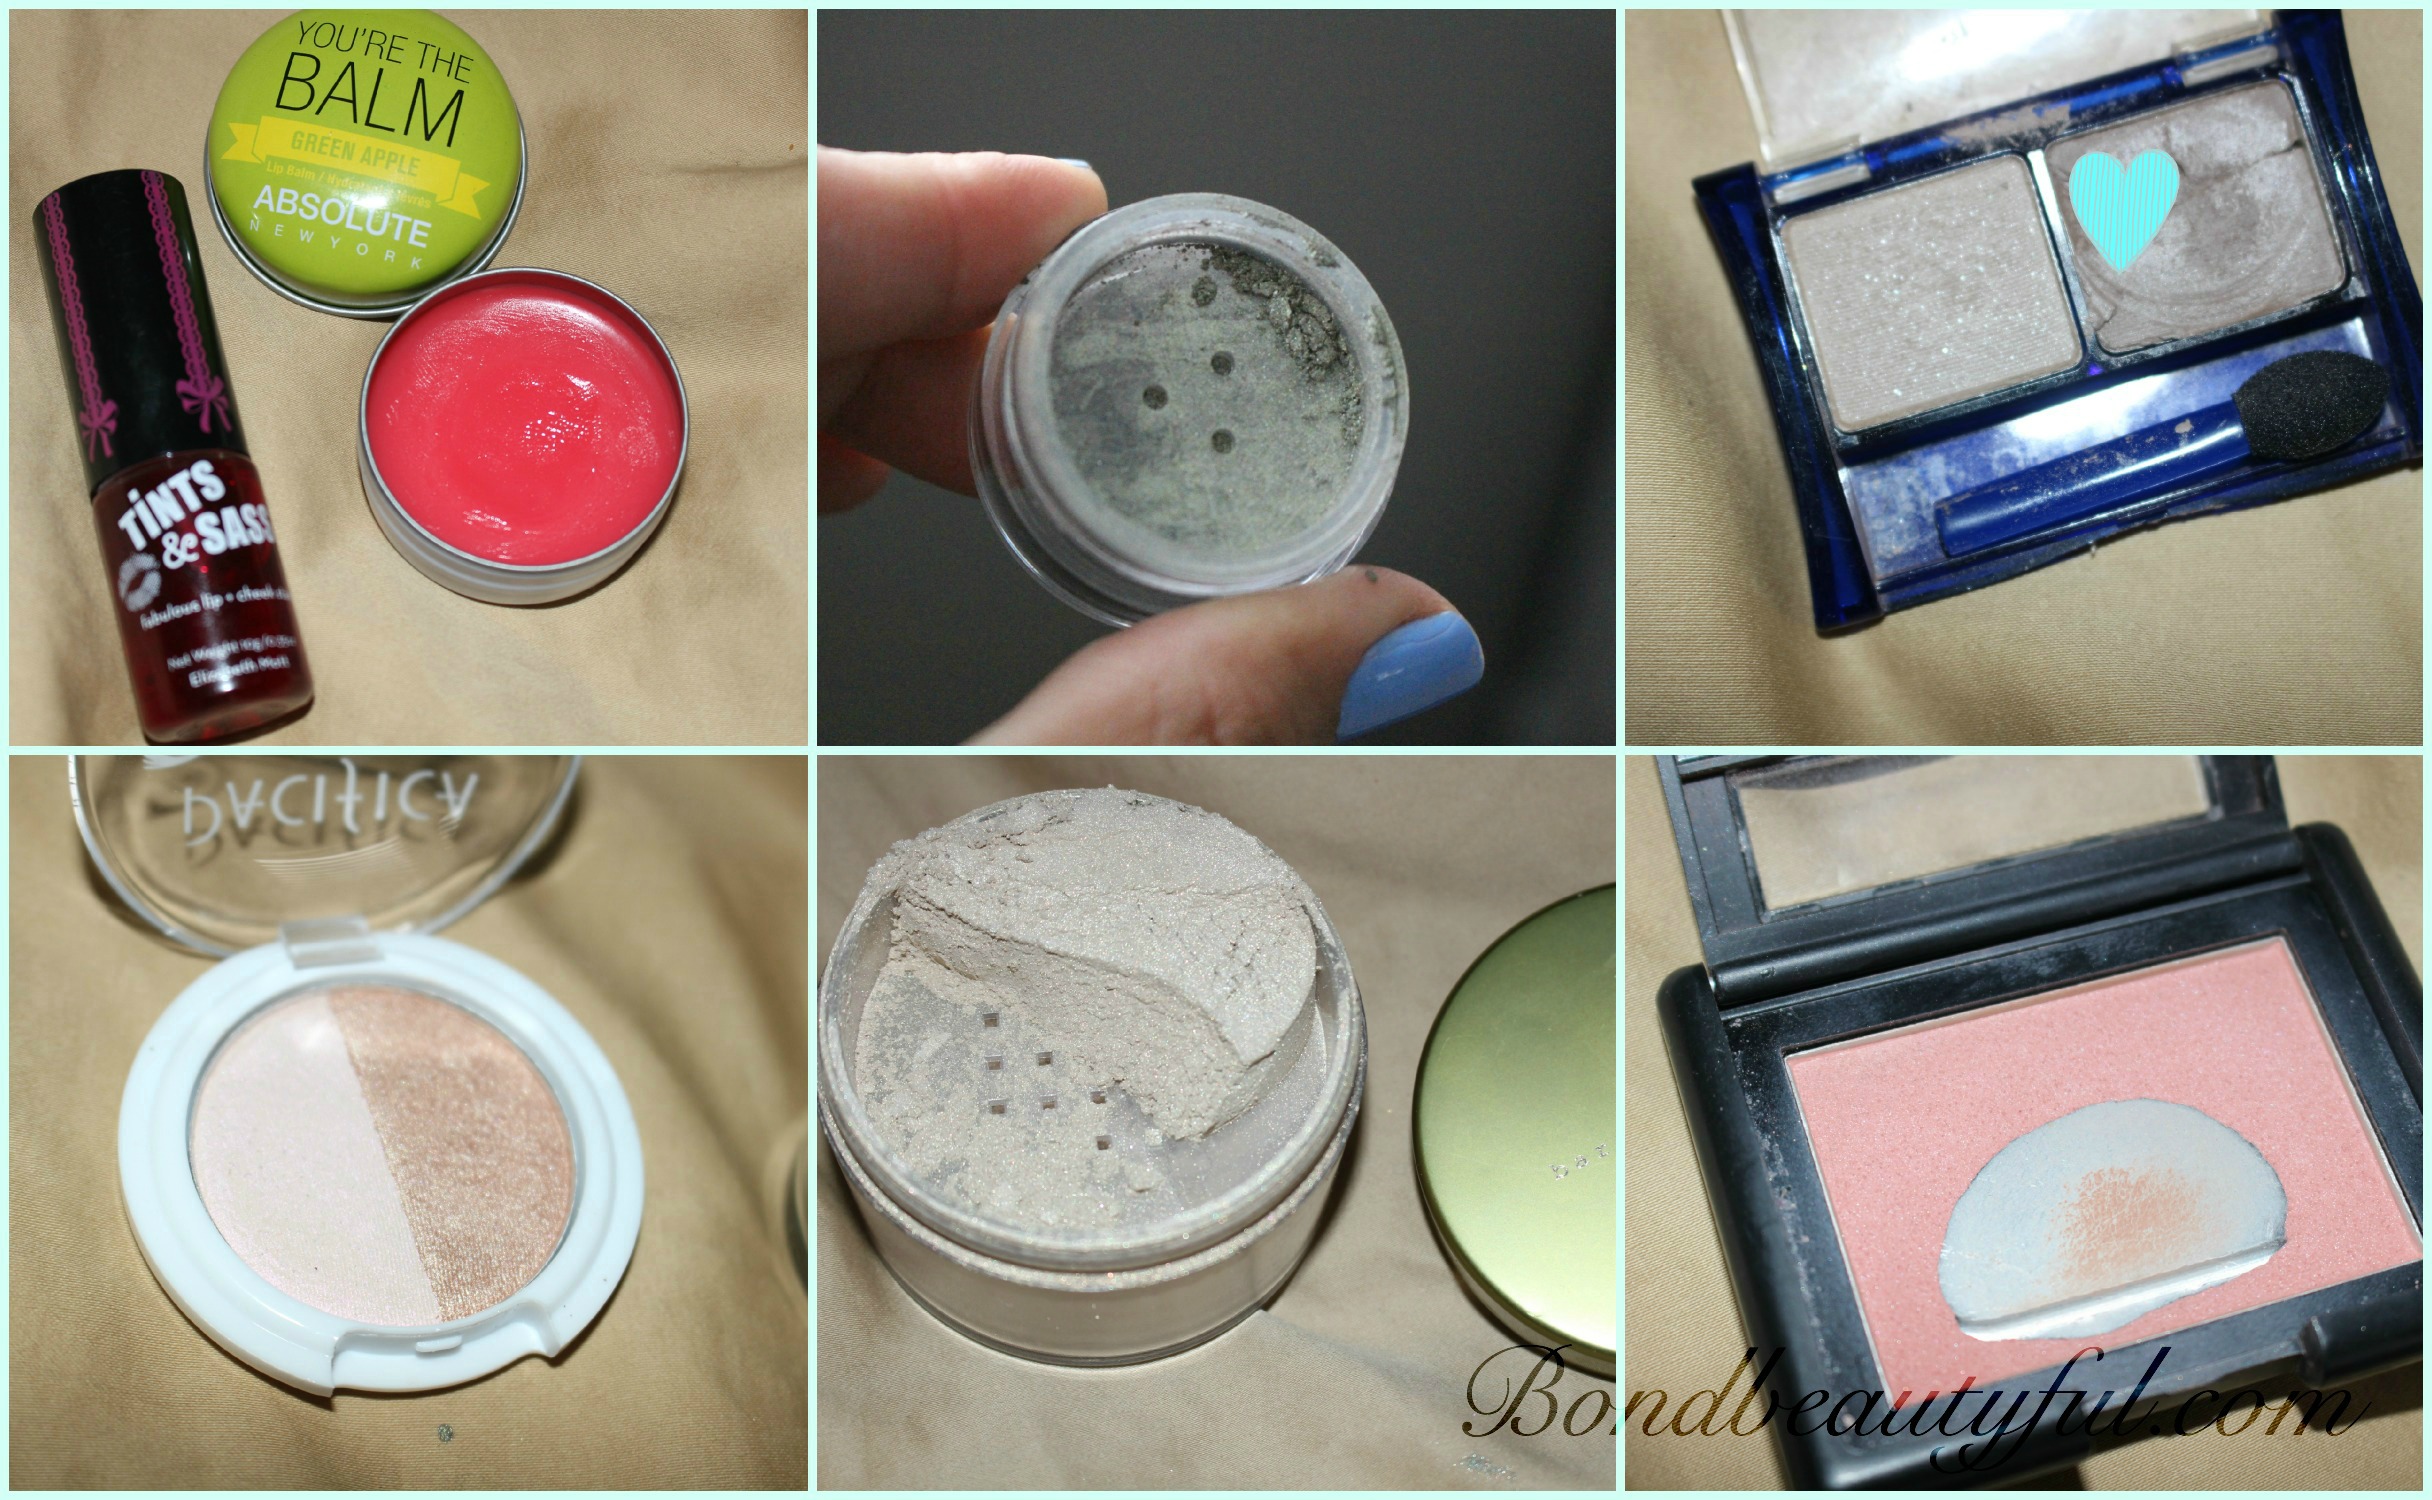
Its early , I’m up and the kids are cozy in their beds still. Perfect time to share this makeup look with you beauties. I was recently looking through my makeup and realized that their is a lot of IPSY products that I have not tried yet! What!! I know pretty crazy, so I took everything out that I have not tried yet & made this beautiful makeup look with it. I also did a easy video tutorial to go along with this post for all you visual learners!
So the star of the show today is the Olive Green pigment , it is gorgeous! As soon as I saw it I new I had to make a look around this color! You don’t usually see wearable olive green eye makeup, but I think that this look turned out pretty darn wearable!
They Key to making a intense eye look wearable is making your face makeup & Lips look as natural as possible. So here are the products I used & the steps to create this look. Again If you are more visual then check the tutorial!
Step #1 : Prep
It is so important to prep your skin for makeup! Taking care of your skin is so important because it keeps your skin look smooth & less aged. Nobody wants to look 40 at 25!
1. Moisturizer first
2. Face Primer second
3. Exfoliate those beautiful lips too!
Step #2 : Makeup
Its time to apply some makeup & create a beautiful unique olive eye look. (which makes all eye colors look gorgeous especially brown or honey eyes!)
Eyes:
1. Apply a warm brown eyeshadow pencil to the lid & crease, then use your finger to blend it out. (this will be your base.. Do the eyes first so if you have any fall out it won’t mess up your face makeup.)
2. Then use a Midtone Cool brown (Blue heart) to apply into the crease & blend it out real well. (this is going to act as our transition color which will help blend the olive out better)
*the key in this eye look is blending really well so take your time doing this with a fluffy CLEAN blending brush!
3. Apply the olive green with a eyeshadow brush onto the out half of the lid & toward the crease. I used this pigment dry so instead of swiping with the brush just pat the color onto the lid; slowly building up the color.( don’t worry about fall out thats why we didn’t do our face makeup first!) Then blend the green and the crease color together using a Clean blending brush.
4. Apply the light pink in the duo underneath the brow to highlight & in the inner most corner of the eye.
5. Apply the Gold in the duo in the inner half of the lid and with the eyeshadow brush you are using carefully blend the olive green and gold together to make a smooth transition.
Face: (im skipping to the face next but I will be back to finish the eyes later!)
1. Apply your concealer & foundation
2. apply a brightenng concealer in an inverted triangle shape under the eyes to brighten , then powder your face
3. apply a bronzer to the hallows of your cheeks for a subtle contour
4. use a light natural pink blush
5. highlight your cheek bones for a beautiful glow
6. apply a lip stain to your lips (this is what gives your look such a natural effect the stain looks natural!) also apply the stain to the apples of your cheeks to add a naturally flushed appearance.
Eyes: (go back to the eyes to finish )
1. apply the eyeshadow pencil to lower lash line & blend with finger.
2. apply the mid toned brown to the lower lid & add the gold shadow to the inner ⅓ of lower lid
3. apply a black eyeliner to the tight line & a green eyeliner to the waterline
4. apply a liquid liner to the upper lashes making a cat eye winged liner.
5. apply mascara & false lashes if needed!
Thats it , I know it seems like a lot of steps because I really broke everything down so that I could be more detailed. This really is a fast look to accomplish and anyone can do this look! I hope you will try it out & use the hashtag #bondbeautyfullooks so that I can see too!
I hope you guys like seeing video tutorials & step by step instructions, if you do I will definitely do more!
What kind of looks are you personally interested in? Wedding, everyday, under 5 min, colorful, neutral .. let me know so that I can do more!!!!!! Your opinion matters so give it to me!!:D
Don’t forget Beauty Comes from within so let yours shine!
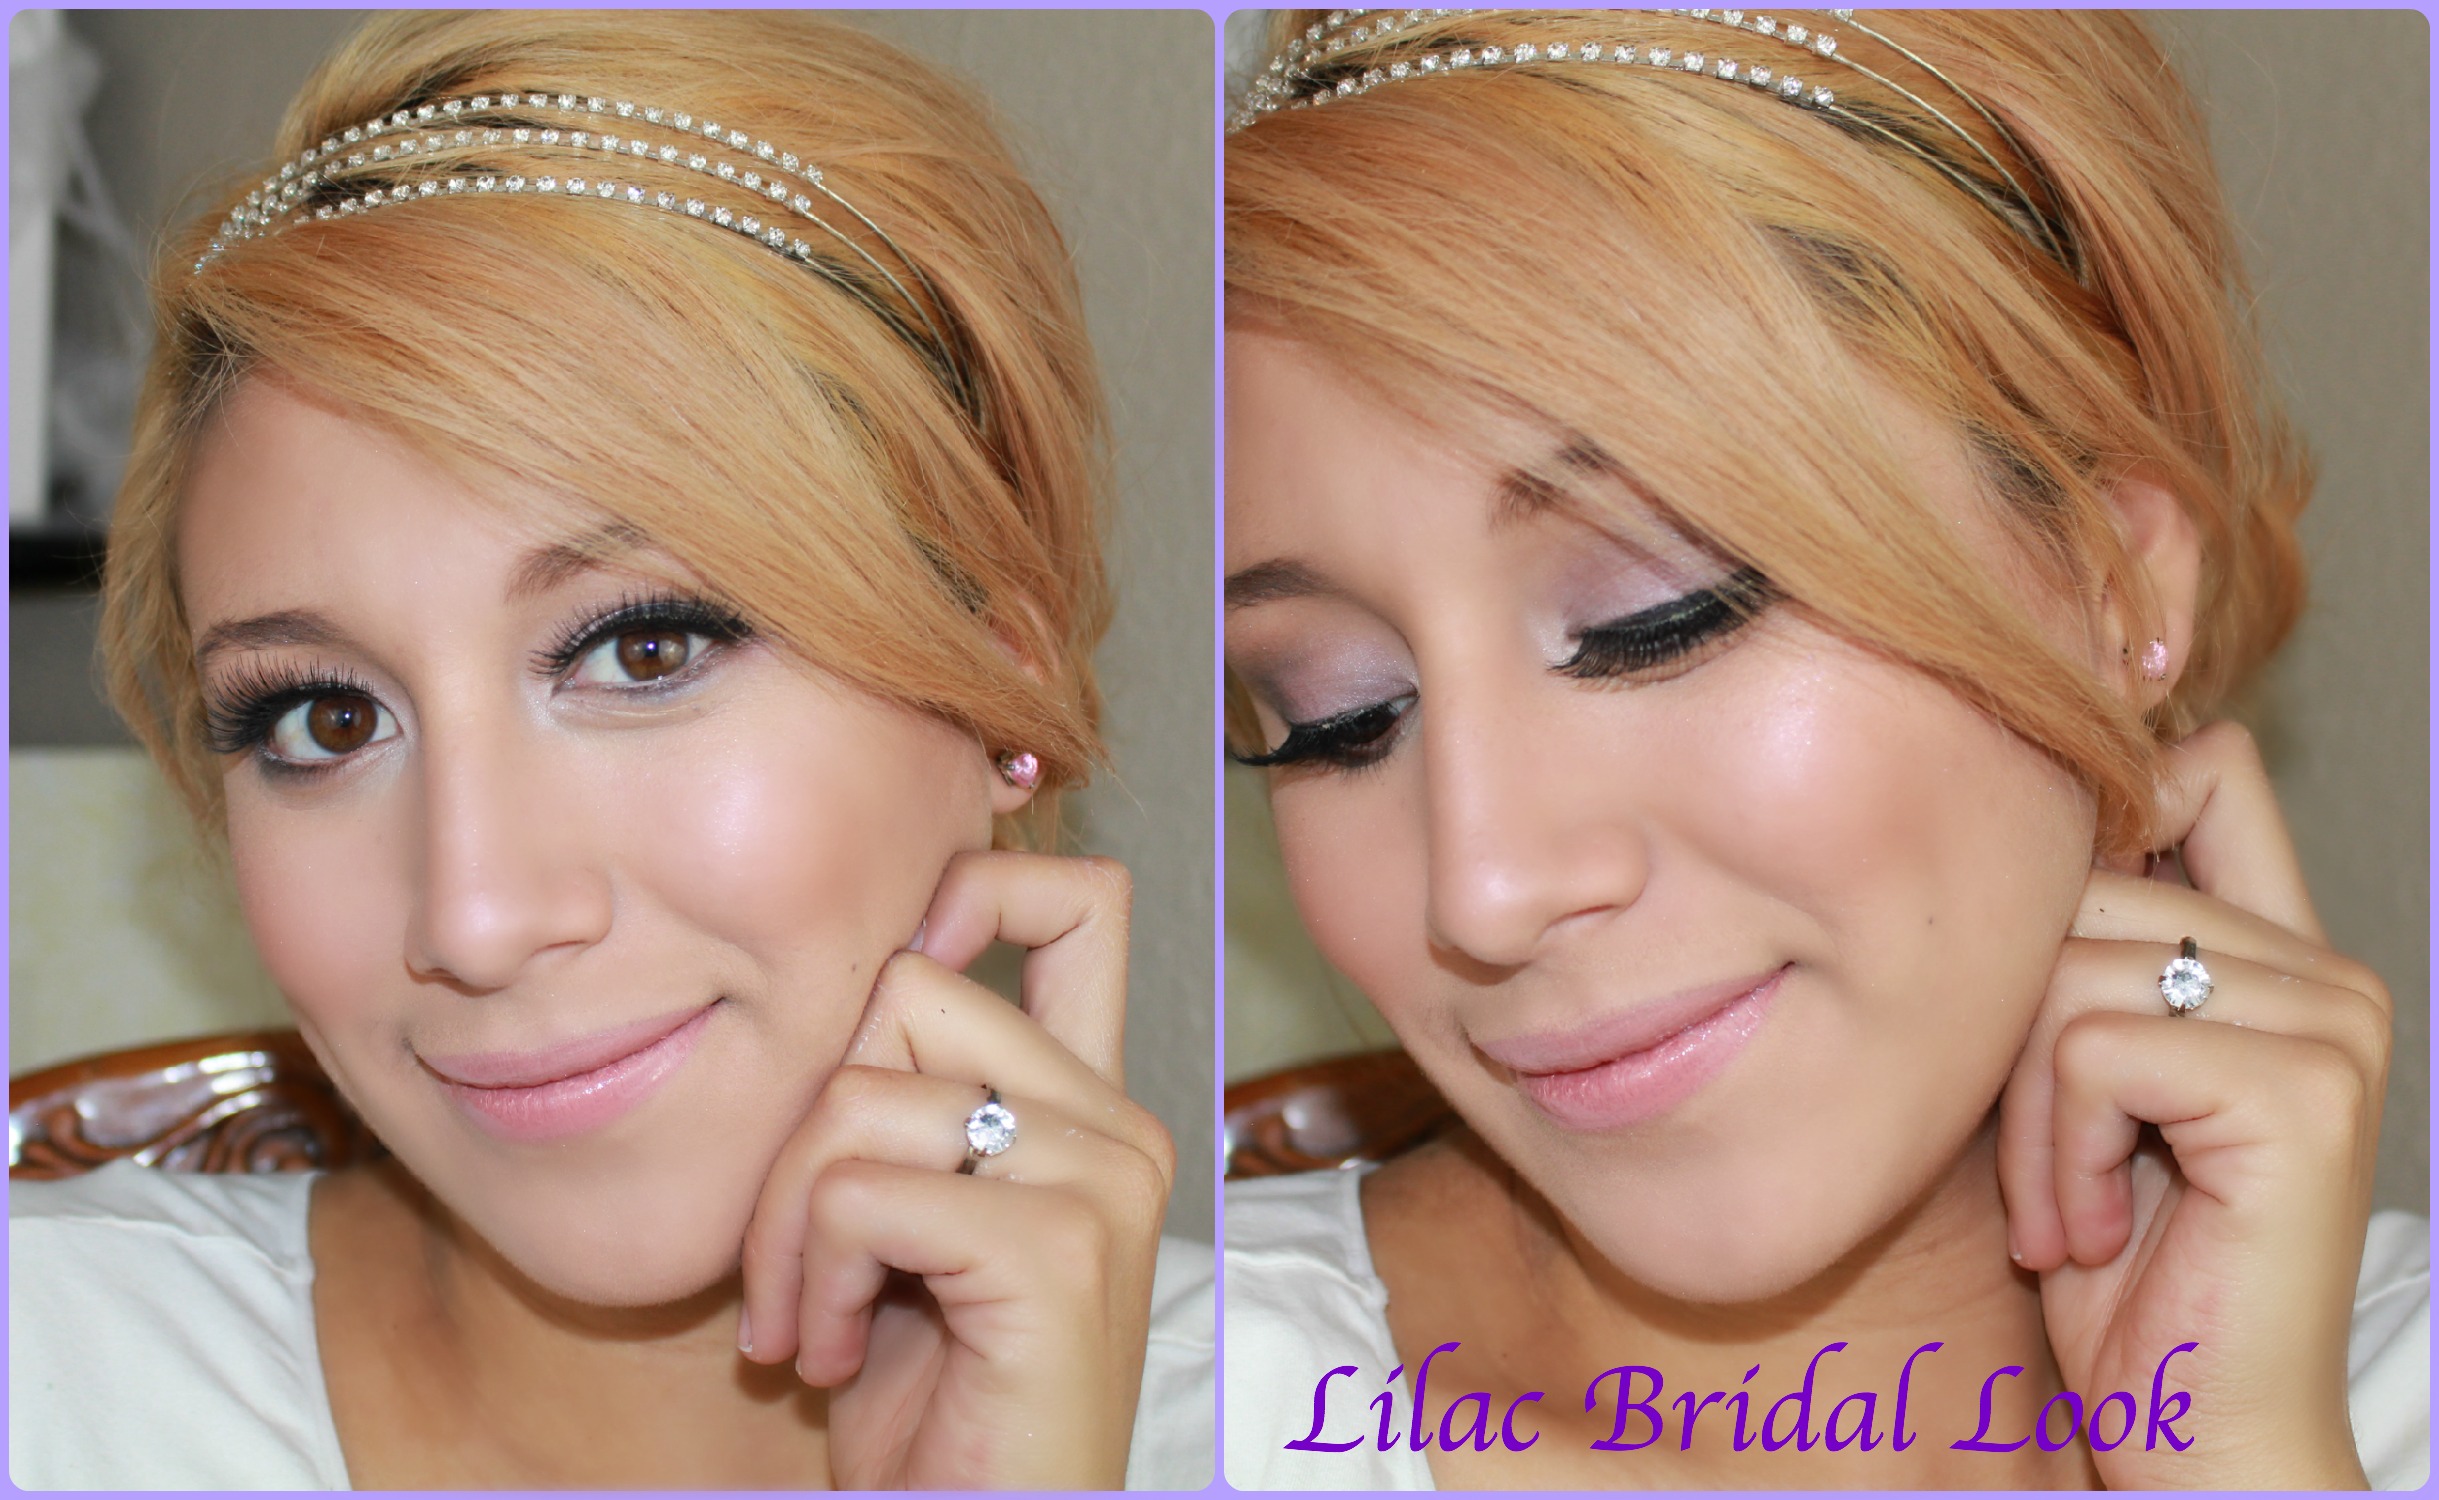
I am so excited to share this Bridal Makeup Look with you guys ! For this look I paired up with Lover.ly , which is a online one stop shop for brides. I was really surprised when I visited their website, it really is a one stop shop! I wish this was around when I got married it would have made wedding planning a whole lot easier!
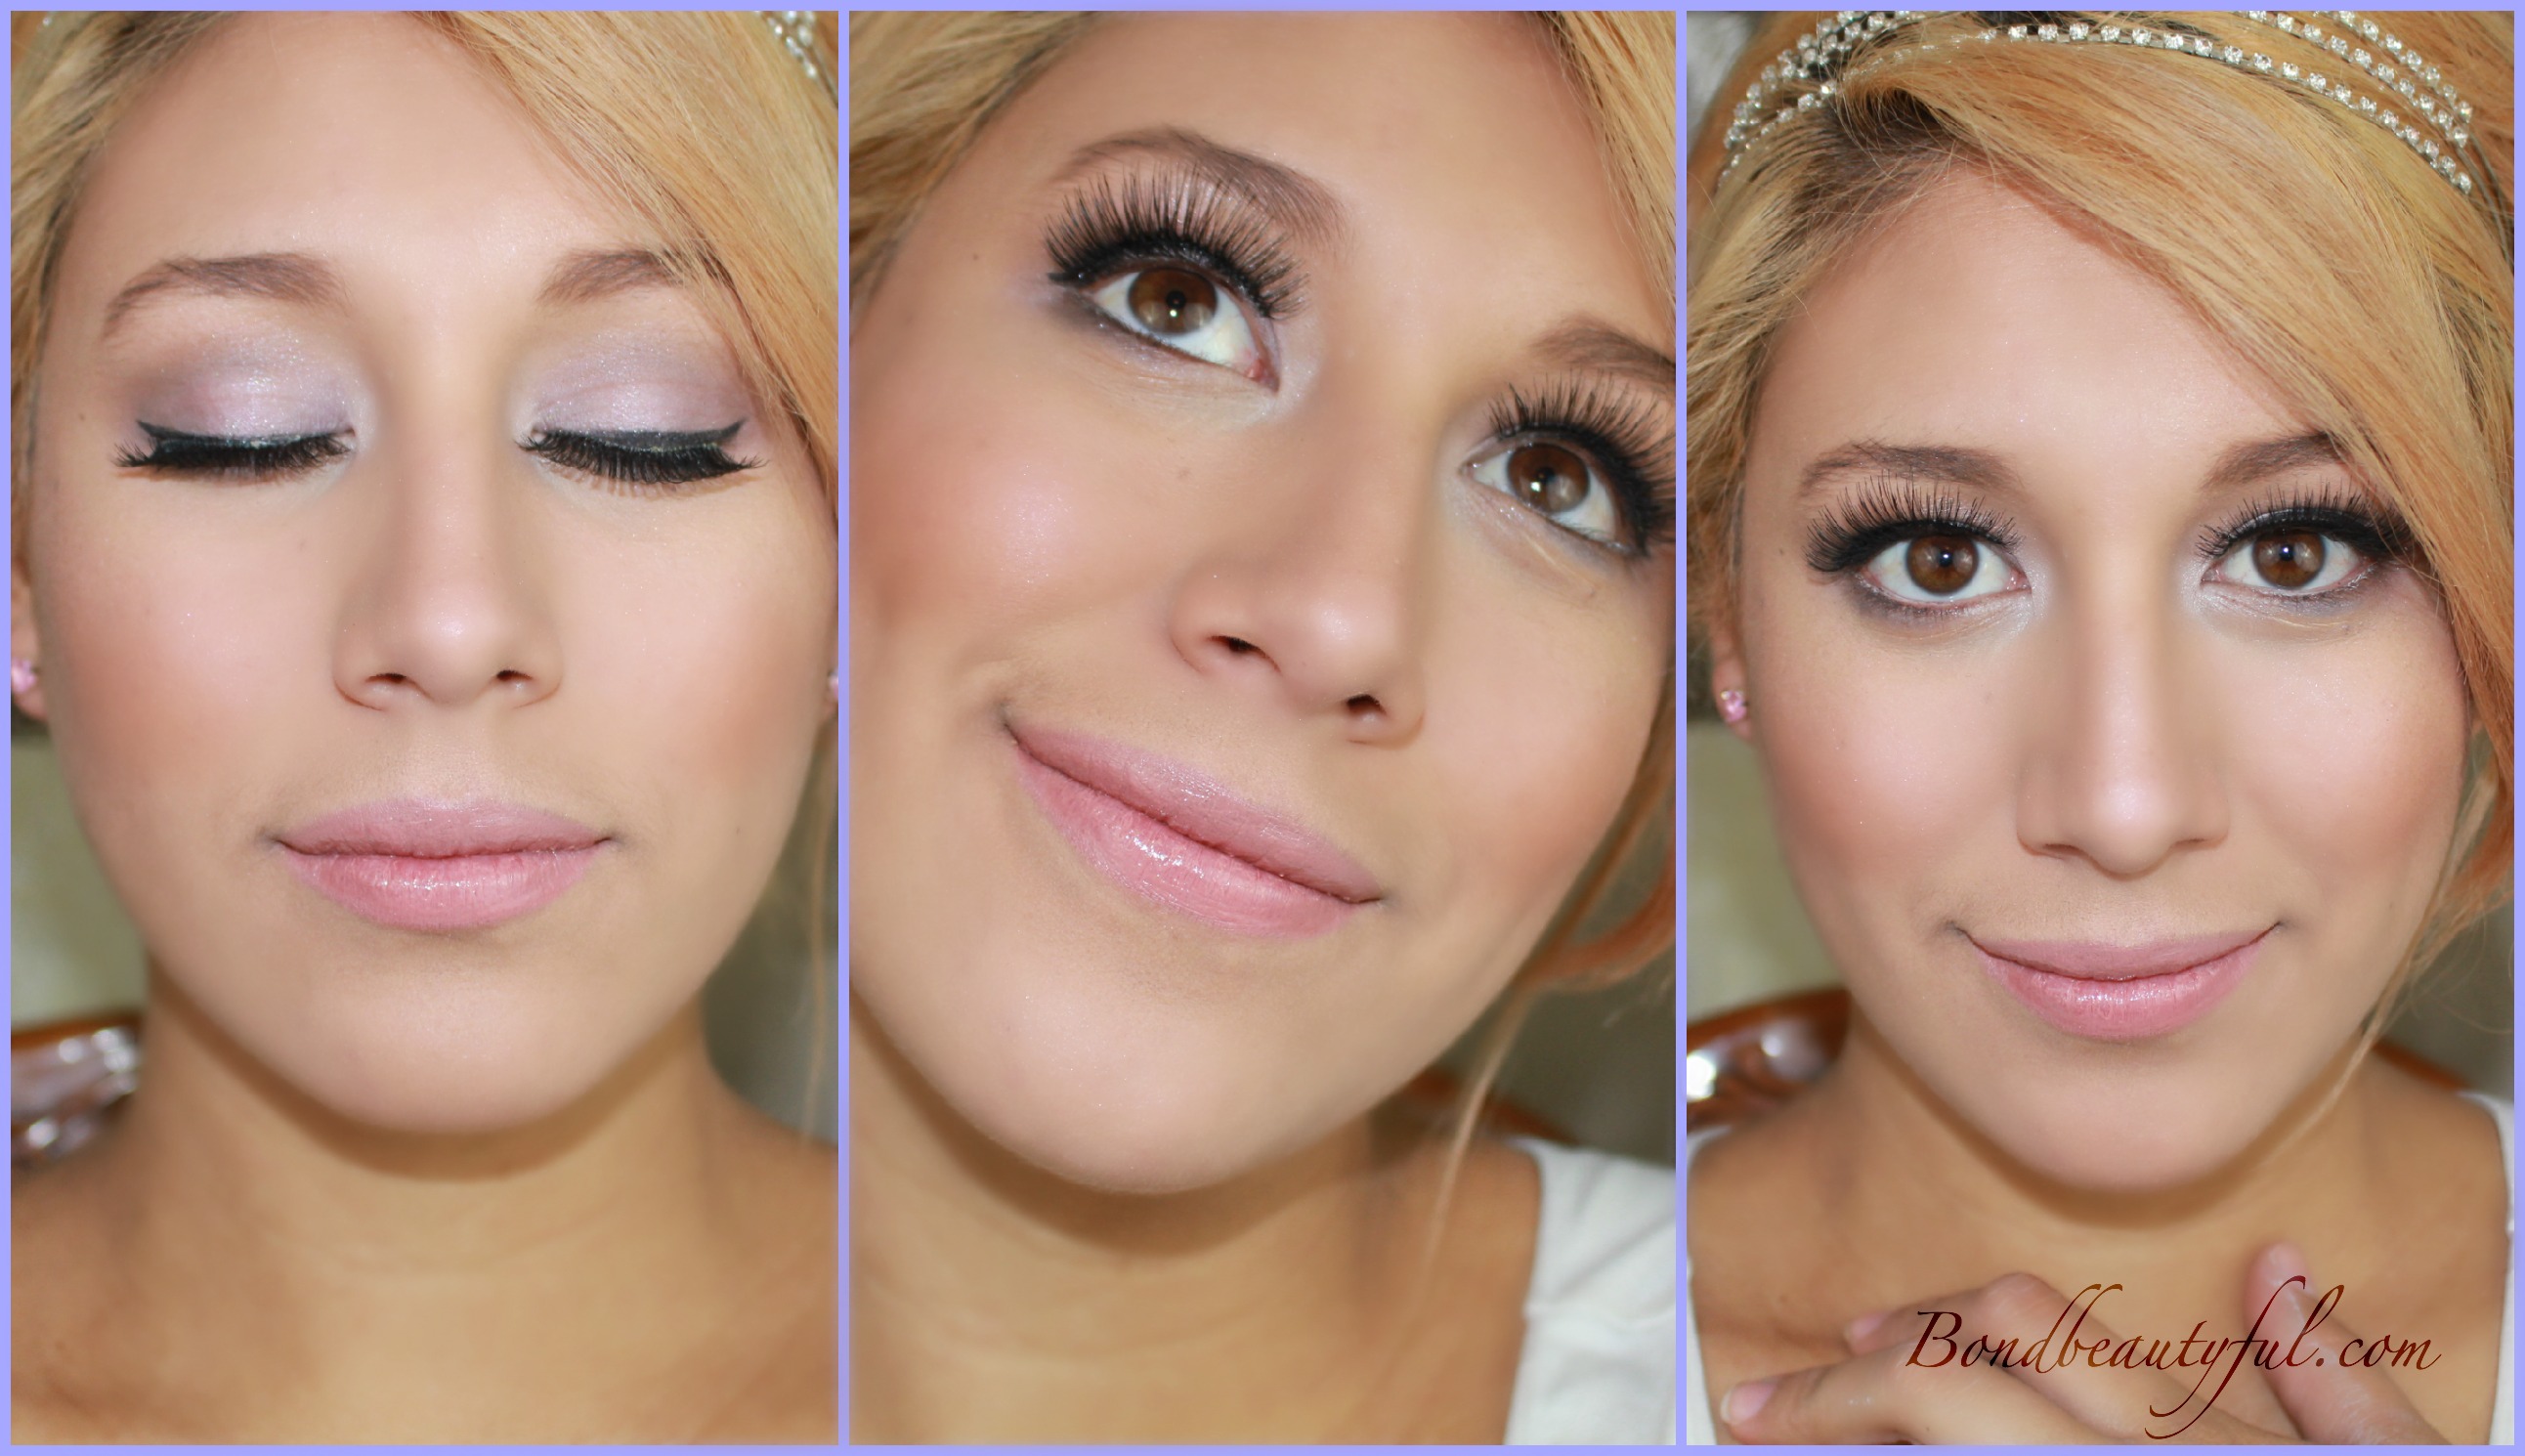
They sent me pictures of three different dresses and I immediately got inspired by the beautiful strapless dress with purple detailing at the bottom. The first thing I noticed on this dress was the beautiful ombre fabric on the dress. It turned this dress into a non- traditional wedding dress. This gave me lots of leg room for what type of makeup to do. Usually bridal makeup is more neutral and natural; but for this look I wanted to add a modern twist by having lilac eye makeup instead of the usually browns. It added flavor and a modern twist to this bridal look without making it look informal. The sweetheart neckline gave me even more of a reason to use a such a feminine color on the eyelid.
This Lilac Bridal Look that I have created for you will compliment this dress perfectly. The Lilac eye makeup really ties the makeup and the gown together nicely. I wanted this look to be fun and flirty but still elegant. I wanted you to notice the makeup but I didn’t want to take away from how stunning the dress looks. So enough of all the blabbing lets get started with how to accomplish this look. (List of the products used will be below).
First I applied a white cream eyeshadow base to the Eyelid area. (to help the lilac color show up more vibrantly.)
I then applied a cream matte shade to the brow bone for a subtle highlight. (because the dress is so eye catching I didn’t want to distract with shimmery makeup!)
Then I applied a matte Lilac Shade to the Eyelid. (Using patting motions for the most color payoff).
Next I applied a Light Cranberry Shimmery Shade on the outer half of the lid. (Blend the two shades together)
Apply a Medium Brown shade to the crease with a crease brush.
To deepen the crease I used a Matte Grey shade in the crease and lightly to the outer third of the lid. Then make sure to blend with a fluffy blending brush.
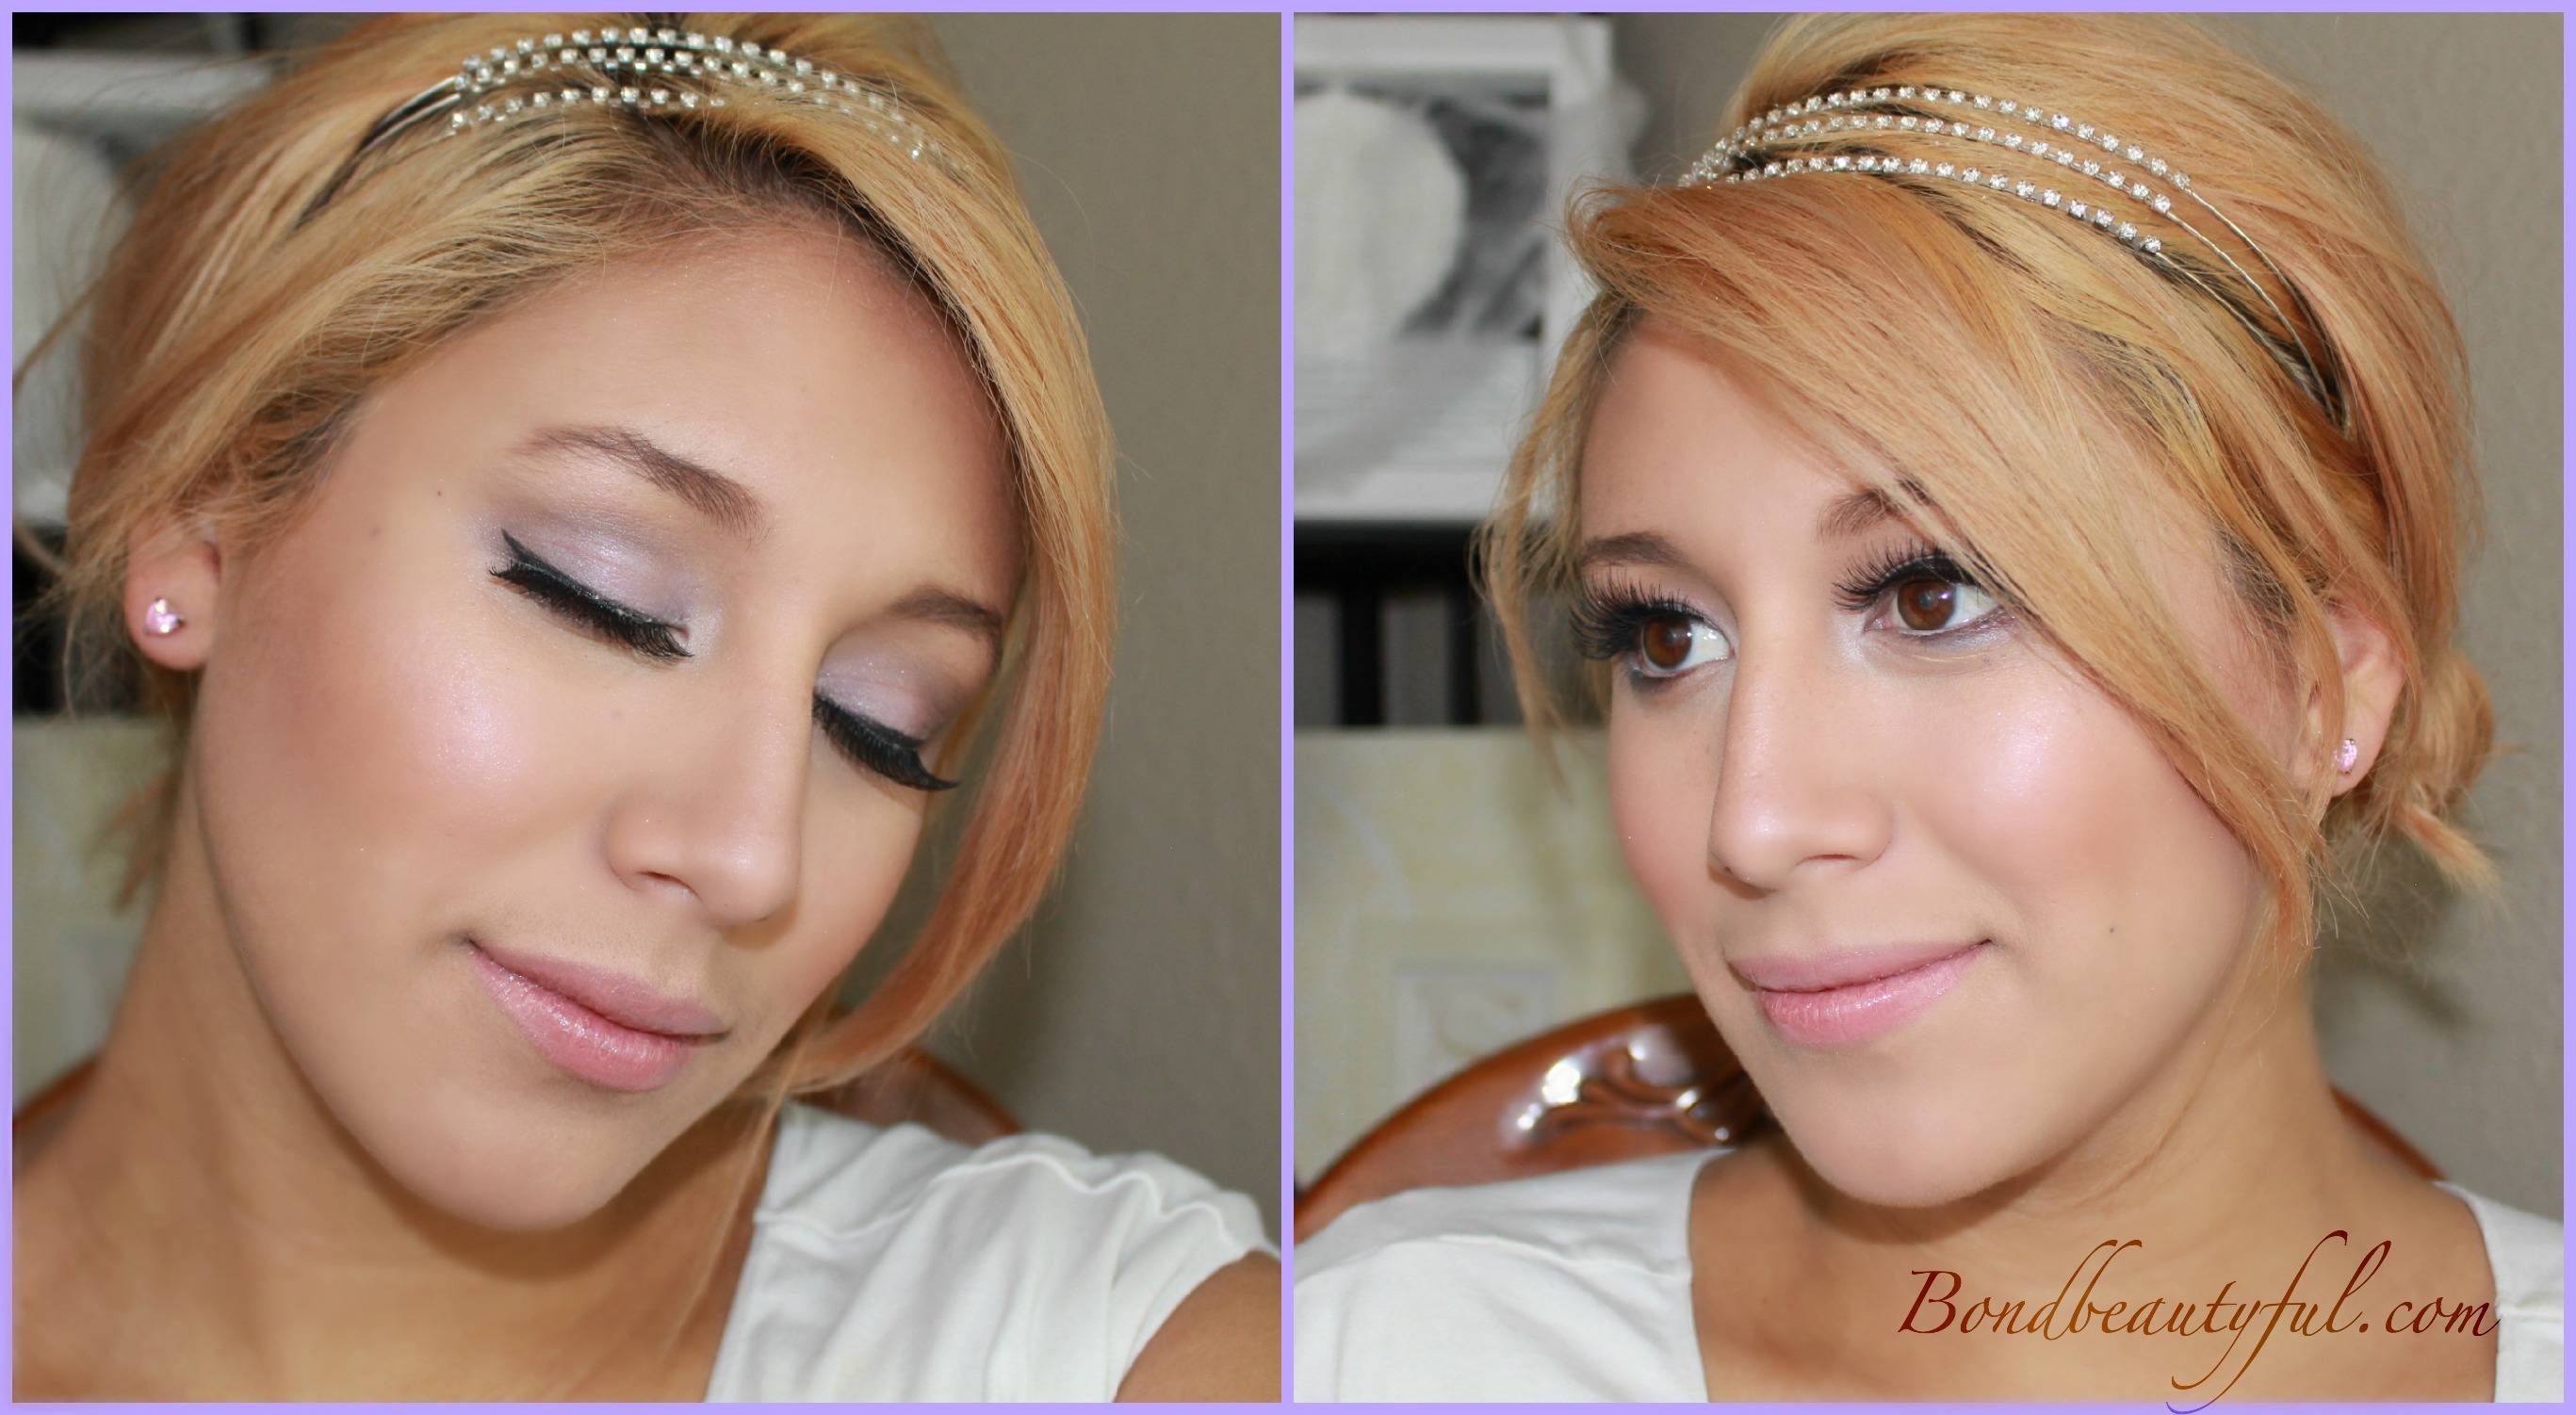
I Also added that same Grey in the lower lid. I also added a pearly white shade to the inner corner of the lid. (doing this opens your eyes more and it looks stunning in pictures)
Next is winged liner. I also added a dark eyeliner to the tight line and in between the upper lashes to add volume. Then in the waterline I added a white eyeliner pencil to open up the eyes even more!
No Bridal look is done without adding lashes! (Lashes really show up beautifully in pictures so even if you are not a lashes girl I would highly recommend them for your wedding pictures).
Since the dress is a strapless dress it adds a sexy vibe to the bridal look ; so I wanted to incorporate that into my eye makeup with a winged eyeliner. Having your eye makeup done is only half of it, next is having flawless face makeup.
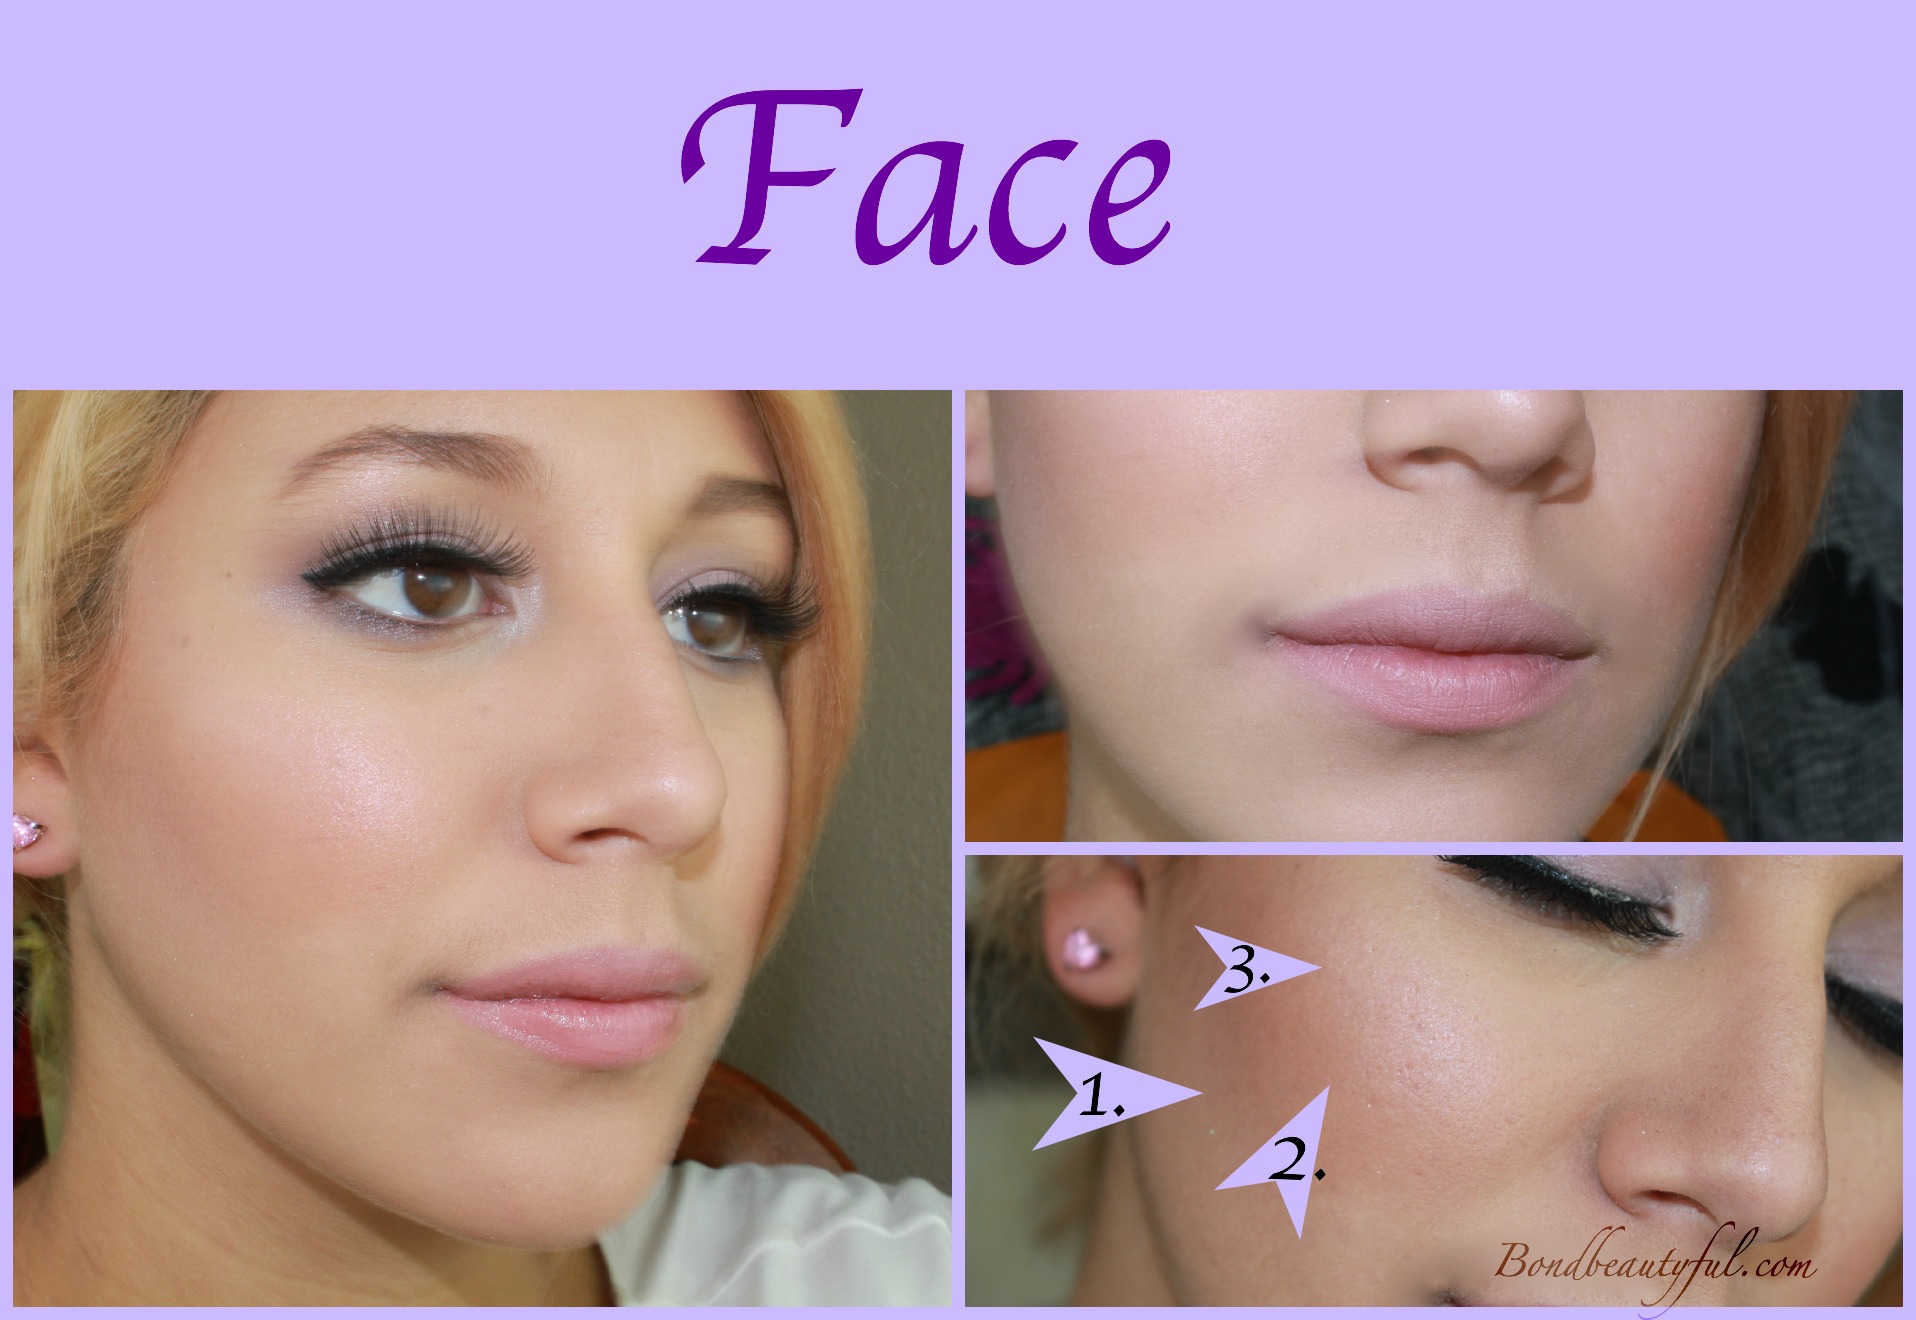
First I applied a Matte Bronzer underneath the cheek bone for a nice contour. (Even if you never contour or highlight your face doing so on your wedding will make such a difference in your pictures. Don’t you want that bridal glow?!)
Next I applied my blush, I chose a blush that is more of a natural Pink shade. (you don’t want to much purple or it won’t look natural and will take away from the dress.)
Last I applied a pink highlight shade to the tops of my cheek bones, nose & cupid bow.
For the Lips I decided to do more of a nude pink shade . I used a matte lipstick and then later added a lipgloss for that shiny finish. (Matte or Shiny is up to you, they both photograph beautifully).
This makeup look is so easy you can do it at home. If you are getting it done by a makeup artist make sure to do a trial run. I hope you guys like this look, if you do feel free to pin these pics on your Pinterest for later! Thank you so much for all your support and also thanks to Lover.ly for featuring me on their website! Make sure to check out their website!
Products I Used:
Face:
Covergirl Stay Fabulous Foundation
Rimmel Stay Matte Powder
Instant Age Rewind Neutralizing Concealer (Under the eyes inverted triangle shape)
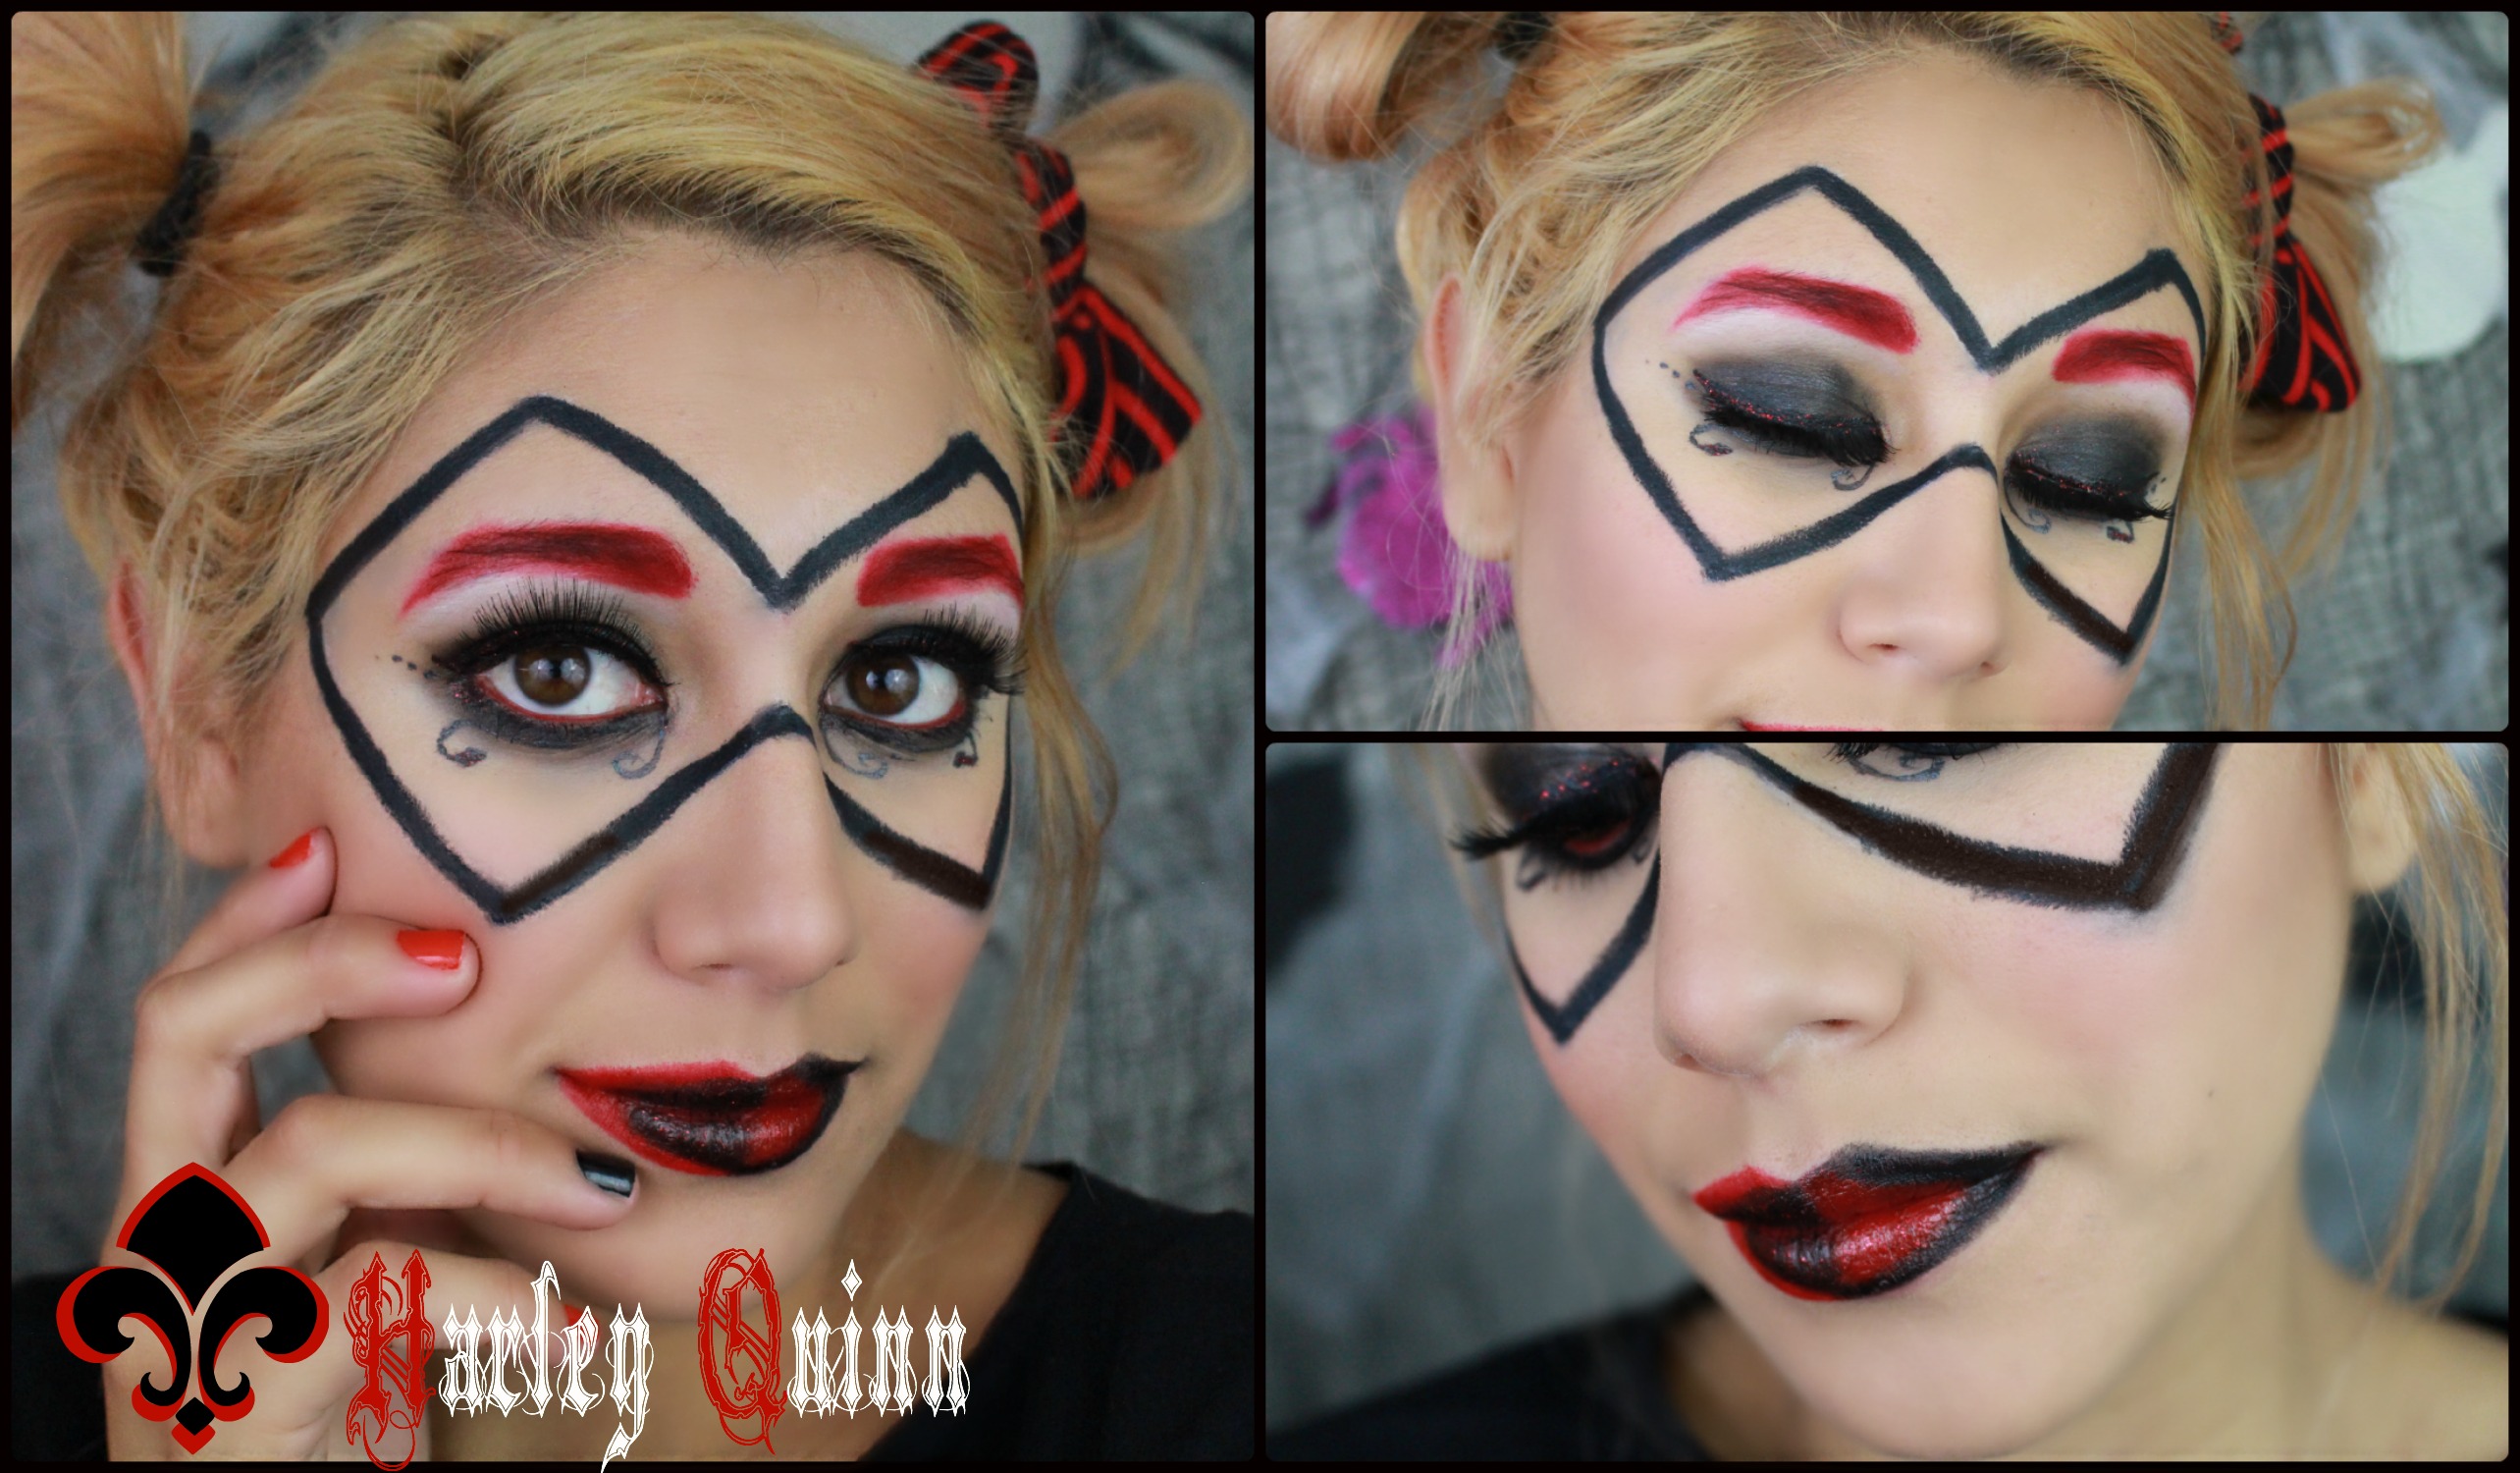
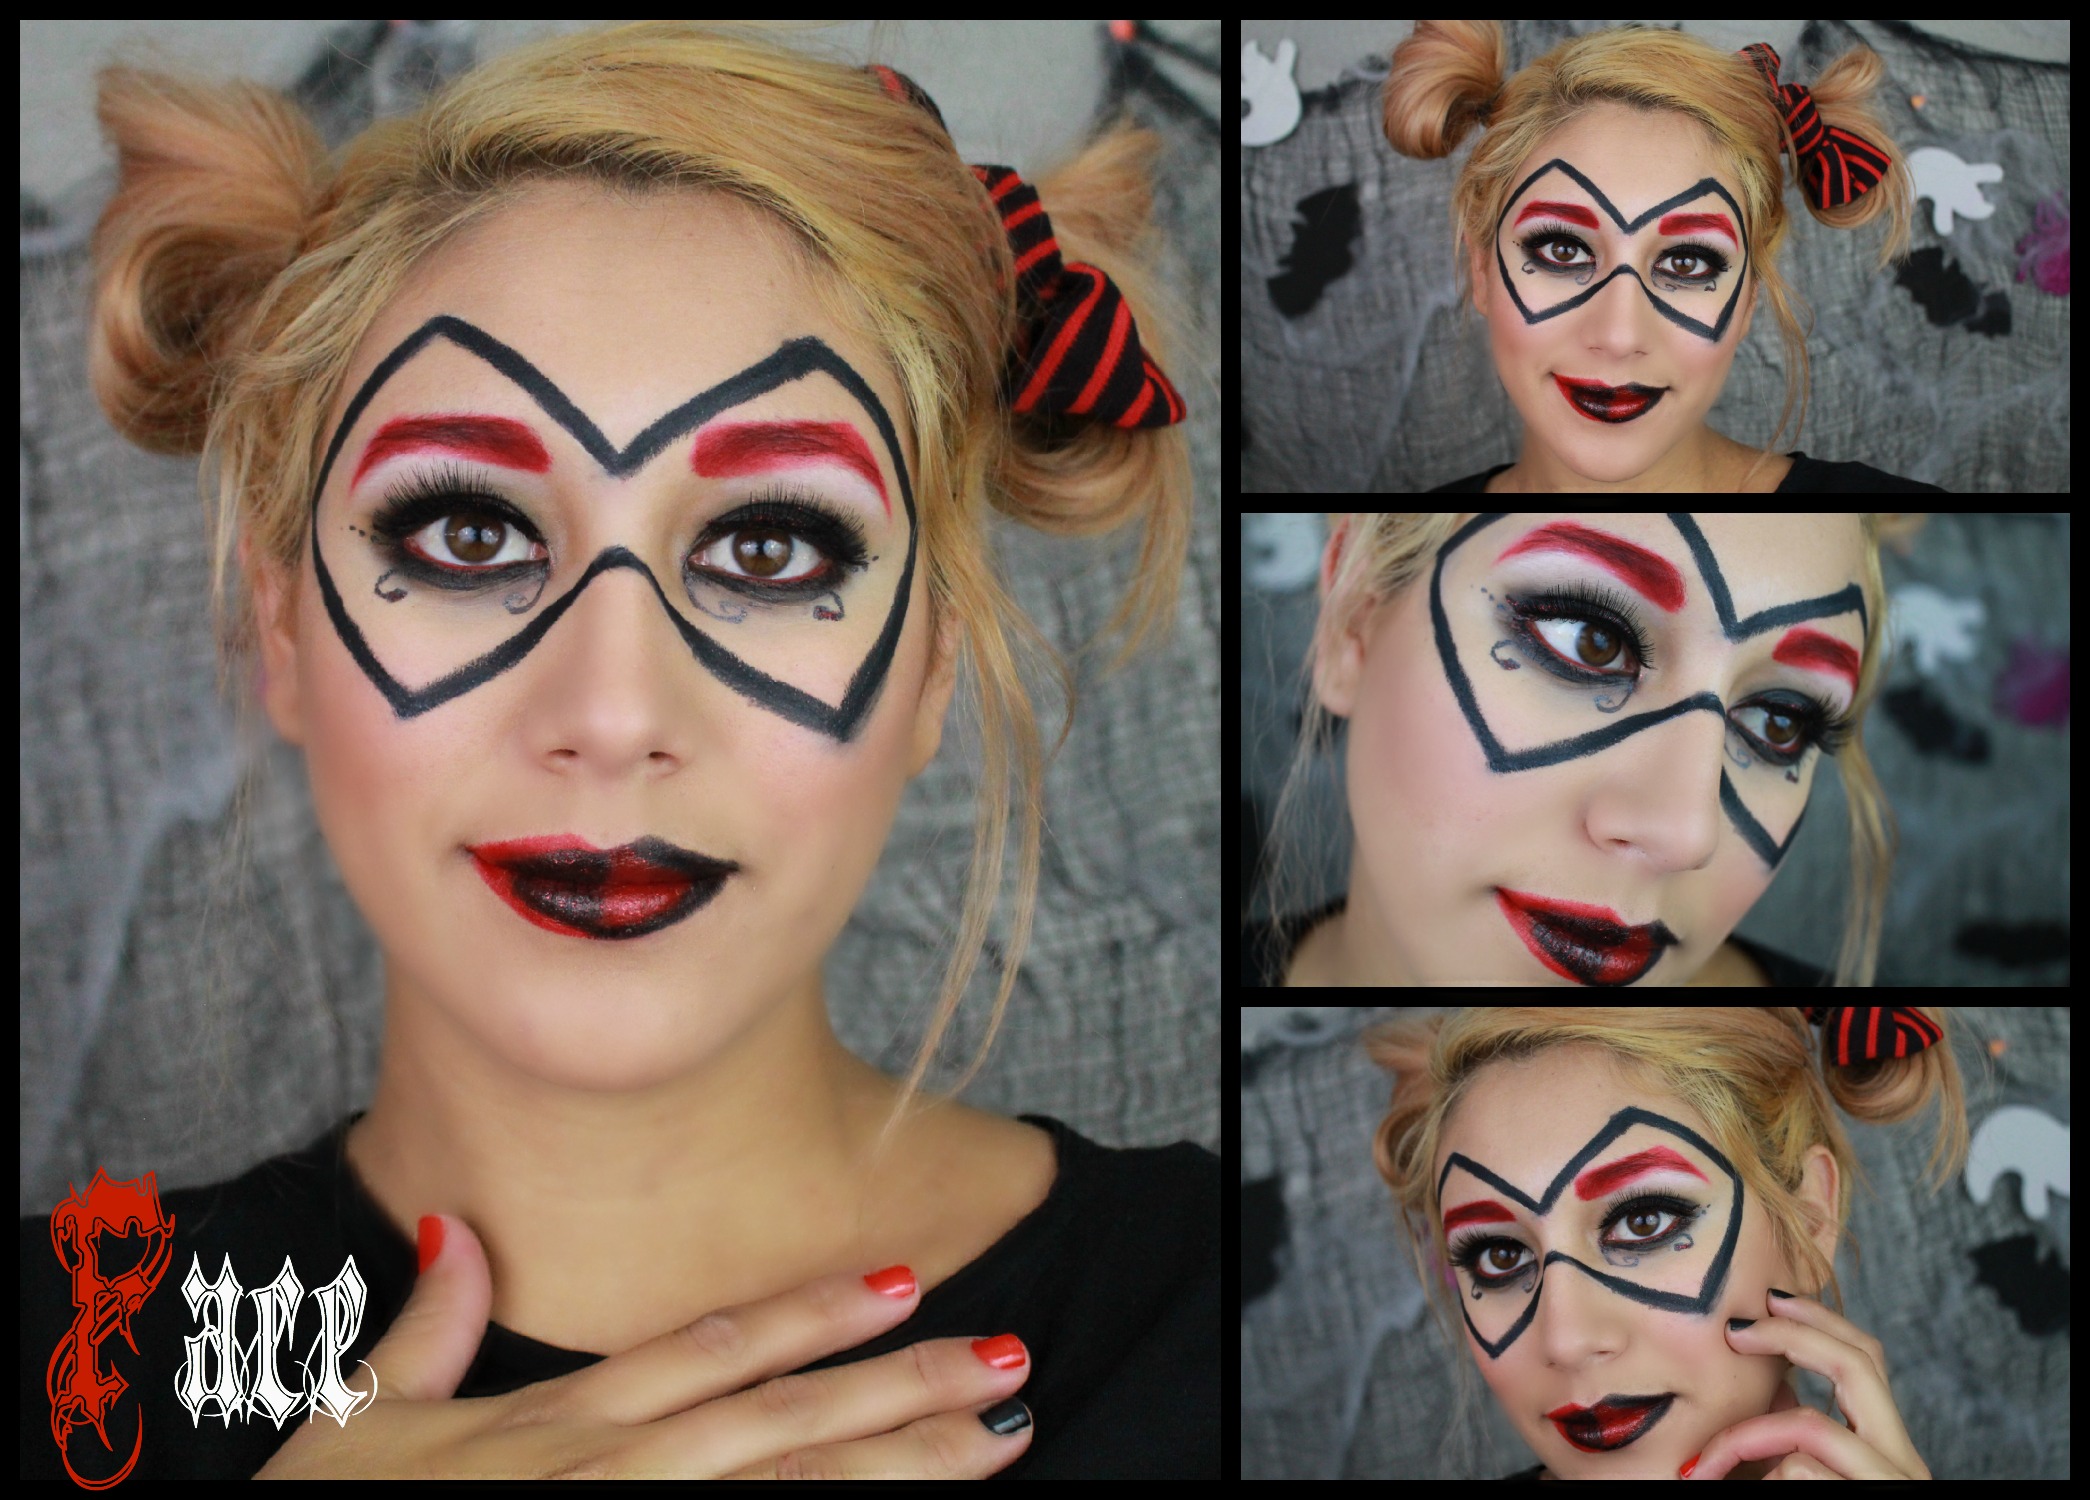
Yes , I am doing another halloween makeup look. This time I am doing a collab with another Beauty Guru on youtube , we decided to each pick a villain from the Batman Comics. I decided to do Harley Quinn and she is doing Poisen Ivy. I am so excited I loved the Batman Comics as a kid and still do , last year I did do a cat woman Halloween look too. A video is so much easier to do for this because of all the steps.
I hope you enjoyed the tutorial. This was actually a pretty easy look to do it just took a few steps ; but I felt like it turned out great.
For the face I decided to use my reg ular foundation and concealer rather than a white face paint. I really wanted Harley Quinn to still have her pretty look rather than look ugly. So all I did was apply my concealer & foundation, then I used a red blush on the cheeks.
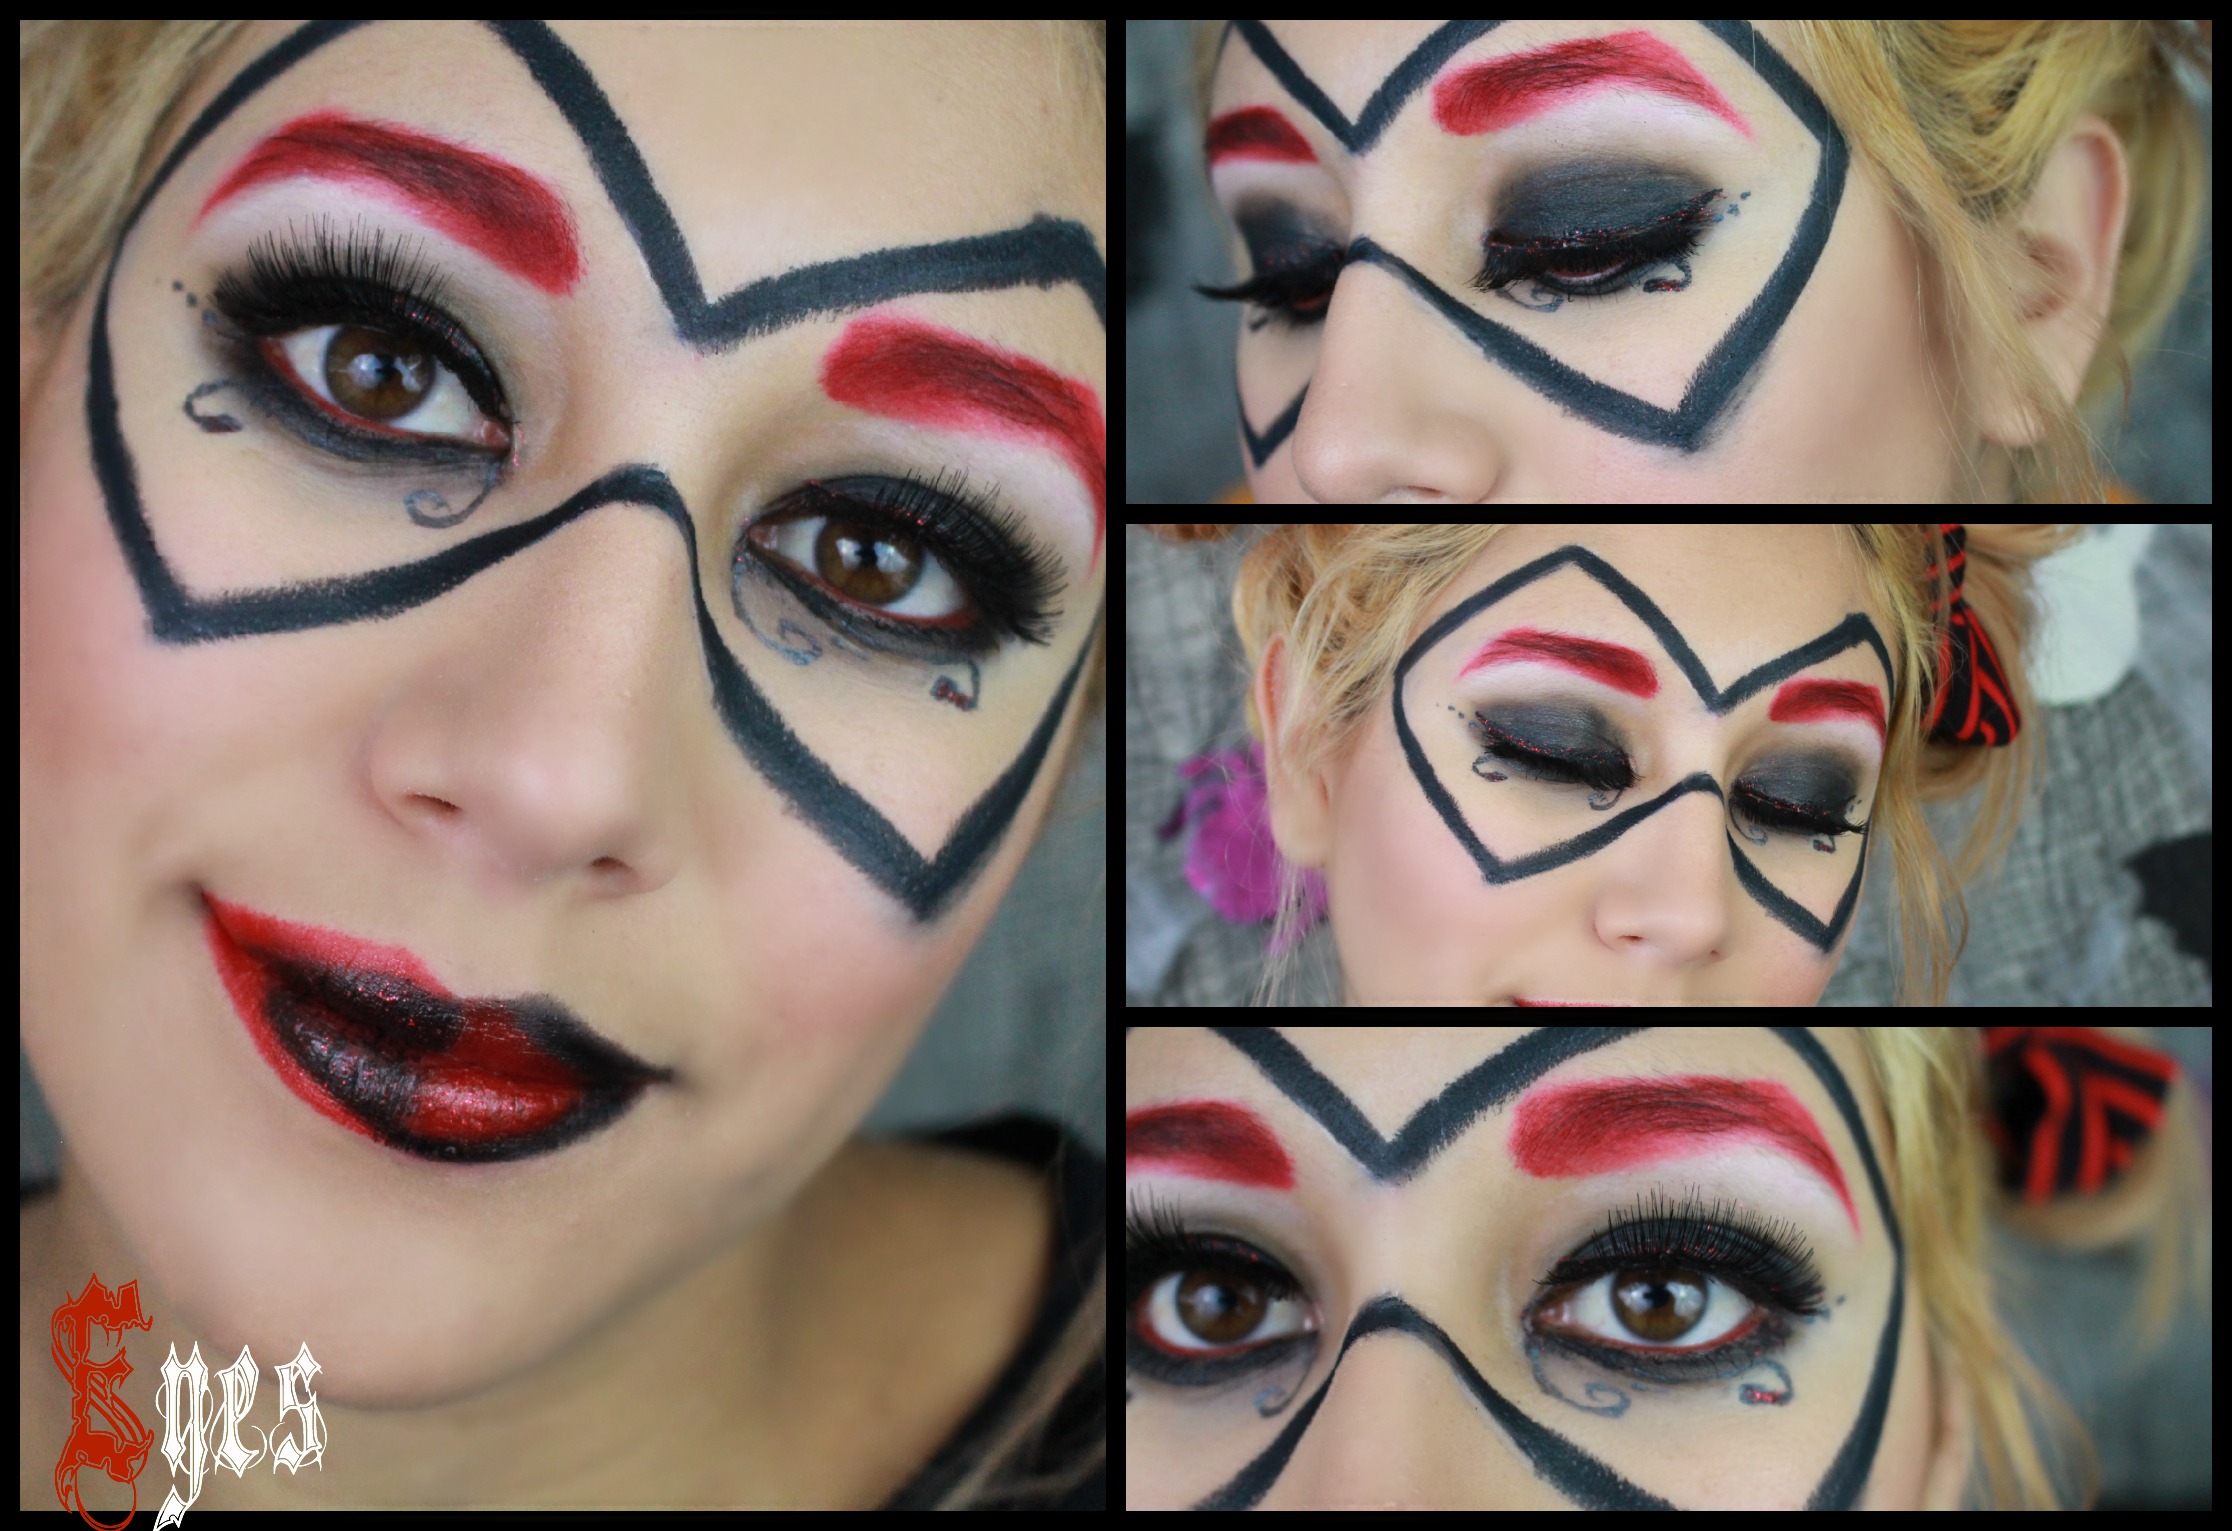
The eyes are a little bit more complicated. I decided to do a black smokey eye on and smudge black eyeliner on the lower lid. Harley Quinn’s costume is half black and half red so I decided to incorporate the red in with the eyebrows. I just used a Lipliner and then applied red shadow on top to make it more long lasting. I did notice that my lashes got lost in all the black so falsies are definitely going to be your friend with this look. I think that all the curvy lines and dots really added to her look and made it seem more like her.I did decided to do a winged eyeliner on the upper lash line & fill in the waterline with a red lipliner. (Any time you use lipliner make sure to top of with red eyeshadow.) I also went onto of my winged liner with a glittery eyeshadow to add some sparkle and red into the eye look.
The mask was pretty easy to do with an eyeliner, if it is easier for you just map out your lines with a white or nude eyeliner first. I really wanted to keep the diamond trend going on the face because her costume has lots of diamonds on it. So thats why I made my mask look more like diamonds.
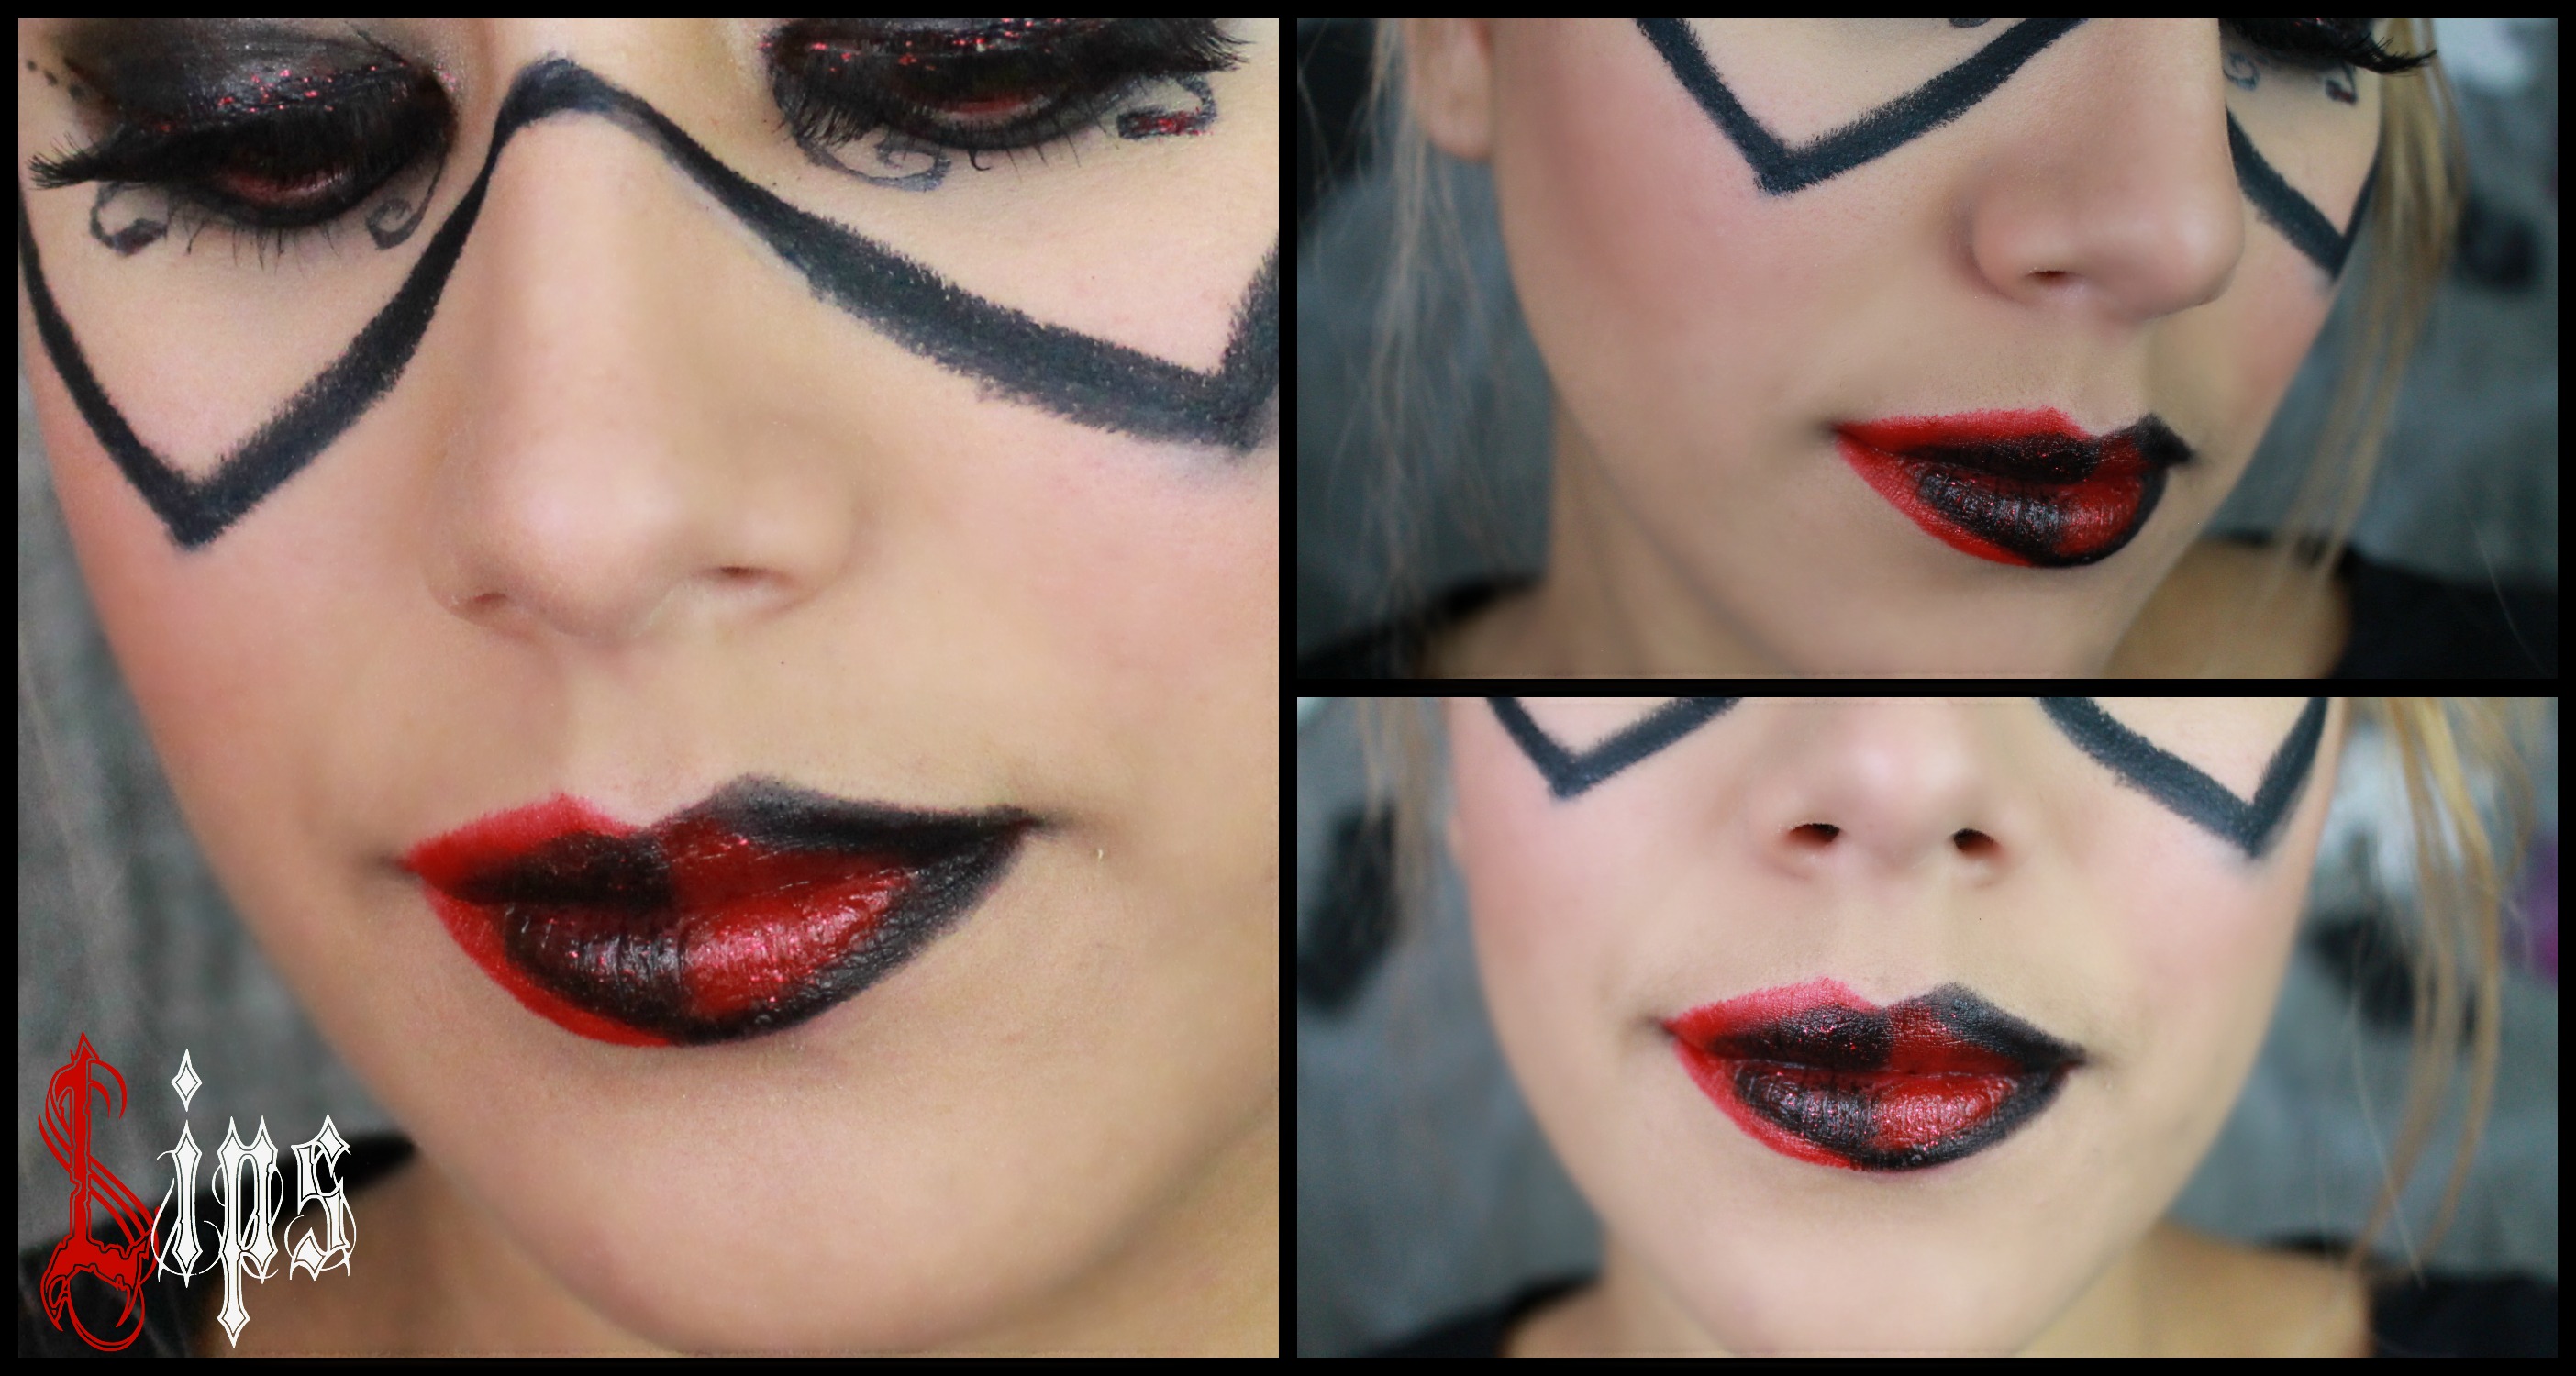
I wanted the Lips to be a big eye opener so I decided to do a diamond in the center of the lips but make it half black and half red. Then on the outside of the lips I used the opposite colors. I did decided to make my lips more pointy and a little thicker than my actual lips to play up the costume.
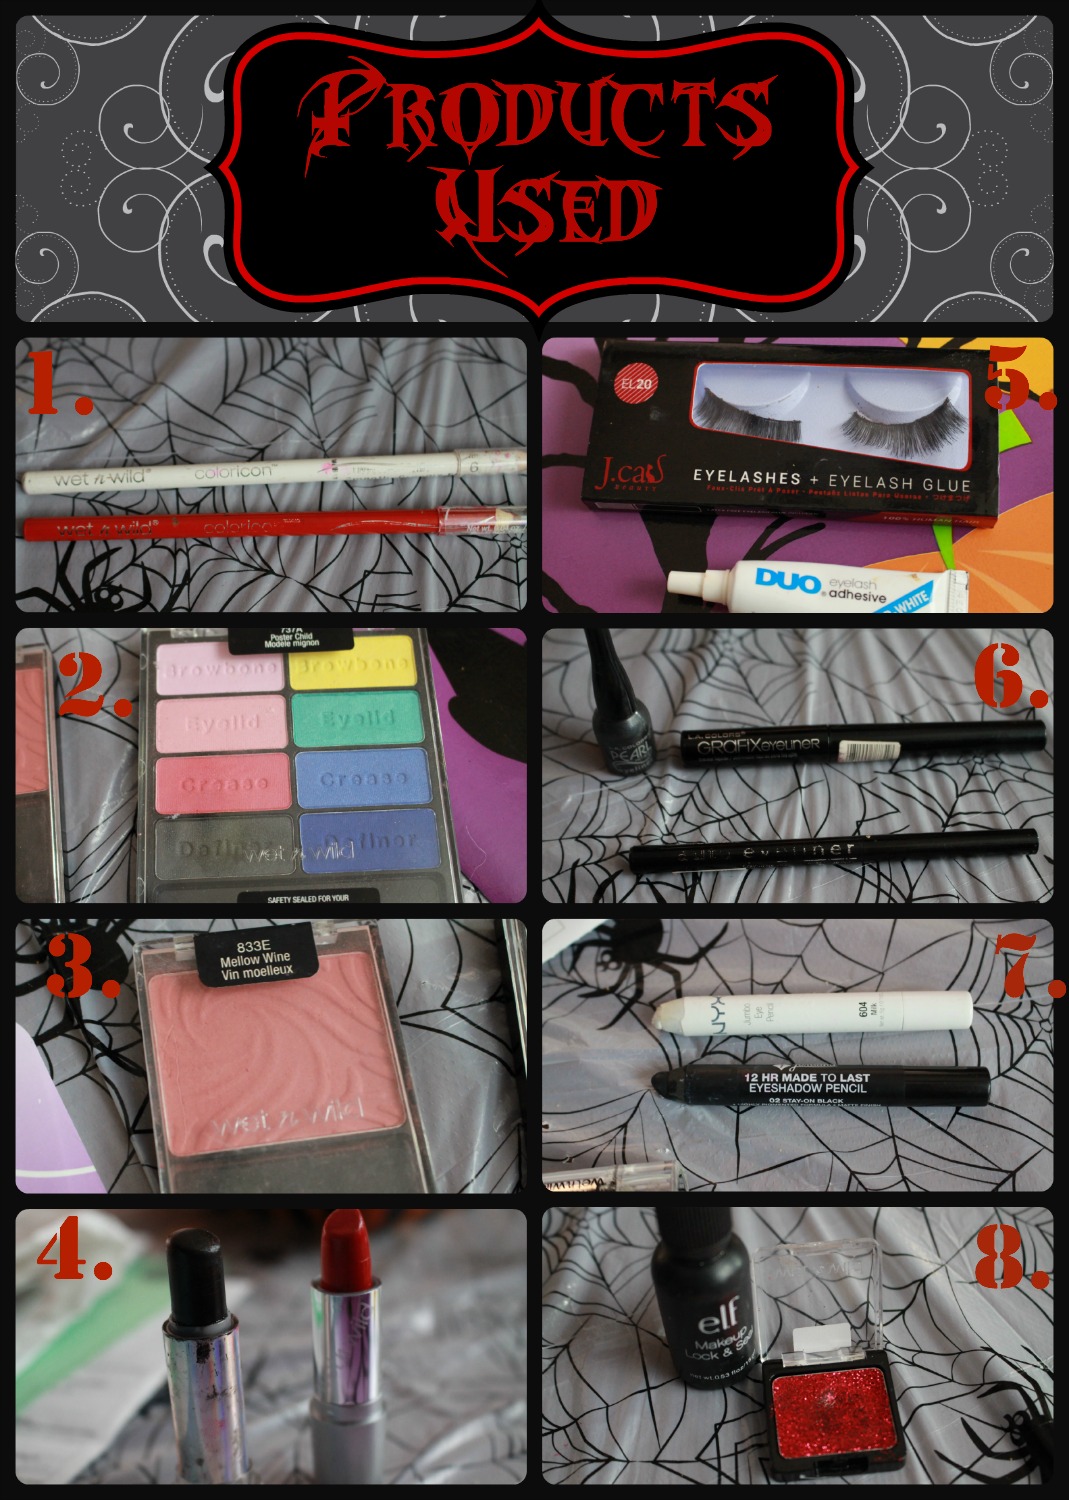
Wet N Wild Eyeliner : White , Wet N Wild Lipliner: Berry Red
Wet N Wild Palette: Poster Child (Red & black)
Wet N Wild Blusher: Mellow Wine
Wet N Wild Lipstick: Cherry Frost 514a , Wet N Wild Fantasy Lipstick: Black
J Cat Beauty Lashes: EL20 , Duo Lash Glue: Clear
LA Colors Pearl Eyeliner, LA Colors Grafix Eyeliner, LA Colors Automatic Eyeliner
Jordana 12 hr Eyeshadow Pencil: Stay on Black , Nyx Jumbo Pencil : Milk
Elf Makeup lock & Seal, Wet N Wild Single Glitter Eyeshadow: Vices
I hope you guys enjoyed this Halloween Look, I had so much fun doing this collab with Gemma! Make sure to subscribe for my youtube for more videos & like my Facebook Page!
Don’t forget Beauty Comes from Within so let yours Shine!
I am sorry I have been gone for a couple months , but I am back and I have been itching to show you guys how to recreate Melinda Gordons famous Brown Smokey eye! If you want to see what look that was exactly then click here.
Like always I did do a video tutorial for you guys , but I also decided to take real detailed pictures for you guys to pin for later or for you to do right now!!!
If you guys like my videos then make sure to subscribe to my youtube channel!
Ok so lets get started with the makeup. (List of the products used will be at the end)
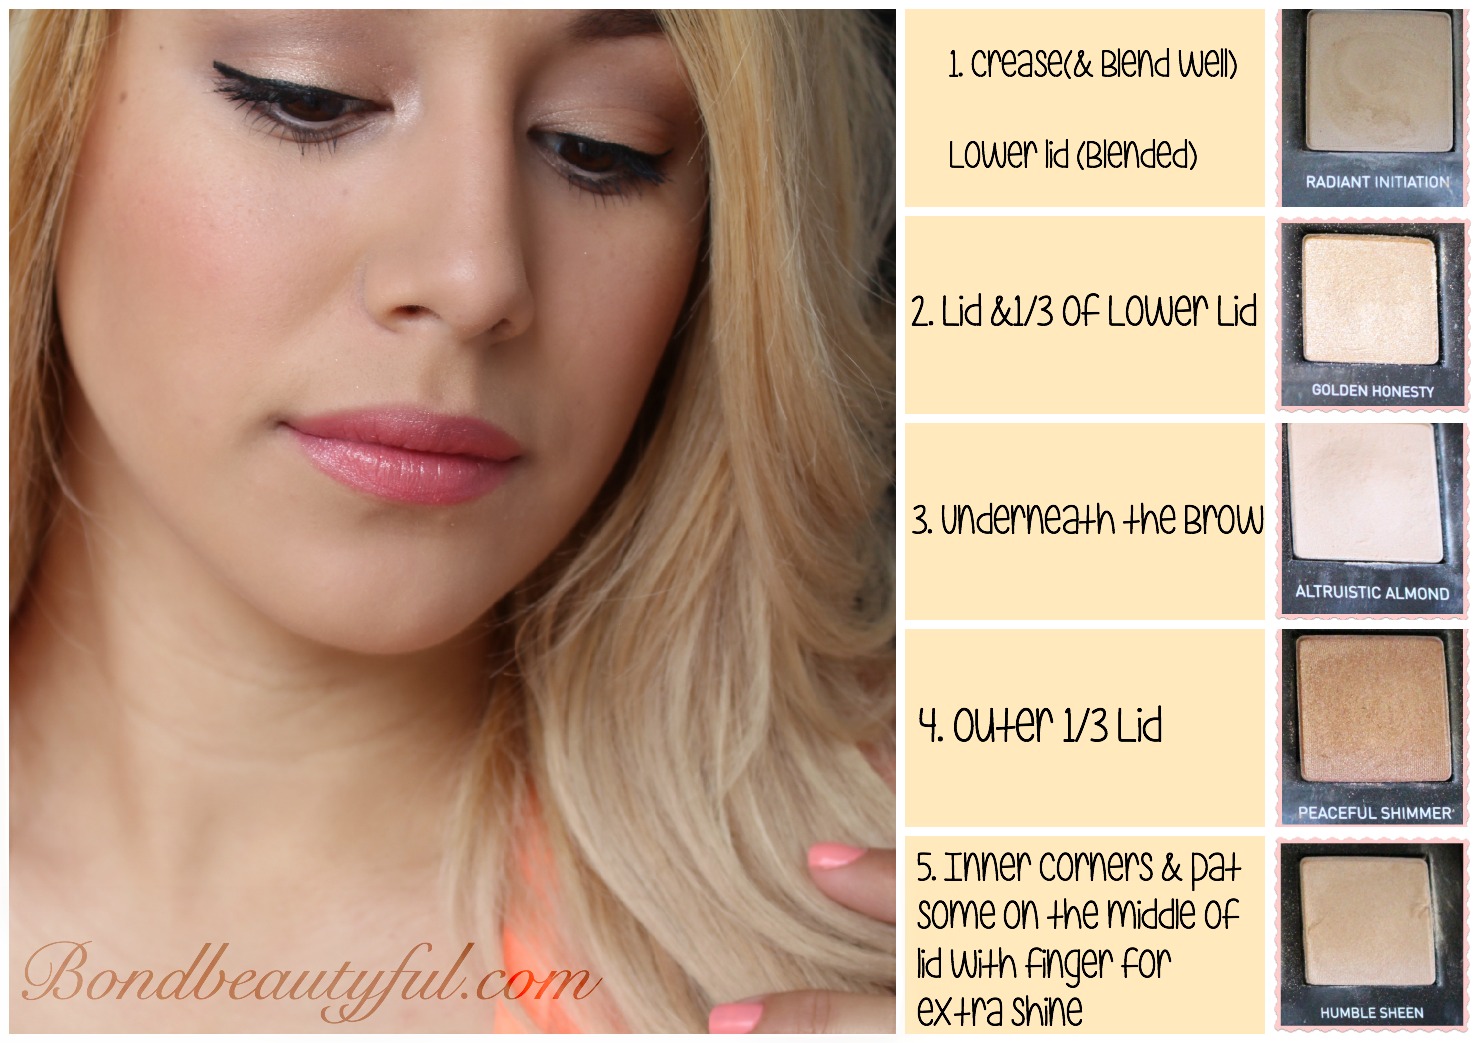
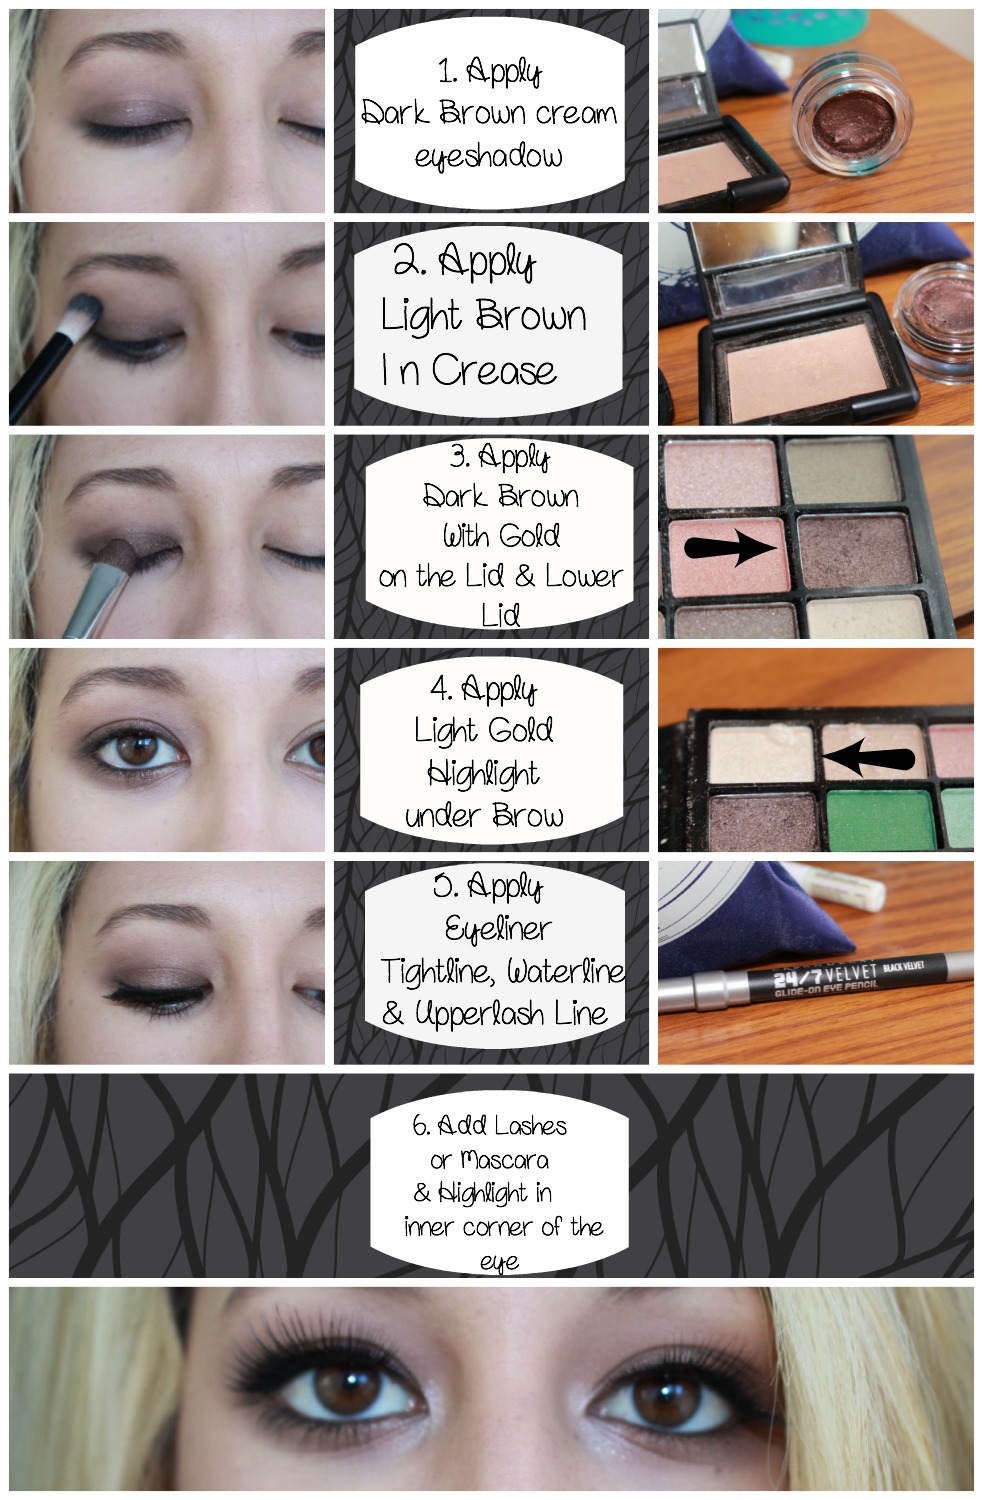
* She is almost always rocking this Dark golden brown smokey eye & of course you can’t forget her fake lashes that make her eyes look doe eyed! Its actually super simple to recreate.
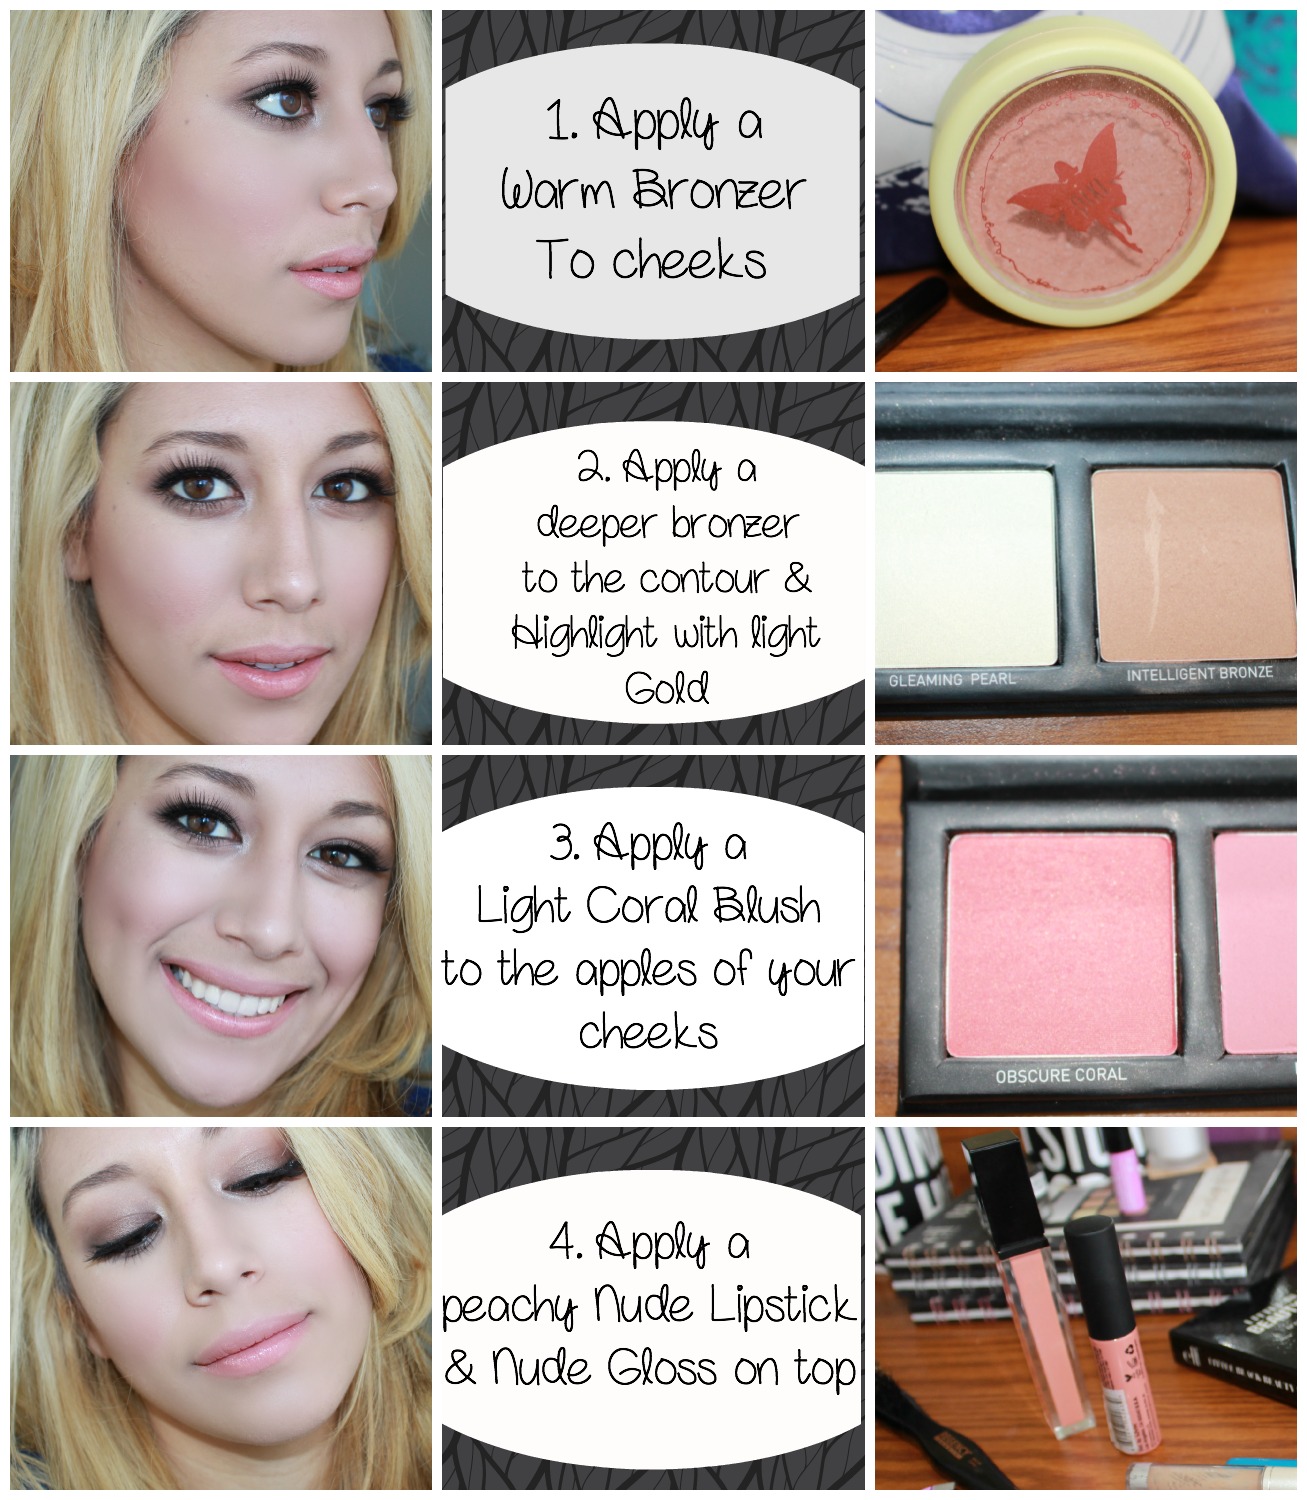
*For her face she kept it simple. She warmed up her complexion and added a very soft coral blush. She does always contour her cheeks & highlights to bring out her bone structure. Then for her lips she used a nude or a slightly natural pink lipstick & gloss.
So thats it, as you can see it is pretty simple. I tried to use more affordable products , the only high end product is the face palette.


 E.L.F. Smudge Pot Aint That Sweet http://go.magik.ly/r/BondBeautyful/1364/


