BondBeautYful

Find Your Beauty From Within

Menu

Skip to content
  • About
  • Beauty
  • Bondbeautyful LIfe
  • My Foundations Shade Matches

Category Archives: DIY Halloween

Harley Quinn Halloween Makeup

10 / 22 / 145 / 24 / 16

harley quinn thumb

Hello my Bondbeautys,

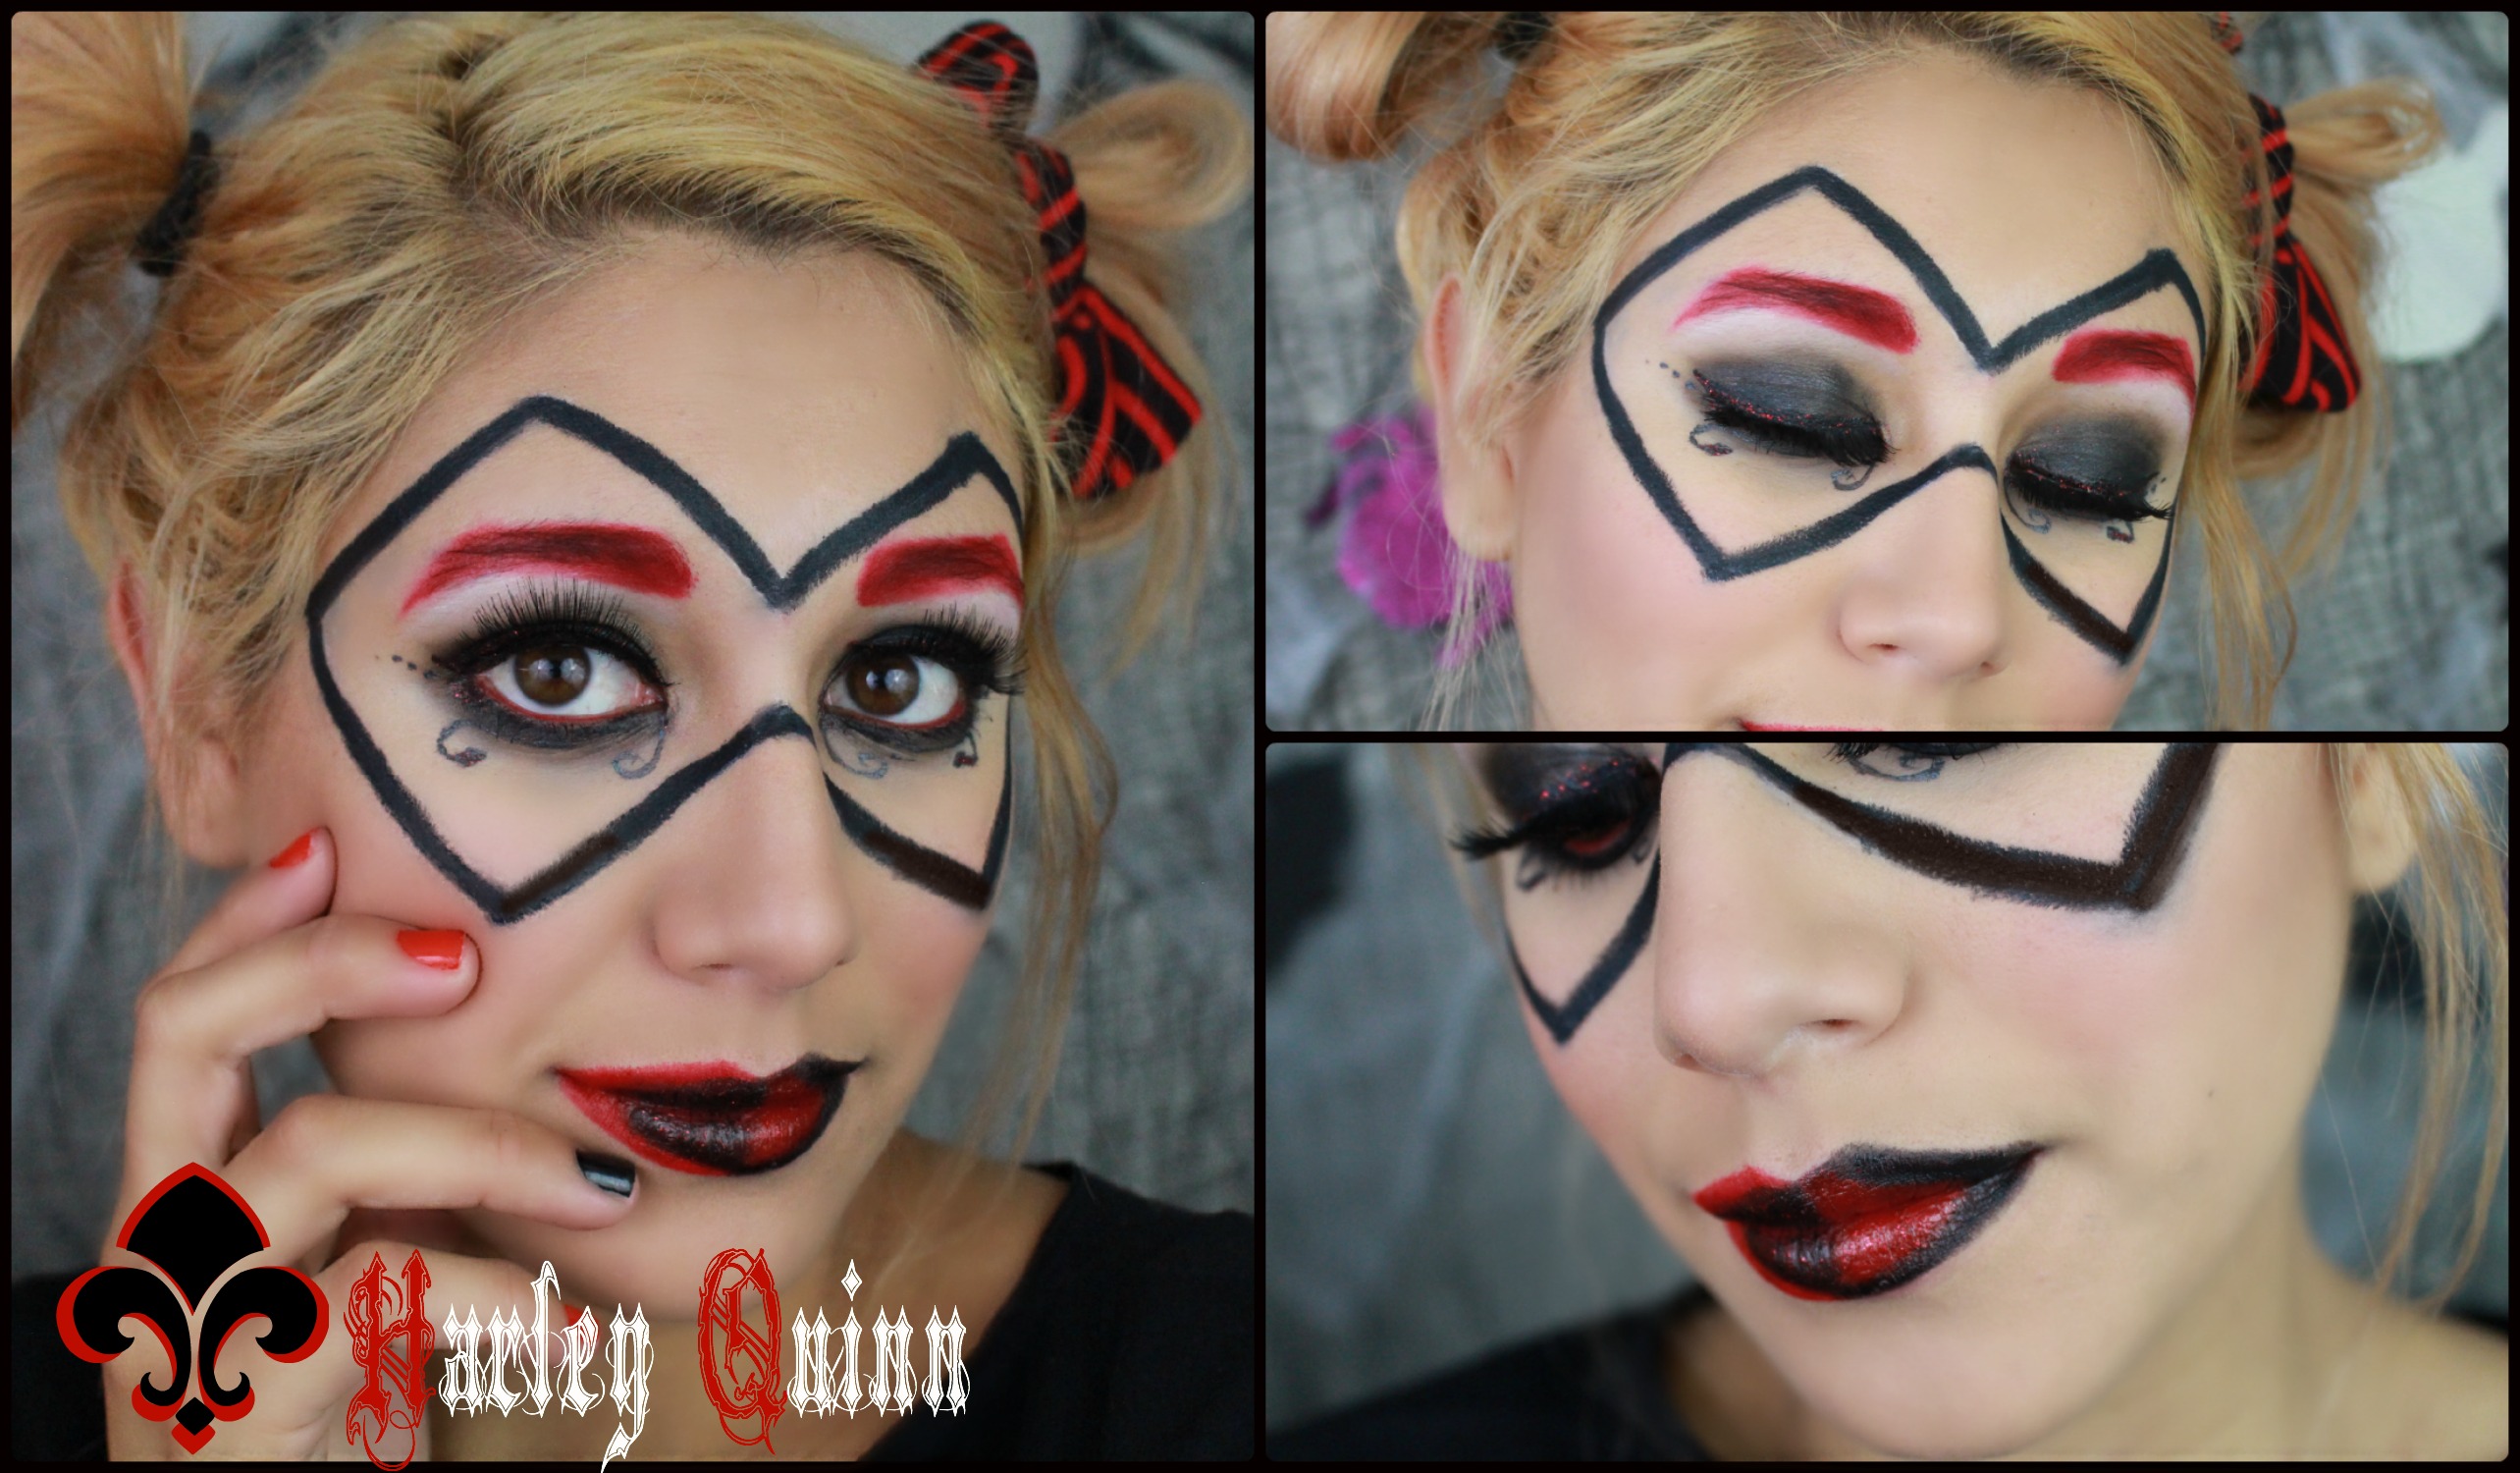
Yes , I am doing another halloween makeup look. This time I am doing a collab with another Beauty Guru on youtube , we decided to each pick a villain from the Batman Comics. I decided to do Harley Quinn and she is doing Poisen Ivy. I am so excited I loved the Batman Comics as a kid and still do , last year I did do a cat woman Halloween look too. A video is so much easier to do for this because of all the steps.

I hope you enjoyed the tutorial. This was actually a pretty easy look to do it just took a few steps ; but I felt like it turned out great.

Harley Quinn FaceFor the face I decided to use my reg
ular foundation and concealer rather than a white face paint. I really wanted Harley Quinn to still have her pretty look rather than look ugly. So all I did was apply my concealer & foundation, then I used a red blush on the cheeks.


harley quinn eyes

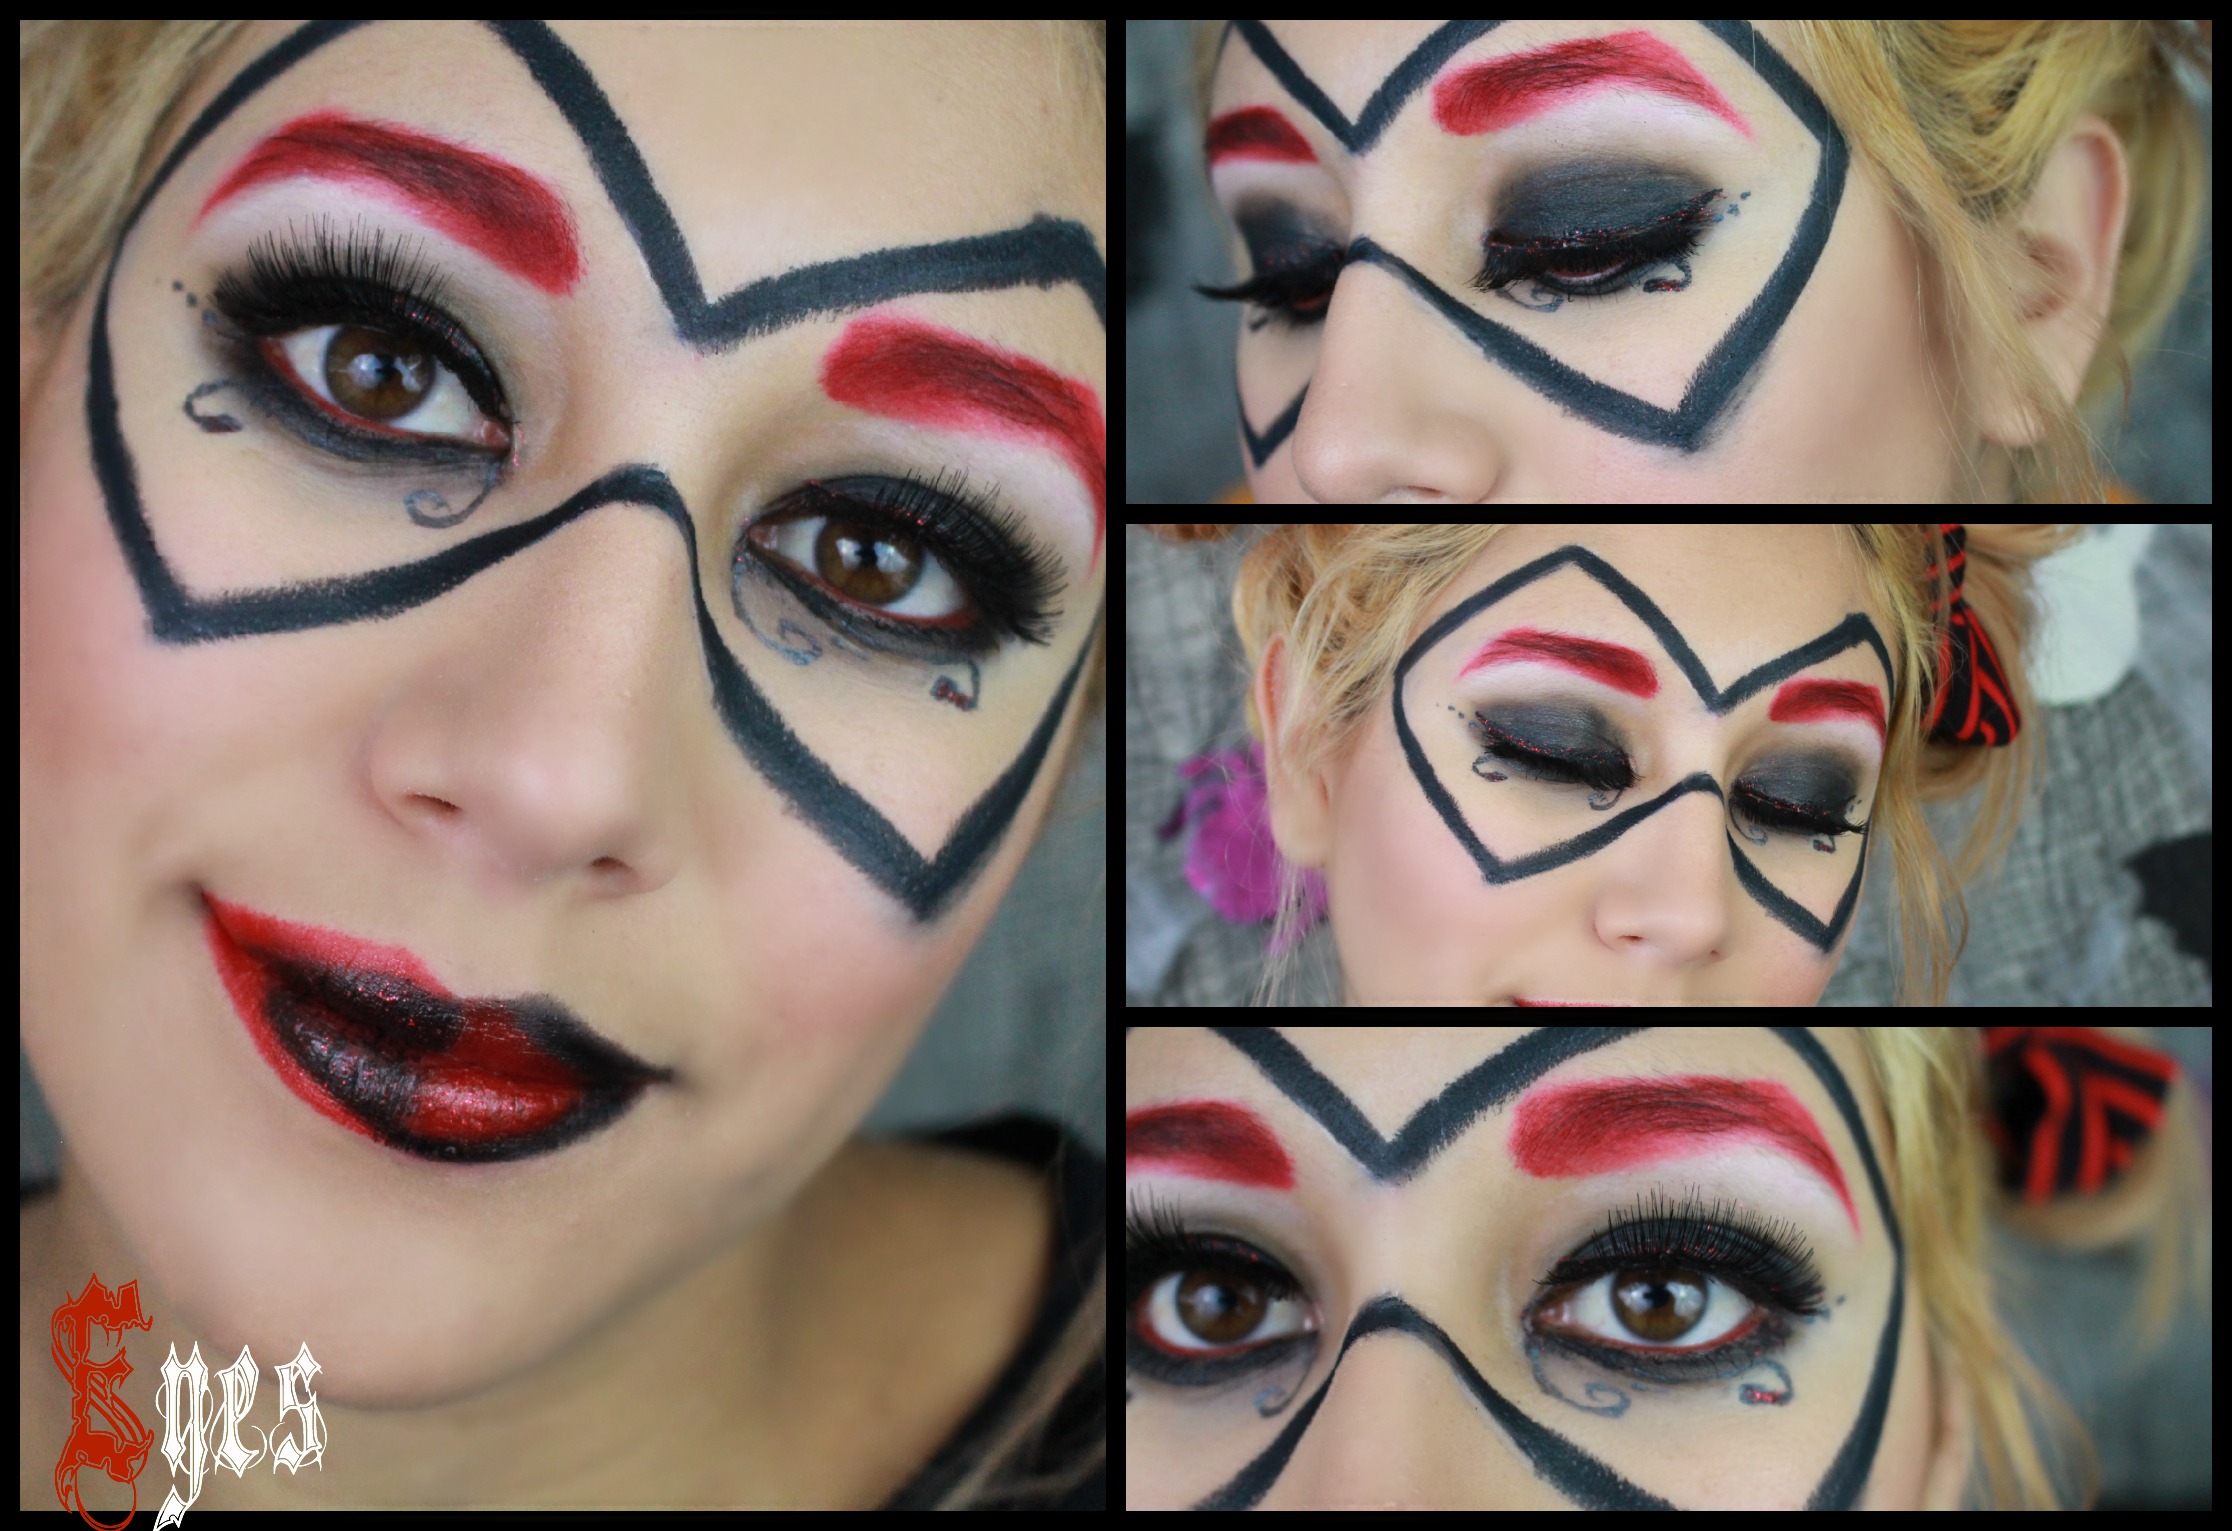
The eyes are a little bit more complicated. I decided to do a  black smokey eye on and smudge black eyeliner on the lower lid. Harley Quinn’s costume is half black and half red so I decided to incorporate the red in with the eyebrows. I just used a Lipliner and then applied red shadow on top to make it more long lasting. I did notice that my lashes got lost in all the black so falsies are definitely going to be your friend with this look. I think that all the curvy lines and dots really added to her look and made it seem more like her.I did decided to do a winged eyeliner on the upper lash line & fill in the waterline with a red lipliner. (Any time you use lipliner make sure to top of with red eyeshadow.) I also went onto of my winged liner with a glittery eyeshadow to add some sparkle and red into the eye look.

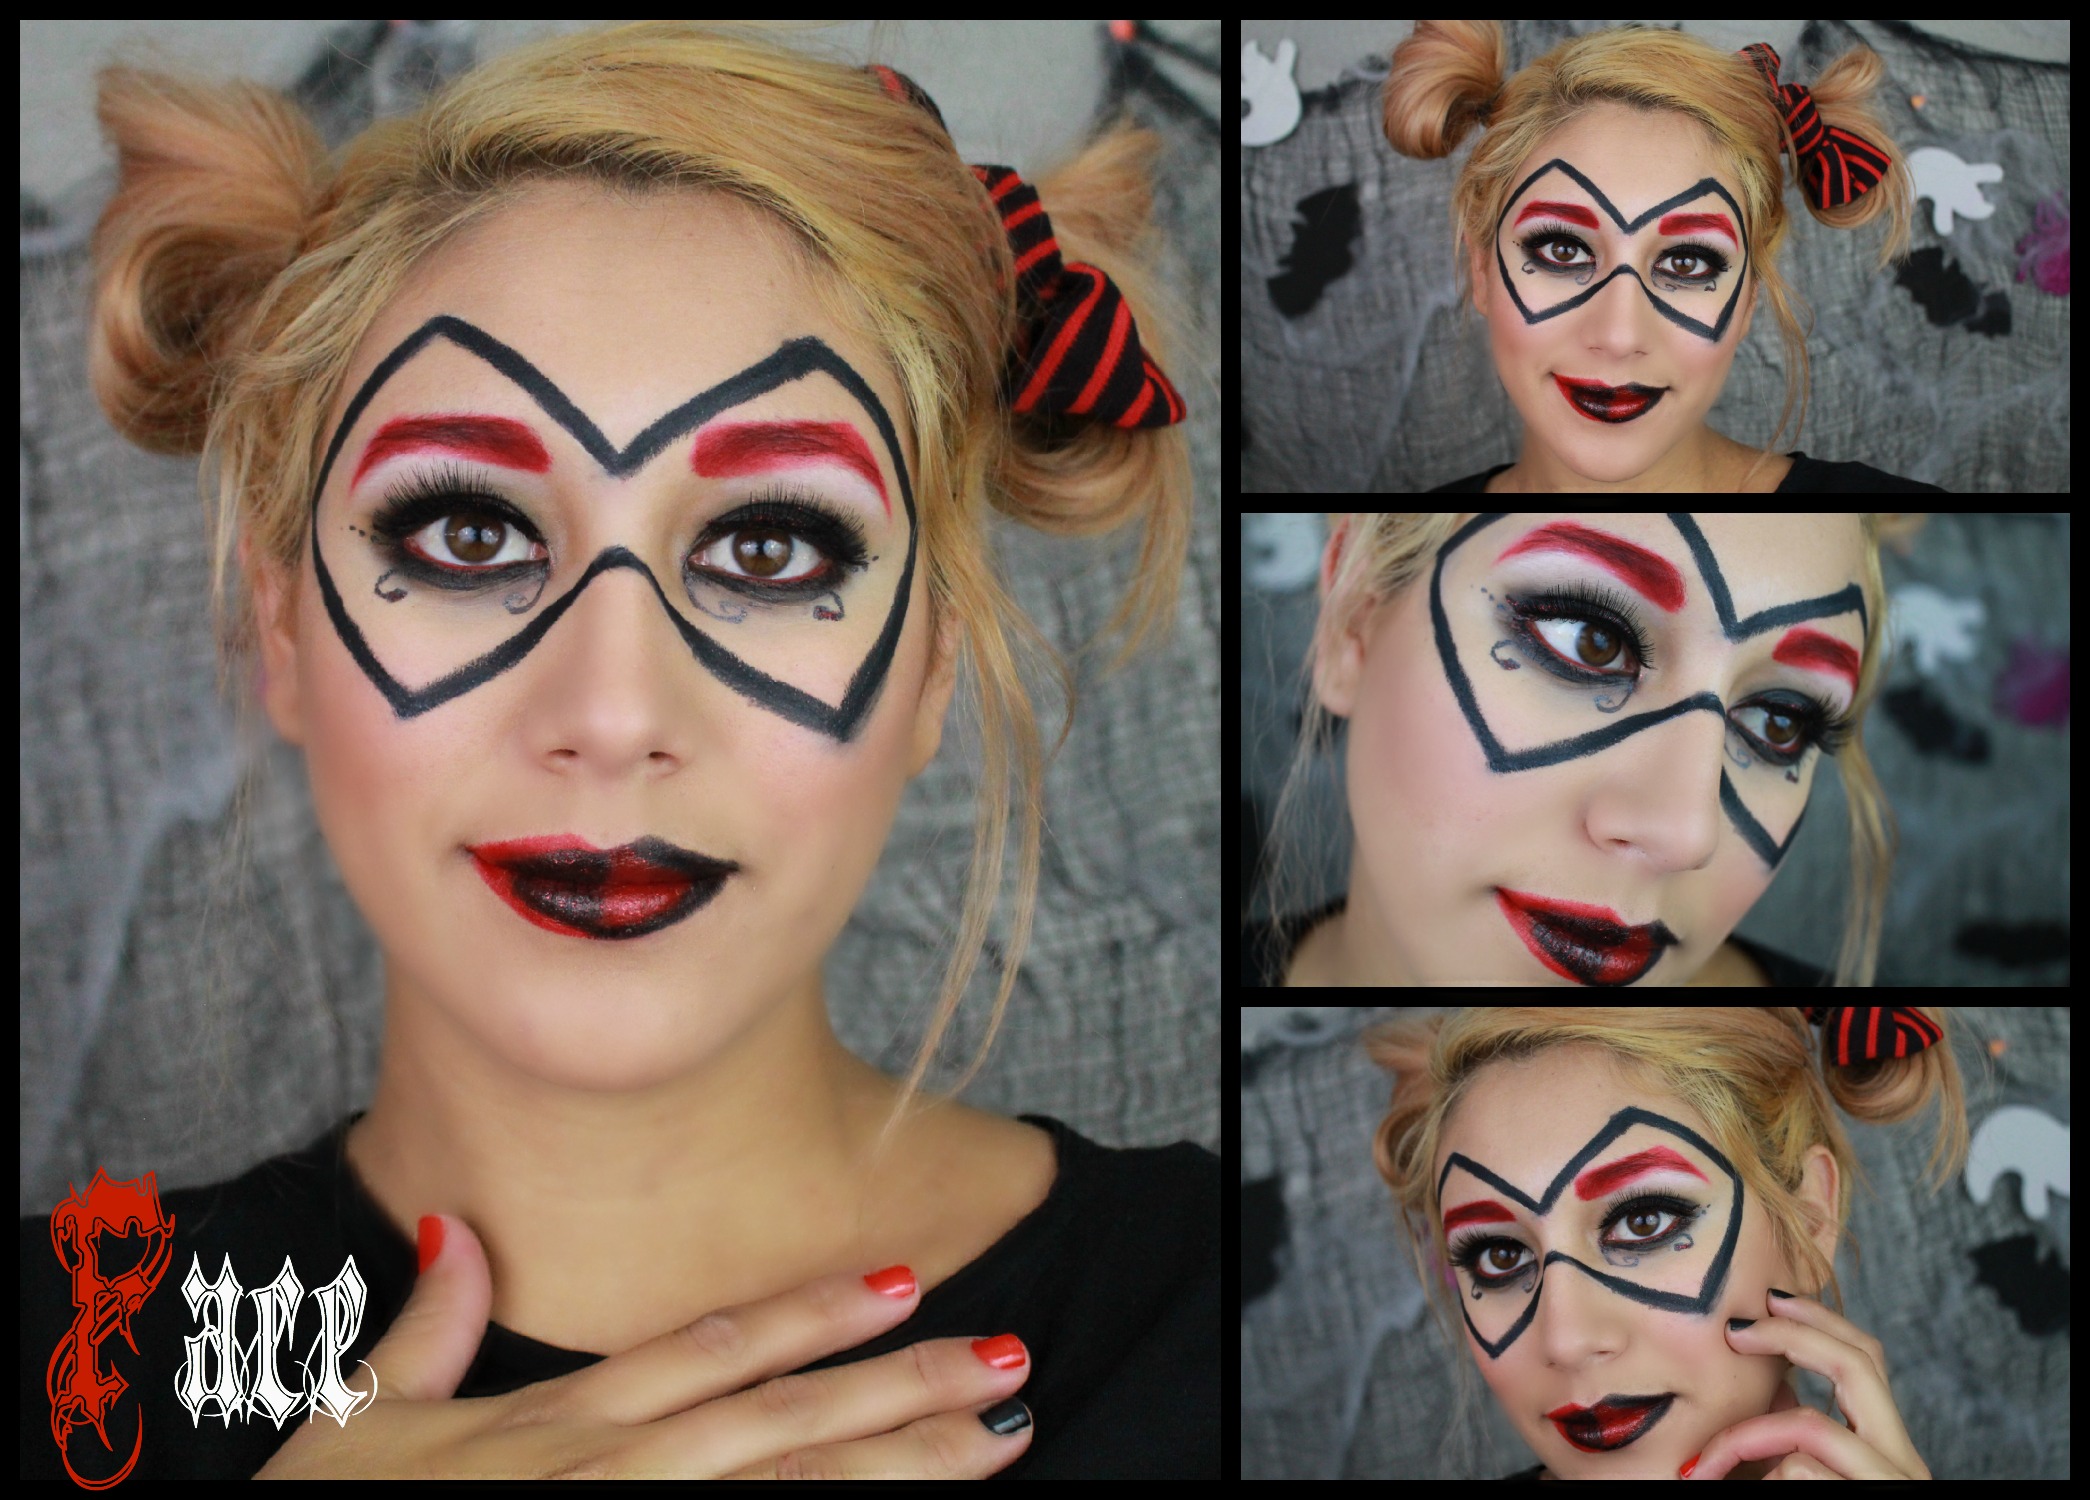
The mask was pretty easy to do with an eyeliner, if it is easier for you just map out your lines with a white or nude eyeliner first. I really wanted to keep the diamond trend going on the face because her costume has lots of diamonds on it. So thats why I made my mask look more like diamonds.

harley quinn liips

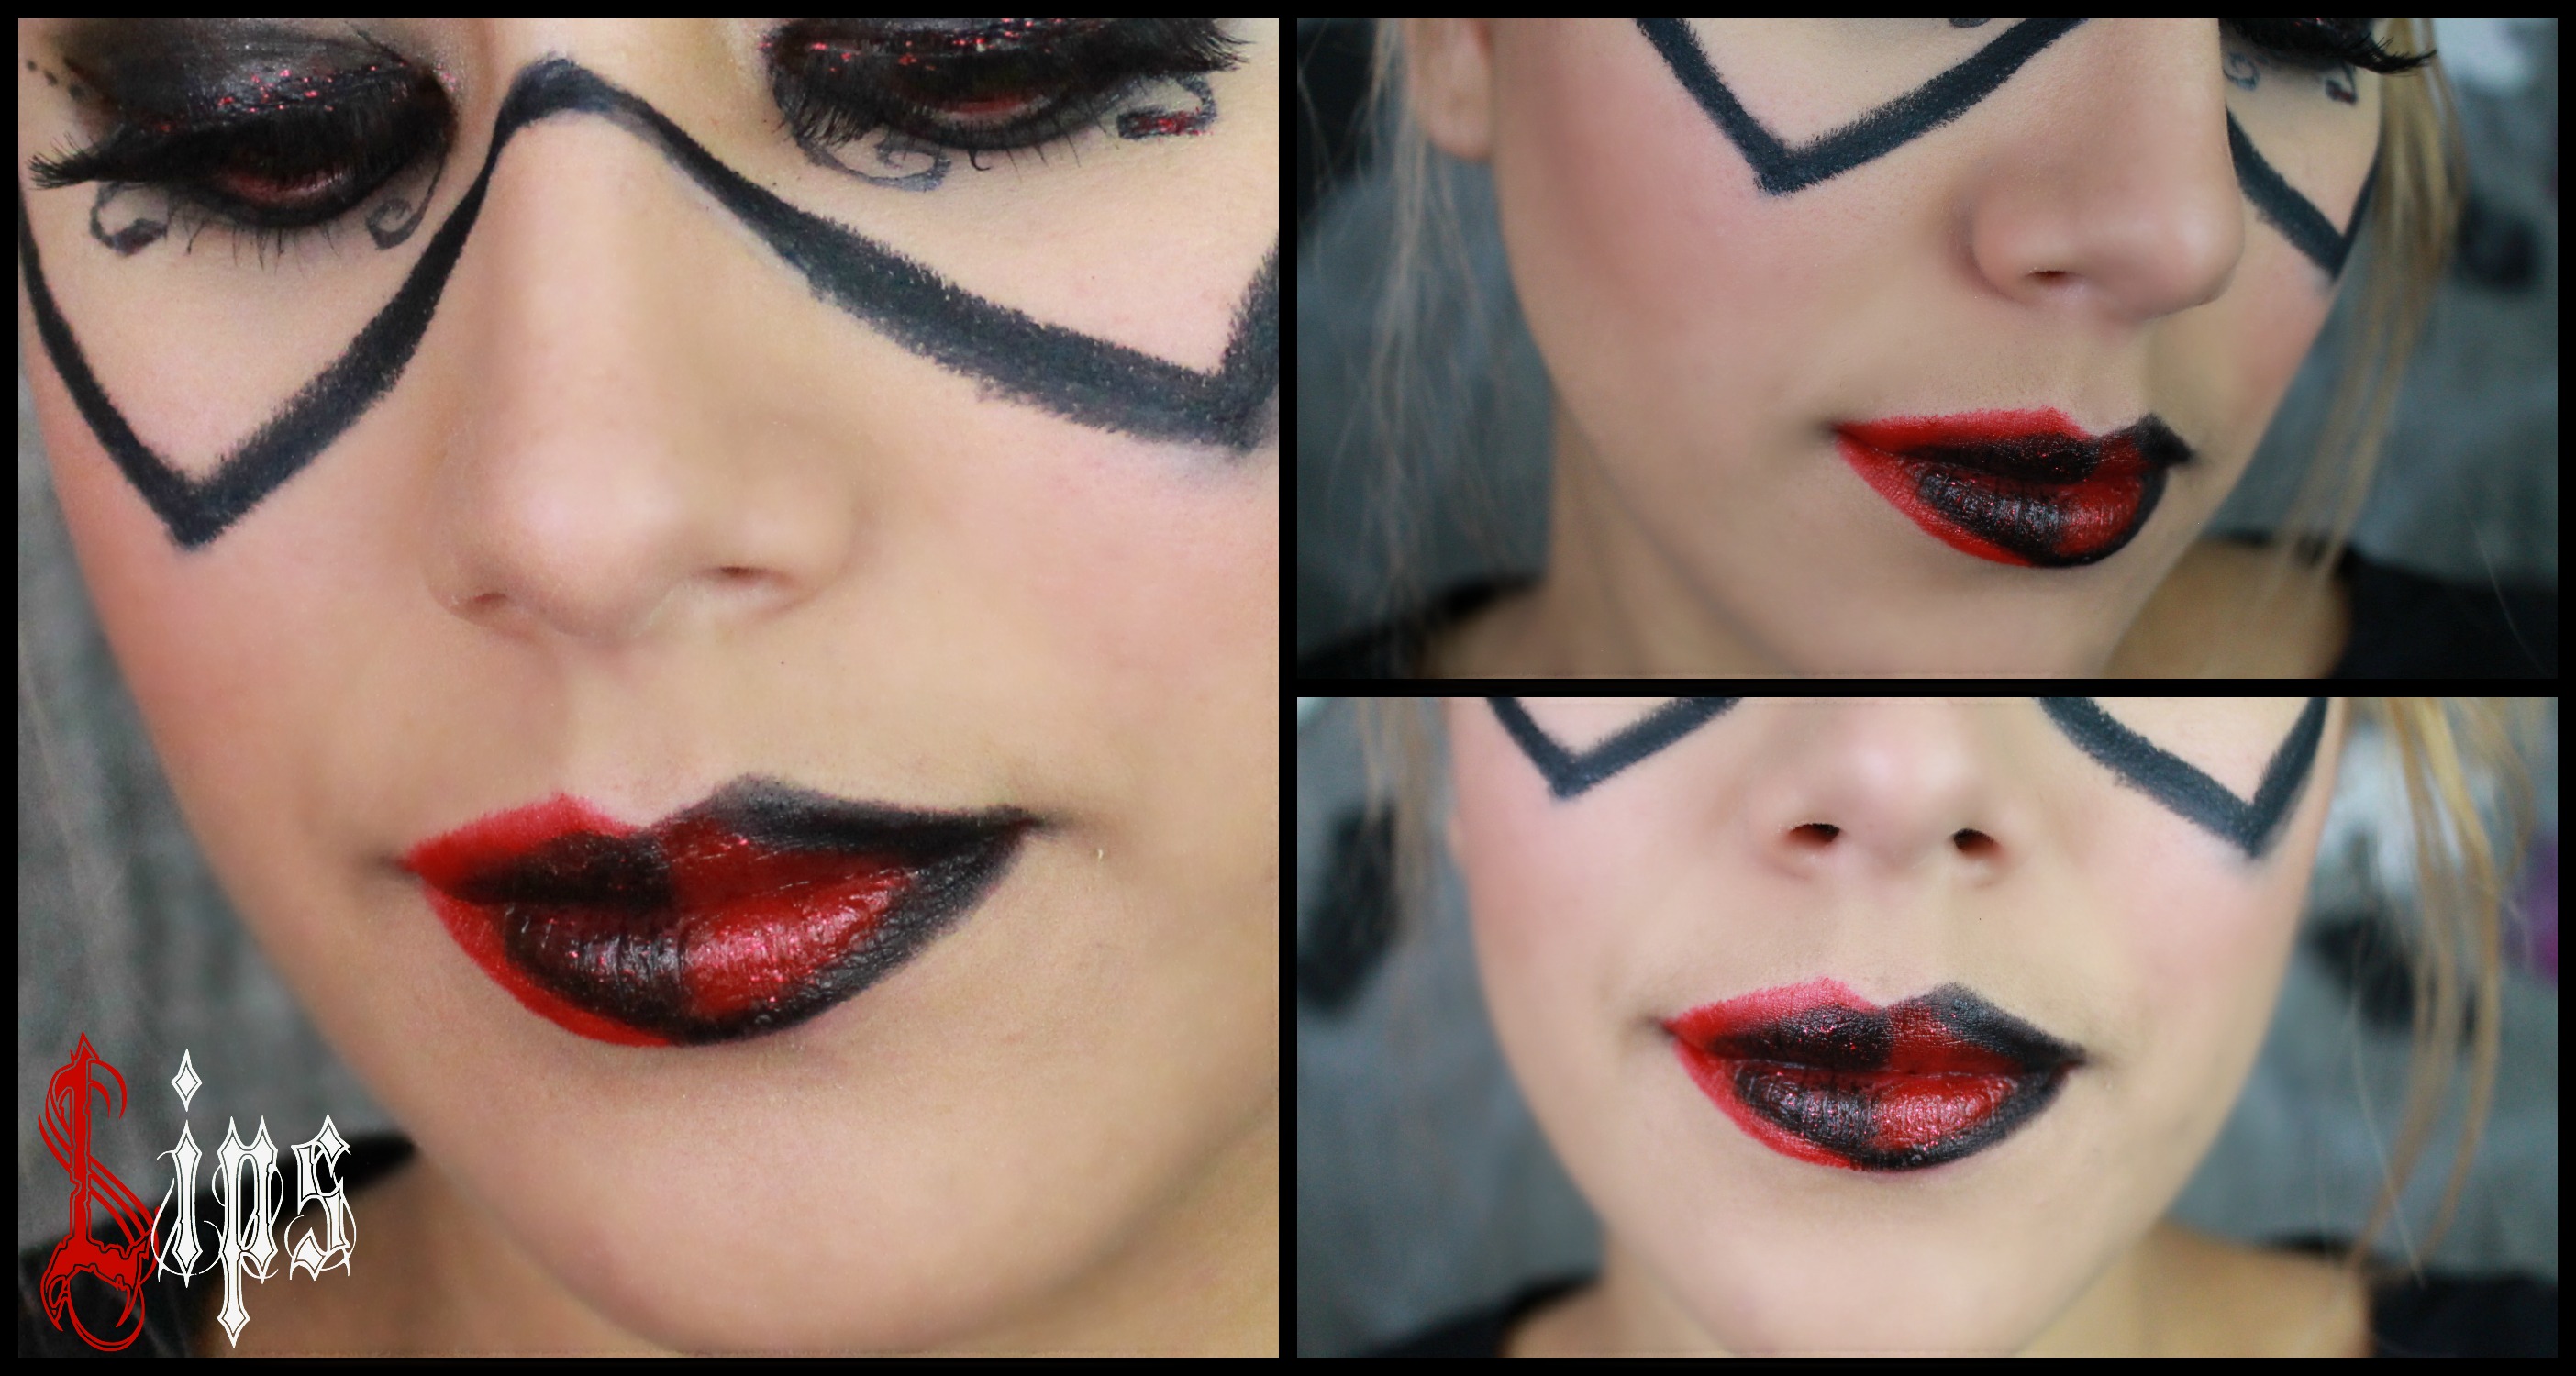
I wanted the Lips to be a big eye opener so I decided to do a diamond in the center of the lips but make it half black and half red. Then on the outside of the lips I used the opposite colors. I did decided to make my lips more pointy and a little thicker than my actual lips to play up the costume.

harley quinn products


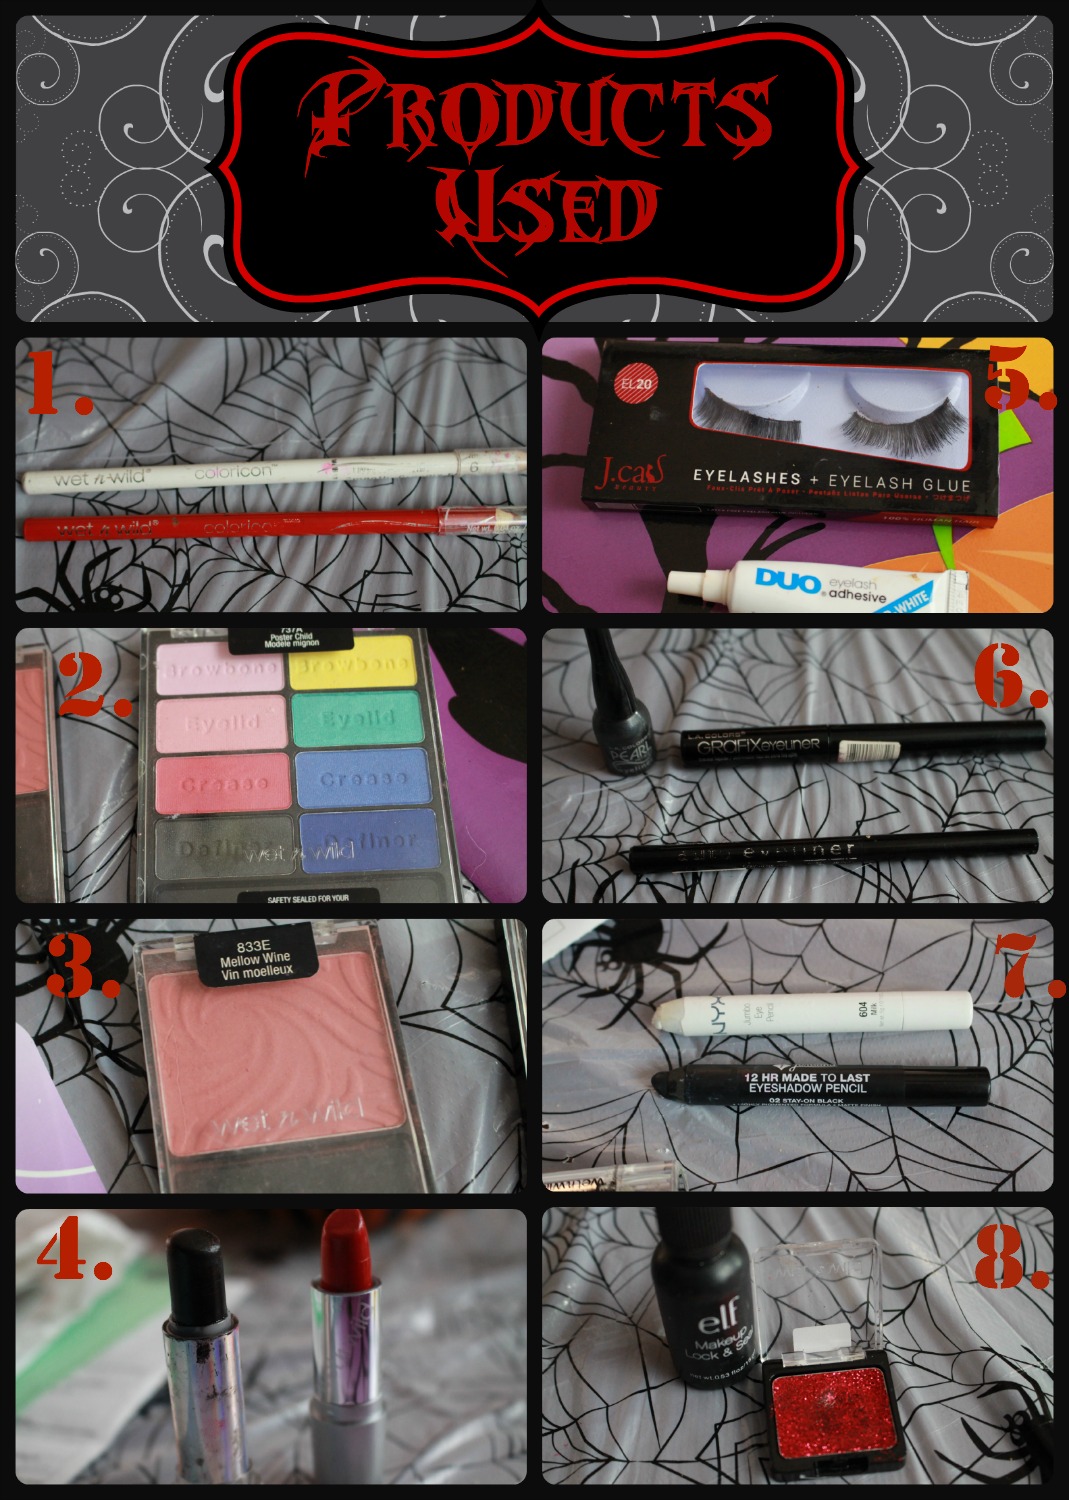
  1. Wet N Wild Eyeliner : White , Wet N Wild Lipliner: Berry Red
  2. Wet N Wild Palette: Poster Child (Red &  black)
  3. Wet N Wild Blusher: Mellow Wine
  4. Wet N Wild Lipstick: Cherry Frost 514a , Wet N Wild Fantasy Lipstick: Black
  5. J Cat Beauty Lashes: EL20 , Duo Lash Glue: Clear
  6. LA Colors Pearl Eyeliner, LA Colors Grafix Eyeliner, LA Colors Automatic Eyeliner
  7. Jordana 12 hr Eyeshadow Pencil: Stay on Black , Nyx Jumbo Pencil : Milk
  8. Elf Makeup lock & Seal, Wet N Wild Single Glitter Eyeshadow: Vices

I hope you guys enjoyed this Halloween Look, I had so much fun doing this collab with Gemma! Make sure to subscribe for my youtube for more videos & like my Facebook Page!

Don’t forget Beauty Comes from Within so let yours Shine!

<3 Love, Bondbeautyful

Leave a comment

Easy Monster Halloween Nail Tutorial

10 / 25 / 1310 / 25 / 13

Photo Oct 22, 7 14 43 PM
Hello My Beautys
I hope You are having a great day! Halloween Is almost here , I know that not all of you are going to dress up in a costume. Here is a easy way to be festive this halloween without needing to dress up. This is a super easy halloween monster nails! Anyone can do this , its not to complicated or flashy!

What you need:

  • Orange Nail polish (Wet N Wild: Sunny side up)
  • Black nail polish (wet N Wild : Black Creme)
  • Bobby Pin (If you don’t have nail art polishes)
  • Orange nail art polish (sinful colors nail art)
  • Black nail art polish (sinful colors nail art $1.99 Walgreens)
  • Top Coat (NYC Top Coat)

Photo Oct 22, 7 13 18 PM

  1. Apply orange & Black nailpolish as a base coat ( I did all my nails orange except for my middle and Ring finger, Its your choice how you want to do it)
  2. Start with the stitches, Make black stitches on all the orange nails using the bobby pin & black nail polish or the black nail art polish Photo Oct 22, 7 18 41 PM
  3. On Your thumb creat a monster, with two eyes and stitches for the mouth using the bobby pin or Nail art polish Photo Oct 22, 8 33 48 PM
  4. Using the orange nail polish & Bobby pin or orange nail art nail polish make a monster on the black nails.. I Just did dots for the eyes & Stitches for the mouth
  5. Photo Oct 22, 8 36 58 PM
  6. Last, top it off with a top coat of your choice!Photo Oct 22, 8 42 55 PM

And there you have it easy , festive monster nails ! Photo Oct 22, 8 40 46 PM

Hopefully you guys like my monster nails, I know there not super detailed but it still fun to have something on your nails for halloween! Halloween is my favorite holiday it is so fun& Spooky!

Whats your favorite holiday?

Remember , Beauty Comes From Within..

<3 Love, Bondbeautyful

Leave a comment

Fiona Halloween Tutorial (shrek 3)

10 / 22 / 13

photo 1Hello My Beautys
I HOpe you guys are having fun this october! I have another Halloween Tutorial for you!
Can you guess what it is??

image


I love the Shrek Movies so I thought why not do fiona! So I hope You enjoy my tutorial… If you want to see how I did this look + the Ogre ears then Take a look below!..

So The makeup was pretty easy here are the products I used…

photo 4

  • Wet N wild Comfort Zone Palette
  • Elf Natural Lashes
  • Revlon Balm Stain: Romantic
  • Elf Eyebrow Pencil Medium
  • Halloween Makeup
  • Nyx Jumbo Pencil Milk
  • BhCosmetics 88 Matte Palette
  • True Colors Pigments
  • BhCosmetics 10 Blush Palette
  • Its So big Mascara
  • Wet N Wild Liquid Eyeliner Brown
  • Ulta Eyeliner : Bronze
  • Haircolor Hairspray Orange

So here is a look at my costume… I basically used the cloths I could find in my closet …

photo 3

  • Shirt: Walmart
  • Skirt: Shirt That I turned into skirt.,
  • photo 2

So what are you going to be for halloween?

I hope you guys enjoyed make sure to check out my facebook,instagram & twitter! Hope you guys have a safe and FUN halloween

Remember, Beauty Comes From Within…

<3Love Bondbeautyful

Leave a comment

Yzma Halloween Costume Tutorial

10 / 16 / 1310 / 16 / 13

yzma thumb

Hey Beautys!

Are You guys freaking out because halloweens just around the Corner? Well Dont worry Im here to give you a unique Yzma Halloween Idea! This Costume Cost me  about $8 or $9! So it is really inexpensive costume to do…

IMG_0737Need:

  • Purple Dress
  • Round Blue Or purple Earings
  • Shoes of your choice… Boots look great!
  • Blue Headband (I found at dollar store $1)
  • Black Hairspray
  • Cheerleading megaphone or cone shaped object (I found mine at dollar store aswell $1)
  • Crazy lashes (I found mine for $3 at walmart!)
  • GLue Stick
  • Purple & Black Eyeshadow
  • Plum or cranberryish Lipstick
  • Purplish Blush
  • A CRAZY LAUGH!!!!

IMG_0721

Everything else you need you probably have at home already! SO just work with what you got… I Found everything I needed at home except for the megaphone,lashes,black hairspray, & Headband so thats why it only cost me $8… Make your own version & Add your own twist to your costume!


Do you want to see how I did my nails, makeup & Hair… Then take a look Below!..

IMG_0723IMG_0720

Super easy to do… Now do you want to see my full outfit I created? Well then take a look….

IMG_0733IMG_0734

I hope You Guys really enjoyed my halloween Yzma look! This is truely a unique costume to do… Now all you need is a KRONK!

IMG_0735


So what are you going to be for halloween?? …. We are going to be the Shrek Family!..

Remember, Beauty Comes From Within..

<3 Love, Bondbeautyful


Leave a comment

Candy Corn Boo Nail Tutorial

10 / 14 / 1310 / 14 / 13


photo 3


Hello my beauties!

So today Im doing a fun Feastive Nail Tutorial… HALLOWEEN Candy Corn Boo Nails to be exact! I love rocking nail art but Im not going to lie im terrible and doing my own nails! So if I can do this then you can do! Its super easy and fool proof! I broke It down step by step and all the products I am using are Found at WALGREENS & they are no more than $2 products At most!

photo 2

I hope you guys enjoy I love doing these sorts of things for you guys and I had loads of fun doing it!

All You Will Need:

IMG_0629

  •    Scotch Tape
  • NailPolish Remover
  • Bobby Pin (To Make the Boo)
  • Orange Poilish- Wet N Wild Wild Shine : Sunny Side Up $1
  • Black Polish- Wet N Wild Wild Shine- Black Creme $1
  • White Polish- Sinful Colors Professional- Snow Me White $1.99
  • Nail Art Polish-Sinful colors nail art- Bright Orange: Orange Alert $1.99        Orange: Sunset $1.99      Yellow: Sunset $1.99    Shimmery Silver: What a night $1.99 (you can find them at walgreens)
  • Top Coat

Step 1 :IMG_0630Remove your previous nail polish…

Step 2: IMG_0631Apply the Orange & Black Nailpolish On your nails any way you would Like I thought the Black on only the two middle fingers was super cute! Dont forget to apply 2 Coats and make sure you dry them completely or else when you apply the tape it will rip off the nailpolish underneath!

Step 3:

IMG_0632Apply Your Scotch Tape: I tried to stick them on surfaces and play around with them before I put them on my nails so that the tape wouldn’t be too sticky, then I made a triangle and applyed them like so on my nails , This is going to make our candy corn look flawless..

Step 4: IMG_0633 Then I grabbed my White Nailpolish and applied it right over top of the Tape, dont worry the tape wont let you mess up the black part around the candy corn so just go ahead and apply it all over …Let that dry without taking the tape off!

Step 5:IMG_0634Then You can grab your bright orange nail art polish and start designing your candy corn on top of the white, (leave the tape on there to prevent any mess ups) So candy corn is white, orange then a yellow base so I applied the orange in the middle…

Step 6: IMG_0635Then I bet you can guess.. I did the yellow next using the yellow nail art Polish from sinful colors ( these polishes are super great and they have many different colors… I have the whole collection!)

Step 7: IMG_0636Now I wanted to add Some glittery silver outline onto my candy corn this is totally optional! I just thought It added a nice effect and with the tape on there it is full proof and gurantees a straight line!

Step 8:IMG_0637Now all you have to do is pull of the tape once its dry or when its wet its up to you! I prefer to wait when its completely dry because I have a smudging problem! NOw this alone is sooo cute , you definitly do not have to add Boo’s to the other nails but if you want to like I did, Ill show you how!

Step 9:IMG_0638

Now you can grab your handy dandy bobby pin and you want to have a piece of paper or plate , you are going to put some nailpolish on your paper and then your going to dip your bobby pin in . Then Go ahead and start making your BOO, I just started by making two dots for the B and then I connected them Then Two dots for the OO Super easy!

Step 10:IMG_0639Now I wanted to add Some Black dots in the Middle of The B I thought It looked like little eyeballs and It just made the B stand out more! Completely optional thought , all you do is put some black polish on a paper and then dip in your bobby pin like before….

Step 11: IMG_0640Now again totally optional I wanted to add some stitch marks on the nails with the boo on it, Kind of like frankienstein stitches I just used the orange nail art polish that was a little darker than the one I used on the candy Corn and I made my Lines & Stitches……

Last :IMG_0641

Just apply a top coat and you are all finished!!!! As easy as that … Now To make It even easier I made a video Tutorial showing you how I did this… Take a look……


Do you want to see my outfit + Makeup for the day? Then Take a look at my Look of the day Naturals post…. I decided this was enough writing for one post!

Do you have any halloween requests? Or Faves?

Remember, Beauty Comes From Within…..

<3 Love, Bondbeautyful

Leave a comment

Halloween/craft/decor Haul

10 / 11 / 13

Hey Ladies,
So today I decided I wanted to do some halloween decorating & Go Costume shopping!
IMG_0546
I got a few great things that helped me decorate… Look at the cute decorations I made… ( Check out my Pumpkin DIY mason Jar Post I did to learn How)
OLYMPUS DIGITAL CAMERA
To see what I Got then look below!

My look today is simple, A headband that is super easy to make (comment below if you would like for me to do a DIY Headband Blog Post) My eyes are a simple green look using the Wet N Wild comfort zone Palette
IMG_0565
My lips are Elf Matte Lip Color : Natural With a Sinful COlors Lipgloss : Goddess On top Which you can find at walgreens…. Super easy (If you want me to do a tutorial let me know! I do what you guys want to see!)

OLYMPUS DIGITAL CAMERA

OLYMPUS DIGITAL CAMERA

OLYMPUS DIGITAL CAMERAAnd my nails are Wet N Wild Megalast: Haze of love


Hopefully you guys enjoyed my haul! Check back tommorow for another How to change your haircolor but not your season post for Summer & Winters!


Whats your favorite halloween decoration?

Remember, Beauty Comes From Within…

<3Love, Bondbeautyful


Leave a comment

DIY Pumpkin Mason Jar Halloween Decoration

10 / 10 / 1310 / 10 / 13


IMG_0503Hey Ladies!

Happy halloween! I love decorating for halloween; but sometimes it can be expensive! They I realized how many mason jars I had lying around, I keep all my jam jars, spagetti sauce jars & wash them out and store them. Now here is a simple Halloween DIY to help you use up all those mason jars you have lying around! You can even Use Baby Food Jars to make Baby Pumpkins!

All You Need:

  • IMG_0492Mason Jars Or Baby food jars, jars of your choice
  • Paint (clack and orange for pumpkin, green for frankenstein.. You can do whatever you would like)
  • Glitter (If you so choose..)
  • Brushes
  • Newspaper (to paint on)
  • Foam stickers (You can get at your local $1 Store)
  • Fake candle or real candle…
  • Glue, Hot glue or krazy Glue (to glue candle to the bottom of jar)


1st: Soak your jar in hot water & soap for 5 min to remove any paper stickers (I know those can be a real pain to take off)

2nd: You can put some paint into you mason jar & Flip it upside down and let it drain

IMG_0493 IMG_0494*If paints to thick add some water to help it run a lot faster, You only need a dime size drop of paint in there….

or you can just grab your brush and paint the inside yourself…

IMG_0495Its alot faster to paint the inside with a brush, but its your choice…

3rd: Set it out to dry

IMG_04964th : You can paint the lids it all depends on the look you want..

IMG_04975th: Paint the face on your pumpkin….(this is the fun part, get creative, you can do scary pumpkins or goofy ones like mine!)
IMG_0498

Last: you want to either glue your candle to the bottom of mason Jar (or else it will fall out when you try to light it) or you can just add a fake candle

IMG_0499And Walla! Easy Halloween Decorations!

IMG_0502You can even get more creative & Create Witches, frankenstein & ghosts..

IMG_0504

You can add stickers to the outside of your pumpkins or keep them plain its all up to you! On my Ghost I Added A ghost face in front and then ghost stickers in the back….You can use any glass jars you like, the Ghost is actually made with a recycled Snapple Bottle!

IMG_0505


I love halloween because I love the crazy costumes & Decorations are so fun!! Hope You guys liked this EASY DIY… Whats your favorite halloween decoration? What do you do with your mason jars?


Remember, Beauty Comes From Within

<3 Love, Bondbeautyful


Leave a comment

About

Hi Im Bondbeautyful, I’m a mom of 4 Boys. I like to share my thoughts on makeup & beauty as well as other tidbits. I’m a proud American/Latina beauty influencer & youtuber. I love sharing what I know and have learned with you.

Subscribe Via Email

Recent Posts

  • Green Fun Summer Dress Outfit
  • How to get rid of dry patches on your skin
  • JOAH Truly Yours Natural Finish Foundation Drops Review Swatches Dry Skin
  • Dior Backstage Face & Body Foundation
  • Foundation Week | 7 Days of Foundation

Archives

Pages

  • About
  • BlogBeautyful
  • Disclaimer Page
  • Home
  • My Foundations Shade Matches
Site made with ♥ by Angie Makes
Angie Makes Feminine WordPress Themes
InstagramInstagramInstagramInstagramInstagramInstagram