BondBeautYful

Find Your Beauty From Within

Menu

Skip to content
  • About
  • Beauty
  • Bondbeautyful LIfe
  • My Foundations Shade Matches

Category Archives: Valentines Day

How to do a Basic Smokey Eye for all Ages

7 / 5 / 155 / 24 / 16

Hello my Bondbeautys,

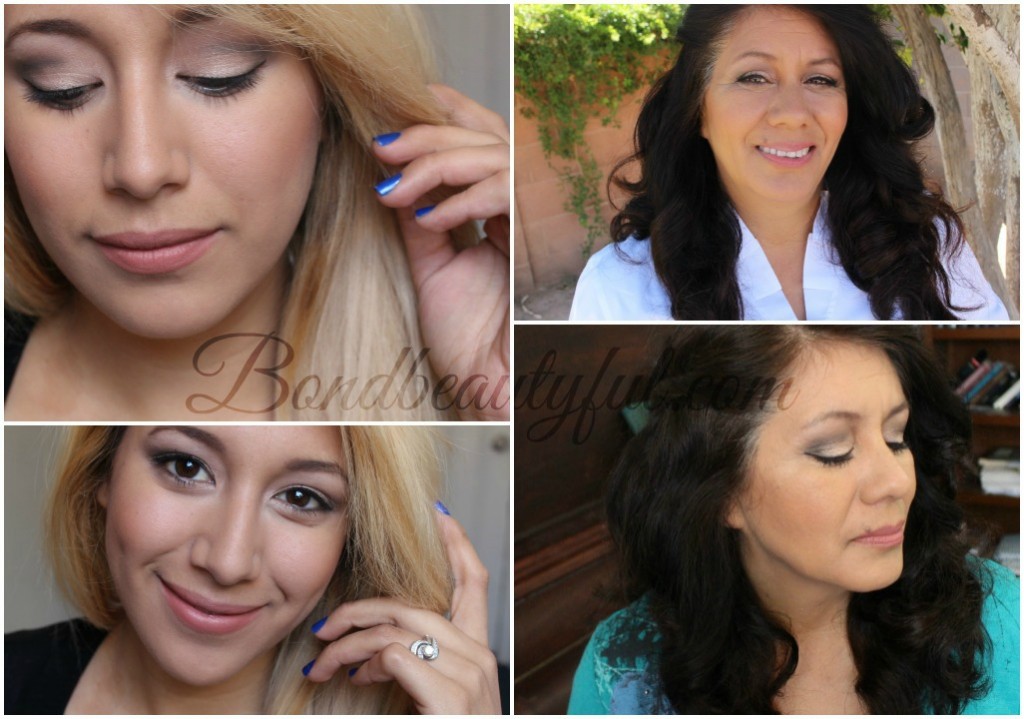
I am super excited about todays post! I have been thinking lately about how I want my blog and videos to be something that anyone can enjoy no matter age. Most of the makeup looks I come up with I think would look good on younger or older women. Sometimes it doesn’t seem that way so to help you see how this makeup look looks on younger or more mature women I invited my mom to join us! Todays makeup tutorial is how to do a basic smokey eye that is perfect for all ages!


This smokey eye is very appropriate for this summer time , in fact it is perfect for anytime of year because it is not too dark. This is also such an easy look to create because I am only using 3 eyeshadows! Obviously when doing makeup on younger skin and older skin there are little tweeks you have to make. For example I am wearing a nude lipstick on my mom I used a light natural pink lipstick. I also used this particular blush because its glowy without being shimmery which is looks great no matter your age!

eye pic of our eye looks


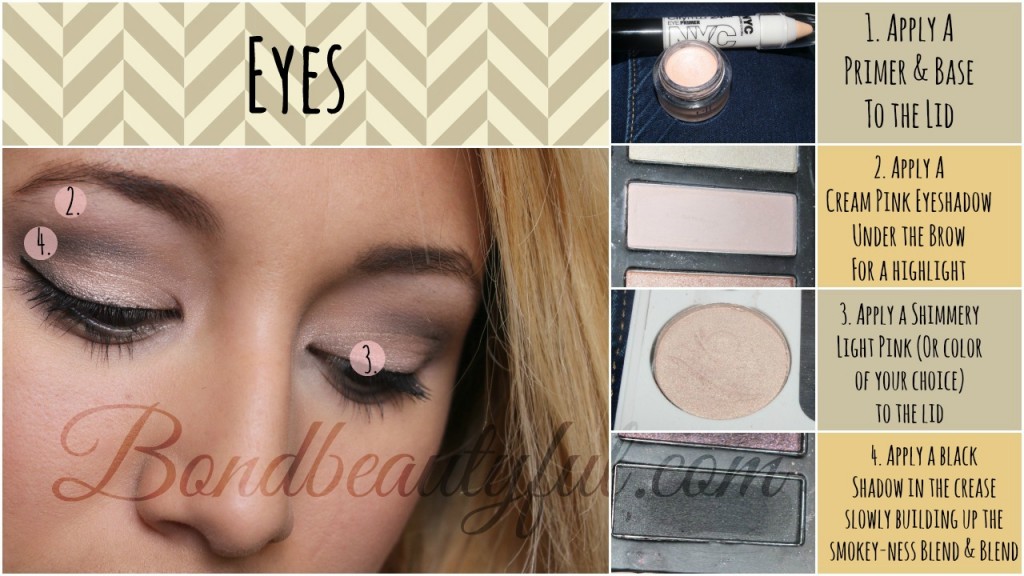
Personally I love this makeup look for date night, special occasions,weddings, pictures things like that . So lets get started with the eyes! ( I recommend starting with the eyes because we will be using black and that can sometimes get everywhere).

eyes collage


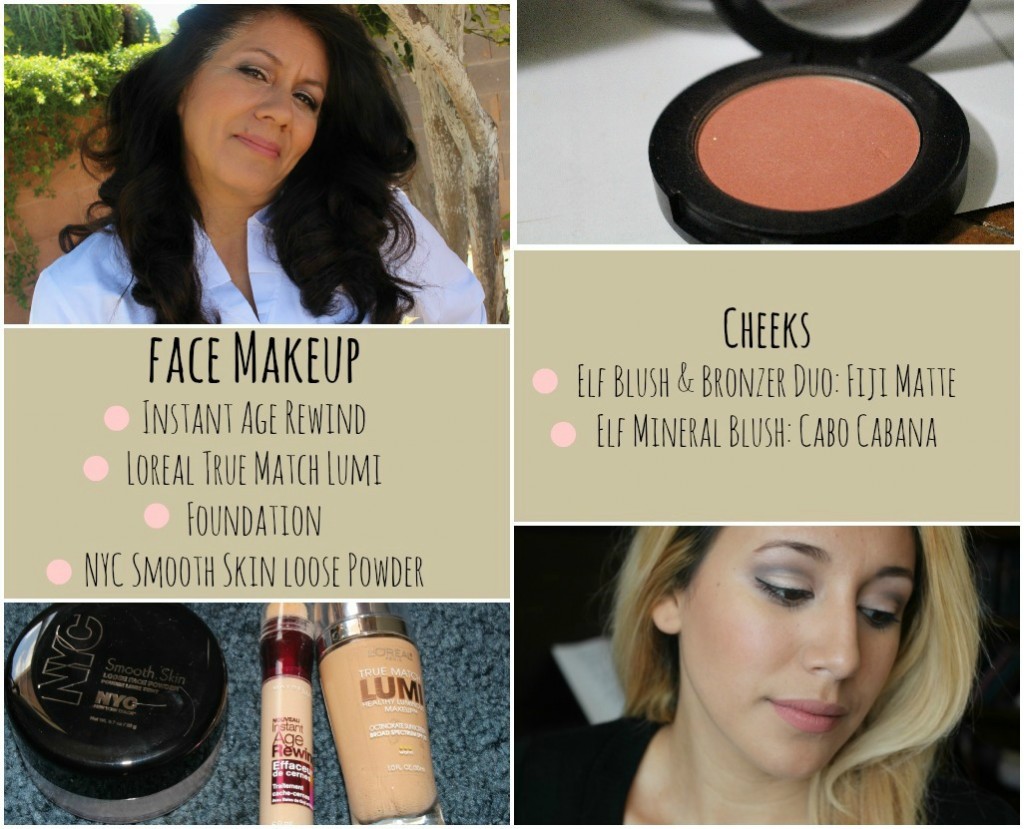
For the face makeup I purposely used a blush that has no shimmer but has a beautiful glow because it is more versatile for all ages! This coral blush really warmed up the face for the summer. Now remember everyones skin tone is different so you might need to pick a lipstick that fits your undertone and skin shade better. For my mom I picked a Pink lipstick from Elf -Mink Pink and I think it looked better than the nude lipstick that I am wearing.

face final2

Products Used

Face:

  • NYC Loose Powder Translucent
  • Loreal True Match Lumi Foundation W6 Sun Beige
  • Maybelline Instant Age Rewind Eraser For Dark Under Eye Circles: Neutralizer
  • Elf Blush & Bronzer Duo: Fiji Matte
  • Elf Mineral Blush Cabo Cabana

Eyes:

  • Coastal Scents Revealed 2  Palette (Light Pink for Under the Brows & Black)
  • NYC 24 Hr Eye Primer
  • Elf Smudge Pot: Aint that Sweet
  • Elf Single Eyeshadow: Pink Ice
  • Nyc Liquid Liner Black
  • BH Cosmetic Brushes

I hope you guys found this tutorial helpful and easy to follow. If you do recreate this look I hope you will use the hashtag #Bondbeautyslook so I can take a look at what you did! You guys are so awesome and beautiful! I challenge you to try this smokey eye out this weekend or whenever!
Bondbeautyful Signature


Leave a comment

DIY Cute Candy Machine

2 / 17 / 142 / 23 / 14

DIY Candy MachineHello Ladies…

Happy Monday, its time for another cute DIY project.

This is a great gift, decoration or just project to hold your candy!

This is an easy Candy machine to make and pretty inexpensive…


What you will need:

Need


This is a super easy DIY project you can do with your kids, or just for fun/gifts!

step 1 paint


So now that the painting is all dry lets make our candy machine look cute!

step 2


Now to finish off our DIY Project lets start Glueing!

step 3

See that was pretty easy! I personally love decorating my house for the holidays no matter how small, it adds some personality to my home…


FINISHED MACHINE


If you recreate this or do it yourself make sure to tag me on instagram #BondbeautyfulCandyMachine


Make sure you check out my social networks & youtube channel!:D

So whats your favorite candy?

Till next time, Remember Beauty Comes From Within so Let it shine!

<3 Love Bondbeautyful


Leave a comment

2 Valentines Day Hairstyles for any occasion, Casual or Fancy

2 / 13 / 142 / 13 / 14

2 Valentines day hairstyles casual or fancy 2Hello My Loves,

Happy Valentines Day, Because tomorrow is the Day of Love I wanted to show you two choices for valentines day. One is more casual and the other is fancier for a nice dinner. If you want to see me show you how to do this then click on the video below.


Casual:

Casual

1. You can curl your hair or have it straight. (I curled it the night before & this is what it looked like today! I wanted it to look messy & real slummy).

2.Braid your bangs into a rope braid & pin it underneath some hair to hide the bobbypin.

3. Make A Half pony tail & with your thumb create  a hole. Then flip the pony tail in the hole 2 times to create a twist.

4.divide the pony tail into two parts & braid each part.

5. Flip them over & above the twist & pin them in a heart shape!

Thats a super easy casual hairstyle perfect for the day of LOVE.


Fancy:

Fancy

1. Seperate your bangs & face framing bits of hair . Then pin it out of the way.

2. Take out 1 inch strand of hair behind your ear & braid it.

3. Pull your hair to one side & twist it in the back .

4. tie your ponytail & braid a strand of hair, wrapping it around the base of the pony tail.

5. put the braid behind your hair in between a bobbypin & sew it through the twist you made.

6. Last use a 1 1/2  inch curling iron & curl your bangs, & ponytail.

* Dont forget to use hairspray to insure that your hairstyle lasts all day!


I hope you guys have a good valentines & if you need help finding a makeup look that is perfect for tommorow check out my makeup tutorials for valentines day!

So whats your favorite curling iron?

Mine is the Cortex 4 in 1 curling wand!


Remember, Beauty comes From within so Let it SHINE!

<3 Love, Bondbeautyful

Leave a comment

Love Is In The Air Valentines Day Tutorial

2 / 3 / 142 / 3 / 14

Love is in the air thumb final

Hello My BondBeautys,

Happy Monday, Valentines Day is right around the corner so I paired up with a fellow beauty guru on youtube and we decided to give you two great Valentines Day Makeup Options. I am showing you how to do a soft smokey eye and nude lip. She is doing more of a flirty pink Valentines Day Look. If you want to check out her video you sure can, here is her channel link

https://www.youtube.com/user/cutecouturecolor


I hope you guys like this look I created for you.


Products I used:

  • Naked Palette
  • LA Colors Eye liner & Eyeshadow Dual: Coffee
  • Starlooks Kohl Pencil: Amethiest
  • Jordana 12 Hr Eyeshadow Pencil: Stay on Black
  • Its so Big Mascara
  • CoverGirl Flamed Out Mascara
  • Maybelline Brow Powder
  • Elf Eyebrow Treat & Tame: Medium
  • Mary Kay Intense Moisturizing Cream
  • Skiin Smoothing & Soothing Eye Cream
  • Mojito Lip Balm
  • Elf Face Primer
  • Covergirl Stay Fabulous Foundation: 842
  • Elf Brightening concealer
  • Elf Contouring & Bronzing Cream: St. Lucia
  • Bare Minerals: Medium Beige
  • Elf Baked Highlighter
  • Elf Moisturizing Lipstick: Wink Pink
  • Holiday Hugs Lipgloss
  • ½ Inch Cortex Curling Wand
  • Design Essentials : Silk
  • Aussie Mega Hairspray

Makeup2


Lets talk makeup, this Eye look was super easy. I wanted to do a smokey eye, but I wanted to make sure that it was wearable. You can wear this look in the day time because it is so soft, or night time. I decided to go with a nude pink lip & a shiny gloss so that the eyes would appear softer..

Makeup 1

  1. First , I applied the Highlight shade Virgin underneath the brow lightly.
  2. Then I used the duo end pencil (brown side) and I applied it to the crease and made a V in the outer edge of the lid.
  3. Next I blended it out with a crease brush
  4. Then I applied Sin all over the Lid
  5. Next I applied Buck everywhere that I used the Brown Pencil with a crease brush , I also applied it to the outer half of the lower lid
  6. Then I went in with creep and only applied it to the deepest part of my crease. Use a very light hand, this makes the crease look deeper & your eyes look more defined.
  7. Then with naked I blended with a blending brush softly you just want to smoke it out.
  8. Next I used the Jordana 12 hr eye pencil on the upper lash line & smoked it out with a  smudge brush.
  9. Last I lined my water line & tight line with a black pencil . Don’t forget to curl your lashes and apply mascara. Your all finished.

hair


Now Lets talk Hair!

  1. I Curled My hair with a 1 ½ inch Curling wand . I curled away from my face & I used 1 inch sections.  * Make sure to spray your curls with hairspray after each curl is curled individually.
  2. Then I let it completely cool down. * Don’t skip this important step or else your curls will not last all night.
  3. Then I hairspray my entire head again.
  4. Next I Used silk serum & applied it to my ends to add shine. I also ran my fingers through my hair softly to open up the curl a lot more.
  5. Tease the Hair to add volume.
  6. I took a 1 inch section on my right side and twisted it. I then pinned it to the back.
  7. Now on the left side, where my bangs are combed to I am going to do two twists & pin  them.
  8. I do not like flat hair so I tugged on the crown a little to make it more voluminous. You can hairspray it again if you like but its all finished.

Simple Hair & Makeup for valentines day!

I hope you guys are as excited about the day of love, as I am!

What are you going to do for Valentines Day?

If you try this look or hair out make sure you tag me on instagram , twitter or Facebook! I would love to see!

Thanks you guys for all your support & have a fun and safe Valentines Day!

Remember, Beauty Comes From within So let it Shine!

<3 Love, Bondbeautyful

Leave a comment

Elsa Frozen Romance

1 / 27 / 141 / 27 / 14

Elsa Frozen RomanceHello My Lovely Ladies,

So today I thought I Would do another makeup tutorial, This one is inspired by Frozen a popular Disney movie. Elsa is the Frozen Queen , so why not recreate her makeup. Valentines day is just around the corner so here is a beautiful option for you gals. Yes I did a video tutorial for you to see, so take a look.

Products I Used:

  • Covergirl Outlast Stay Fabulous Foundation
  • Starlooks Obsidien Kohl Pencil
  • Elf Pressed Powder Eyeshadow: Miss Popular
  • Elf Blush : Berry Merry
  • Flamed Out mascara & Its So Big Mascara
  • Elf Lip Exfoliator
  • Elf HD Lifting Concealer
  • Elf Long Lasting Lustrous Eyeshadow: Soiree
  • Be a Bombshell : Shameless
  • Ultra Brow Powder Maybelline: Light Brown
  • Rimmel Stay Matte
  • Elf Mineral Infused Face Primer
  • Elf Little Black Book : warm Edition
  • Profusion Neo Perle Palette (Purple edition)
  • Photo Jan 24, 3 16 16 PM

Eyes:

  1. Apply a Cream Eyeshadow (Cranberry shade) , Blend with your finger
  2. Apply a light matte shade underneath the brow
  3. Apply a Cranberry Shimmery Shade on the lid , using patting motions
  4. Apply a Taupe shade into the crease &Lower Lash Line
  5. Blend it out with  a light pink shade
  6. Liner your upper lash line, bottom Lash Line, Waterline & Tight Line with a black pencil (Pencil liner is softer)
  7. Apply Mascara
  8. Fill in your eyebrows with a Brow Powder (This makes the eyebrows look soft)

Face & Lips:

  1. Apply a Silicone based Primer to fill in your fine lines & Pores. This gives your the flawless “look”.
  2. Apply a long lasting full coverage foundation
  3. Apply a brightening concealer in a inverted triangle shape underneath the eyes. Blend with your foundation brush
  4. Apply A powder over top of the concealer & along the Tzone if your oily
  5. Apply a Cranberry “frost bite” Type of blush, you can also add some on your nose to make you look like you just came in from a cold night.
  6. Apply a Shimmer light pink highlight to the top of you cheek bones to give you the Frosty Elsa look.
  7. Last, Apply a Cranberry Semi Matte Lipstick, All Done!!!

Photo Jan 24, 3 12 32 PM


Hair:

  1. Curl Your hair with a 1 ½ inch curling want, curl them outwards
  2. run your hand through the curls once they have cooled , & spray with hairspray
  3. Tease & Pin up your crown with bobby pins, to add volume
  4. Gather your hair & start twisting the hair around the face all the way around to the desire side. (Leave hair out to frame your face)
  5. Now start braiding your side bride.
  6. Last to add volume tug on the braid to make it look thicker & messier. Wala your all done with the Elsa Hair!

Music: “Let It Go” : Jun Sung Ahn, Www.Juncurryahn.com

https://www.youtube.com/user/JuNCurryAhn

Photo Jan 27, 11 35 02 AMI hope you guys enjoyed my video tutorial, Make sure you take a look at all my social networks! So what are you planning for valentines day?

Im currently planning to go to dinner at The Chocolate Factory! Yum ..

Till Next Time ,

Remember, Beauty Comes From Within So let it SHINE!

<3 Love Bondbeautyful


Leave a comment

About

Hi Im Bondbeautyful, I’m a mom of 4 Boys. I like to share my thoughts on makeup & beauty as well as other tidbits. I’m a proud American/Latina beauty influencer & youtuber. I love sharing what I know and have learned with you.

Subscribe Via Email

Recent Posts

  • Green Fun Summer Dress Outfit
  • How to get rid of dry patches on your skin
  • JOAH Truly Yours Natural Finish Foundation Drops Review Swatches Dry Skin
  • Dior Backstage Face & Body Foundation
  • Foundation Week | 7 Days of Foundation

Archives

Pages

  • About
  • BlogBeautyful
  • Disclaimer Page
  • Home
  • My Foundations Shade Matches
Site made with ♥ by Angie Makes
Angie Makes Feminine WordPress Themes
InstagramInstagramInstagramInstagramInstagramInstagram